
This post is part of our ongoing series on running MongoDB on Kubernetes. We’ve published a number of articles about running MongoDB on Kubernetes for specific platforms and for specific use cases. If you are looking for a specific Kubernetes platform, check out these related articles.
Running HA MongoDB on Azure Kubernetes Service (AKS)
Running HA MongoDB on Amazon Elastic Container Service for Kubernetes (EKS)
Running HA MongoDB on Google Kubernetes Engine (GKE)
Running HA MongoDB on Red Hat OpenShift
Running HA MongoDB on IBM Cloud Kubernetes Service (IKS)
Running HA MongoDB with Rancher Kubernetes Engine (RKE)
Running HA MongoDB on IBM Cloud Private
Failover MongoDB 300% faster and run only 1/3 the pods
Kubernetes Persistent Volume Tutorial by Portworx
And now, onto the post…
Thanks to advances in the container ecosystem recently (Kubernetes stateful sets, PVCs, etc), getting started running MongoDB in a container is easy. But running MongoDB in production still requires a lot of forethought and planning. Here are some of the things you need to think about when running MongoDB on Kubernetes in production:
This blog post will show you how you can run MongoDB in production on Kubernetes so you can easily answer these questions. After reading through the following steps, you will understand how to run a HA MongoDB cluster in production using Kubernetes.
This post will walk you step-by-step through how to deploy and manage a HA MongoDB cluster on Kubernetes. Before getting into all that detail. Let’s summarize.
There are 5 basic steps to run HA MongoDB:
Read on for more details about running a HA MongoDB cluster on Kubernetes. Follow this link to launch the MongoDB Kubernetes Katacoda tutorial.
MongoDB can run in a single node configuration and in a clustered configuration using replica sets (not to be confused with Kubernetes Stateful Sets). A replica set is a group of MongoDB instances that maintain the same data set. A replica set contains several data bearing nodes and optionally one arbiter node. Of the data bearing nodes, one and only one member is deemed the primary node, while the other nodes are deemed secondary nodes. This is documented here and illustrated by the following:
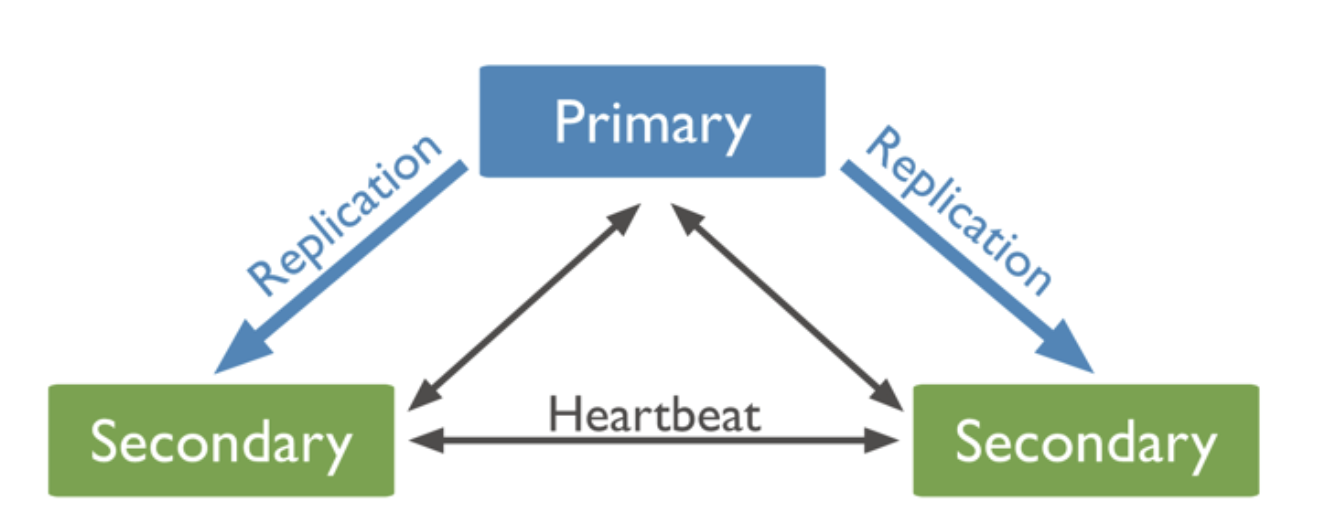
Figure 1: 3 node MongoDB replica set
Important, the documentation states: “In this configuration the failover process generally completes within a minute. For instance, it may take 10-30 seconds for the members of a replica set to declare a primary inaccessible. One of the remaining secondaries holds an election to elect itself as a new primary. The election itself may take another 10-30 seconds.”
For small MongoDB clusters, Portworx replicated volumes offer a simpler solution to running HA MongoDB on Kubernetes. With Portworx you can have a single MongoDB instance that leverages a replicated volume provided by Portworx. This is far less complex to manage and configure and requires ⅓ of the MongoDB Pods and therefore ⅓ of the CPU and Memory because Portworx is already running on your Kubernetes cluster and synchronously replicates data for all of your applications with great efficiency and scale. It also means there is less network traffic as you eliminate a hop from master to secondary on your way to writing the data to an underlying disk which is often network attached itself.
Our configuration will look something like this:
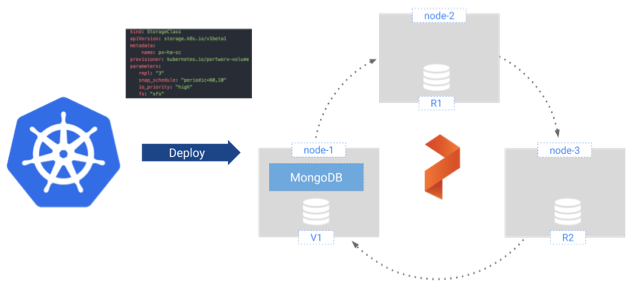
Figure 2: MongoDB Running on Portworx Replicated Volume
| HA MongoDB config | MongoDB pods required | Volumes required |
|---|---|---|
| Without Portworx replication | 3 | 3 |
| With Portworx replication | 1 (1/3 the pods for the same reliability!) | 3 |
Table 1: Resource utilization with Portworx replication versus with MongoDB replica set
In figure 1 we define a Kubernetes Storage Class object that declaratively defines how we want to handle storage for MongoDB:
kind: StorageClass
apiVersion: storage.k8s.io/v1beta1
metadata:
  name: px-ha-sc
provisioner: kubernetes.io/portworx-volume
parameters:
  repl: "3"
  io_profile: "db"
  io_priority: "high"
Along with the repl:”3”, io_profile:”db”, and io_priority”high” settings we can add Kubernetes snapshot schedules and encryption policy directly in this storage class definition. This declarative style of configuration is exactly what modern cloud native infrastructure is all about. No more snowflakes, you can recreate whole environments from source code, including the automation of your common data management tasks.
With our Storage Class defined we will create a Read/Write Once Persistent Volume Claim (PVC) and assign a maximum size to our volume of 10GB:
kind: PersistentVolumeClaim
apiVersion: v1
metadata:
  name: px-mongo-pvc
  annotations:
    volume.beta.kubernetes.io/storage-class: px-ha-sc
spec:
  accessModes:
    - ReadWriteOnce
resources:
  requests:
    storage: 10Gi
And finally, we will pass in the defined PVC as a parameter for our MongoDB Helm chart:
helm install --name px-mongo --set “persistence.size=1, auth.adminUser=admin, \ auth.adminPassword=password, persistence.existingClaim=px-mongo-pvc” \
stable/mongodb
Now let’s walk through a failover scenario. In the tutorial we will simulate a node failure by cordoning the Kubernetes nodes where MongoDB is running and then deleting the MongoDB pod.
Once Kubernetes identifies that the pod needs to be rescheduled it will work with Portworx’s Kubernetes scheduler extender, STORK, to identify which node is best suited to host the restarted pod. In our small environment any of the two remaining nodes will do because we have a copy of the data on all three nodes. In reality you will likely have much larger clusters and that’s when STORK will benefit you by making sure the pod starts on a node where a copy of the data is locally stored. In the unlikely event that your pod cannot be started on one of those nodes it will be able to start on any of the cluster nodes and access it’s data seamlessly through the Portworx storage fabric.
This failover should all happen within a very short time window, which is very similar to the MongoDB replication configuration described above. This failover is depicted in the figure below:
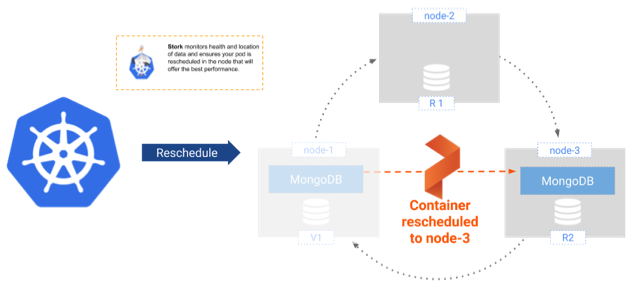
Figure 3: MongoDB Failover
So it seems that just for Reliability and High Availability alone it would be worth running MongoDB on Kubernetes and Portworx. But there is a lot more that you can do. So many of the data management operations that are error prone and time consuming are now going to be fully automated the same way in any cloud environment. First we’ll show how volumes can be dynamically expanded without reconfiguring or restarting MongoDB, and then we will show how Snapshots can be easily restored.
Data management tasks like these need to be predictable and automatable when it makes sense to do so. The MongoDB Kubernetes KataCoda tutorial embedded at this bottom of this post will show how a simple command run from your Kubernetes command line interface, kubectl, can expand the MongoDB volume with zero downtime. Since Portworx volumes are virtual and carved out of your aggregate storage pool on your cluster we thinly provision the volumes so that the expansion doesn’t immediately require you to add more storage capacity to your cluster. For information about expanding MongoDB storage capacity view our docs.
Snapshots can be scheduled as part of your storage class definition, by using the Portworx command line interface (pxctl) or taken on demand by using Stork. Stork uses the external-storage project from kubernetes-incubator to add support for snapshots. The Katacoda tutorial will show how to use Stork with this simple yaml file to create a snapshot on demand:
apiVersion: volumesnapshot.external-storage.k8s.io/v1
kind: VolumeSnapshot
metadata:
  name: px-mongo-snapshot
  namespace: default
spec:
  persistentVolumeClaimName: px-mongo-pvc
To learn more about MongoDB snapshot schedules please refer to our docs page. In the Katacoda tutorial you will also learn how to start a new MongoDB instance from a snapshot for point-in-time recovery of your data.
There are cases where running a single MongoDB instance is not going to cut it and when we will want to spread our reads to the secondary nodes which are part of our MongoDB replica set. For these scenarios you can leverage the Kubernetes Stateful Sets to handle all the replica set configuration for you and still get all the agility benefits from Portworx by using the storage class for Portworx in the same way as before. There is a Helm chart available for this and it can very easily be used with Portworx as follows:
helm install --name px-mongo --set “persistence.size=1, auth.adminUser=admin, \ auth.adminPassword=password, persistentVolume.storageClass=px-ha-sc” \
stable/mongodb
Note here that what we are passing into the helm configuration is the storage class for Portworx and not the PVC. This is because the stateful set comes with a template for creating new PVCs as you scale the number of nodes in your set. Kubernetes and Portworx will dynamically create the PVCs for members of your replica set and you will still benefit from the same declarative data management capabilities for all the volumes.
You can choose to turn off Portworx replication in this case but we recommend that you set it to replication factor of 2 so that when nodes go away and restart the synchronization process is much faster. When one of the MongoDB instances gets restarted it doesn’t have to rebuild the dataset from scratch because it can start with a copy of the volume that is consistent up to the time of the crash. This helps you reduce the instance outage window which in turn can help you reduce the total size of your cluster while keeping similar uptime guarantees. This in turn allows you to save on your total compute, memory, and network utilisation.
As we’ve just seen, you can easily run an HA MongoDB container on Kubernetes using Portworx for replication, snapshots, backups, volume resizing and even encryption. Depending on the size of the cluster, you can either forego MongoDB replication and use Portworx replication for HA, or use both MongoDB replication (for spreading out writes) and Portworx replication (for faster failover). For more information about running HA MongoDB cluster on Kubernetes, watch the video below or explore our Katacoda tutorial for HA MongoDB on Kubernetes.