
This post is part of our ongoing series on running WordPress on Kubernetes. We’ve published a number of articles about running MySQL on Kubernetes for specific platforms and for specific use cases. If you are looking for a specific Kubernetes platform, check out these related articles.
Running HA WordPress on Amazon Elastic Container Service for Kubernetes (EKS)
Running HA WordPress on Azure Kubernetes Service (AKS)
Running HA WordPress on Google Kubernetes Engine (GKE)
Running HA WordPress on Red Hat OpenShift
And now, onto the post…
This Kubernetes WordPress HA guide will show you how to horizontally scale WordPress containers on a Kubernetes cluster using Portworx Shared Volumes.
WordPress runs 28% of all websites on the Internet. That is a phenomenal installed base of some 75 million sites.
It was designed 14 years ago, during which time, the number of users on the Internet has increased from 600 million to 3.7 billion.
WordPress has two stateful components: a MySQL database and a filesystem directory to save uploaded media files and plugins.
Back when WordPress was first released, the most common deployment strategy was to install the WordPress PHP application, the MySQL database, and the file storage directory all on a single server. We would hopefully have been taking backups, but essentially we didn’t need to think about “storage” beyond having enough local disk capacity.
Fast forward through 14 years and an additional 3.1 billion users and no one would disagree that we are in a different era of the Internet from when WordPress was first released.
From those 75 million WordPress websites, there are going to be some amazingly popular ones that are struggling to cope with the amount of traffic on just a single server.
Thankfully, some very clever folks have been inventing some great tools to help with these problems.
This blog post focuses on two of those tools:
Kubernetes enables us to schedule WordPress and MySQL containers to run across many computers. It means we can horizontally scale and have enough compute capacity to serve our rapidly growing user base.
Portworx gives us a “data management layer,” meaning we can safely run a MySQL server on one node and not worry if that node breaks. Its block layer replication means the data is already present on another machine, which greatly reduces time to failover.
It also gives us “shared volumes” which is a killer tool for WordPress because it allows us to have “multi-writer” semantics for our file uploads folder, meaning we can horizontally scale the WordPress PHP container and not worry about uploads being split across multiple disks in the cluster.
By combining these two features of Portworx with a Kubernetes cluster we get a supercharged WordPress instance with the following abilities:
All of that using a single data management layer!
This blog post explores this setup and then demonstrates how to run it on a Kubernetes cluster.
First let’s take a closer look at how a single node installation of WordPress without Kubernetes or Portworx would run:
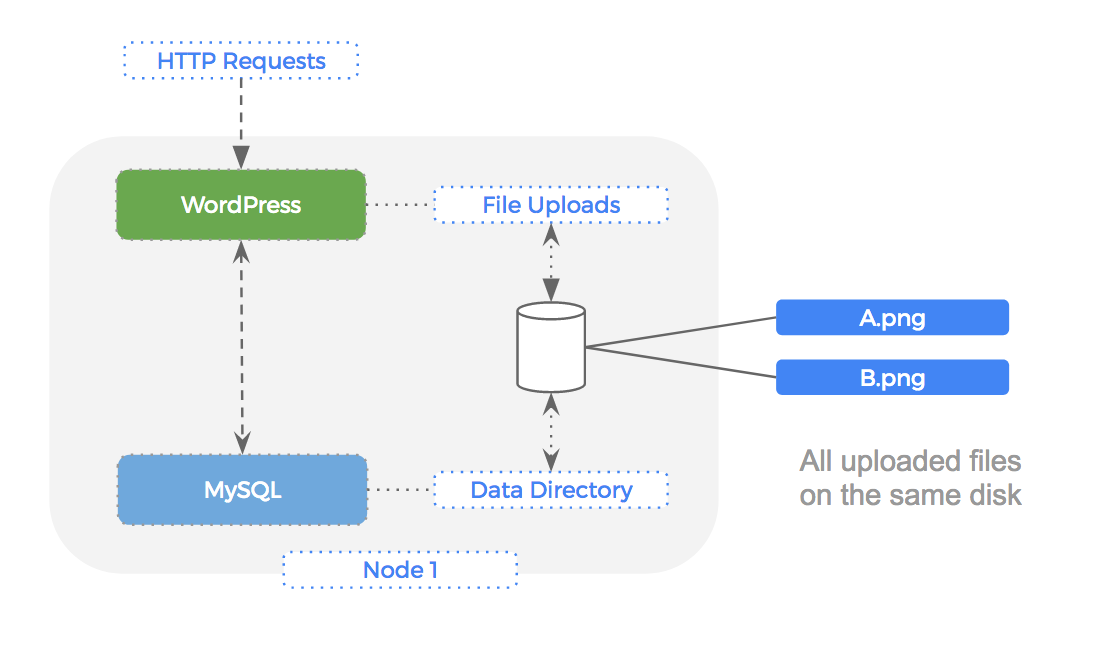
As you can see the PHP application will serve incoming HTTP requests, reads/writes are made to the file upload directory and queries are made against the backend MySQL database.
In our single node setup, both the file upload directory and MySQL data directory are folders on the local disk, and there is a single filesystem on one block device.
If we were to scale the WordPress container, we would use a proxy in front of them to load-balance the traffic.
The problem with this setup is that now the file uploads are split across multiple servers.
Let’s take a look at a manually installed 2 node cluster running WordPress on both nodes:
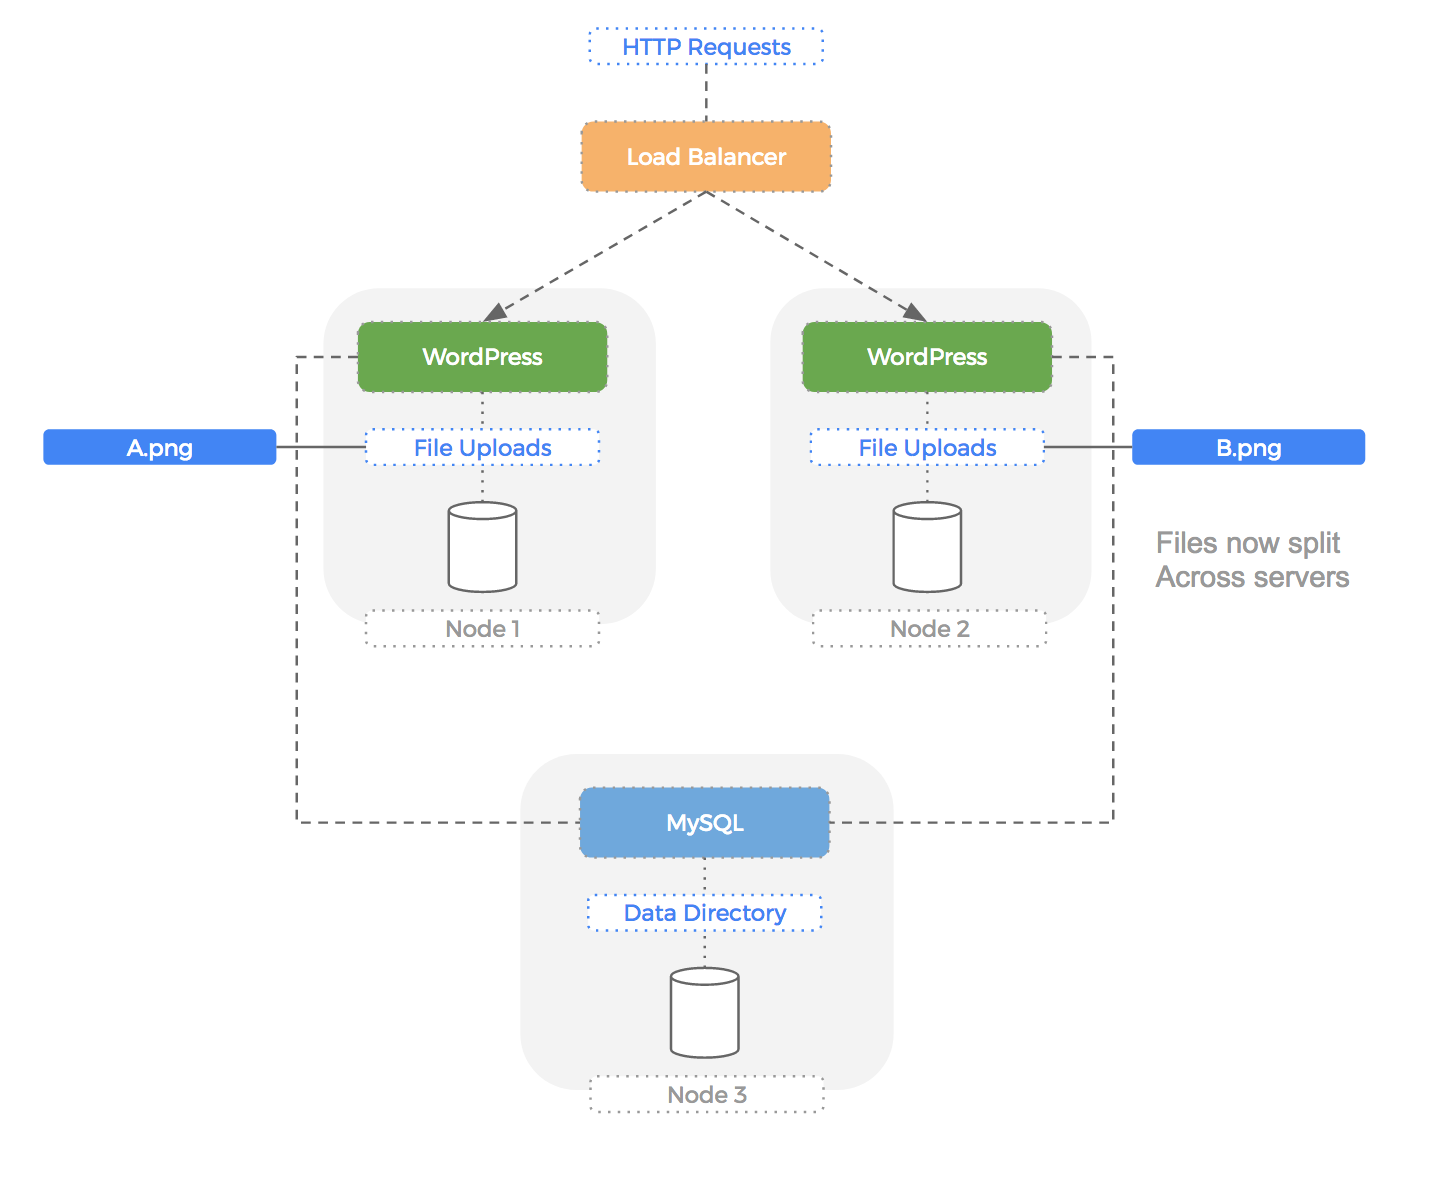
As you can see, the entire volume of file uploads is now split across multiple disks. WordPress does not have a native understanding of this and so users would see periodically missing files using this setup.
Ideally , we need some kind of file system that is shared; i.e., it doesn’t matter where we read or write from, the storage looks the same to every WordPress container.
Our database storage presents a different problem: We need to make sure that our data is safe in case of a node failing.
The first step is to make sure we have a copy of the data on another computer that can be used to rebuild the server in case of failure.
Let’s take a look at a setup where our MySQL server fails:
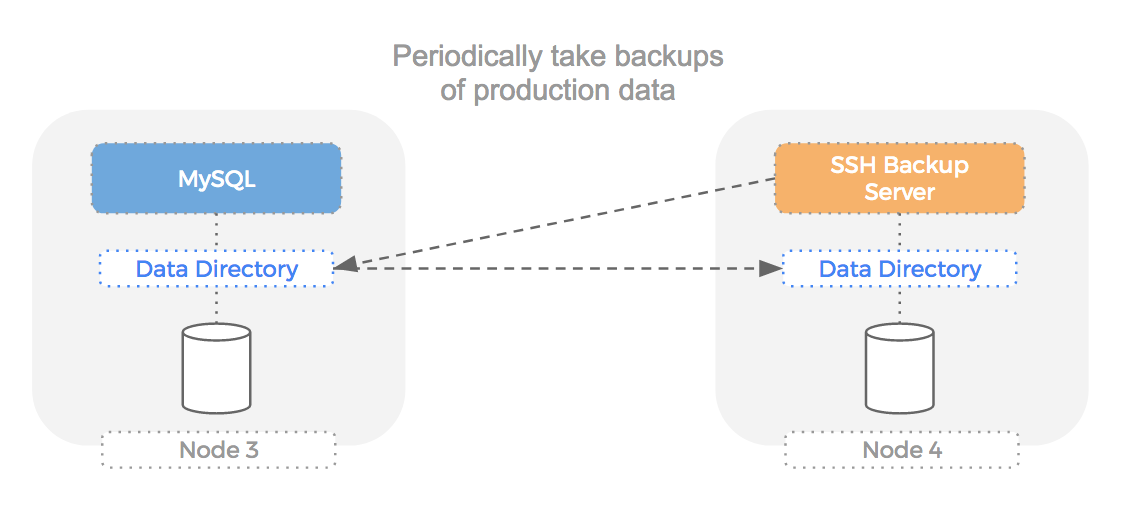
We are mitigating the risk of node failure by having an automatically updated copy of the data on another computer. However, this means we must automate failover somehow and the time taken to do so will hurt our users. We could use a MySQL master slave setup but as mentioned in a previous blog but this is not always the fastest way to failover and performance can suffer as we resync changes between the newly elected master and new slave.
The file-uploads volume mentioned above will also need some kind of replication for the same reason (i.e. what if the disk breaks).
Using Kubernetes we can solve the automatic failover problem because if a node dies, it will automatically reschedule the MySQL container to another node.
However, we also need the data and so the solution is not complete. If we were on AWS, we could use EBS as a solution (Kubernetes has an EBS plugin) but this leads to other problems like stuck EBS volumes.
Equally, the problem introduced when we horizontally scale the WordPress PHP container is not addressed by Kubernetes alone, it is a container management layer. We could use some kind of NFS volume but this increases complexity because we are using multiple storage backends for our project.
What we need is a data management layer that offers the following features:
This solution would need to have native Kubernetes integration and so we begin our search.
Portworx is the perfect solution for this use case because it offers both types of storage (replicated and multi-writer) we are after, and has a native Kubernetes integration.
This solves our use case in the following ways:
Because Portworx can create “shared” volumes that use “multi-writer” semantics, we can use the same Portworx volume for multiple WordPress contianers.
Each file that is written is made available to the other volumes because Portworx knows which actual node the file lives on and will transparently proxy the request to load that file to that node. This happens at the block layer and so any container that can write to a file-system is unaware that the volume is in fact a shared one with the data not residing locally.
We can see this in operation in the following diagram:
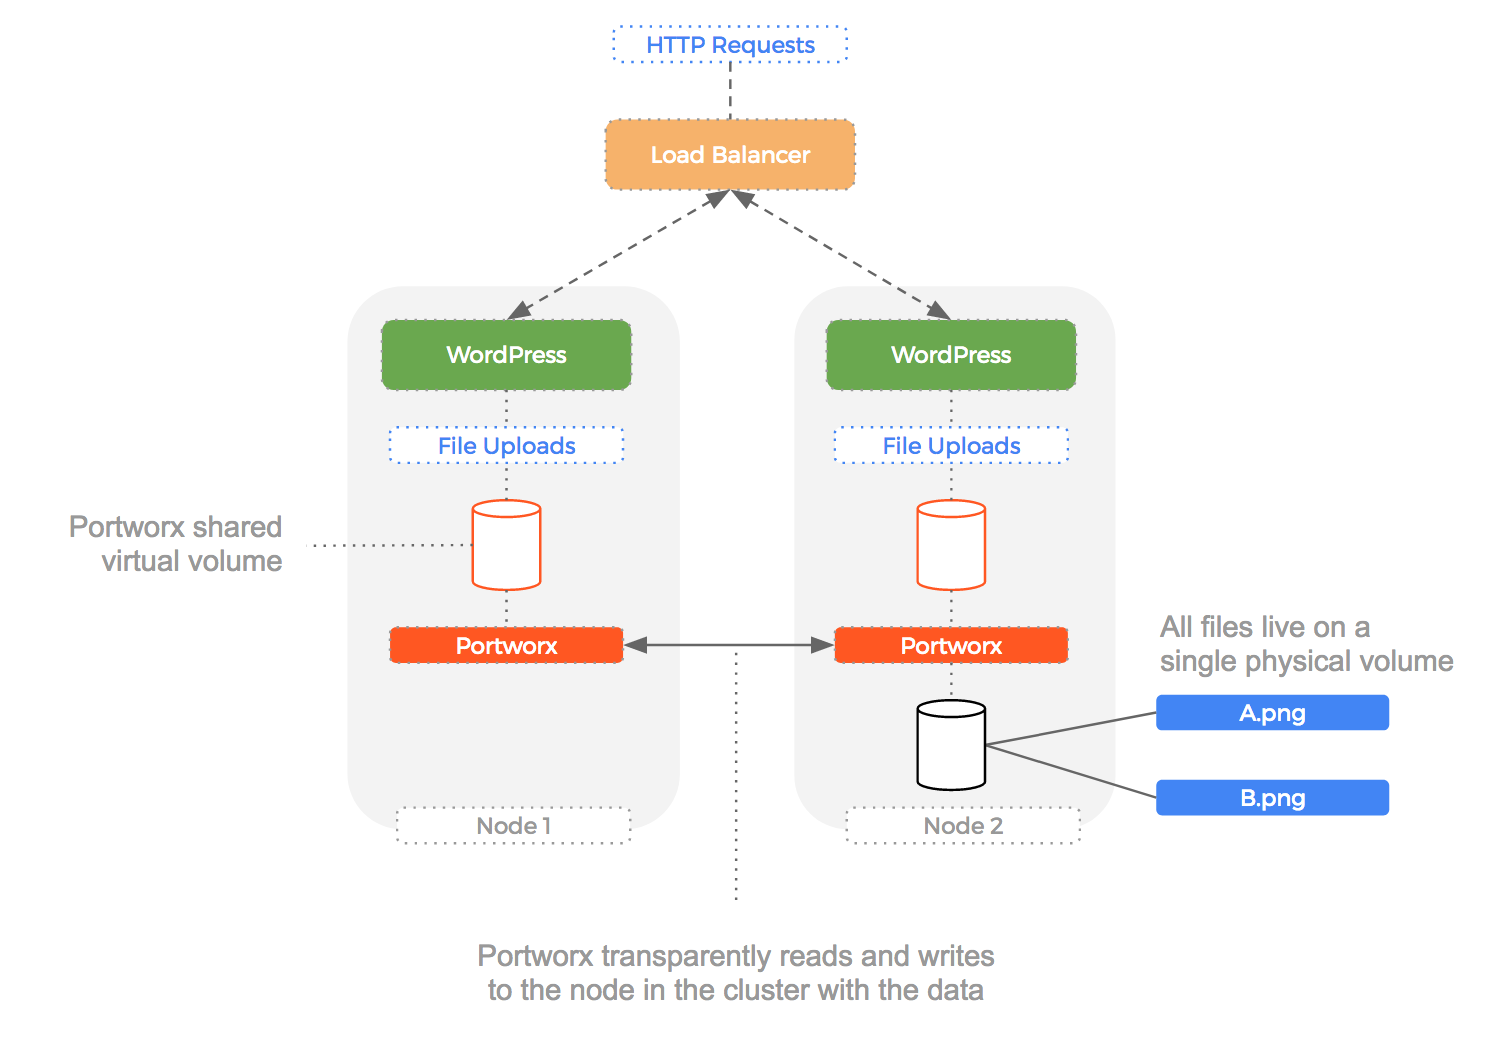
Add to this that shared volumes can be replicated (in case of node failure) and it gives us a compelling solution to the problem of files being written to multiple hosts.
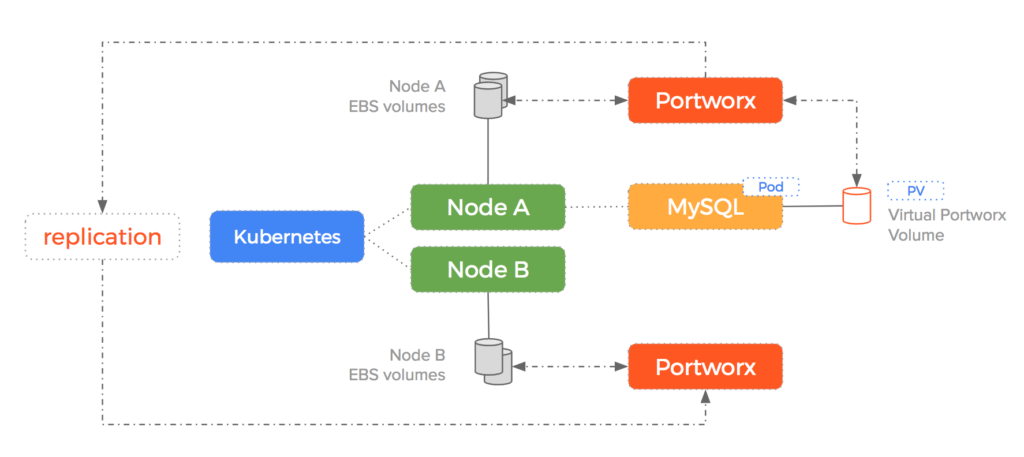
Here is an overview of how Portworx handles the MySQL replication for us.
Here is the cluster before the node failure. Notice how Portworx is doing block layer replication of the MySQL volume.
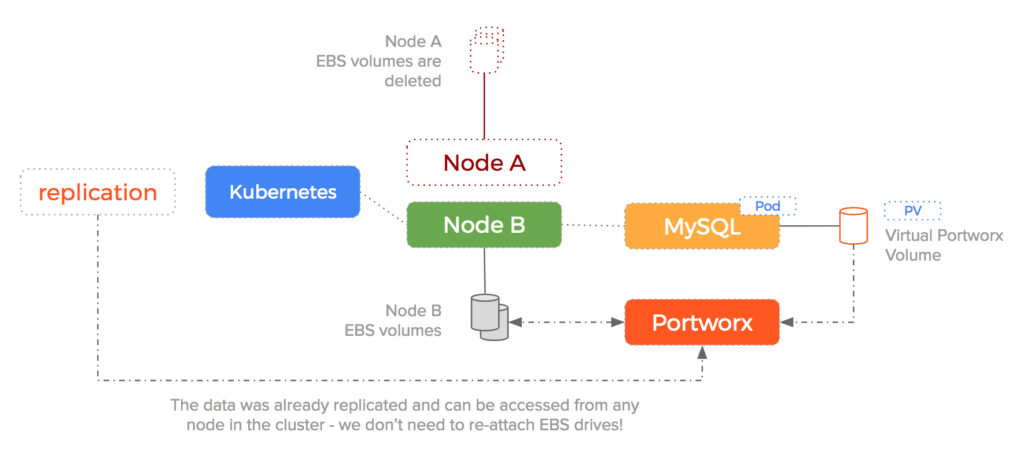
Then, if a node fails, Kubernetes will reschedule the pod to Node B where the MySQL replica is ready and waiting to go. This reduces time to failover and means that failures are automatically handled by migrating both the container and the data to a new host.
To keep the example above simple, we have used a single MySQL pod. In production would would use a StatefulSet which allows MySQL to run in a master/slave configuration.
Naturally, Portworx integrates nicely with StatefulSets and MySQL can make use of the faster block layer replication beneath it’s own application layer replication. You can read about how Portworx helps Cassandra with the same thing in this blog post.
Additionally, the following useful features come for free because Portworx is much more than just a storage connector but a fully capable data management layer:
Here is a short run-through of running the setup described above on a Kubernetes running on AWS bootstrapped using the kops tool.
First – we use the kops AWS guide to create a Kubernetes cluster on AWS.
$ kops create cluster \
    --zones=${ZONE} \
    --kubernetes-version=${K8S_VERSION} \
    --dns-zone=${NAME} \
    --yes \
    --name ${NAME}
We install an etcd server (Portworx will use this to keep the cluster co-ordinated). We use the CoreOS etcd operator to get etcd installed easily.
$ kubectl apply -f https://coreos.com/operators/etcd/latest/deployment.yaml
$ sleep 20
$ kubectl apply -f https://coreos.com/operators/etcd/latest/example-etcd-cluster.yaml
$ kubectl apply -f manifests/etcd-proxy.yaml
Next we create a template volume. `kops` uses AWS Auto Scaling Groups under the hood and Portworx integrates really well with Auto Scaling Groups.
$ export VOLUMEID=$(aws ec2 create-volume \
  --size 20 \
  --volume-type gp2 \
  --region ${REGION} \
  --availability-zone ${ZONE} \
  --output text \
  --query 'VolumeId')
Now we run Portworx as a Deamonset which means one Portworx container will run on each node in the cluster.
$ cat manifests/px.yaml | envsubst | kubectl create -f -
$ ssh admin@api.${NAME} sudo /opt/pwx/bin/pxctl status
Now Portworx is installed – we can SSH onto any of the nodes in the cluster to use the `pxctl` cli and create some volumes.
Let’s create a replicated volume for our MySQL data:
$ ssh admin@api.${NAME} sudo /opt/pwx/bin/pxctl volume create \
  --size=5 \
  --repl=2 \
  --fs=ext4 \
  mysql-disk
The name for the volume above is `mysql-disk` – it will be `5GB`, formatted with `ext4` and have 2 copies across the cluster (the replication we need for failover).
Then we create the `multi-writer` disk for the WordPress PHP container. This will have the same properties as the MySQL disk with an additional `–shared` flag. This allows the volume to be attached to multiple containers which is what we need to horizontally scale our WordPress container:
$ ssh admin@api.${NAME} sudo /opt/pwx/bin/pxctl volume create \
  --size=5 \
  --repl=2 \
  --fs=ext4 \
  --shared \
  storage-disk
We can see these volumes having been created by using the `list` command of `pxctl`:
$ ssh admin@api.${NAME} sudo /opt/pwx/bin/pxctl volume list
Now we have a disk ID – we can use it to run a MySQL pod:
$ export MYSQL_DISK_ID=$(ssh admin@api.${NAME} sudo /opt/pwx/bin/pxctl volume list | grep mysql-disk | awk '{print $1}')
$ cat manifests/mysql.yaml | envsubst | kubectl apply -f -
Here is the contents of the yaml – we are using `envsubst` to replace the id for the disk we created:
---
apiVersion: v1
kind: Namespace
metadata:
  name: mysql
---
apiVersion: v1
kind: Service
metadata:
  name: mysql
  namespace: mysql
  labels:
    app: mysql
spec:
  ports:
  - port: 3306
    name: mysql
  clusterIP: None
  selector:
    app: mysql
---
apiVersion: extensions/v1beta1
kind: Deployment
metadata:
  name: mysql
  namespace: mysql
spec:
  replicas: 1
  template:
    metadata:
      labels:
        app: mysql
    spec:
      containers:
      - name: mysql
        image: mysql:5.6
        env:
          # Use secret in real usage
        - name: MYSQL_ROOT_PASSWORD
          value: password
        ports:
        - containerPort: 3306
          name: mysql
        volumeMounts:
        - name: "${MYSQL_DISK_ID}"
          mountPath: /var/lib/mysql
      volumes:
        - name: "${MYSQL_DISK_ID}"
          portworxVolume:
            volumeID: "${MYSQL_DISK_ID}"
            fsType:   ext4
Finally – we run the WordPress PHP pod:
$ export WORDPRESS_DISK_ID=$(ssh admin@api.${NAME} sudo /opt/pwx/bin/pxctl volume list | grep storage-disk | awk '{print $1}')
$ cat manifests/wordpress.yaml | envsubst | kubectl apply -f -
Same trick as with the MySQL pod – we are using `envsubst` to replace the id for the disk we created:
---
apiVersion: v1
kind: Namespace
metadata:
  name: wordpress
---
apiVersion: v1
kind: Service
metadata:
  name: wordpress
  namespace: wordpress
  labels:
    app: wordpress
spec:
  ports:
  - port: 80
    name: wordpress
  clusterIP: None
  selector:
    app: wordpress
---
apiVersion: extensions/v1beta1
kind: Deployment
metadata:
  name: wordpress
  namespace: wordpress
spec:
  replicas: 1
  template:
    metadata:
      labels:
        app: wordpress
    spec:
      containers:
      - name: wordpress
        image: wordpress:latest
        env:
          # Use secret in real usage
        - name: WORDPRESS_DB_PASSWORD
          value: password
        - name: WORDPRESS_DB_HOST
          value: mysql.svc.cluster.local
        ports:
        - containerPort: 80
          name: wordpress
        volumeMounts:
        - name: "${WORDPRESS_DISK_ID}"
          mountPath: /var/www/html
      volumes:
        - name: "${WORDPRESS_DISK_ID}"
          portworxVolume:
            volumeID: "${WORDPRESS_DISK_ID}"
            fsType:   ext4
Notice how we are actually deploying WordPress and MySQL inside a Kubernetes “deployment.” This means we can easily scale up and down the number of containers running for each deployment.
It wouldn’t make sense to increase the scale of the MySQL deployment. As mentioned we would be using a stateful set and master/slave semantics for that.
However, we can use “kubectl scale deployment” to increase the number of WordPress containers because they are using a Portworx “shared” volume.
Here is the command to increase WordPress to 10 containers:
kubectl scale deployment wordpress --replicas 10
This hands-on guide has shown you how to install and operate WordPress and Portworx on an AWS Kubernetes cluster. As demonstrated in other posts, there are various advantages to using Portworx such as when EBS volumes get stuck in an attaching state.
Another advantage of using Portworx alongside kops specifically is the integration with AWS Auto Scaling Groups for containers. This means Portworx will manage our underlying EBS pool and be-able to re-use previous EBS volumes after a scale up/down/up operation.
Want to learn more about Kubernetes storage? Be sure to checkout our documentation for running Portworx on Kubernetes!