Kubernetes Persistent Volume Tutorial
This article is designed as an initial overview of Kubernetes Persistent Volumes (PVs) and should answer key questions about Kubernetes Storage and PVs
What Is a Persistent Volume (PV) in Kubernetes?
Kubernetes Persistent Volumes are administrator-provisioned volumes. These are created with a particular filesystem and size and identifying characteristics such as volume IDs and names. A Kubernetes PV has the following attributes:
- Provisioned either dynamically or by an administrator
- Created with a particular filesystem
- Has a particular size
- Has identifying characteristics such as volume IDs and a name
Pods can start using these volumes by claiming them via a Persistent Volume Claim (PVC). A PVC describes the storage characteristics required by the pod, finds a matching PV, and claims it. The claim is referenced in the spec for a pod.
Storage Classes describe default volume information like a filesystem, size, and block size. A detailed understanding of Kubernetes storage use cases will help you solve the challenges of running stateful services.
Kubernetes Volumes vs Persistent Volumes
There are currently two types of storage abstracts available with Kubernetes: Volumes and Persistent Volumes. A Kubernetes volume exists only while the containing pod exists – once the pod is deleted, the associated volume is also deleted. Kubernetes volumes are thus useful for storing temporary data that does not need to exist outside of the pod’s lifecycle. Kubernetes PVs remain available outside of the pod lifecycle, so volume data will not get deleted even after the associated pod is deleted. Once the associated pod is deleted, the data is retained and another pod can claim the PV.
So how does the usage of Kubernetes volumes differ from Kubernetes Persistent Volumes? The answer is simple: Kubernetes PVs store data that needs to be retained regardless of the pod lifecycle, while Kubernetes volumes store temporary data. Furthermore, while standard volumes are defined directly in the Pod spec, PVs are decoupled and accessed through a Persistent Volume Claim.
Why do we use Persistent Volumes?
Containers were designed to be stateless. As Kubernetes matured and container-native storage solutions evolved (such as Portworx), organizations started to imagine beyond stateless applications. Today, it is common to run not just databases, but full virtual machines using tools like KubeVirt, which rely entirely on Persistent Volumes to store disk images. By having an application in a container and also storing, retaining, and backing up data created or used by that application, they could gain benefits like a fast startup, high availability, and self-healing. This separation of concerns is achieved by using a Persistent Volume Claim, which allows a developer to request specific storage resources (like size or class) without needing to understand the underlying physical infrastructure.
Persistent Volumes: A Use Case
One of the most common use cases for Kubernetes PVs is databases. Databases need real-time data availability, and by leveraging PVs, we can use databases like MySQL, Cassandra,and MS SQL for any application. By ensuring consistent data state, we can start putting complex, 12-factor-style applications and machine learning platforms like Kubeflow into containers. With PVs, we can simplify the deployment of distributed, stateful applications. During deployment, we need to ensure that:
- Each pod is created with the required appropriate config and environment variables.
- A PV is attached to the pod via a PVC.
- The claimed storage is mounted inside the pod as required.
These high-level steps will be repeated for each pod in the application, and occur in series. This way, we can be confident the initial pod deploys and has required storage, and each additional replica that is created has identical storage attachments and mounts (required for any clustered application). We can easily scale this StatefulSet of pods and join many more replicas to the distributed application. If any pod fails, it can be replaced, and the storage will be reattached.
How do Kubernetes PersistentVolumeClaims Work?
PersistentVolumeClaims (PVCs) allow users to request and manage storage resources within a Kubernetes cluster by abstracting the underlying storage infrastructure. They act as a middleman between the user’s workload and the available PVs in the cluster.
The Relationship Between PVs and PVCs
While PVs are storage resources provisioned in the Kubernetes cluster, PVCs are requests from users to consume these resources. The relationship is 1:1, which means each PVC can bind to only one PV, and once bound, the PV is no longer available for other PVCs.
Binding and Releasing PVCs
When a PVC is created, Kubernetes finds a matching PV that satisfies the claim. If a match exists, it binds the PVC to that PV. Upon successful binding, the storage is available for the requesting Pod.
- Binding: The PVC and PV are matched based on criteria like storage capacity and access modes. In the binding process, the `claimRef` field in the PV is updated to reference the PVC, indicating that the PV is now claimed.
- Releasing: When a PVC is deleted, the PV remains but is no longer bound. Depending on the PV’s `persistentVolumeReclaimPolicy`, the volume might be deleted, manually reclaimed, or kept for reuse.
This binding and releasing process allows for efficient management of storage resources as applications are scaled up or down.
Dynamic and Static Provisioning
Kubernetes supports dynamic and static provisioning of storage resources through PVCs. In static provisioning, an administrator has to create PVs in advance manually. With dynamic provisioning, Kubernetes automatically creates PVs on demand when a PVC is submitted. It simplifies the storage management process and allows for more flexible resource allocation.
How to use Kubernetes Persistent Volumes?
Now that we understand PVs, how they differ from regular volumes, and why they are used, we can move on to using them. In the following sections, we will deep-dive into best practices for setting up PVs, understand their lifecycle, and perform the steps to create a Kubernetes PV with a set size. This assumes you have a functional Kubernetes environment running with Portworx installed and operational.
Best Practices for the Kubernetes Persistent Volume Claim
Guidelines for creating PVs
A good Kubernetes PV example starts in the creation process. Here are two tips to keep in mind when doing this.
- Specify a StorageClass when defining your Persistent Volume Claim; otherwise, the request will fail. In addition, always give your StorageClass definition a meaningful name.
- Include PVCs when configuring containers, but never PVs. You don’t want to bind containers to specific volumes, hence, the need for PVCs.
Use dynamic provisioning whenever possible
It’s preferable to create PVs dynamically for maximum performance. Assigning static PVs to PVCs consumes more resources and overhead, making the practice challenging to scale. In addition, administrators can limit the amount of storage that can be assigned to a dynamic PVC request via StorageClasses.
Pre-plan storage requirement
Kubernetes provides various storage sizes and capacities to accommodate different node sizes. To optimize usage, containers should always be provisioned based on the space required. Overprovisioning wastes resources, while underprovisioning causes issues like application crashes or data loss. Consider using `StorageClass` with different performance characteristics to match the needs of your applications.
Use resource quotas to limit storage usage
Resource quotas are set limits to control the amount of memory, processing, and storage a container can use. They are used to impose limits on containers in a specific namespace, backup, or service level. Limits help prevent individual applications from consuming excessive storage and ensures the fair allocation of resources among multiple teams or projects.
Include Quality of Service (QoS) definitions if possible
Some PVC requests in specific Kubernetes platforms include a Quality of Service (QoS) parameter. It tells Kubernetes the nature of the workload and then assigns the best persistent storage for Kubernetes in that scenario. QoS helps specify performance requirements like IOPS, throughput, or latency for PVCs. For example, if a container requires high read/write output, QoS can help Kubernetes assign SSD storage for the best results.
Lifecycle of Kubernetes PV and PVC
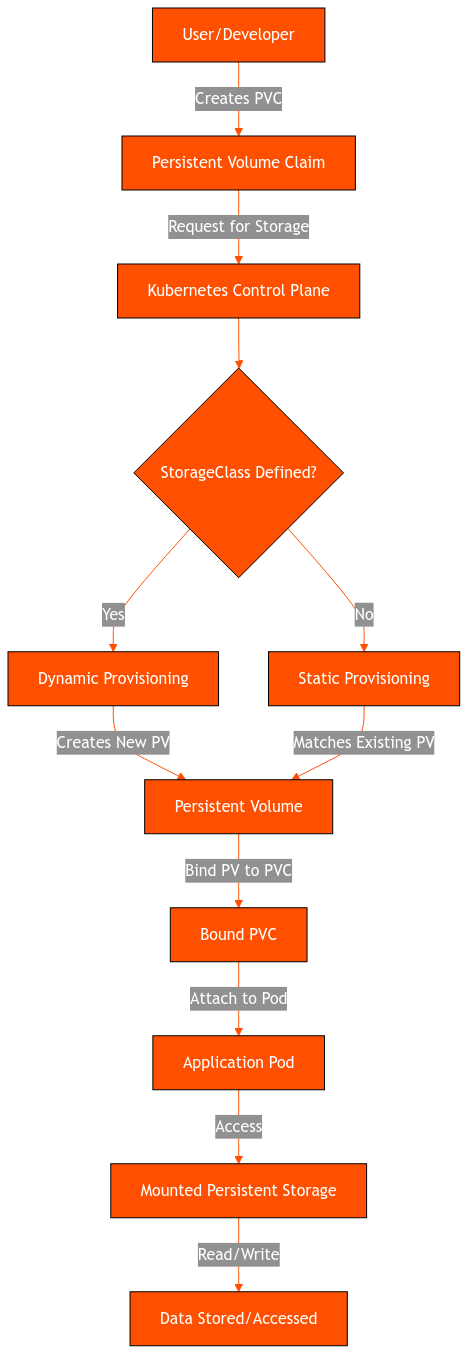
In Kubernetes, PVC requests for a PV go through the following process:
Provisioning
There are two ways to provision:
- Static provisioning creates PVs that represent real storage. These PVs already exist as part of the Kubernetes API and are manually deployed in advance by cluster administrators. Static PVs are also a common resource, making them accessible to all users in the Kubernetes cluster.
- Dynamic provisioning creates PV storage in real-time based on a pre-configured StorageClass definition. This happens when the PVC request doesn’t match any available static PV.
Binding
Once suitable PV storage is found to match the PVC request, they are then bound together.. When a user creates a PVC request, it also defines the PV’s desired storage space and access mode. A control loop routine continually monitors the system for any new PVCs.
What it does next will depend on whether the PV was provisioned statically or dynamically. With static provisioning, the control loop will look for a PV that matches the specifications of the PVC. If the PV was already dynamically provisioned to a PVC, the control loop will simply bind them.
The Kubernetes PVC and PV are bound using ClaimRef, which creates a bi-directional 1:1 mapping of the two objects, which means the PV and PVC are exclusive to each other.
Using
After binding the PV and PVC, Kubernetes pods can now mount the storage. It does this by treating the PVC as a Kubernetes volume mount. This, in turn, causes the Kubernetes cluster to find the PV storage linked to the PVC and then mount that to the pod. At this point, the user can now use the PV storage in the pod. Check our basic guide to Kubernetes storage for details.
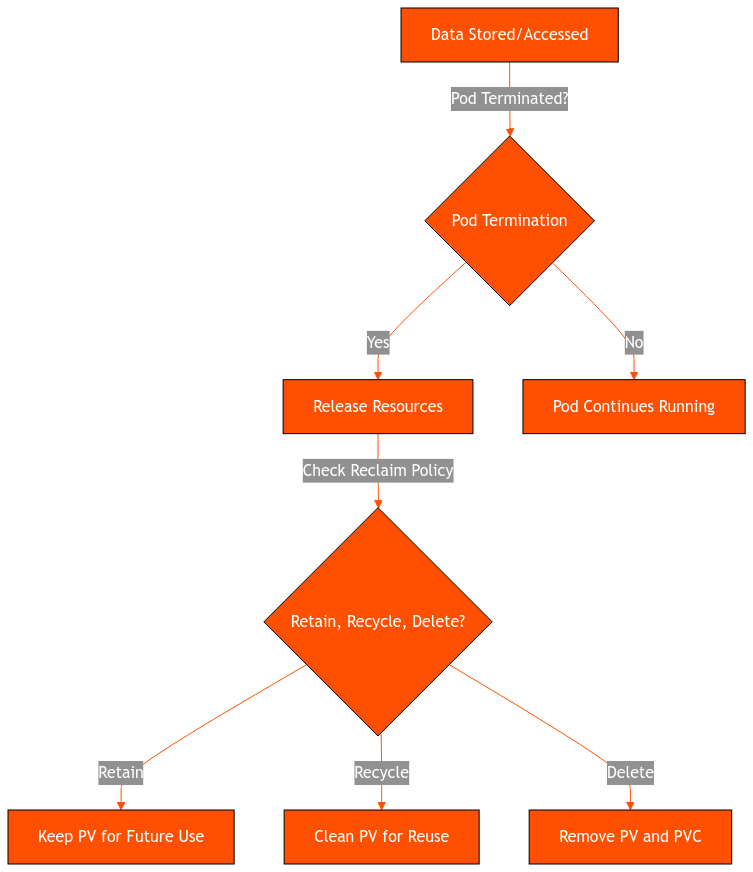
Reclaiming
After a pod is finished using a PVC, it can be deleted and released. What happens to the bound PV storage will depend on the policy set in the PersistentVolume definition. There are two possibilities:
- Retain policy. Here, the PV resource is unbound from the PVC but still keeps any data from the previous pod; it cannot be deleted and used by another PVC. The administrator must manually delete this PV to make it available for use.
- Delete. This completely removes the PV together with the PVC. This also erases any storage asset from external platforms like Azure Disk, GCE PD, or AWS EBS.
Creating a Persistent Volume
Persistent Volumes and Persistent Volume Claims
The following YAML will create a PV with 10GB storage. This volume uses the local host’s file system at /mnt/data as storage. The PV has a retention policy set to retain, which means the volume will persist even after the associated Pod or PVC is deleted.
yaml
apiVersion: v1
kind: PersistentVolume
metadata:
name: my-pv
spec:
capacity:
storage: 10Gi
accessModes:
- ReadWriteOnce
persistentVolumeReclaimPolicy: Retain
storageClassName: manual
hostPath:
path: "/mnt/data"
---
apiVersion: v1
kind: PersistentVolumeClaim
metadata:
name: my-pvc
spec:
accessModes:
- ReadWriteOnce
resources:
requests:
storage: 10Gi
storageClassName: manual
Save the above configuration in a file pv-pvc.yaml and apply it on your cluster.
$ kubectl apply -f pv-pvc.yaml
persistentvolume/my-pv created
persistentvolumeclaim/my-pvc created
Verify the status of PV and PVC using kubectl:
> kubectl get pv
NAME   CAPACITY   ACCESS MODES   RECLAIM POLICY   STATUS   CLAIM            	STORAGECLASS 	REASON   AGE
my-pv2  10Gi   	RWO        	       Retain       	     Bound      default/my-pvc  	manual                	85m

> kubectl get pvc
NAME     STATUS    VOLUME  CAPACITY   ACCESS MODES   STORAGECLASS AGE
The above outputs confirm that the PV and PVC have been successfully created and are bound together.
StatefulSets and Data Persistence
StatefulSet in Kubernetes is a type of workload designed to manage stateful applications like datasets. It helps ensure data persistence. You can create StatefulSets using Persistent Volumes.
In the following configuration, we will create a StatefulSet with 3 replicas and use the PV and PVCs created above. Each replica will have unique network identities and stable storage. Even in case of restart or termination, the newly created pod will have the same name and storage attached to it with all the data intact. Data storage will be persistent even after the pod or container restarts.
apiVersion: apps/v1
kind: StatefulSet
metadata:
  name: my-statefulset
  namespace: default
spec:
  serviceName: "my-service"
  replicas: 1
  selector:
    matchLabels:
  	app: my-app
  template:
    metadata:
  	labels:
    	app: my-app
    spec:
  	containers:
  	- name: my-container
    	image: nginx:latest # You can replace this with your preferred container image
    	ports:
    	- containerPort: 80
      	name: web
    	volumeMounts:
    	- name: my-storage
      	mountPath: /usr/share/nginx/html # Adjust this based on your application needs
  	volumes:
  	- name: my-storage
    	persistentVolumeClaim:
      	claimName: my-pvc # Reference the existing PVC here
Save it in a file statefulset.yaml and apply it on the cluster.
$ kubectl apply -f statefulset.yaml
statefulset.apps/my-statefulset created
Verify the status of the StatefulSet
> kubectl get statefulset
NAME         	READY   AGE
my-statefulset   3/3 	2m46s
The StatefulSet is successfully created with 3 replicas.
Snapshots and Cloning
Volume Snapshots
VolumeSnapshot is a request by the user/admin for a snapshot of a volume. As of now, it is only supported for the CSI drivers. Hence, taking a snapshot of the volume is a prerequisite for a CSI driver, which you can read and follow the guide for here [LINK]. Once you install a CSI driver, you can follow the guide to take a snapshot of the Persistent Volume Claim.
1. Create a VolumeSnapshotClass that defines the snapshot storage provider and other parameters. Following is an example of YAML for creating VolumeSnapshotClass for Azure CSI Driver.
apiVersion: snapshot.storage.k8s.io/v1
kind: VolumeSnapshotClass
metadata:
  name: azure-disk-snapclass
driver: disk.csi.azure.com
deletionPolicy: Delete
parameters: {}
Verify status of VolumeSnapshotClass:
> kubectl get volumesnapshotclass
NAME                 	DRIVER           	DELETIONPOLICY   AGE
azure-disk-snapclass 	disk.csi.azure.com   Delete       	4m38s
2. Create a VolumeSnapshot
With the VolumeSnapshotClass created, you can now create a `VolumeSnapshot` resource to capture the state of the PVC:
apiVersion: snapshot.storage.k8s.io/v1
kind: VolumeSnapshot
metadata:
  name: new-snapshot-test
spec:
  volumeSnapshotClassName: azure-disk-snapclass
  source:
    persistentVolumeClaimName: my-pvc
Verify snapshot creation:
> kubectl get volumesnapshot
NAME            	READYTOUSE   SOURCEPVC 	SOURCESNAPSHOTCONTENT   RESTORESIZE   SNAPSHOTCLASS           	SNAPSHOTCONTENT                                	CREATIONTIME   AGE
new-snapshot-test   true     	azure-pvc                         	5Gi       	azure-disk-snapclass  	snapcontent-bf82466b-e7eb-4dd3-928c-5c97d33070eb   24s        	24s
The snapshot is successfully created to capture the state of the `azure-pvc`
Volume Cloning
Volume Cloning is available only for CSI volume plugins. The feature adds support for specifying existing PVCs in the dataSource field to indicate that a user would like to clone a Volume.
apiVersion: v1
kind: PersistentVolumeClaim
metadata:
    name: clone-of-my-pvc
    namespace: default
spec:
  accessModes:
  - ReadWriteOnce
  storageClassName: azure-disk-sc
  resources:
    requests:
  	storage: 5Gi
  dataSource:
    kind: PersistentVolumeClaim
    name: my-pvc
This would create a new PV and PVC with the same content as `my-pvc`.
> kubectl get pv
NAME   CAPACITY   ACCESS MODES   RECLAIM POLICY   STATUS   CLAIM            	STORAGECLASS 	REASON   AGE
my-pv  10Gi   	RWO        	       Retain       	     Bound      default/my-pvc  	manual                	85m
pvc-xxxxxx-yyyy 5Gi RWO Delete Bound default/clone-of-my-pvc azure-disk-sc 3m

> kubectl get pvc
NAME     STATUS    VOLUME  CAPACITY   ACCESS MODES   STORAGECLASS AGE
my-pvc    Bound       my-pv        10Gi   	RWO        	         manual       	    10m
clone-of-my-pvc Bound pvc-xxxxxx-yyyy 5Gi RWO azure-disk-sc 3m
How to Troubleshoot PVC Issues
Common Persistent Volume Claim Errors and Warnings
- PVC Stuck in “Pending” State: If there are no available PVs, the size requested in the PVC is larger than any available PV, or the storage class doesn’t match then the PVC status shows “Pending”.
- PVC Bound but Pod Fails to Mount Volume: If the volume mount in the pod’s YAML file is misconfigured or there are permission issues on the host’s file system, the pod fails to mount the volume.
- VolumeSnapshot Fails to Restore: If the snapshot isn’t in a “Ready” state, restoring a PVC from a snapshot may fail.
Debugging Tips and Tools
- Check the Status of PVC and PV using the following commands:
kubectl get pvc
kubectl get pv
If the current state of PVCs and PVs is `Pending` or `Failed`, check if the PV and PVC are bound correctly and use the correct StorageClasses.
- Review Pod Events: When a pod fails to mount a PVC, the error is often logged in the pod’s events:
kubectl describe pod <pod-name>
- Check for Quota Limitations: Storage quotas might prevent a PVC from being bound if your namespace has exceeded its storage quota.
kubectl get resourcequota
By using these tools and tips, you can identify the root cause of PVC issues and resolve them to ensure storage is provisioned correctly in your Kubernetes cluster.
Advanced PersistentVolumeClaim Topics
Using PVCs with StatefulSets
Each pod in the StatefulSet can have its own PVC, which is automatically created and managed by the StatefulSet controller. The volumeClaimTemplates field in a StatefulSet allows you to define the specifications, like the size, access modes, and storage class. This helps ensure that each pod gets a PV that meets its requirements for stateful applications like Cassandra with Portworx on Kubernetes.
PVCs in Multi-Zone and Multi-Region Deployments
With PVCs distributed across multiple zones or regions, you can ensure that your stateful applications remain operational even if one zone experiences an outage. In a multi-zone deployment, if a StatefulSet pod is rescheduled to a different zone, the associated PVC must also be available in that zone. Regional PVs help ensure that the PVC is available regardless of the pod’s location, reducing downtime due to zone failure.
Security Considerations
- Implementing role-based Access Control (RBAC) to manage who can create, modify, or delete PVCs and PVs can prevent unauthorized access to sensitive data stored in persistent volumes.
- Using ReadWriteOnce (RWO) access mode for your PVC, you can ensure that only one node can write to the volume at a time, reducing the risk of data corruption or unauthorized write access.
- Utilise Kubernetes Network Policies to control traffic to and from pods that access PVCs.
To conclude, understanding how to configure and manage PVs and PVCs efficiently allows Kubernetes administrators and developers to ensure reliable, scalable, and secure storage solutions for both stateless and stateful workloads. Our guide to Kubernetes storage solutions can help you get started.
Portworx is a powerful and comprehensive solution for managing persistent storage in Kubernetes environments. It simplifies the deployment and management of storage resources, enabling developers to focus on building applications without worrying about the underlying storage infrastructure.
Frequently Asked Questions
What is the difference between a Persistent Volume (PV) and a Persistent Volume Claim (PVC)?
Think of the Persistent Volume (PV) as the actual storage resource (like a 100GB hard drive) in your cluster. It is a piece of infrastructure. The Persistent Volume Claim (PVC) is a request for that storage (like a ticket saying “I need 100GB”).
- The PV is the “supply” provided by an administrator or created dynamically.
- The PVC is the “demand” created by a user. Kubernetes binds the PVC (request) to a matching PV (resource) so your Pod can use it.
What happens to a Persistent Volume when I delete my Persistent Volume Claim (PVC)?
This depends on the Reclaim Policy set on that specific PV. There are two common outcomes:
- Delete (Default for most cloud storage): When you delete the PVC, Kubernetes automatically deletes the underlying PV and the storage asset (e.g., the AWS EBS volume), resulting in data loss.
- Retain: When you delete the PVC, the PV and its data survive. The PV is marked as “Released,” meaning it is safe but not yet available for a new claim until an administrator manually reclaims it.
How does Kubernetes decide which Persistent Volume to bind to my PVC?
Kubernetes looks for a PV that matches the specific requirements listed in your PVC, such as Capacity (size) and Access Modes (e.g., ReadWriteOnce).
- If you specify a StorageClass, Kubernetes will only bind to a PV of that specific class (or dynamically provision a new one).
- If a compatible PV exists, the binding happens immediately. If not, the PVC will remain in a “Pending” state until a matching volume becomes available.