


Hyperconverged or disaggregated? Modern design for cloud native data centers and cloud deployments for Kubernetes includes how to deploy compute, networking, and storage. Compute and storage can be combined on the same infrastructure to try and reduce cost and complexity while increasing scalability. Clusters can also be deployed and managed separately in a disaggregated model where there are strict separations of concern for compute and storage. Portworx is most often deployed in a hyperconverged fashion where storage devices are consumed by Portworx on the same worker nodes that application pods, deployments, and StatefulSets run. In this blog we’ll explore the disaggregated model and how it is deployed in comparison to the hyperconverged. We’ll also talk about the pros and cons of each deployment mode. Let’s get started.
What we will discuss in the rest of this blog will be both hyperconverged Kubernetes clusters with Portworx and disaggregated Kubernetes clusters with Portworx. For clarification, disaggregation is sometimes used interchangeably with composable disaggregated infrastructure (CDI); however, while CDI is disaggregated in the sense that resources are separated over a network, CDI is different from—although related to—what we are discussing. In this blog, disaggregated refers to the architectural decision to separate Kubernetes compute from storage servers or VMS.
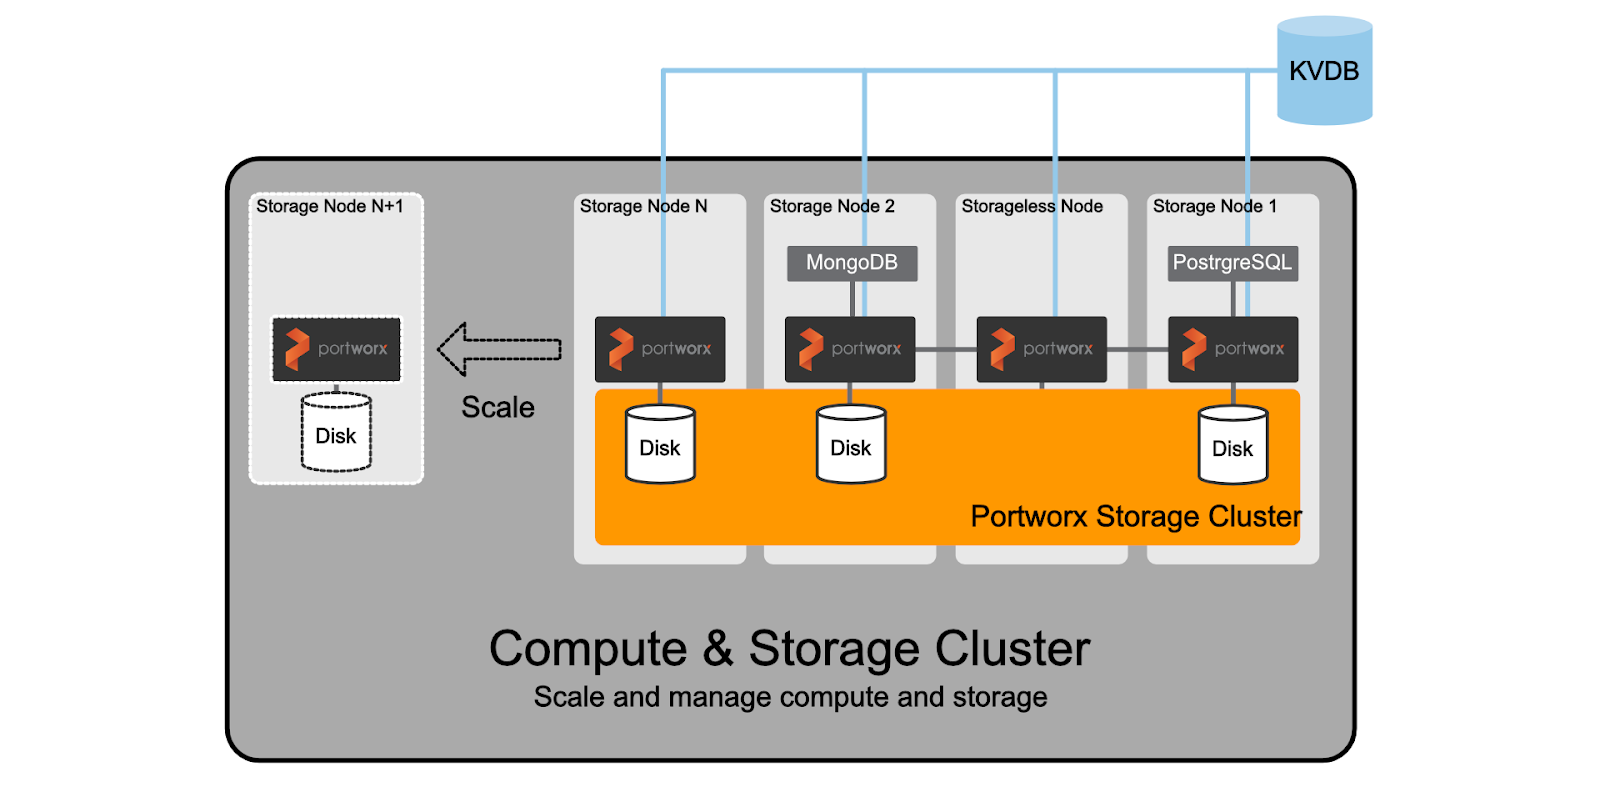
I’ll keep this brief, but I want to cover the most common way Portworx is deployed with Kubernetes, which is hyperconverged or converged. If you would like to view a quick refresher lightboard session on this topic, watch the recent pool rebalancing video where I review this topic.
In short, Portworx is packaged as a container image and is deployed by a Kubernetes operator or DaemonSet and deployed as a system level container on the worker nodes as a pod. These pods will install the Portworx components, install configuration, benchmark drives, and create storage pools that will join with other Portworx processes running on other Kubernetes nodes. The memory footprint from Portworx is minimal, so Kubernetes workers are configured with enough memory and CPU to accommodate both applications and data management. This reduces the overall footprint of compute, saving cost and complexity while generally allowing teams to be nimble enough to quickly scale out their cluster.
If you would rather get hands on with Portworx and deploy Portworx on a smaller hyperconverged lab, you can access a free lab below to do just that.
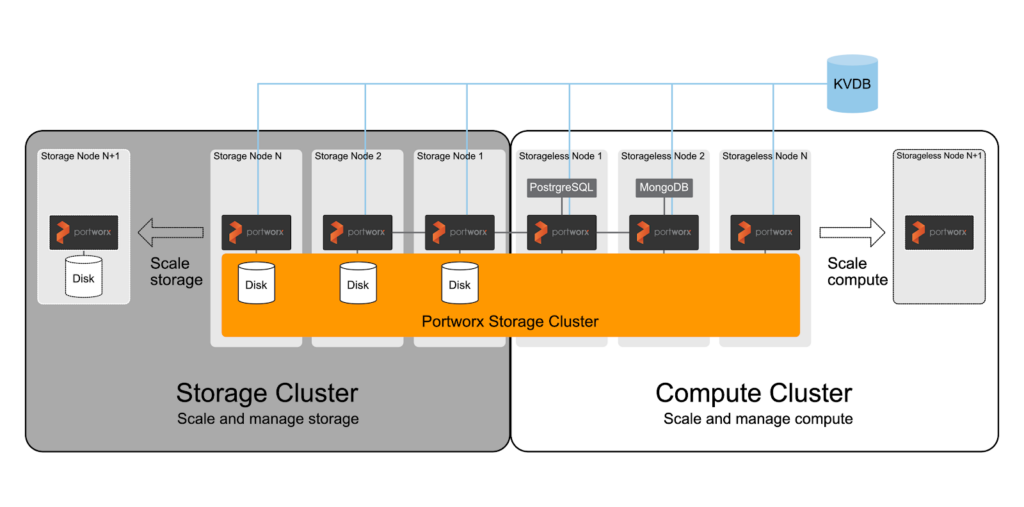
Next, let’s cover what disaggregated is and how we can configure an environment this way.
Generally you would choose this option if you have a very dynamic compute environment, such as a bursty big data environment where the number of compute nodes can elastically increase or decrease based on workload demand—especially if this scaling happens daily or even hourly. Here are some examples of what can cause this elasticity:
There are other reasons as well, and the above list is not exhaustive. Below is a sample architecture of what this may look like. Note that Portworx requires a few general steps in order for disaggregated clusters to work properly:
Let’s walk through an example deployment together in this blog. First, we will dig into our “management nodes” where we will set up our Etcd cluster as well as generally run commands using Ansible to help speed up running commands on each node.
First, make sure you have an “external” Etcd cluster setup. When I say “external,” I mean you will want to set up Etcd in a location on the network that both storage nodes and compute nodes can access, generally on a separate failure domain.
In this example, I have a single node, unauthenticated Etcd running in Docker. However, we recommend at least three nodes for production. You can use this example for a three node cluster as well as read through the Portworx Etcd recommendations.
[centos@ip-10-5-6-7 nodes-Storage]$ docker ps
CONTAINER ID        IMAGE                                COMMAND                 CREATED             STATUS              PORTS                              NAMES
f386a91e18d4        docker.io/bitnami/etcd:3-debian-10   "/entrypoint.sh etcd"   5 hours ago         Up 5 hours          0.0.0.0:2379->2379/tcp, 2380/tcp   etcd_etcd_1
I have set up two different directories where I will maintain configuration and inventories for the storage nodes and compute nodes.
[centos@ip-10-5-6-7 disaggregated]$ ls
kubespray-Compute  nodes-Storage
[centos@ip-10-5-6-7 disaggregated]$ cd nodes-Storage/
[centos@ip-10-5-6-7 nodes-Storage]$
Next, let’s install the storage cluster.
On your storage nodes, you will need to install Docker to run the Portworx OCI bundle, which will install the necessary components onto your nodes. For this, I’m using Ansible to run the yum package manager on CentOS to install and configure Docker.
> Note: Ansible is not required, it is only used to simplify running commands on multiple nodes. If you wish to use Ansible, you will need to install Ansible and put your nodes into an Ansible inventory in order to use these commands.
ansible all -i inventory.ini -m shell -b -a "yum install -y yum-utils && yum-config-manager --add-repo https://download.docker.com/linux/centos/docker-ce.repo"
ansible all -i inventory.ini -m shell -b -a "yum install -y docker-ce docker-ce-cli containerd.io && systemctl start docker && systemctl enable docker"
Next, I’m going to use the latest Portworx version available to me, portworx/px-enterprise:2.6.0.2, to run the OCI bundle.
> Note: You can also find detailed instructions available on the Portworx documentation site.
ansible all -i inventory.ini -m shell -b -a "sudo docker run --entrypoint /runc-entry-point.sh --rm -i --privileged=true -v /opt/pwx:/opt/pwx -v /etc/pwx:/etc/pwx portworx/px-enterprise:2.6.0.2"
>Note: If you’re connecting this Portworx cluster to OpenShift 4.X, you will need to add the argument
-r 17001to make sure Portworx uses the correct ports for OpenShift.
Once that is complete, you will need to verify what disks you have available for Portworx to use. Below is the output of lsblk from a storage node where I can see there are four disks available for me to use. I am going to initially use /dev/sdc and /dev/sdd.
ip-10-0-21-118.brbnca.spcsdns.net:$ lsblk
NAME   MAJ:MIN RM   SIZE RO TYPE MOUNTPOINT
sda      8:0    0   128G  0 disk
├─sda1   8:1    0   3.7G  0 part /boot
└─sda2   8:2    0 124.3G  0 part /
sdb      8:16   0    32G  0 disk
sdc      8:32   0   128G  0 disk
sdd      8:48   0   128G  0 disk
sde      8:64   0   128G  0 disk
Insert the /dev/sdc and /dev/sdd devices into the below command as shown using the -s flag. We are also going to use the cluster name of disaggregated-pwx and point to our external Etcd cluster at etcd://10.5.6.7:2379.
>Note: If you are using a secure Etcd cluster with TLS, you will need to configure the username and password or certificates as well as use the etcd:https://<IP>:<PORT> format. To use TLS certificates, you will want to put them in /opt/pwx, /etc/pwx, or in another location. If you choose another location, you will need to pass that in as a
-vparameter to therunc-entry-point.shstep above. Data and management networks can also be seperated using-dand-mYou can find these examples using the Portworx documentation for runC.
ansible all -i inventory.ini -m shell -b -a "sudo /opt/pwx/bin/px-runc install -c disaggregated-pwx -k etcd://10.5.6.7:2379 -s /dev/sdc -s /dev/sdd"
Once this completes, simply reload systemd and enable and start Portworx.
ansible all -i inventory.ini -m shell -b -a "systemctl daemon-reload && systemctl enable portworx && systemctl start portworx"
After a few minutes, Portworx should be up and running. You can verify this by logging into one of the storage nodes and issuing a pxctl status command.
# pxctl status
Status: PX is operational
License: Trial (expires in 31 days)
Node ID: 8182d247-04e1-4678-865b-f1632df6c210
IP: 70.0.21.119
  Local Storage Pool: 1 pool
POOL IO_PRIORITY RAID_LEVEL USABLE USED STATUS ZONE REGION
0 HIGH raid0 256 GiB 12 GiB Online default default
Local Storage Devices: 2 devices
Device Path Media Type Size Last-Scan
0:1 /dev/sdc STORAGE_MEDIUM_MAGNETIC 128 GiB 30 Sep 20 19:12 UTC
0:2 /dev/sdd STORAGE_MEDIUM_MAGNETIC 128 GiB 30 Sep 20 19:12 UTC
total - 256 GiB
Cache Devices:
 * No cache devices
Cluster Summary
Cluster ID: disaggregated-cluster
Cluster UUID: aca73f1d-1b06-4e50-94e4-3390bafa0fe1
Scheduler: none
Nodes: 3 node(s) with storage (3 online)
IP ID SchedulerNodeName StorageNode Used Capacity Status StorageStatus Version Kernel OS
10.0.21.118 ee4f7b56-76e4-455e-a246-fd3676ec0e17 N/A Yes 12 GiB 256 GiB Online Up 2.6.0.2-d505d8d 3.10.0-957.21.3.el7.x86_64 CentOS Linux 7 (Core)
10.0.21.119 8182d247-04e1-4678-865b-f1632df6c210 N/A Yes 12 GiB 256 GiB Online Up (This node) 2.6.0.2-d505d8d 3.10.0-957.21.3.el7.x86_64 CentOS Linux 7 (Core)
10.0.41.36 5a57c6ca-b6a6-4321-96ed-6437e3ed7359 N/A Yes 12 GiB 256 GiB Online Up 2.6.0.2-d505d8d 3.10.0-957.21.3.el7.x86_64 CentOS Linux 7 (Core)
Global Storage Pool
Total Used     :  36 GiB
Total Capacity :  768 GiB
Next, let’s install our storageless compute nodes.
We are assuming Kubernetes is already installed and the worker nodes that are part of the Kubernetes cluster can also access the storage nodes and the Etcd node(s) over the network.
$ kubectl get no
NAME    STATUS   ROLES    AGE     VERSION
node1   Ready    master   8m27s   v1.18.9
node2   Ready    <none>   7m18s   v1.18.9
node3   Ready    <none>   7m18s   v1.18.9
> Note: If you’re using the Operator in Kubernetes or Openshift, be sure to specify in the StorageCluster CR that there are no devices using storage.devices = [] using node selectors.
You can produce the Kubernetes spec file needed to install Portworx using the below link. However, note that this spec file is using inputs that specify Kubernetes 1.18.9 and the Etcd cluster at 10.5.6.7.
> Note: (You can also visit https://central.portworx.com and create one there.)
Update Args
Your arguments within the spec file should be similar to the below snippet.
args:
  ["-k", "etcd:http://10.5.6.7:2379", "-c", "disaggregated-pwx", "-a", "-secret_type", "k8s", "-x", "kubernetes", "-z"]
Apply the spec.
kubectl apply -f px-spec.yaml
Then, after a bit of time, you should see your Kubernetes worker nodes that are running “Storageless” as StorageNode = No in your pxctl status output.
# pxctl status
Status: PX is operational
License: Trial (expires in 31 days)
Node ID: c53d8b1a-d00d-4a51-9969-5a9dc62f0f02
IP: 70.0.20.39
  Local Storage Pool: 1 pool
POOL IO_PRIORITY RAID_LEVEL USABLE USED STATUS ZONE REGION
0 HIGH raid0 256 GiB 12 GiB Online default default
Local Storage Devices: 2 devices
Device Path Media Type Size Last-Scan
0:1 /dev/sdc STORAGE_MEDIUM_MAGNETIC 128 GiB 30 Sep 20 21:21 UTC
0:2 /dev/sdd STORAGE_MEDIUM_MAGNETIC 128 GiB 30 Sep 20 21:21 UTC
total - 256 GiB
Cache Devices:
 * No cache devices

Cluster Summary
Cluster ID: disaggregated-pwx
Cluster UUID: 03f8ee4e-7f41-485a-ae6a-0b4e72cf78d1
Scheduler: none
Nodes: 3 node(s) with storage (3 online), 2 node(s) without storage (2 online)
IP ID SchedulerNodeName StorageNode Used Capacity Status StorageStatus Version Kernel OS
10.0.20.39 c53d8b1a-d00d-4a51-9969-5a9dc62f0f02 N/A Yes 12 GiB 256 GiB Online Up (This node) 2.6.0.2-d505d8d 3.10.0-957.21.3.el7.x86_64 CentOS Linux 7 (Core)
10.0.58.180 5b4d144a-ff79-40c9-8d42-be7e2881281a N/A Yes 12 GiB 256 GiB Online Up 2.6.0.2-d505d8d 3.10.0-957.21.3.el7.x86_64 CentOS Linux 7 (Core)
10.0.52.166 05295280-a31f-4523-ae9f-599d94d848f2 N/A Yes 12 GiB 256 GiB Online Up 2.6.0.2-d505d8d 3.10.0-957.21.3.el7.x86_64 CentOS Linux 7 (Core)
10.0.63.78 f6721788-bc76-465a-a890-6e8d6f25a483 node2 No 0 B 0 B Online No Storage 2.6.0.2-d505d8d 3.10.0-957.21.3.el7.x86_64 CentOS Linux 7 (Core)
10.0.32.200 edb3f0b0-8a80-4673-a0a4-722a32747a06 node3 No 0 B 0 B Online No Storage 2.6.0.2-d505d8d 3.10.0-957.21.3.el7.x86_64 CentOS Linux 7 (Core)
Global Storage Pool
Total Used     :  36 GiB
Total Capacity :  768 GiB
That’s it! You now have Portworx deployed in disaggregated mode. If you have any questions, you can also reach out directly via the related topic in the Portworx support forum.