


As Kubernetes adoption continues to grow, another trend has emerged in managing cloud-native resources. At scale, enterprises are increasingly embracing GitOps to manage the deployment of their Kubernetes infrastructure in a more controlled and repeatable manner. With the right planning, infrastructure administrators can quickly deploy a consistent tool stack into a Kubernetes cluster, enabling declarative control of infrastructure resource allocations and providing their customers, the business units within the enterprise, with a standardized platform on which they can build their applications.
This approach also reduces administrative burden by utilizing Infrastructure as Code tools like Terraform, Ansible, and others. Once the cluster has been deployed, the admin can then deploy their CD tooling of choice, register a public or private Git repository and deploy their technology stack. In this example, I have selected the popular open-source solution, FluxCD, and Github.com. But the same principles apply to other Continuous Delivery tools and Code versioning platforms like ArgoCD and GitLab.
To start implementing a GitOps based deployment method, I have selected to use FluxCD. More information on this particular tool can be found at https://fluxcd.io/.
Flux has a client tool to install flux into, or “bootstrap”, the target Kubernetes cluster. Once this has been done, a deployment of FluxCD will be installed to the ‘flux-system’ namespace on the cluster and a Custom Resource is created pointing to the Git repository named in the bootstrap command. At this point, FluxCD starts monitoring this Git repo for new ‘git commits’. Using Flux’s kustomization api files or kustomization files used with the popular Kubernetes tool Kustomize, FluxCD then tries to reconcile the contents of the repository with the state of the cluster.
FluxCD supports both imperative and declarative configuration. However, for GitOps, declarative is the only choice. Multiple sources for declarative configuration files can be defined and referenced from the primary Git repository and Flux is able to consume standard YAML with Kustomize, multiple Git repositories, Helm Charts, and S3 Buckets. As administrators select the tooling and sources for their Kubernetes stack, they will also select a structure for their Git repository. Flux supports several choices, which are described in the documentation.
For this example, I have selected to use the Monorepo layout. So, after bootstrapping the cluster, my Github repository contains only a folder named ‘clusters’ and inside this directory is another directory, named for the cluster currently being targeted where the flux manifests are located. This will become the basis for the Git repository and we will add folders and files to build out the stack and declarative configuration.
You can find all of the examples in this document at: https://github.com/cjkennedy1972/portworx-fluxcd
Now that we have decided how to layout our Git repository, let’s dig into how to deploy Portworx using GitOps.
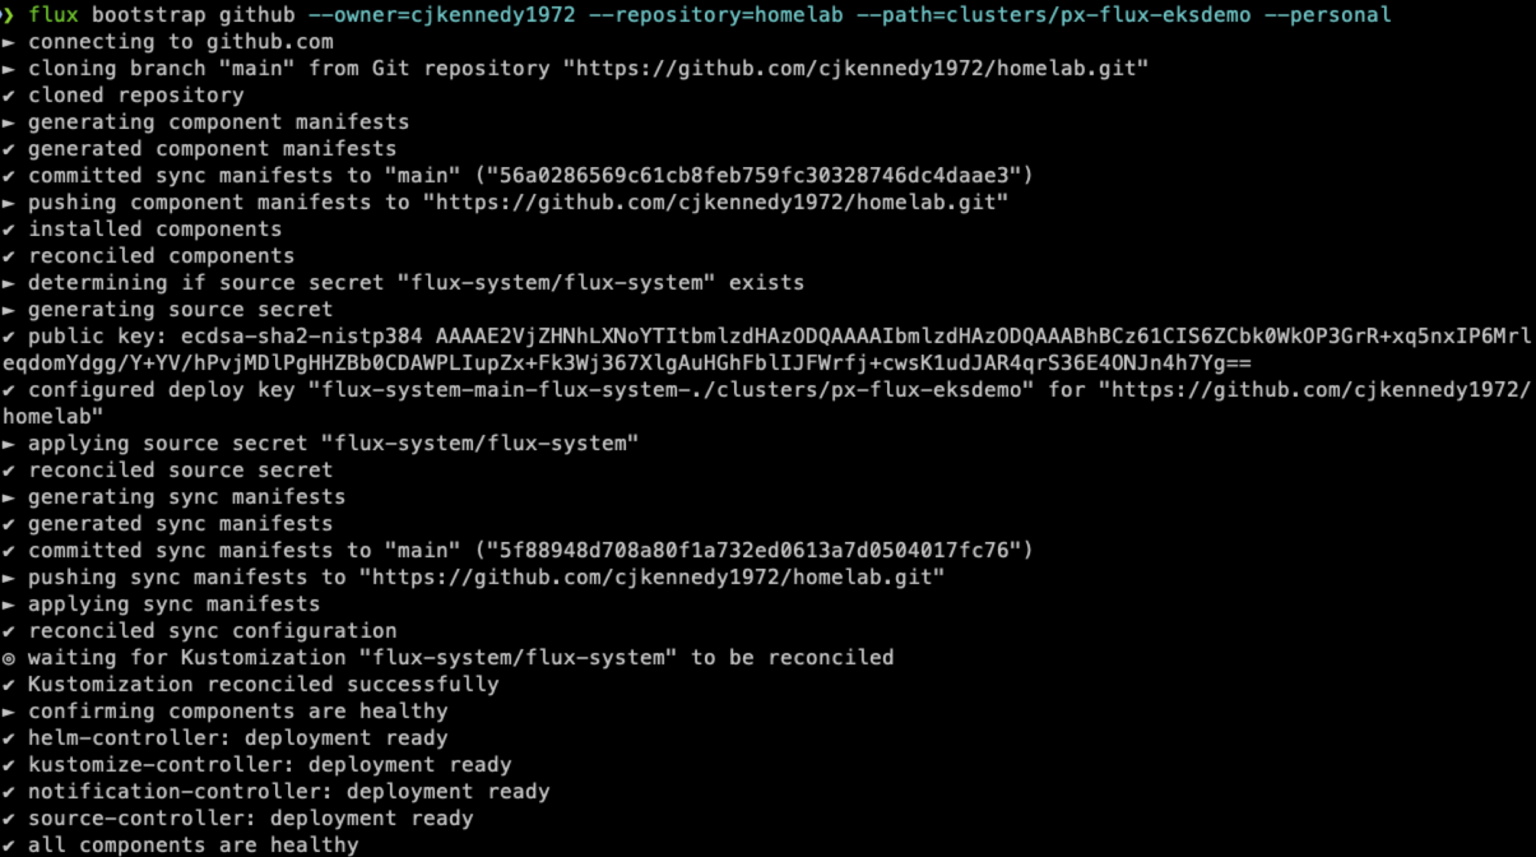
First bootstrap the cluster with FluxCD. Using the command line, issue the following commands to bootstrap your Kubernetes cluster.
Export your Github Personal Access Token
export GITHUB_TOKEN=<your-token>
Then run the bootstrap for a repository in your Github account.
flux bootstrap github \
  --owner=my-github-username \
  --repository=portworx-fluxcd \
  --path=clusters/ck-homelab \
  --personal
When you deploy Portworx there are two primary manifests that are used. The first is for the Portworx Operator and the second is the StorageCluster manifest. Typically a user will visit https://central.portworx.com and generate the installation manifests. This becomes more and more impractical as the number of Clusters under management increases. However, Portworx is deployed using standard Kubernetes commands and manifests, so it is easy to adapt to using a GitOps approach for deploying multiple clusters.
To get started, we will first step through the wizard at https://central.portworx.com to get a base set of files. After logging into the site, select Portworx Enterprise as seen below and click “Next”.
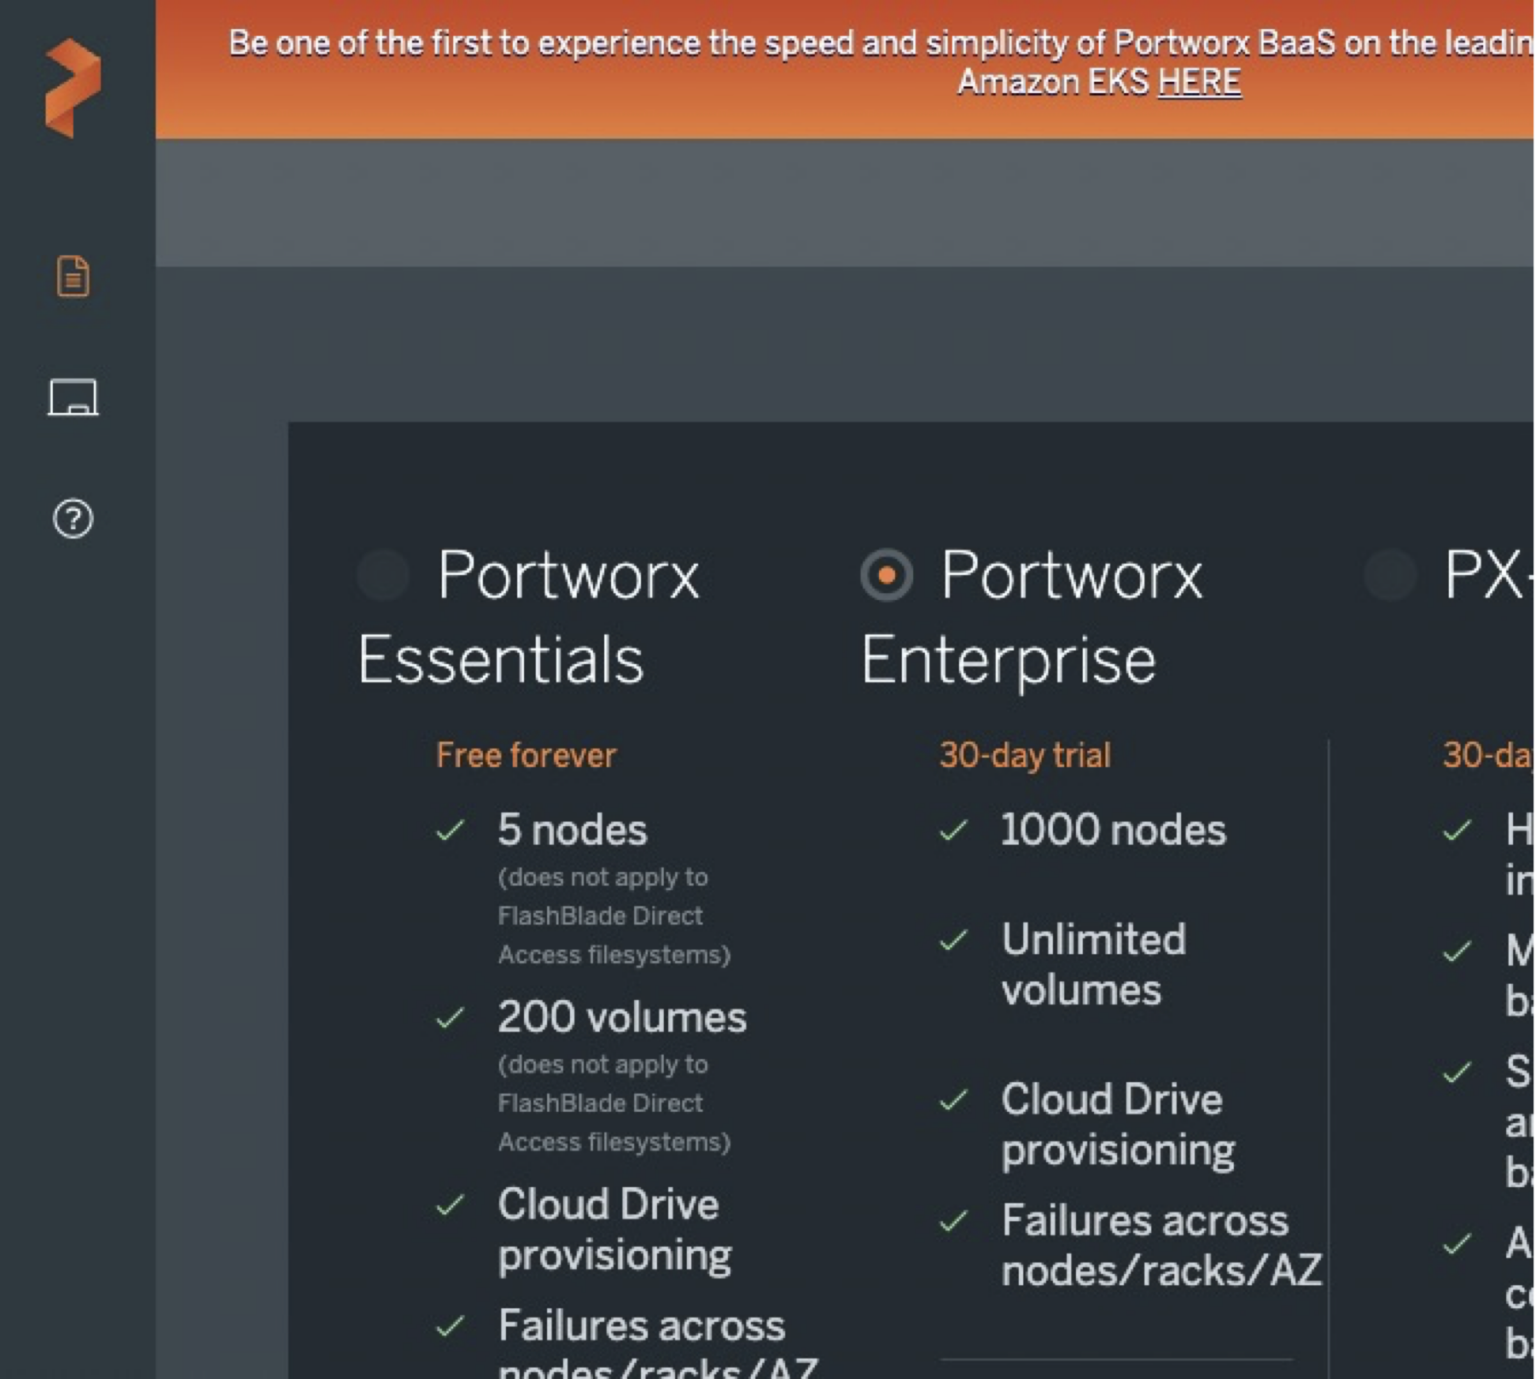
Then on the next screen select the following options and click “Next”.
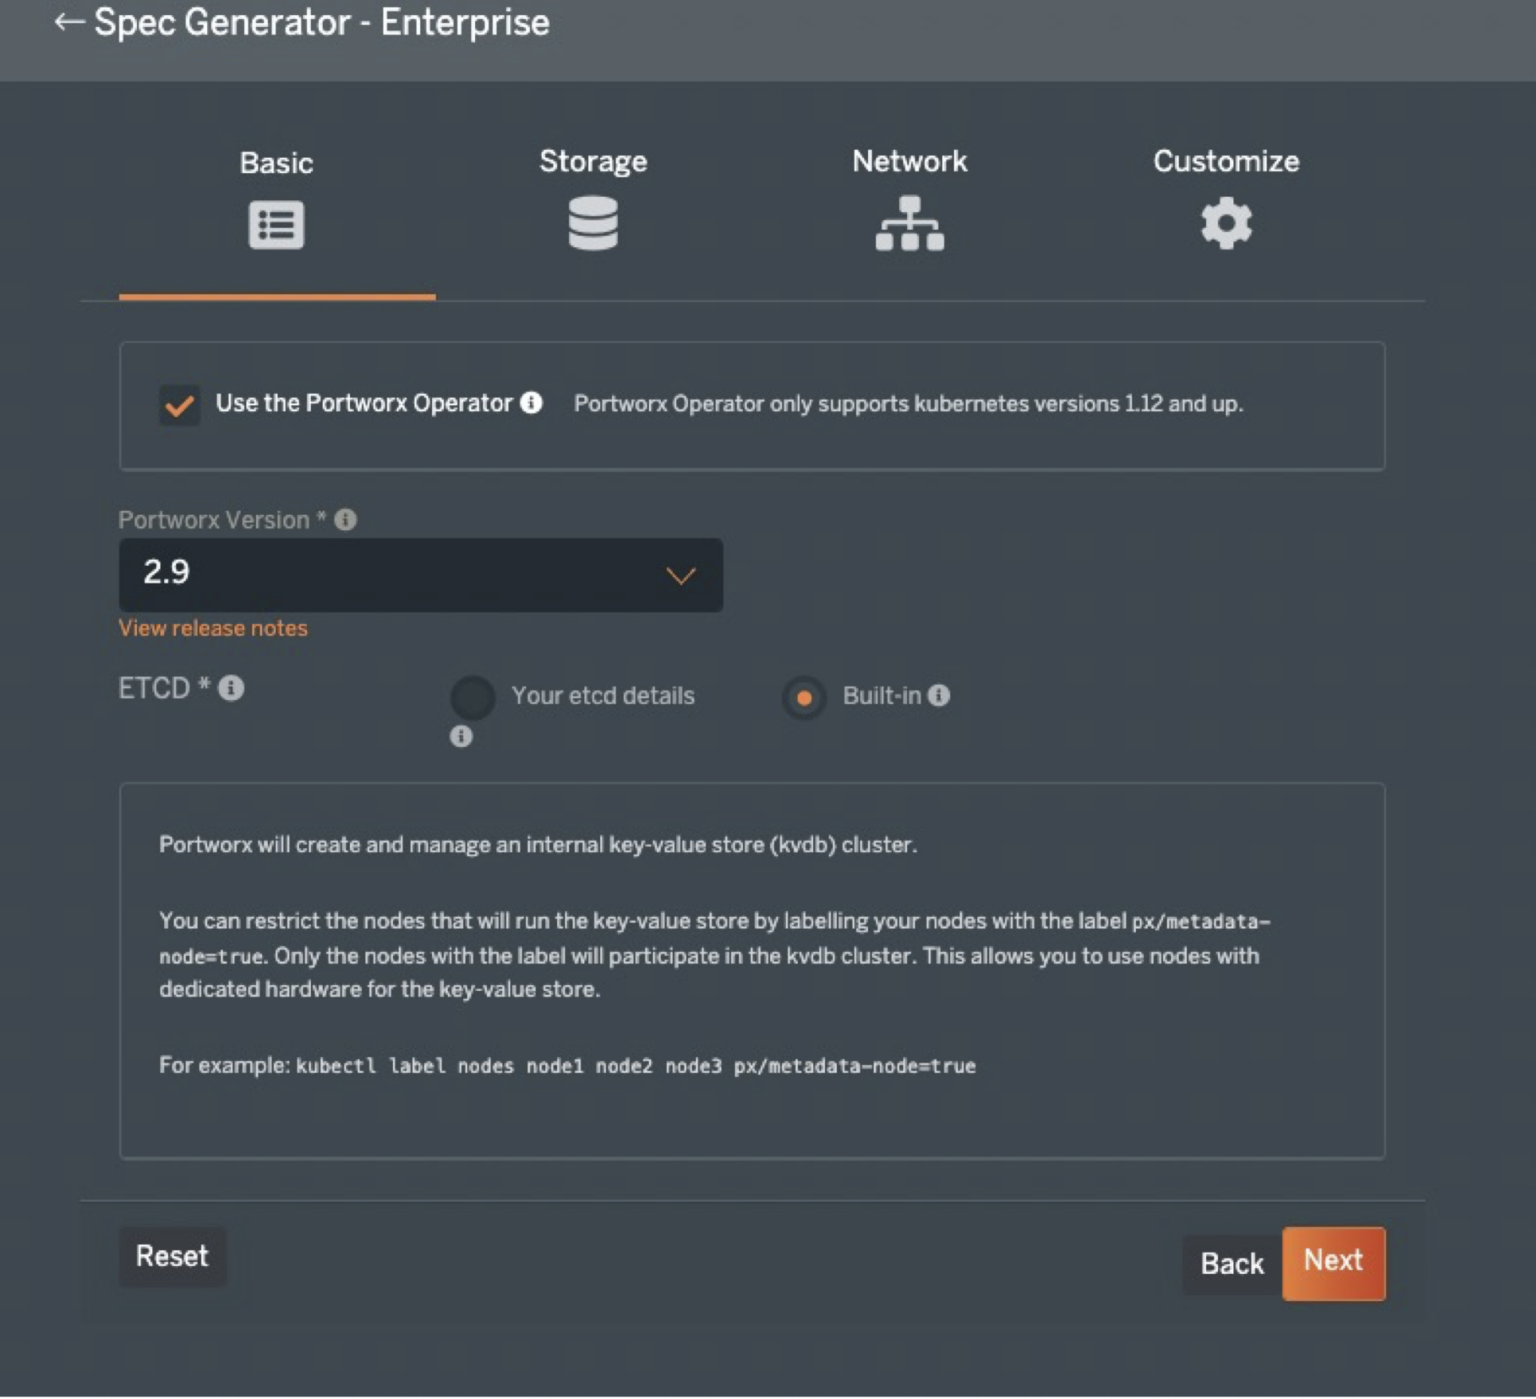
On the following screen, it is best to select the type of environment you will work with most often to minimize changes needed during the provisioning process. In this example, I have created a vanilla Kubernetes 1.22.4 cluster on Ubuntu 20.04LTS hosted in my home-lab, so the selections reflect a bare-metal cluster. But, later, we will deploy an Amazon EKS cluster and look at how to use Kustomize to modify the Portworx configuration for other platforms like AWS, Azure, GCP, VMware, etc.
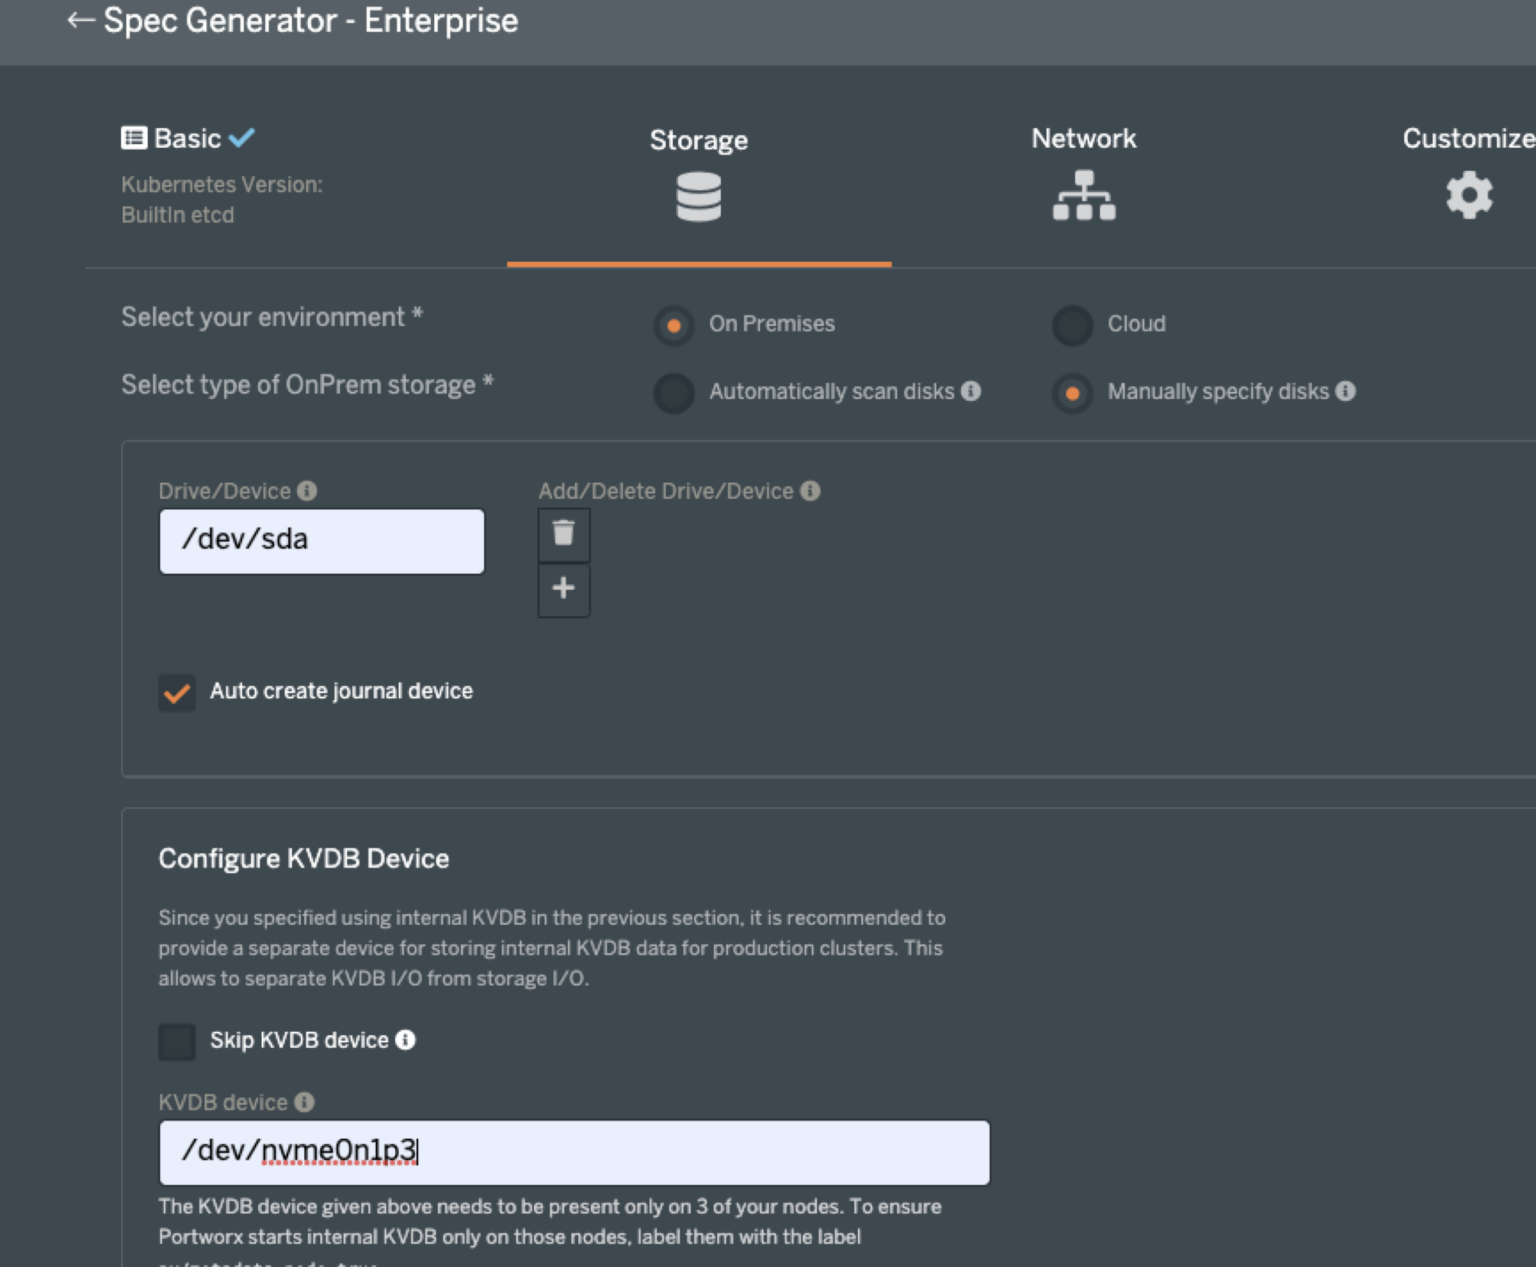
Homelab Cluster Storage selections:
At the bottom of the webpage, Click “Next” to proceed to the network page. There are no relevant changes to make here, so click “Next” to get to the final screen.
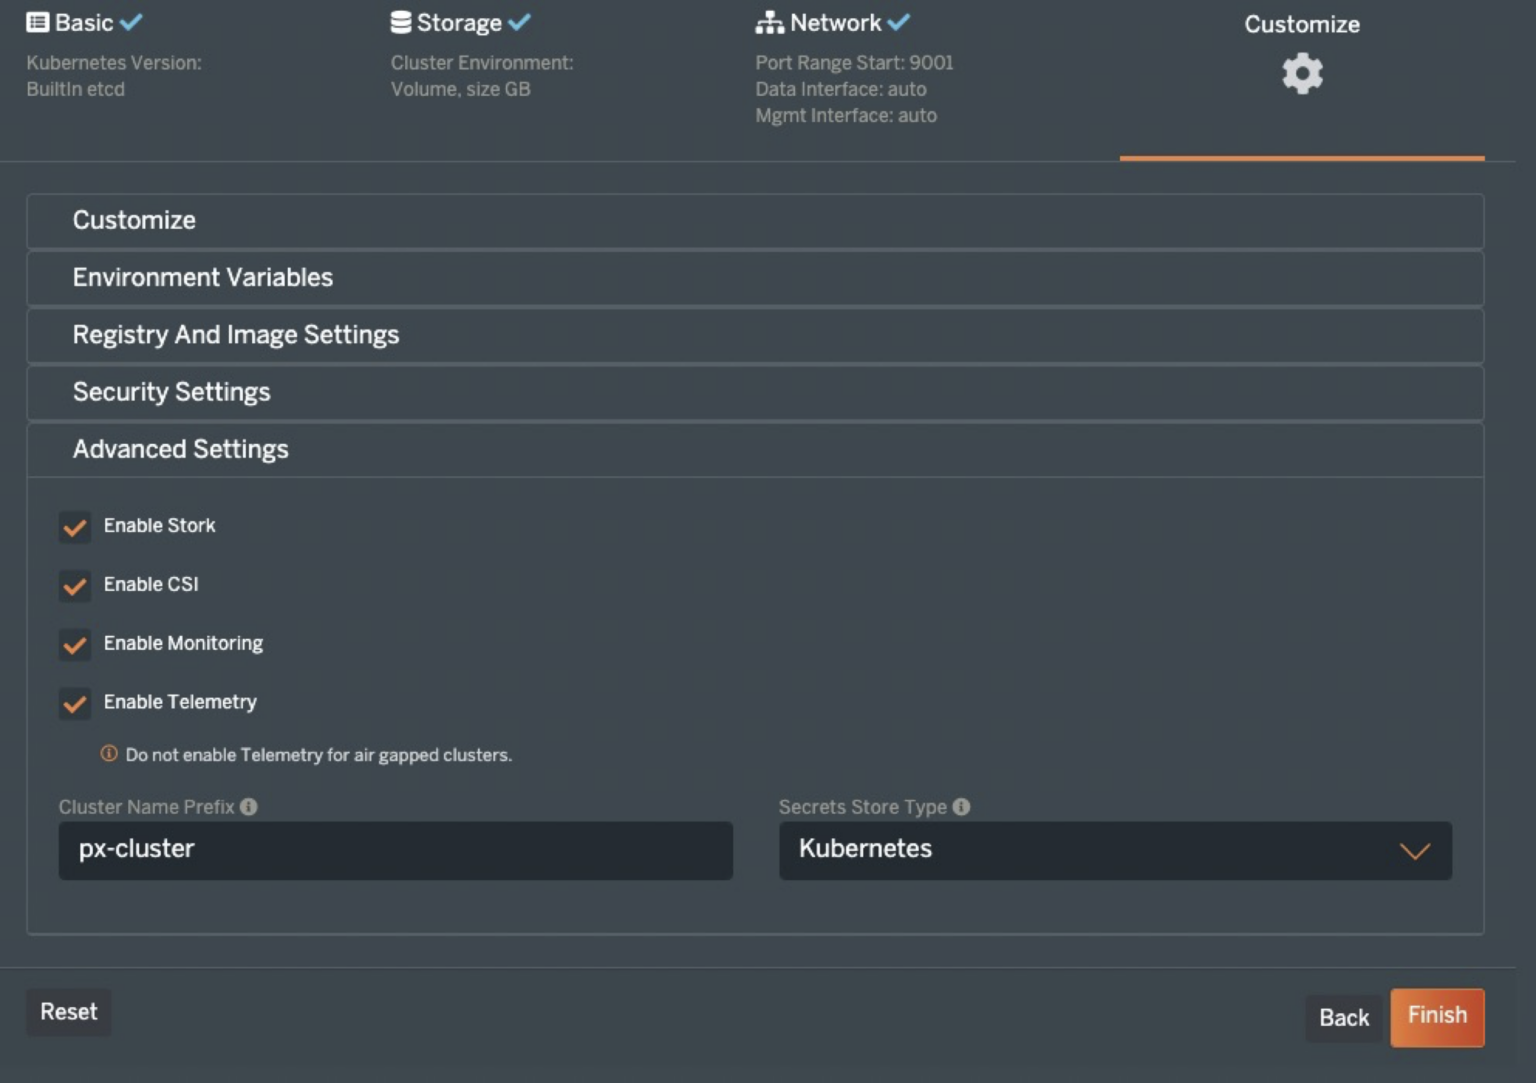
Since this is vanilla Kubernetes, I can select None in the first box. I also do not need to pass any environment variables, nor am I using a custom registry, or plan to enable Portworx Security. Click “Advanced Settings” and enable Telemetry to configure Portworx Metrics to flow to Pure1. This will provide a handy tool to view the health and performance of your Portworx clusters from anywhere, even on a mobile device.
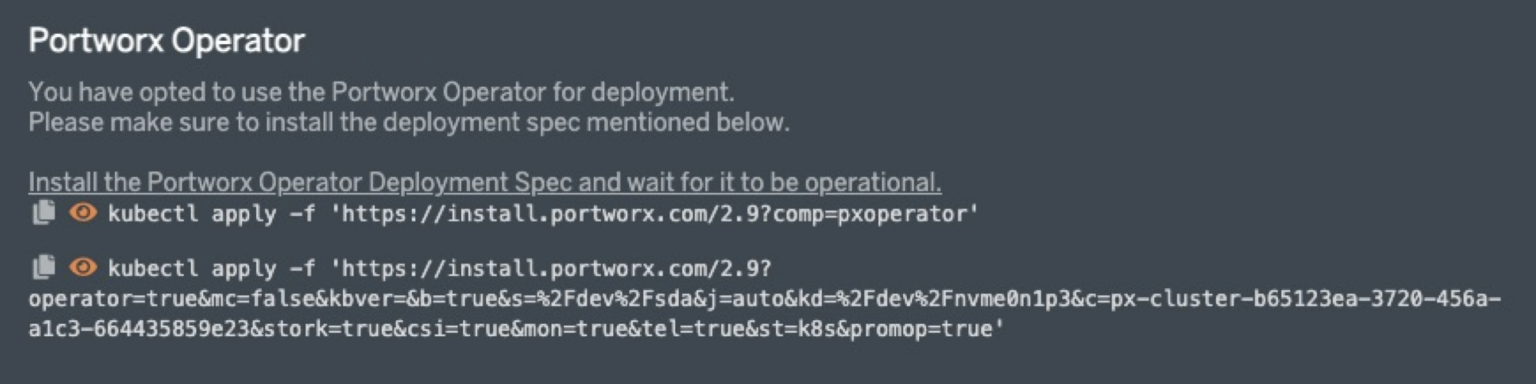
Now, click “Finish” and READ and agree to the End User agreement. Once you do, you will be presented with two preconfigured “kubectl” commands to install the Portworx Operator and the StorageCluster. To use these with GitOps, we will want to copy the URLs and use ‘curl’ to obtain the manifests.
To deploy Portworx, first clone the Git repository you referenced in the bootstrap process. The initial directory structure will be simple with only a folder named clusters. Inside that will be folders for each cluster bootstrapped to this Git repo.
First create a folder at the root of the Git repository for Portworx. Then create two, or three in this example, additional folders inside that to hold the manifests obtained from the URLs above. To do this, copy the URL in quotes from the first command and use it in the following command.
>$ curl "
https://install.portworx.com/2.9?comp=pxoperator
" > portworx-operator.yaml
Next repeat that step, but using the second kubectl command shown. So, again just copy the URL between the single quotes and use the following command.
>$ curl "https://install.portworx.com/2.9?operator=true&mc=false&kbver=&b=true&s=%2Fdev%2Fsda&j=auto&kd=%2Fdev%2Fnvme0n1p3&c=px-cluster-2f1c7f30-5301-43ed-9e12-b0130ed60b06&stork=true&csi=true&mon=true&tel=true&st=k8s&promop=true" > storagecluster.yaml
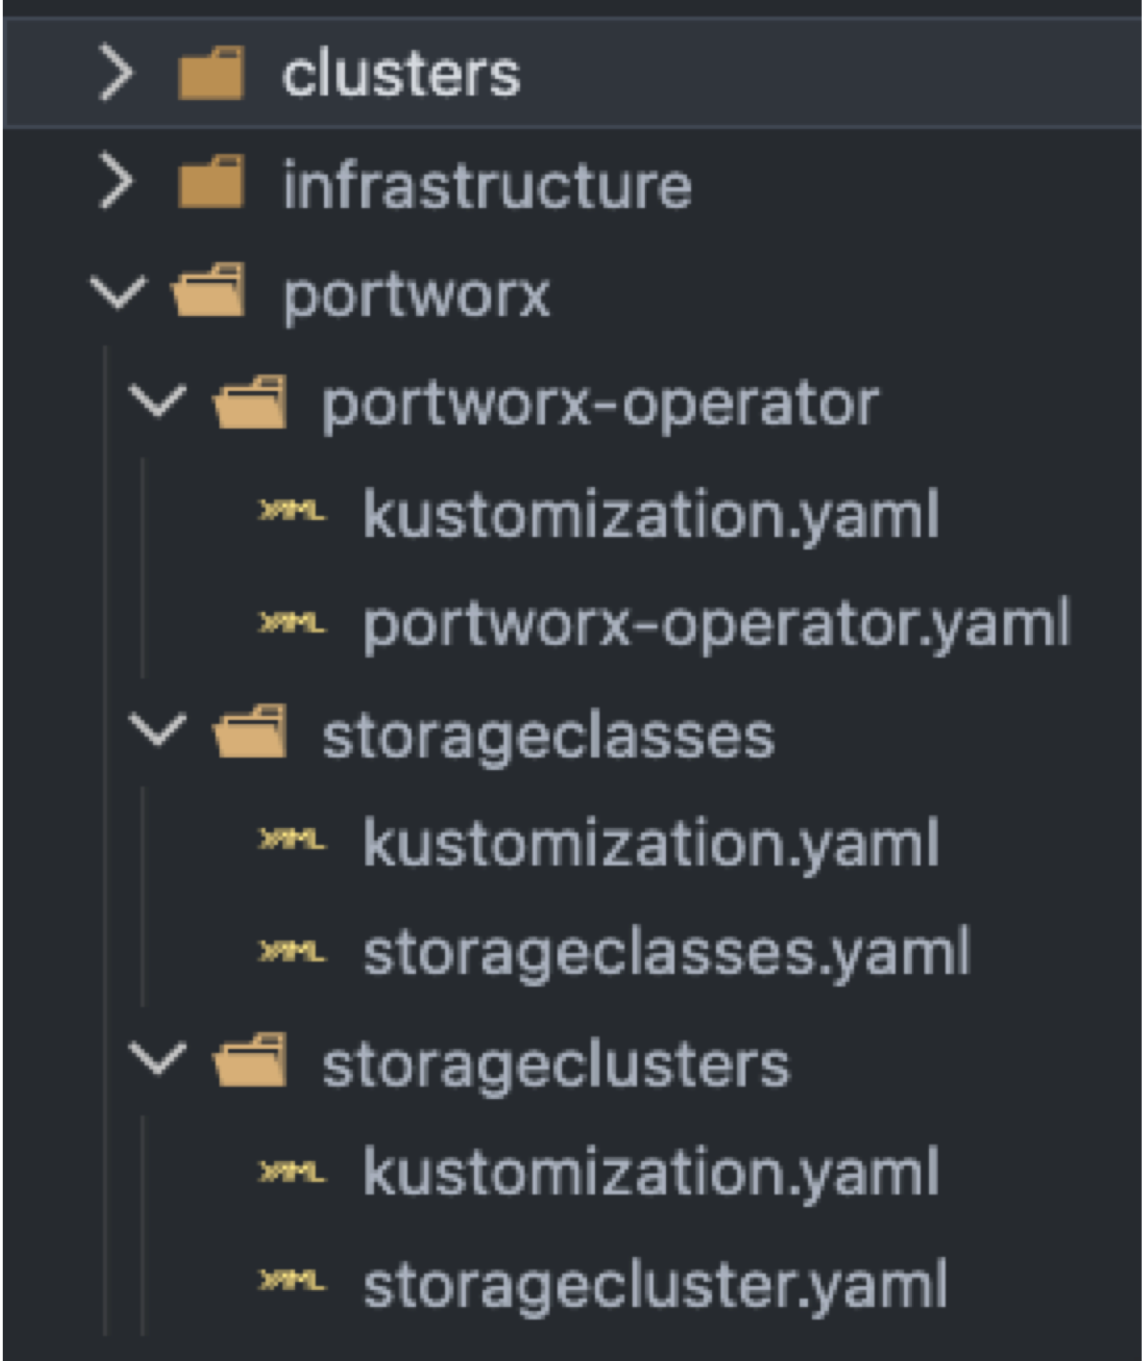
Once this is done, you have the manifests needed to install the Portworx Operator and create the storage cluster. Place each file in the folder with the same name inside the Portworx folder. You can go ahead and create a blank kustomization.yaml file as well. We will fill those in during a later step.
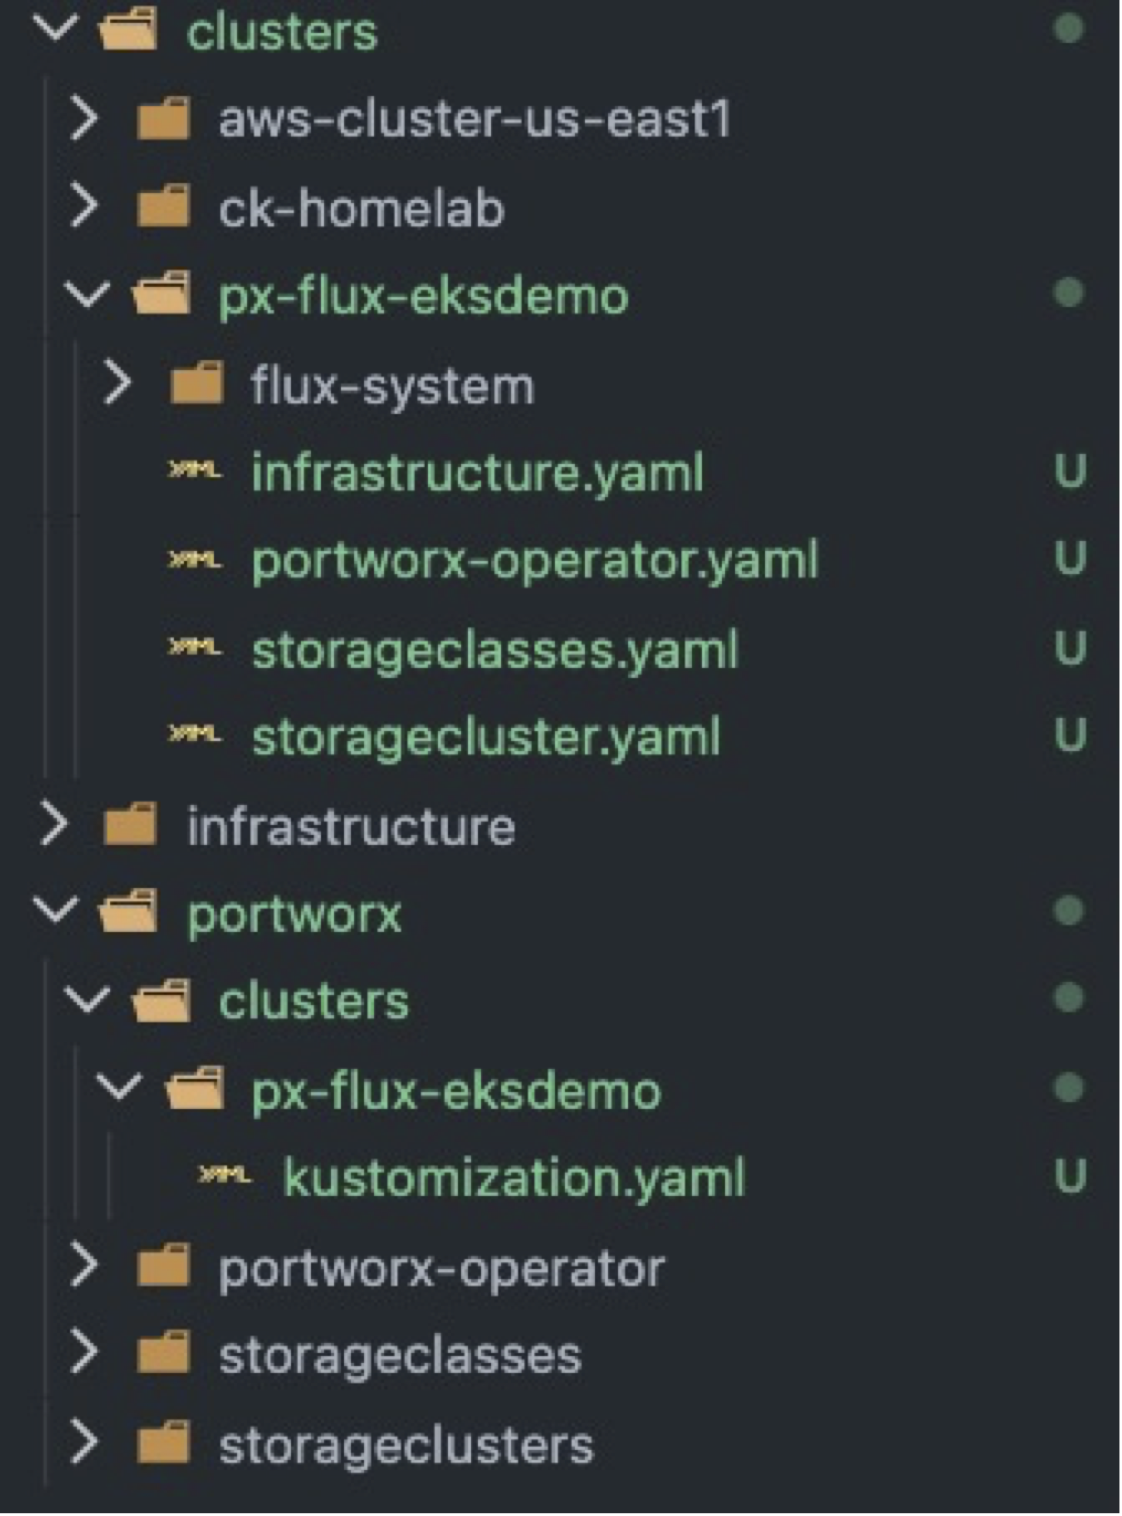
The resulting file structure will look like this.
In the screenshot, you will notice the ‘infrastructure’ folder. Inside are folders for Harbor and kube-prometheus-stack. These applications depend on Portworx being deployed. There is also a folder named sources which contains Flux manifests to define the Helm Chart locations for Harbor and Prometheus. These applications need storage volumes, so we will process this folder last. Configuring these manifests is outside the scope of this post.
However, due to the need for Portworx to be installed first and that requiring applying the YAML files in the correct order, create separate Flux kustomization files to deploy each manifest. You will have one for the Portworx Operator, StorageCluster and possibly one to add additional storageClasses like in the example. These are defined separately because they need to be deployed in a specific order and be sure each step completes before moving on to the next.
FluxCD uses kustomization.yaml files to prepare the resources it will deploy into the cluster. To use the generated Portworx manifests, we need to create the files based on Kustomize. The examples below can be used as a starting point and to deploy the Portworx cluster as it was configured at PX-Central.
/portworx/portworx-operator/kustomization.yaml
apiVersion: kustomize.config.k8s.io/v1beta1
kind: Kustomization
namespace: kube-system
resources:
  - portworx-operator.yaml
/portworx/storageclusters/kustomization.yaml
apiVersion: kustomize.config.k8s.io/v1beta1
kind: Kustomization
namespace: kube-system
resources:
  - storagecluster.yaml
/portworx/storageclusters/kustomization.yaml
apiVersion: kustomize.config.k8s.io/v1beta1
kind: Kustomization
namespace: kube-system
resources:
  - storageclasses.yaml
After creating these files and placing them in the proper folders, you can create additional folders for your tools and applications. In the infrastructure folder you can create folders for applications you wish to deploy as part of a standard tool-set or stack. As mentioned before, we will deploy both Harbor as a private registry and the Prometheus-Community chart kube-prometheus-stack, which include Prometheus, Grafana, and Metrics Server.
Infrastructure folder kustomization.yaml
apiVersion: kustomize.config.k8s.io/v1beta1
kind: Kustomization
resources:
  - base/sources
  - base/harbor
  - base/kube-prometheus-stack
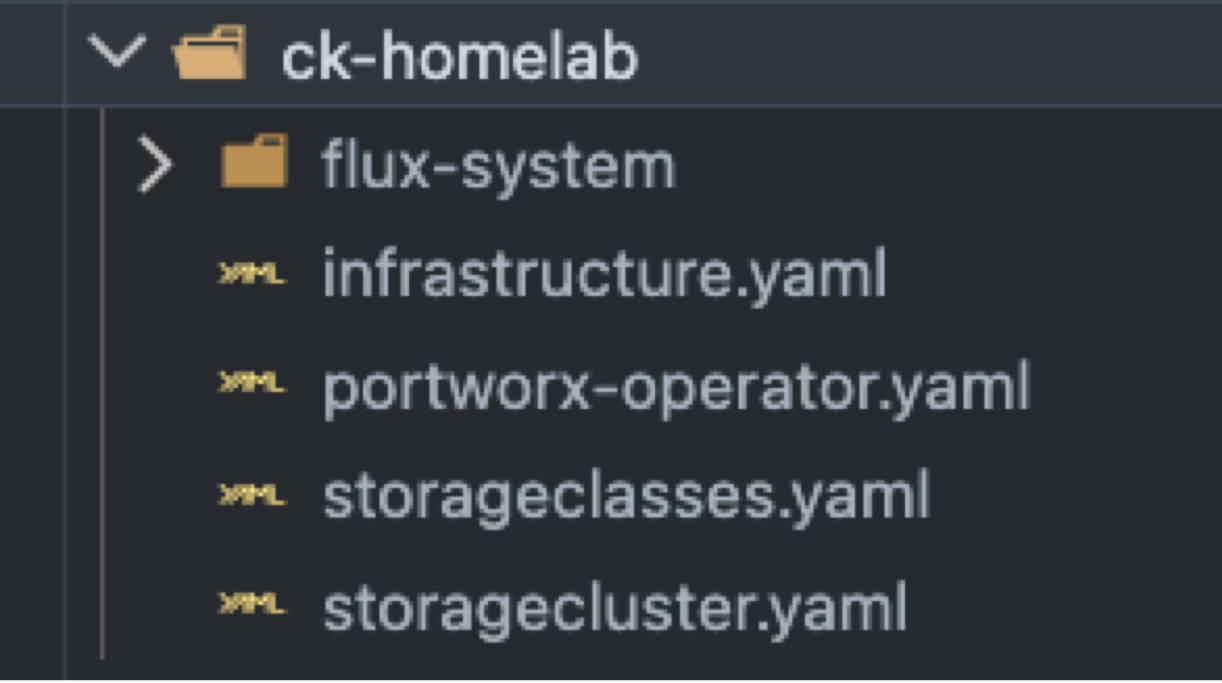
To be sure each Portworx manifest is applied in the proper order, we will create additional manifests in the ck-homelab folder that contains the FluxCD folder to deploy each component. I have also created a YAML file to add two additional storageClasses. So, the folder for this cluster should look like this.
Here are the contents of each yaml file. You will notice that the files contain ‘dependsOn:’ statements and ‘wait: true’ commands to be sure each step completes before the next starts. Using this information, I have listed the file contents in the order they will apply to the cluster.
portworx-operator.yaml
apiVersion: kustomize.toolkit.fluxcd.io/v1beta2
kind: Kustomization
metadata:
  name: portworx-operator
  namespace: flux-system
spec:
  interval: 10m0s
  sourceRef:
    kind: GitRepository
    name: flux-system
  path: ./portworx/portworx-operator
  prune: true
Storagecluster.yaml

apiVersion: kustomize.toolkit.fluxcd.io/v1beta2
kind: Kustomization
metadata:
  name: portworx-storagecluster
  namespace: flux-system
spec:
  dependsOn:
    - name: portworx-operator
  interval: 10m0s
  sourceRef:
    kind: GitRepository
    name: flux-system
  path: ./portworx/storageclusters
  prune: true
  wait: true
Storageclasses.yaml

apiVersion: kustomize.toolkit.fluxcd.io/v1beta2
kind: Kustomization
metadata:
  name: portworx-storageclasses
  namespace: flux-system
spec:
  dependsOn:
    - name: storagecluster
  interval: 10m0s
  sourceRef:
    kind: GitRepository
    name: flux-system
  path: ./portworx/storageclasses
  prune: true
  wait: true
Infrastructure.yaml

apiVersion: kustomize.toolkit.fluxcd.io/v1beta2
kind: Kustomization
metadata:
  name: infrastructure
  namespace: flux-system
spec:
  dependsOn:
  - name: storageclasses
  interval: 10m0s
  sourceRef:
    kind: GitRepository
    name: flux-system
  path: ./infrastructure/
  prune: true
  wait: true
Once everything has been created, you can commit it to the “main” branch of the Git repository and Flux CD will take over from here. In the end, you have a Kubernetes cluster with Portworx orchestrating storage, Harbor for a private registry, and Prometheus, kube-state-metrics, and Grafana monitoring installed.
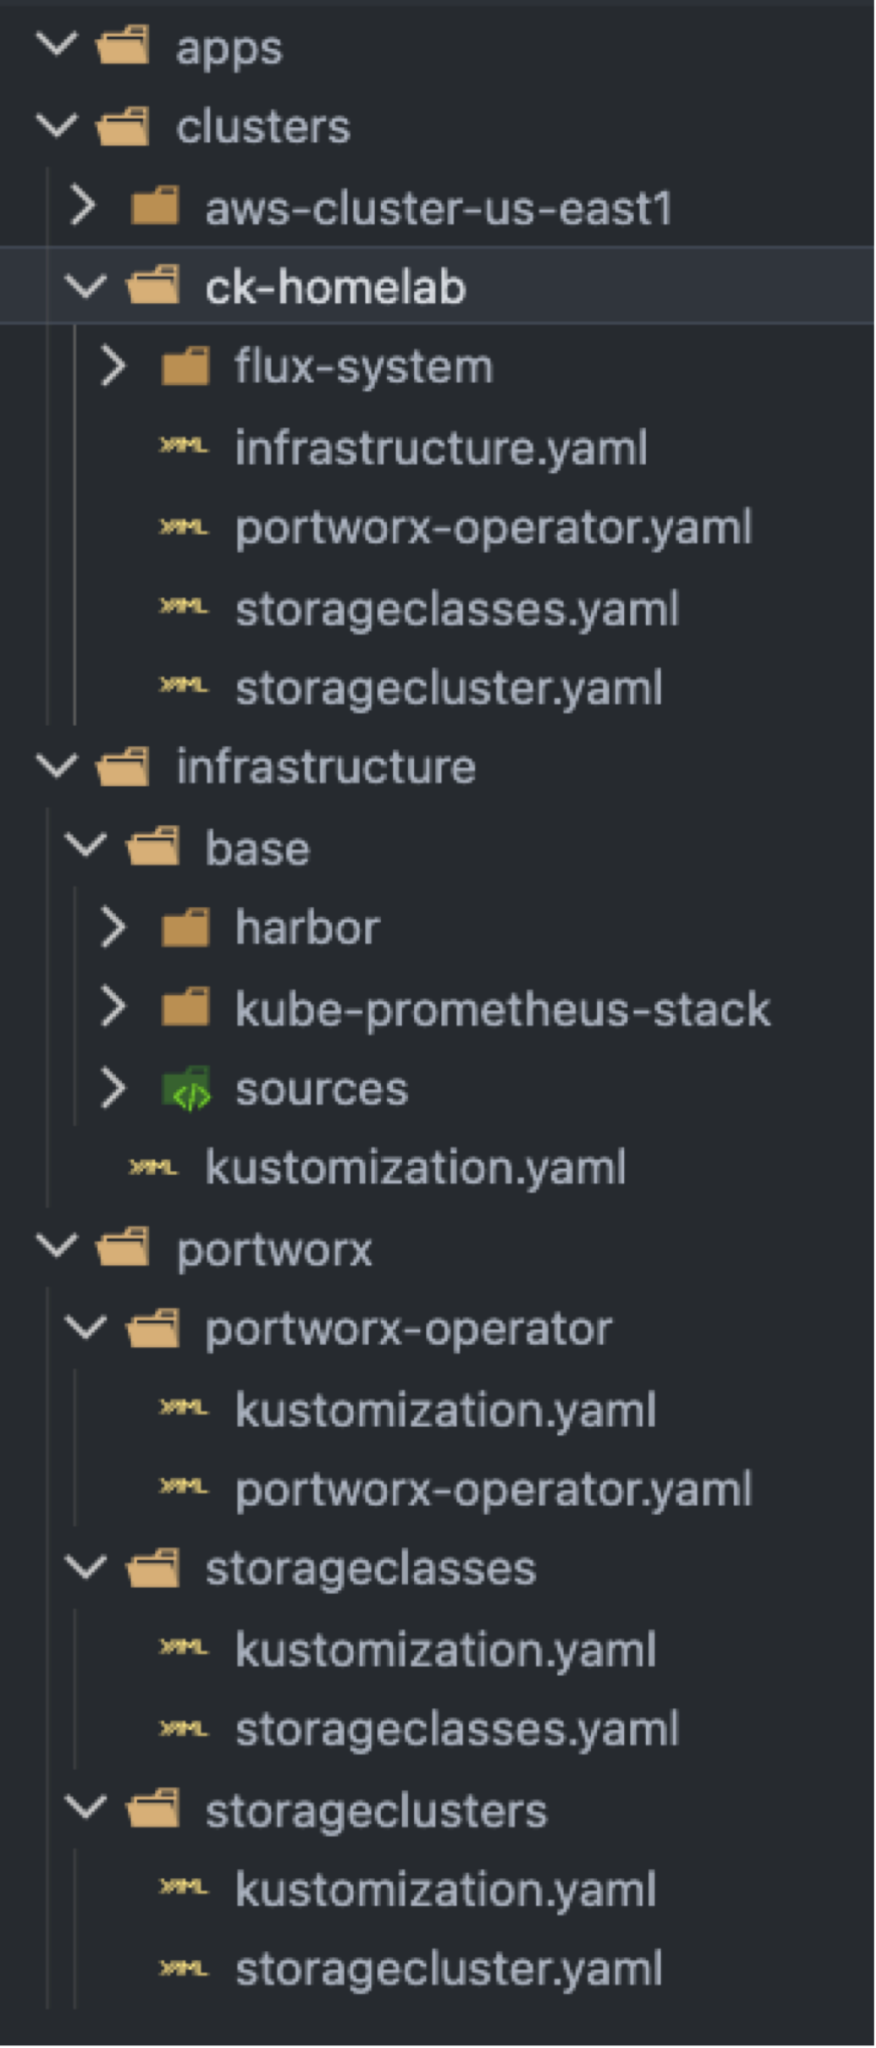
Here is an overview of the GitRepo structure.
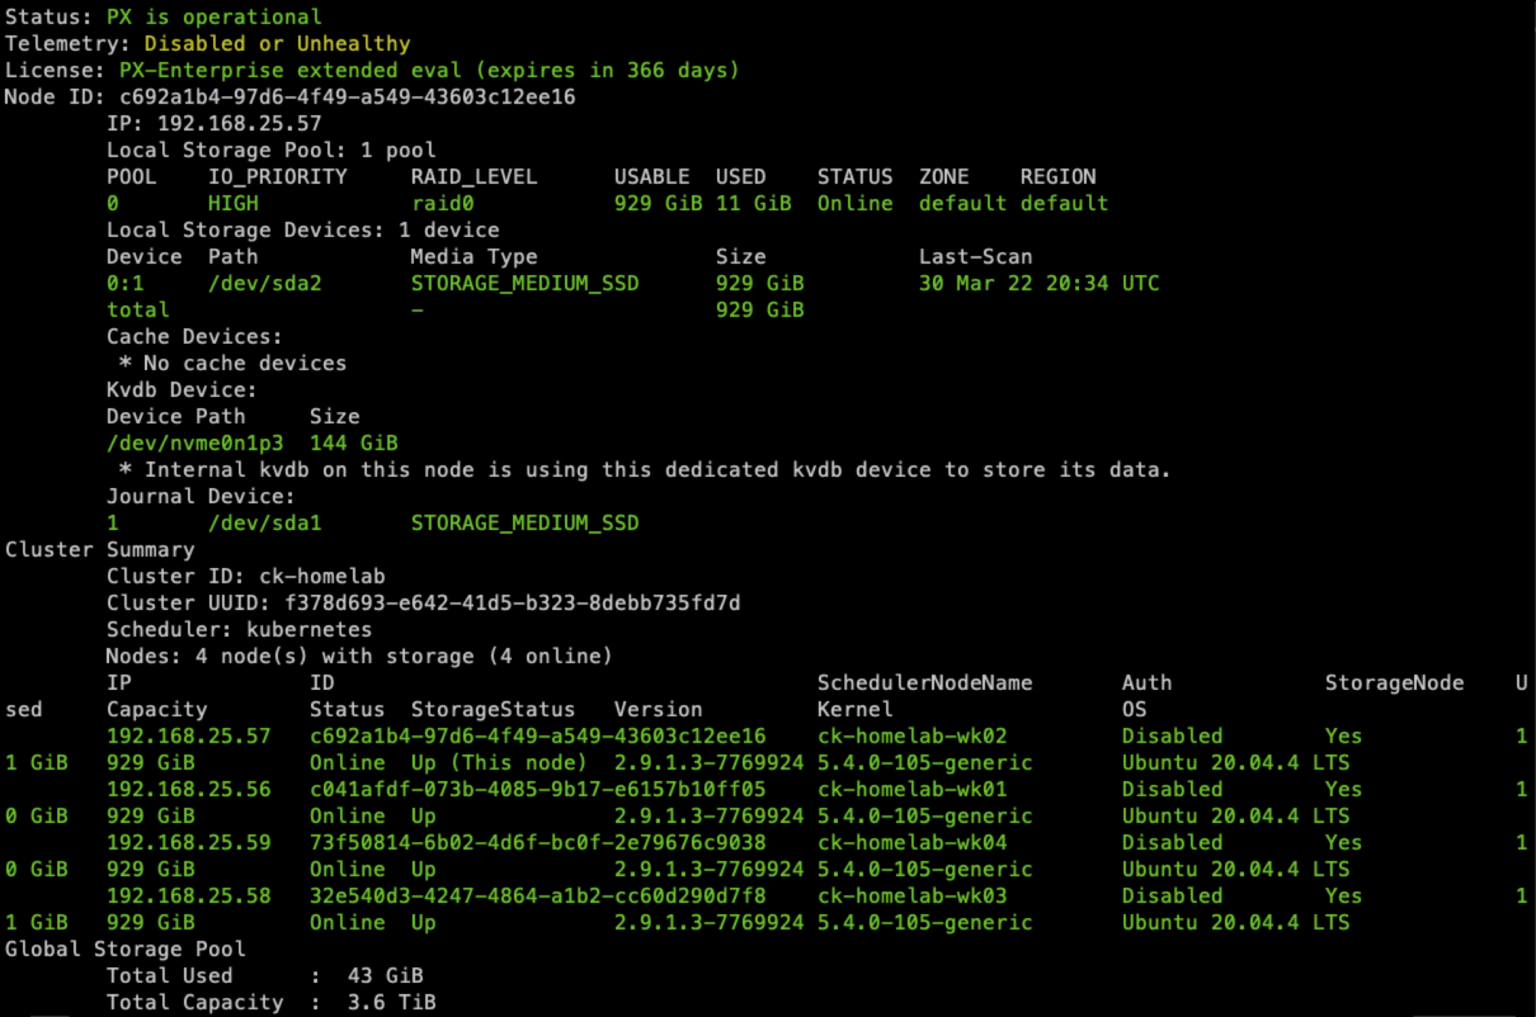
Here is the output from running the Portworx CLI utility ‘pxctl status’ command after Flux has finished processing our Git commits.
GitOps offers infrastructure teams a means to quickly deploy consistent technology stacks. This enables their organizations to develop applications and build on a common set of tools. By integrating the deployment of Portworx into the process, an organization can go from deploying to a fully loaded, production-ready Kubernetes cluster in just a few keystrokes and Git commits.
With the promise of repeatability in mind, let’s deploy a second cluster, but this one will be an Amazon EKS Cluster. Since this post focuses on deploying Portworx, I have already prepared a basic EKS Cluster in AWS Region US-East-1. The Cluster consists of 3 hosts with each one in a different Availability Zone. I am using us-east-1a, us-east-1b, and us-east-1c in this example. So, we will start by bootstrapping FluxCD in the cluster.
To deploy the EKS Cluster, I used the ‘eksctl’ utility and a declarative cluster definition. This includes permissions needed for Portworx to create AWS Cloud Drives for the StorageCluster. More information is available in the Portworx Documentation for AWS dynamic-provisioning.
First, let’s check the EKS cluster:

Now that the EKS cluster is ready, we can use the FluxCD cli bootstrap command to deploy Flux in the cluster and create a new directory in our Git repository.
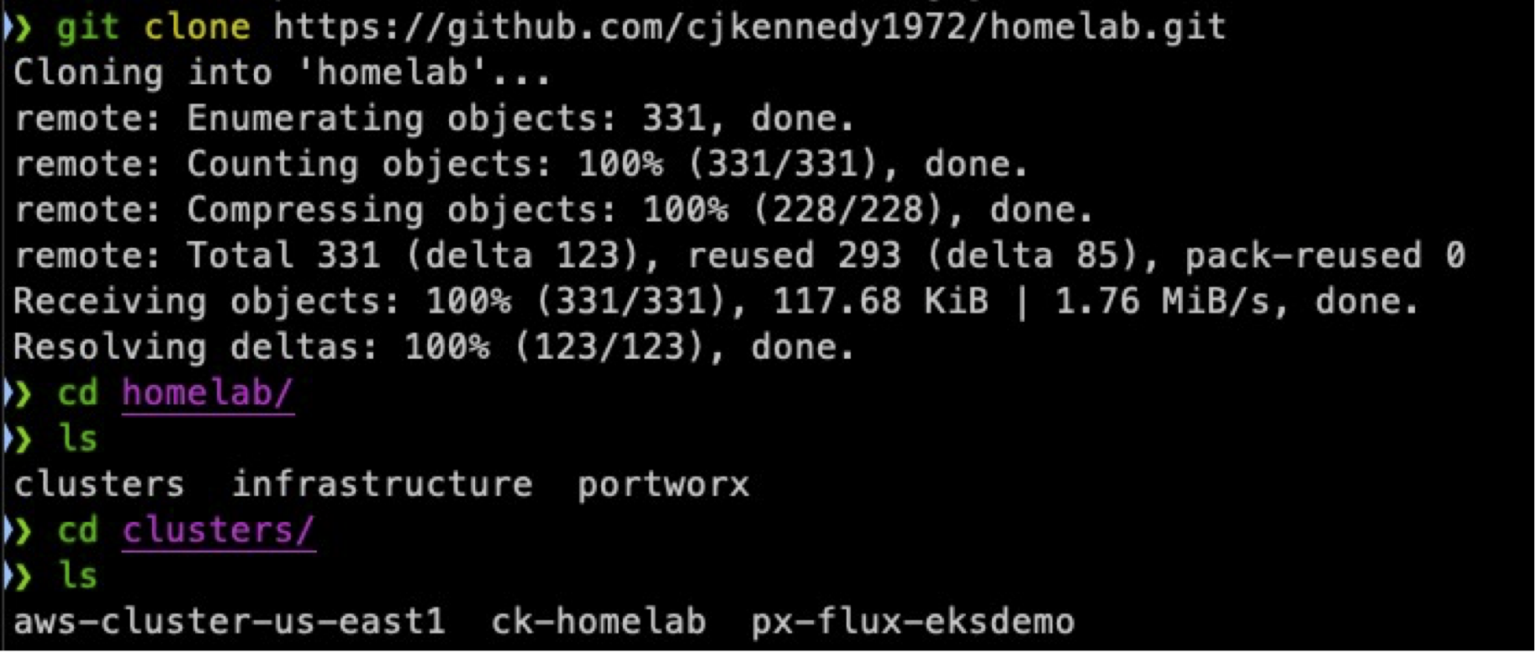
Once the bootstrap command completes, fetch the changes to the Git repository to pull down the new folder created for the EKS cluster. The example below shows a ‘git clone’ to grab the full repository.
We will work inside the px-flux-eksdemo folder, which was created by the bootstrap command and is the source for FluxCD in the EKS Cluster. To deploy Portworx, create my “storageClasses”, and install the infrastructure tooling, simply copy the 4 manifests from our original cluster, ck-homelab, into the ‘px-flux-eksdemo’ folder. Changes must be made to the storagecluster.yaml file, so we will need to handle that as well.
First, copy the manifests from the ck-homelab directory to the new directory:

Next, create a new directory inside the ‘portworx’ folder located in the root directory of the repo. Name this folder ‘clusters’ and inside this, create a directory for the EKS cluster named ‘px-flux-eksdemo’. This will be where we place the kustomization.yaml for our StorageCluster.
To apply the “kustomized” StorageCluster file, edit the storagecluster.yaml file in the /clusters/px-flux-eksdemo folder and change the path to the directory we created previously in the ‘portworx’ folder. The file in your cluster directory should look similar to this.
/clusters/px-flux-eksdemo/storagecluster.yaml

apiVersion: kustomize.toolkit.fluxcd.io/v1beta2
kind: Kustomization
metadata:
  name: portworx-storagecluster
  namespace: flux-system
spec:
  dependsOn:
    - name: portworx-operator
  interval: 10m0s
  sourceRef:
    kind: GitRepository
    name: flux-system
  path: ./portworx/clusters/px-flux-eksdemo   #Changed to point to new folder for EKS Cluster
  prune: true
  wait: true
Now create the kustomization.yaml file in ‘/portworx/clusters/px-flux-eksdemo’. It will be necessary to utilize the capabilities of Kustomize to change the storagecluster.yaml file so it works with Amazon EKS. Information on how to format kustomization.yaml files based on the kustomize.config.k8s.io/v1beta1 API can be found at https://kubernetes.io/docs/tasks/manage-kubernetes-objects/kustomization/
For the EKS Cluster, the file will look similar to this. Notice the use of a StrategicMerge, Annotations, and Json6902 patching to be sure we are applying a properly formatted StorageCluster specification. These changes can be validated by installing Kustomize for your OS and running ‘kustomize build’ in the directory with the kustomization.yaml file.
/portworx/clusters/px-flux-eksdemo/kustomization.yaml

apiVersion: kustomize.config.k8s.io/v1beta1
kind: Kustomization

resources:
- ../../storageclusters/

commonAnnotations:
  portworx.io/is-eks: "true"

patchesStrategicMerge:
- |-
  kind: StorageCluster
  apiVersion: core.libopenstorage.org/v1
  metadata:
    name: ck-homelab
    namespace: kube-system
  spec:
    cloudStorage:
      deviceSpecs:
      - type=gp3,size=250
      journalDeviceSpec: auto
      kvdbDeviceSpec: type=gp3,size=100
patches:
- patch: |-
    - op: remove
      path: /spec/storage
  target:
    kind: StorageCluster
    name: ck-homelab
- patch: |-
    - op: replace
      path: /metadata/name
      value: px-flux-eksdemo
  target:
    kind: StorageCluster
    name: ck-homelab
Once everything for the EKS Cluster has been prepared, your cloned directory should look similar to this before committing it to the Git repository.
To make sure the Portworx Cluster will deploy properly, here is the output of running ‘kustomize build’ inside the directory for the new cluster.
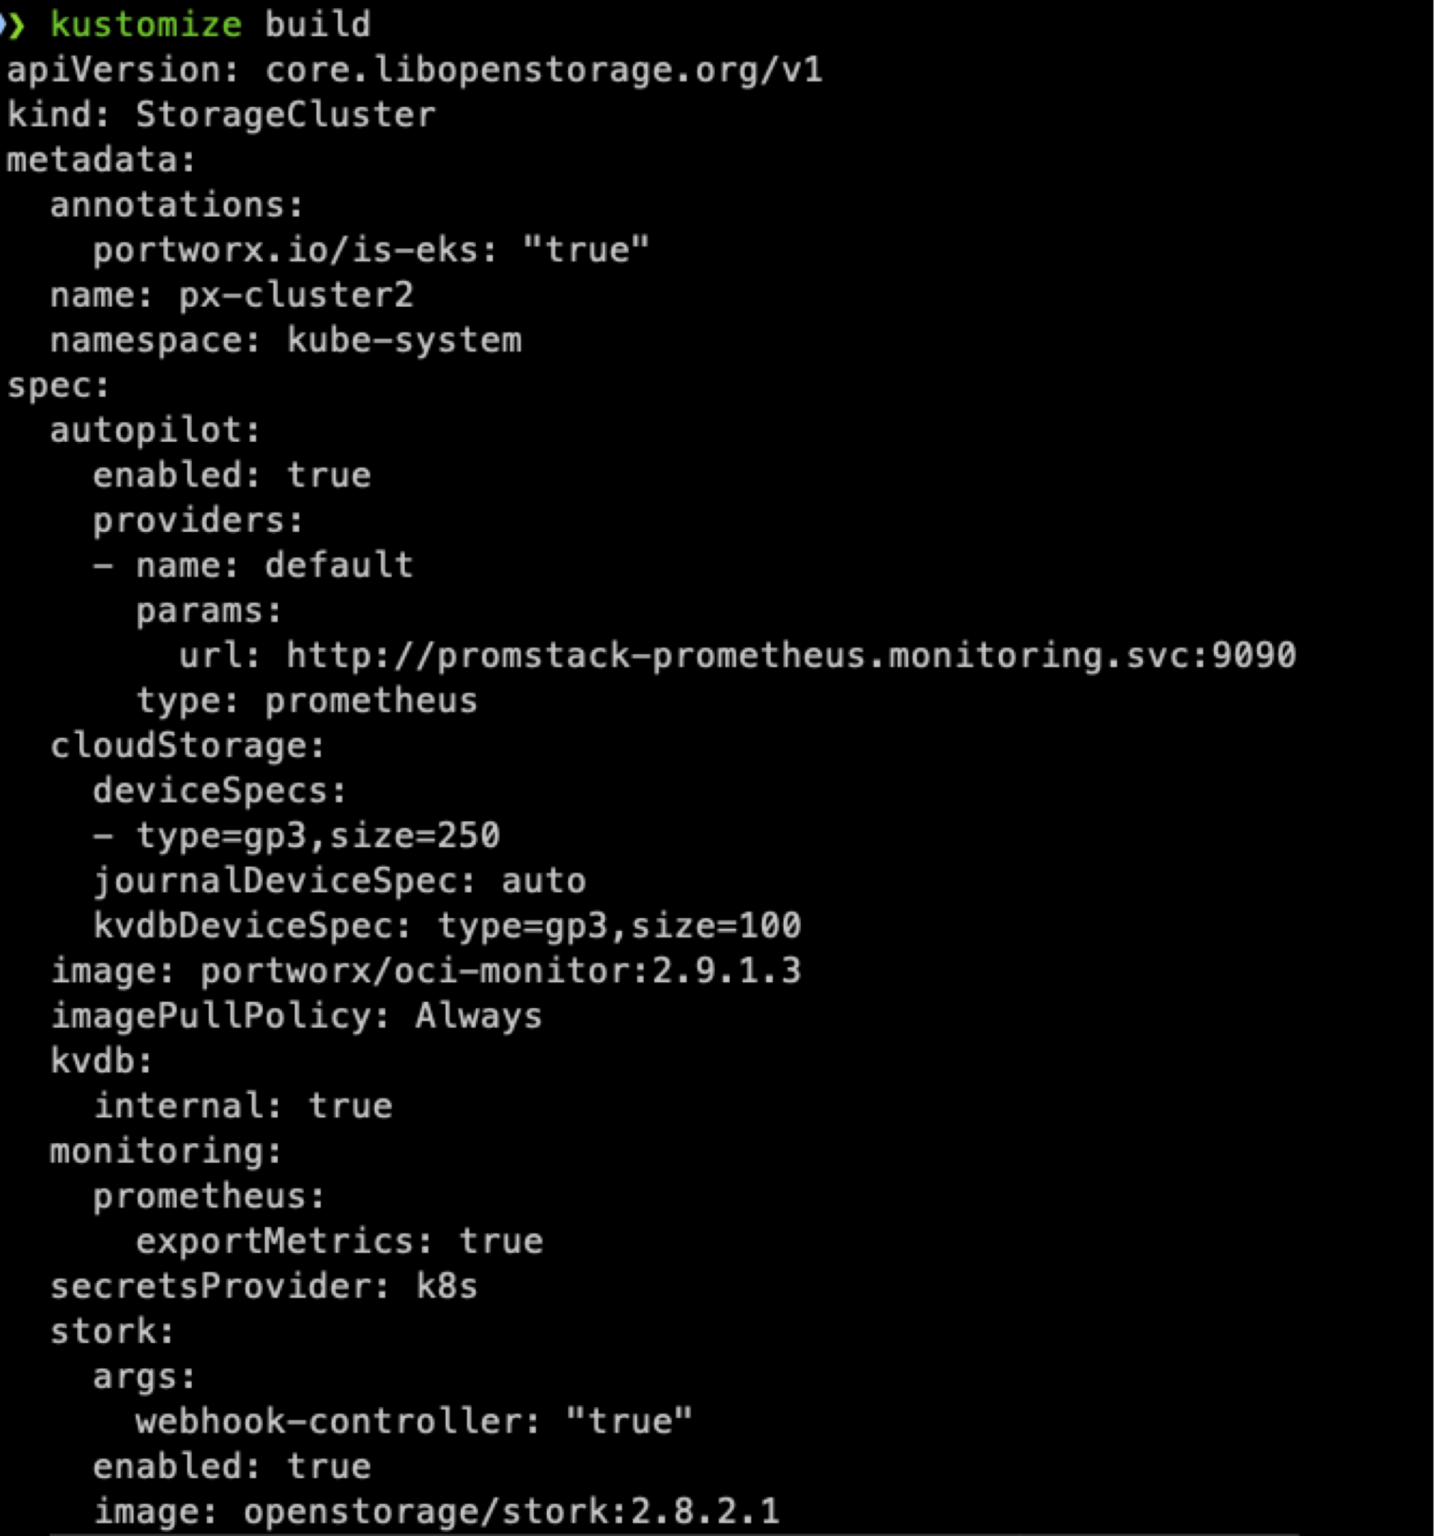
If you were to walk through the “Spec Generator” at https://central.portworx.com and select the options for AWS EKS, you would get a similar looking StorageCluster file. So, we are ready to push the changes to Github and apply them to our EKS Cluster.
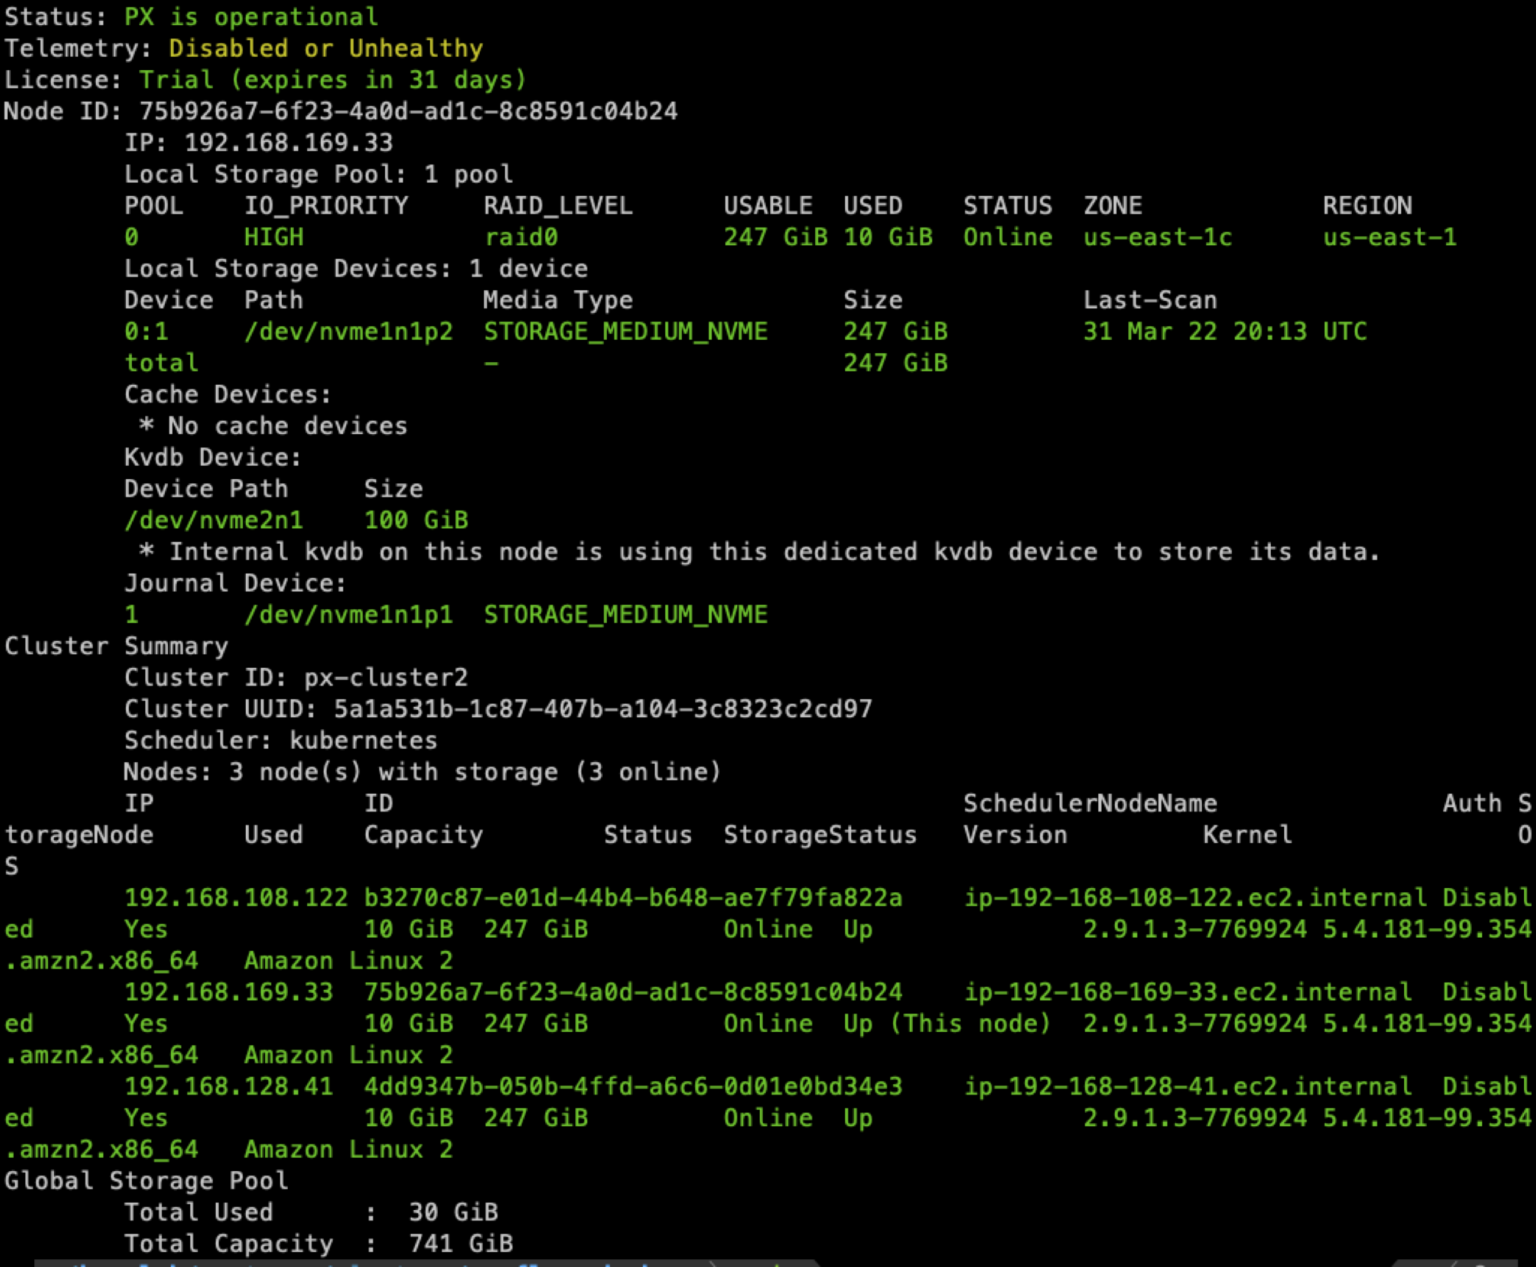
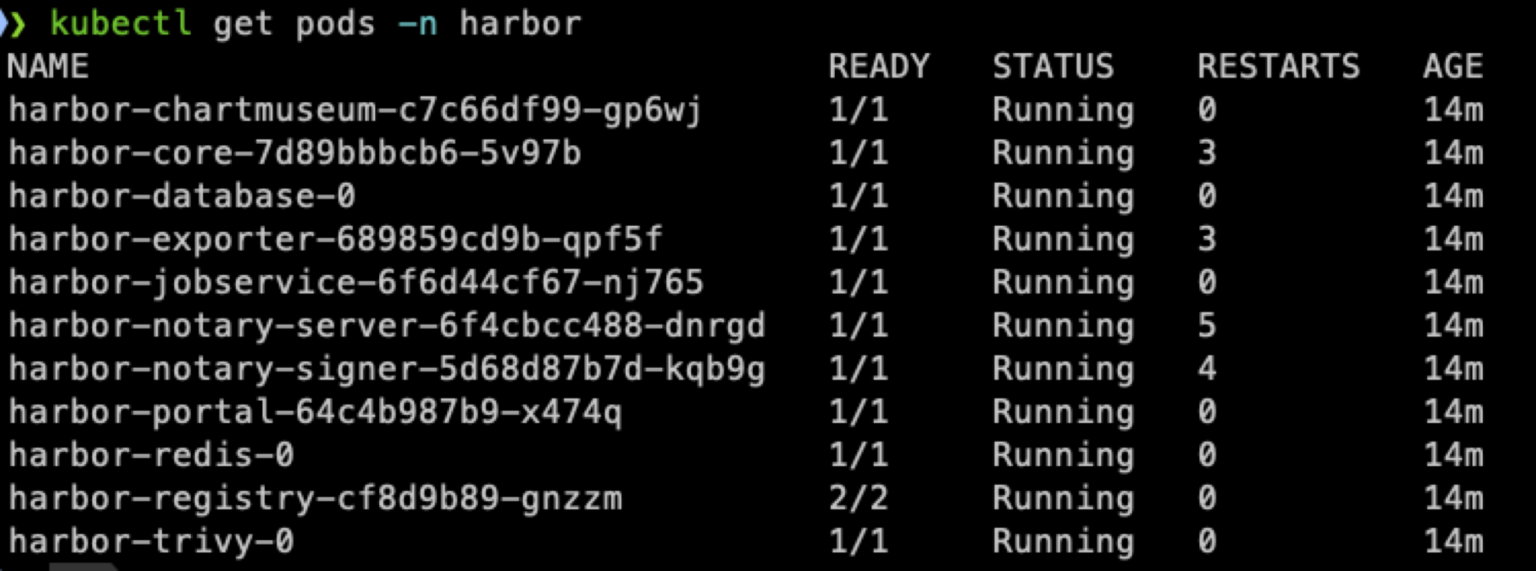
After committing the changes to the Git repository, FluxCD picked up the new files. On the EKS Cluster, we now have a full Portworx Enterprise deployment, Harbor, and Prometheus/Grafana/Metrics. Here are the results.
Output of ‘pxctl status’:
Harbor pods:
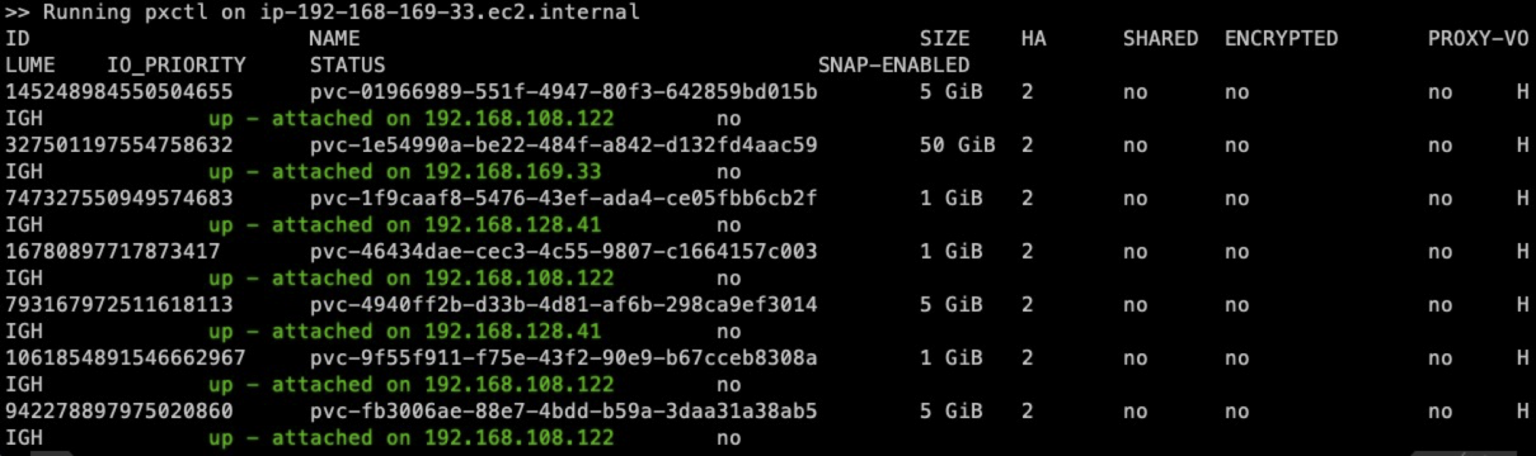
Portworx Persistent Volumes already created in the cluster by GitOps.
So, as demonstrated, by using GitOps to deploy Portworx and the tool stack needed for the cluster, infrastructure admins can easily introduce consistency and speed up the time it takes to deploy Kubernetes clusters with all their tooling in place. Portworx was built by developers for developers, so GitOps is part of our heritage and an area where the platform can lend tremendous value to a business optimizing operations at every opportunity.
Being GitOps friendly is just the tip of what Portworx has to offer!
Get started with your free trial today at https://central.portworx.com.


