


To jump directly to Cassandra specific backup information. Jump to the below section.
Kubernetes runs mission critical applications in production; that is a fact. Running applications—especially stateful applications in production—requires care and planning. We have covered how to run a highly-available Cassandra service on Kubernetes in production already, and now we are going to focus on the best way to protect your data services in production with backup and restore.
Here are some of the things you need to ask yourself when protecting Cassandra with backup and restore on Kubernetes in production:
This blog post will aim to answer most of the questions you may be asking and provide a clear guide on how to backup Cassandra on Kubernetes in production.
When you are creating a backup and restore strategy, it is important to remember that not every data service needs the same level of protection. In production, we typically need the best level of protection that fits our business needs as well as those of our customers. Given this, it’s best to understand the essential steps for creating a backup and restore plan in production.
We’ll walk through and explain these critical steps for backing up Cassandra in production in more detail as well as provide examples and screenshots below.
Before we can backup Cassandra, we must first configure PX-Backup with the access to the cluster which it is running in.
> Note, this blog does not go into installing PX-Backup; for this, please reference our documentation.
Within the PX-Backup interface, select Add Cluster from the navigation.

Then you will need to provide a cluster name and a Kubeconfig for the Kubernetes cluster you are using as well as the Portworx details if you have access to them. Keep in mind that the Kubeconfig is what controls the type of access you have to the cluster, and the same is true within PX-Backup. If you only have access to one namespace, you will only be able to set up backup and restore for that namespace. Also, if you do not have access to the Portworx cluster details or are not using Portworx for volumes, you can leave that section blank.

Once you have done this, you should see your cluster added to the main screen. There should be a green backup icon in the cluster tile that will bring you to the backup view for the cluster.

If your backup icon is not green, double check that you are running Stork 2.4+ in the cluster you added.
> Refer to the Add Cluster screen within the backup UI. You can easily copy the command to add stork to your cluster.
(Running Portworx)
KBVER=$(kubectl version --short | awk -Fv '/Server Version: /{print $3}') curl -fsL -o stork-spec.yaml "https://install.portworx.com/2.5?kbver=${KBVER}&comp=stork" kubectl apply -f stork-spec.yaml(Not running Portworx)
curl -fsL -o stork-spec.yaml "https://install.portworx.com/2.5?comp=stork&storkNonPx=true"

kubectl apply -f stork-spec.yaml
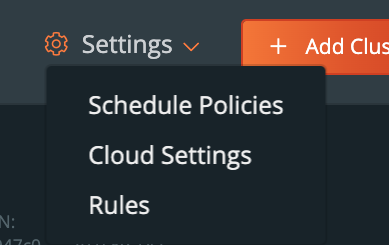
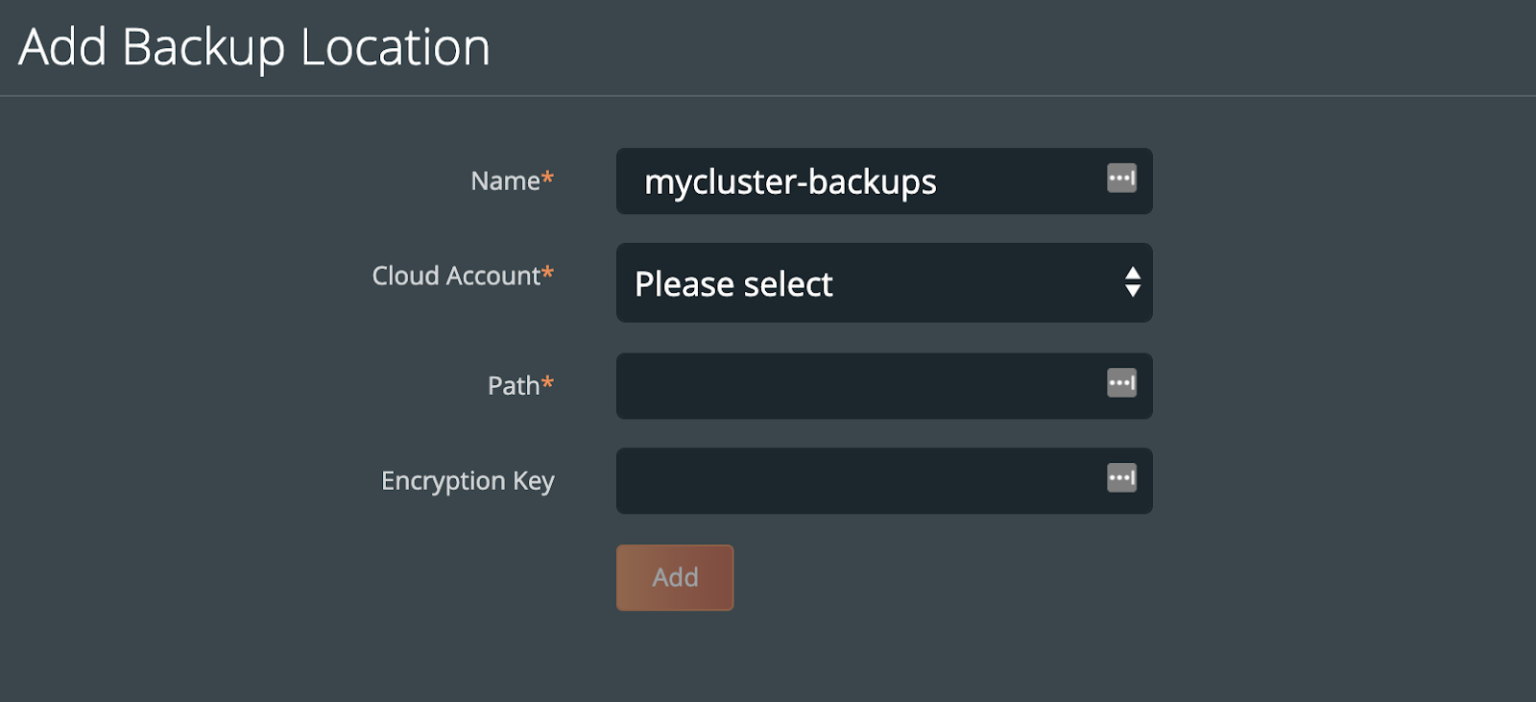
Before we can backup Cassandra from our cluster, we must create a backup target location. Click on Cloud Settings to be taken to the location where you can input your target credentials and bucket information.
You can follow our documentation on how to set up various backup targets. At a minimum, you will need to create both a single Cloud Account (e.g., AWS, Azure, Google) and a Backup Location (e.g., bucket in cloud object store).

![]()
When you create a backup location, you will select the previously created Cloud Account and then fill in the bucket information accordingly for your backup target provider.
Consider characteristics of the backup location. Retention of data within the backup location as well as the geographic location of the location are not configured by PX-Backup and thus should be carefully configured prior to using the location.
To make sure backups are encrypted within the backup location, enter an encryption key of your choice.
This step is optional. However, using a schedule enables point in time recovery (PITR) of applications. Using a schedule will provide the PITR points that can be used.
You may want to create a schedule specifying how often your backup takes place (that allows you to meet your RPO objectives) and how many copies of the backup are to be kept (if you need RPO zero, check out kubernetes disaster recovery). Click Schedule Policies from the settings navigation, and this will bring you to a view where you can configure your schedules.
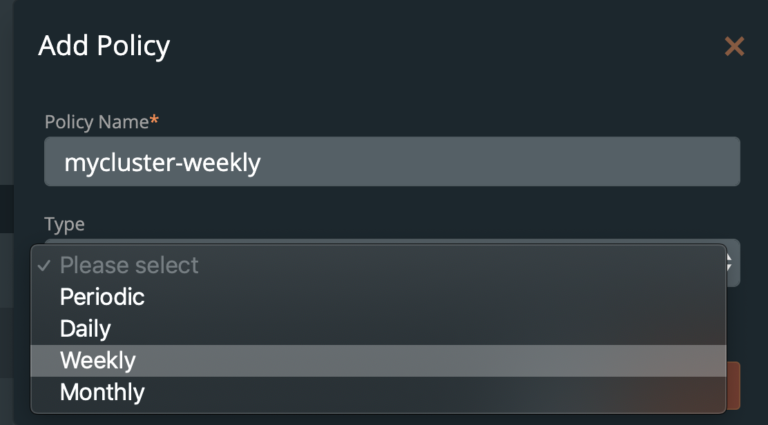
Click the Add button in the navigation bar.
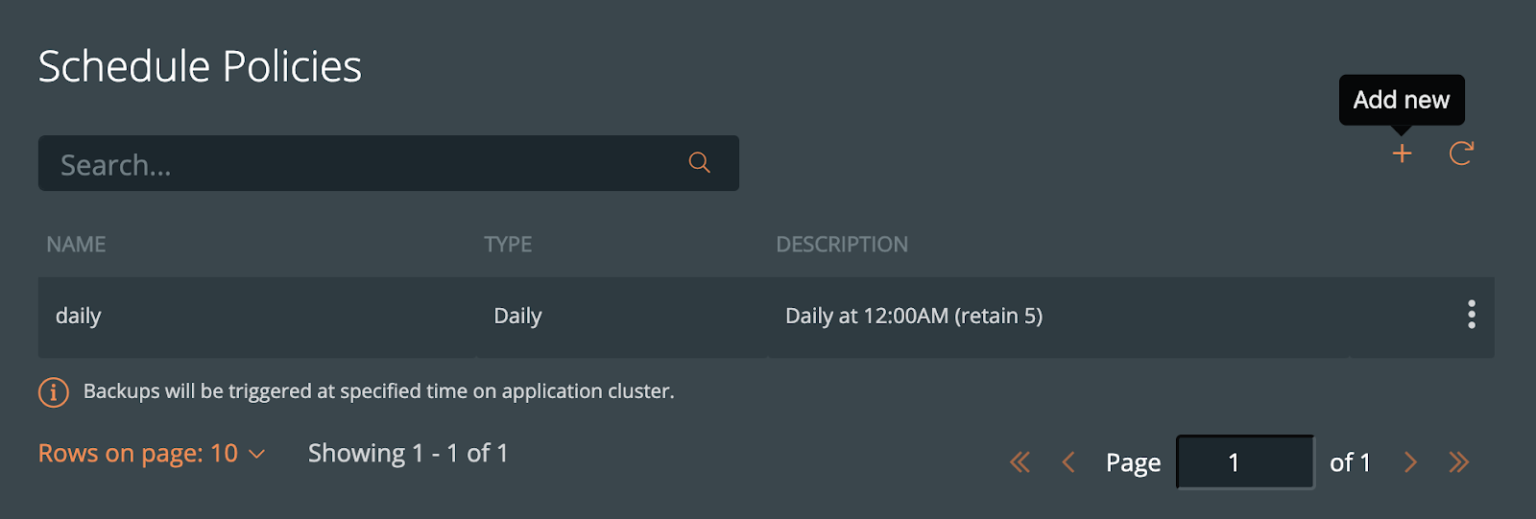
From here, create your desired schedule. When you choose Periodic, Daily, Weekly, or Monthly, you will then be able to select the number of retained copies. Later, you will be able to select this schedule when we create our backup for Cassandra.
Backups should be taken when the system can verify that the data service is ready for a backup. This is called application awareness. For this reason, we may want to control logic that happens before and after a backup is triggered to help control consistency based on the above information. With PX-Backup, we configure pre- and post- rules that can run arbitrary commands inside one or more pods of the data service to achieve these goals.
First, we need to understand how Cassandra stores states. This will ultimately help provide a blueprint for our backup policies and rules in production.
By default, Cassandra stores data in SSTables, and its default SSTable directory path is `/var/lib/cassandra/data/<keypace_name>`. PersistentVolumeClaims (PVCs) are often mounted to `/var/lib/cassandra` so that any data Cassandra produces is persisted to the PersistentVolume that the claim references.
Keep in mind, some images—such as Google’s sample Cassandra image `cassandra:v12`— use the `CASSANDRA_DATA` environment to set the key-space data directory. In the aforementioned image, that directory is `/cassandra_data`, so make sure and double check that your PVCs are mounted to the correct location. A simple way to double check this is to `exec` into the pod and check the directory.
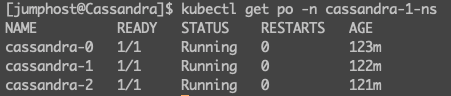
$ kubectl exec -n cassandra-1-ns cassandra-0  -- ls /cassandra_data

commitlog

data

hints

saved_caches
Cassandra is resilient to node failures. However, Cassandra backups are still necessary to recover from the following scenarios:
Cassandra provides an internal snapshot mechanism to take backups with a tool called nodetool. This can be setup to provide incremental or full snapshot-based backups of the data on the node. This tool will flush data from memtables to disk and create a hard link to the SSTables file on the node.
However, disadvantages of this include the fact that nodetool must be run on each and every Cassandra node and data is kept locally, increasing the overall storage footprint. What we’re suggesting is to let Portworx backup the Cassandra PVs at a block level and ultimately store them in a space-efficient object storage target. Portworx allows you to combine techniques that are recommended by Cassandra—such as flushing data to disk with pre- and post-hooks into the application—to give you Kubernetes-native and efficient backup of Cassandra data.
PX-Backup allows application owners to set up pre- and post-hook rules that will be applied before and/or after a backup occurs. For Cassandra, users may want to create a custom flush, compaction, or verify to ensure a healthy and consistent data set before and after a backup occurs. Rules can run on one or all pods associated with Cassandra, which is often a requirement for nodetool commands.
Let’s take a look at a pre- and post-hook rule that can ensure a consistent backup for Cassandra in production.
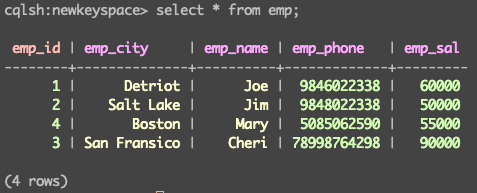
Since the internal tool for Cassandra flushes data from memtables to disk, we want to make sure that our pre-backup rule does the same thing. In our Cassandra deployment, we have a keyspace called ‘newkeyspace’ we are working with that has an ‘emp’ (employee) table within it.
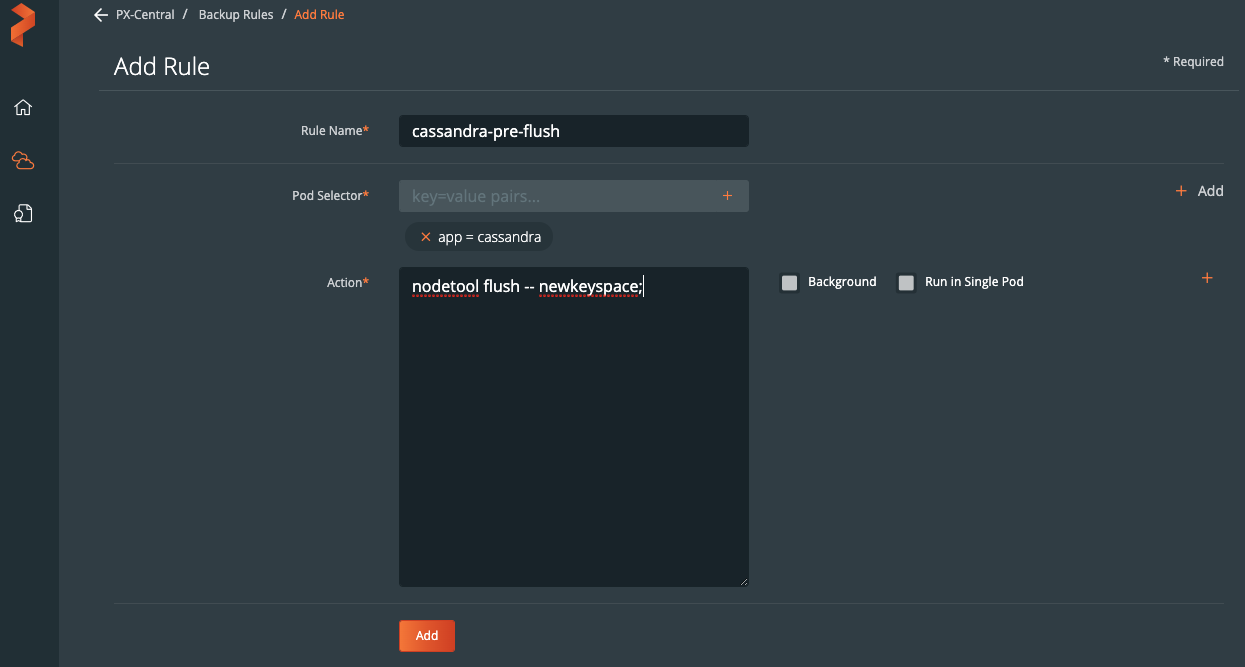
Let’s create a rule that will run `nodetool flush` for our `newkeyspace` before our backup. This is essential, as Portworx will take a snapshot of the backing volume before it places that data in the backup target. See below for what this looks like within PX-Backup. Note that `Run in a single Pod` is unchecked; this will enable the Rule to run on every pod that it matches, which is necessary for Cassandra to flush the memtables on each node to make the backup consistent.
The action will be to flush the keyspace “newkeyspace” during our pre-backup rule.
nodetool flush -- newkeyspace;
In the PX-Backup interface, the action can be added to the “Action*” text box.
A post-backup rule isn’t as necessary as the pre-backup rule above; however, for completeness—and to verify the keyspace is still uncorrupt after the backup occurs—we will create a rule that runs `nodetool verify`. The verify command will verify (check data checksums for) one or more tables.
The action will be to verify the keyspace “newkeyspace” during our post-backup rule.
nodetool verify -- newkeyspace;
In the PX-Backup interface, the action can be added to the “Action*” text box.
Now that configuration is done and we have created rules for our application, we are ready to start backing up Cassandra. What we need to do is enter the backup view of the cluster our service is running in and select the namespace that our application is running in.
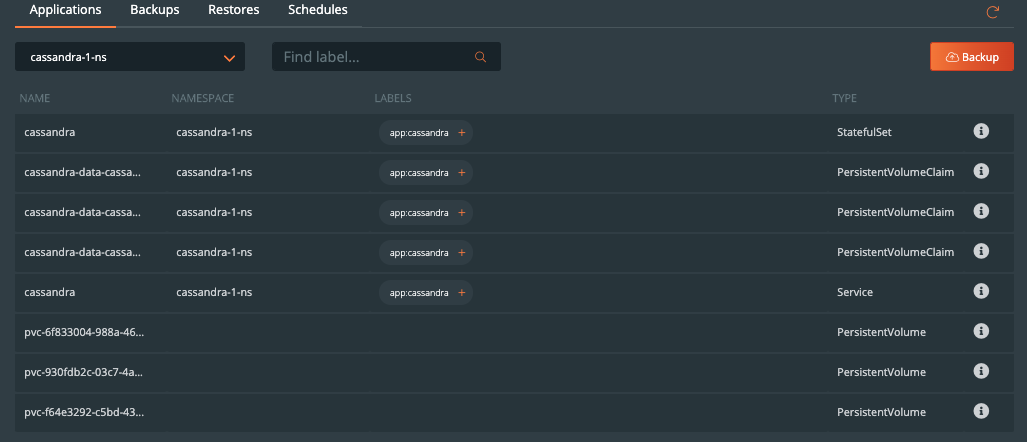
Once you are in the namespace, you can select the labels associated with Cassandra to only backup certain objects with the label or backup the entire namespace by selecting the Backup button in the top right corner of the namespace backup view.

Once you are into the backup-specific input, give the backup the following information in the pop out menu:
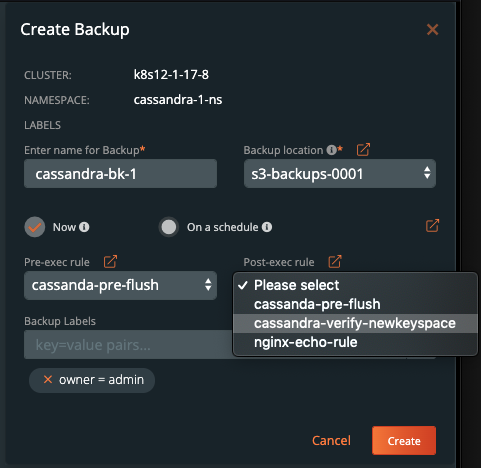
Once you complete this information, click Create.

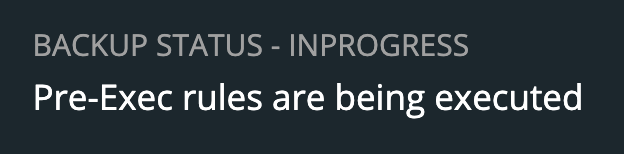
Once created, the backup will enter a Pending and then an In Progress state. The backup icon will look like the below example.

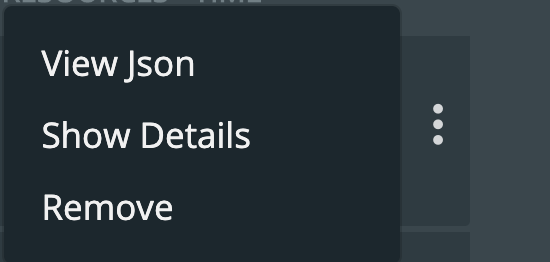
To view the progress of what is happening in the backup, you can select the navigation to the right side of the backup and select the Show Details button. This will allow you to view the current status and metadata of the associated backup. Any progress or errors will be reported within this screen.
Part of this information will be the status of the pre- and post- rules we created earlier. When they are being executed, it will be reported as in progress, and any output or errors will be present within this screen if there is an issue.
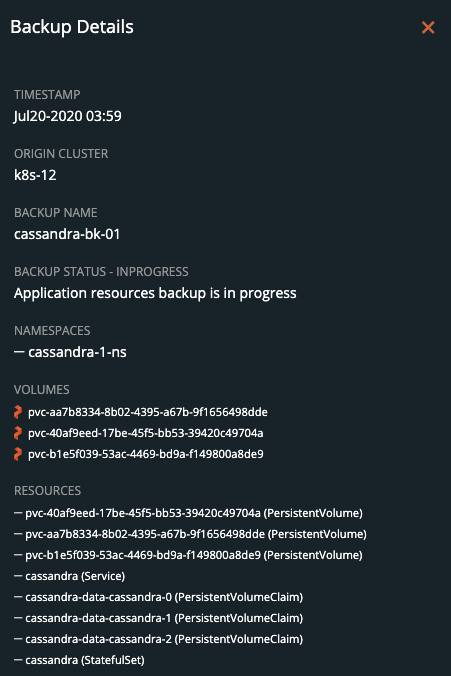
Once the rule is executed, it will continue and start to back up the volumes, and the details will change. An example of these details can be seen below.
Upon successful completion of the backup, the icon will look like the below example.

If something goes wrong, you will notice the icon turn red, and details of the failure will be available in the Show Details section of the backup.

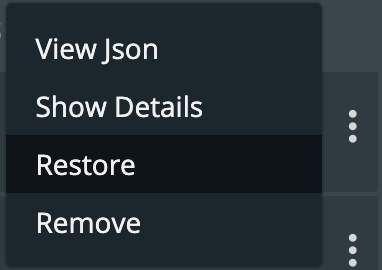
To start a restore, select Backups from the top navigation bar.

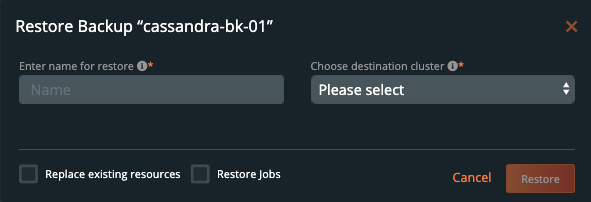
Then find the backup you wish to restore and select the Restore selection from the right navigation.
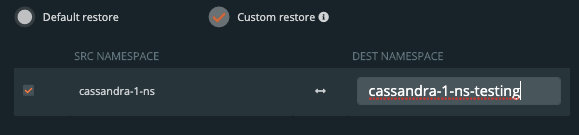
From here you can provide a name for your restore and a destination cluster as well as the following options.
You should see a similar transition in the UI from Pending to Success, and you can select Show Details from the menu—just like with the backup—to get the active information about the backup.
→
As we’ve just seen, backup and restore is a critical piece of the data protection plan for any application in Kubernetes today. PX-Backup makes it simple to understand who, when, where, and how the backup takes place—all while making it hyper configurable to specific data services for extra consistency and application awareness. Remember to check out the documentation on backup—as well as take advantage of a free trial.