


During my time as a Cloud Architect at Portworx, one of the most common questions I would get was: “How can I manage my Portworx installation using standard CD tools?”
Today, I’m going to show you how to use ArgoCD to install and manage Portworx.
For this demo, I am assuming that you have ArgoCD installed. ArgoCD has a great getting started section on their website that I would recommend if you are just getting started. In my environment, ArgoCD is installed in the ArgoCD namespace.
We will also need a target cluster running a supported version of Kubernetes for us to install Portworx. It is also important that our cluster is running a supported Linux kernel. This cluster could be the same cluster running ArgoCD, or, as is the case in my environment, a separate cluster.
One of the things that I find impressive about ArgoCD is that configurations use Kubernetes objects and ArgoCD supplied CRDs. This allows for a lot of flexibility with the tool.
For those looking to copy my environment, here is a list of components I will be using:
First, we need to grab the manifests for Portworx. This can easily be done by heading over to Portworx Central. After logging in, select the Continue button on the Portworx Enterprise tile of the product catalog.
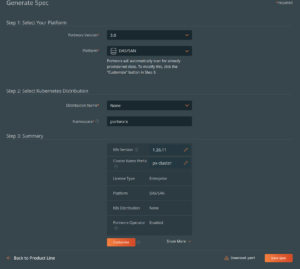
Next, select Continue on the Portworx Enterprise tile. We are now presented with the Spec Generator. For details on requirements and options, see the Portworx Documentation. What you select will depend on how you want to provide disks to Portworx. The most straightforward option is to have disks already attached to your Kubernetes nodes. For a lab, one disk per node will work just fine (I would recommend 100gb to start). For this configuration, be sure to select DAS/NAS as your platform. Also be sure to select your Kubernetes distribution! If your distribution isn’t listed, select None.
Next, select Save Spec and you will be presented with two commands to install Portworx. What is important here is the URL. Notice that the URL is encoded with the information you supplied in the spec generator.
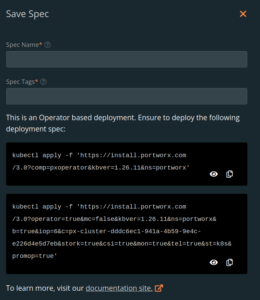
Finally, record the above URLs in a notepad, we will need them later.
We will be installing two ArgoCD applications, one to install the Portworx Operator, the other to install the Portworx Storage Cluster. The operator will install a number of CRDs which includes the StorageCluster kind. We are separating the applications so we avoid a type StorageCluster is not found error.
We will be using Kustomize for this installation. It provides a lot of flexibility when managing multiple clusters, as well as allowing URL based resources (which we can optionally point to Portworx’s Spec Generator). I would encourage checking out the blog over at devopskube.com for an excellent tutorial on using overlays.
First, let’s look at the px-operator application:
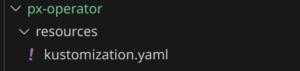
The operator is a rather simple installation as we only need a kustomization.yaml:
apiVersion: kustomize.config.k8s.io/v1beta1
kind: Kustomization
resources:
- https://install.portworx.com/?comp=pxoperator&kbver=1.26.11&ns=portworx
The above illustrates the flexibility of ArgoCD. We can point to an upstream URL! Note that the URL uses query strings to tell the configuration builder which version of Kubernetes we are running and in what namespace we want to install the operator. Some folks will want to manage the above file in their own repositories. All we need to do is download the above file from https://central.portworx.com to the same directory as our kustomization.yaml file and reference it in the resources list.
apiVersion: kustomize.config.k8s.io/v1beta1
kind: Kustomization
resources:
- px-operator.yaml
We will use a similar pattern to install the StorageCluster which is the heart of our installation.
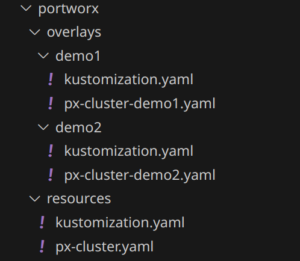
The resource directory contains the common StorageCluster definition. Let’s take a look at the kustomization.yaml file.
apiVersion: kustomize.config.k8s.io/v1beta1
kind: Kustomization
resources:
-https://install.portworx.com/?operator=true&mc=false&kbver=1.26.11+rke2r1&ns=portworx&b=true&iop=6&vsp=true&vc=10.0.1.10&vcp=443&ds=esx2-local1&s=%22type%3Dthin%2Csize%3D80%22&c=px-cluster&stork=true&csi=true&mon=true&tel=false&st=k8s&promop=true
We can see that, again, we are pulling our manifests from the upstream configuration builder.
Just as above, we can also download the file to the resources directory and update the resources list with the filename.
We introduced one more trick in the Portworx Cluster manifest directory: Overlays. Overlays allow us to change the base storage cluster manifests, which allows us to use a common source, and only capture our changes. Let’s look at the demo1 kustomization.yaml:
apiVersion: kustomize.config.k8s.io/v1beta1
kind: Kustomization
resources:
- ../../resources
patches:
- path: px-cluster-demo1.yaml
We can see that we include the resources directory as well as apply a patch in the form of a file:
px-cluster-demo1.yaml:
kind: StorageCluster
apiVersion: core.libopenstorage.org/v1
metadata:
name: px-cluster
namespace: portworx
annotations:
portworx.io/service-type: "portworx-api:LoadBalancer"
The patch will match the resources StorageCluster by looking at the kind and the name. It will then add our annotation which changes the Portworx API to use a LoadBalancer service for my lab.
NOTE: The name MUST match the cluster name used above! By default, the Portworx spec builder uses a randomized name. To change it edit the downloaded YAML file. If you used the URL, look for the c=px-cluster-XXXXX-XXXXX-XXXXX query string variable. Notice I already changed my cluster name in the above example to px-cluster
Now that we have our directory structure set up we are ready to add your demo1 cluster and deploy Portworx!
Clusters are stored as secrets inside of ArgoCD, although under most circumstances we can use the ArgoCD CLI to add a cluster, I am going to apply a manifest so I can change some authentication information. This is required as I am authenticating to the Rancher Server rather than the RKE2 demo1 cluster directly.
To add a cluster to ArgoCD using the command line:
argocd cluster add <CONTEXT> --name demo1
To add a cluster by applying a secret:
cat << EOF | k apply -f -
apiVersion: v1
kind: Secret
metadata:
 namespace: argocd
 name: demo1
 labels:
   argocd.argoproj.io/secret-type: cluster
type: Opaque
stringData:
 name: demo1
 server: $DEMO1URL
 config: |
   {
     "bearerToken": "$ARGO_BEARER_TOKEN",
     "tlsClientConfig": {
     }
   }
EOF
We obviously need to substitute the URL and Bearer Token with values from your kubernetes environment. For those running Rancher, details can be found here
Deploy Portworx to Demo1
We can now deploy Portworx Enterprise by applying the following manifest:
apiVersion: argoproj.io/v1alpha1

kind: Application
metadata:
 name: demo1-px-operator
spec:
 destination:
   name: 'demo1'
   namespace: 'portworx'
 source:
   path: manifests/px-operator/resources
   repoURL: 'https://github.com/ccrow42/homelab'
   targetRevision: HEAD
 project: default
 syncPolicy:
   automated: {}
---
apiVersion: argoproj.io/v1alpha1
kind: Application
metadata:
 name: demo1-portworx
spec:
 destination:
   name: 'demo1'
   namespace: 'portworx'
 source:
   path: manifests/portworx/overlays/demo1
   repoURL: 'https://github.com/ccrow42/homelab'
   targetRevision: HEAD
 project: default
 syncPolicy:
   automated: {}
The above spec can by applied with:
kubectl -n argocd apply -f portworx.yaml
After a few minutes, we should have a running cluster in ArgoCD:
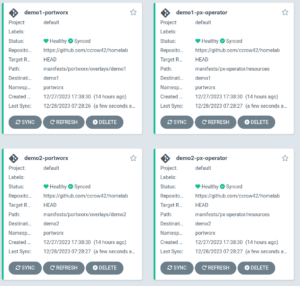
Managing Portworx in with ArgoCD provides a number of benefits. I personally use ArgoCD to build learning and demo environments. The ability to declaratively deploy infrastructure resources has a profound impact on my productivity, and is one of the reasons for the popularity of tools such as Kubernetes, Portworx and ArgoCD.
ArgoCD can be used for more than just provisioning. Because our manifests are in a github repository we can tell ArgoCD to automatically sync changes when they are detected in the repository. This is controlled by the SyncPolicy configuration of the application manifest.
So how does this affect common day 2 operations?
Because Portworx is provided as an operator, upgrades are simple.
First, we need to upgrade the operator. If we had kustomize pointing at the spec generator URL, then simply triggering a sync will cause the operator to be upgraded. If we download the operator, simply download the latest version again.
curl -o px-operator.yaml "https://install.portworx.com/?comp=pxoperator&kbver=1.26.11&ns=portworx"
The above command will download the px-operator.yaml file. Reference it in the resources section of the kustomization.yaml file.
To upgrade Portworx Enterprise, we simply need to change the image version. Edit the px-cluster.yaml file:
spec:
  image: portworx/oci-monitor:2.13.8
  imagePullPolicy: Always
Of course, if we are referencing the spec generator instead of using a StorageCluster manifest in the above example, then the upgrade will happen by simply triggering a sync.
For further details about upgrade procedures, please refer to the Portworx Documentation.
What if we need to expand our Kubernetes cluster, how do we scale storage? It turns out that in the above example, we are using Cloud Drives. Cloud Drives are a Portworx technology that allows for automatic and policy based storage configurations. Portworx automatically manages our storage pool as we add new nodes. Portworx sets a maximum number of storage nodes per availability zone, but under most circumstances it is managed for us.
Let’s take a look at my existing cluster before I scale:
ccrow@ccrow-kubuntu:~/temp$ k get nodes
NAME                         STATUS   ROLES                       AGE    VERSION
demo1-pool1-6e9df3d2-t899b   Ready    control-plane,etcd,master   4d4h   v1.26.11+rke2r1
demo1-pool2-8589fdf3-f54rw   Ready    worker                      4d4h   v1.26.11+rke2r1
demo1-pool2-8589fdf3-jcm8q   Ready    worker                      4d4h   v1.26.11+rke2r1
demo1-pool2-8589fdf3-mfqxr   Ready    worker                      4d4h   v1.26.11+rke2r1

ccrow@ccrow-kubuntu:~/temp$ pxctl status
       IP              ID                                      SchedulerNodeName               Auth            StorageNode     Used    Capacity        Status  StorageStatus Version          Kernel                  OS
       10.0.1.155      b7ec69e6-d976-45f1-be0c-8ca7a349dc18    demo1-pool2-8589fdf3-jcm8q      Disabled        Yes             4.0 GiB 40 GiB          Online  Up (This node)2.13.8-04f8355   5.15.0-78-generic       Ubuntu 22.04.2 LTS
       10.0.1.159      5870a180-5f5a-4cd7-9c5a-ca855f1a407b    demo1-pool2-8589fdf3-f54rw      Disabled        Yes             4.0 GiB 40 GiB          Online  Up            2.13.8-04f8355   5.15.0-78-generic       Ubuntu 22.04.2 LTS
       10.0.1.90       35737db5-e25b-4128-940a-027c9d2aaf87    demo1-pool2-8589fdf3-mfqxr      Disabled        Yes             4.0 GiB 40 GiB          Online  Up            2.13.8-04f8355   5.15.0-78-generic       Ubuntu 22.04.2 LTS
Global Storage Pool
       Total Used      :  12 GiB
       Total Capacity  :  120 GiB
We can see in the above output that I have 3 worker nodes, and all 3 also have storage attached. I will now scale my cluster:
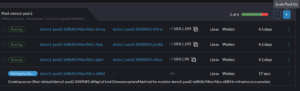
It will take a moment for my cluster to scale, and for Portworx to detect the node and spawn a new pod.
ccrow@ccrow-kubuntu:~/temp$ k get nodes
NAME                         STATUS   ROLES                       AGE    VERSION
demo1-pool1-6e9df3d2-t899b   Ready    control-plane,etcd,master   4d4h   v1.26.11+rke2r1
demo1-pool2-8589fdf3-dhfgp   Ready    worker                      22m    v1.26.11+rke2r1
demo1-pool2-8589fdf3-f54rw   Ready    worker                      4d4h   v1.26.11+rke2r1
demo1-pool2-8589fdf3-jcm8q   Ready    worker                      4d4h   v1.26.11+rke2r1
demo1-pool2-8589fdf3-mfqxr   Ready    worker                      4d4h   v1.26.11+rke2r1
ccrow@ccrow-kubuntu:~/temp$ pxctl status
       IP              ID                                      SchedulerNodeName               Auth            StorageNode     Used    Capacity        Status  StorageStatus Version          Kernel                  OS
       10.0.1.155      b7ec69e6-d976-45f1-be0c-8ca7a349dc18    demo1-pool2-8589fdf3-jcm8q      Disabled        Yes             4.0 GiB 40 GiB          Online  Up (This node)2.13.8-04f8355   5.15.0-78-generic       Ubuntu 22.04.2 LTS
       10.0.1.159      5870a180-5f5a-4cd7-9c5a-ca855f1a407b    demo1-pool2-8589fdf3-f54rw      Disabled        Yes             4.0 GiB 40 GiB          Online  Up            2.13.8-04f8355   5.15.0-78-generic       Ubuntu 22.04.2 LTS
       10.0.1.90       35737db5-e25b-4128-940a-027c9d2aaf87    demo1-pool2-8589fdf3-mfqxr      Disabled        Yes             4.0 GiB 40 GiB          Online  Up            2.13.8-04f8355   5.15.0-78-generic       Ubuntu 22.04.2 LTS
       10.0.1.130      6bf1759c-9b6a-461f-8bd6-e3601040831a    demo1-pool2-8589fdf3-dhfgp      Disabled        Yes             4.0 GiB 40 GiB          Online  Up            2.13.8-04f8355   5.15.0-78-generic       Ubuntu 22.04.2 LTS
Global Storage Pool
       Total Used      :  16 GiB
       Total Capacity  :  160 GiB
The above two examples illustrate the power of operators with Kubernetes. The Portworx operator handles not only the installation but day 2 operations. Common operations are scaling, upgrades, and reconfigurations.


