


The recent CNCF annual survey reveals that 79% of the respondents use certified Kubernetes hosted platforms to run their containerized applications. Of those, the most popular Kubernetes platform is the Amazon Elastic Container Service for Kubernetes (EKS), with a 39% market share.

In September 2021, Amazon announced general availability for Amazon EKS Anywhere, which provides another deployment option for users who want to run Kubernetes clusters inside their own datacenter environments. Both Amazon EKS and Amazon EKS Anywhere are powered by EKS Distro, an open-source distribution for Kubernetes maintained by AWS, bringing a consistent experience to users regardless of where they are running their modern applications.
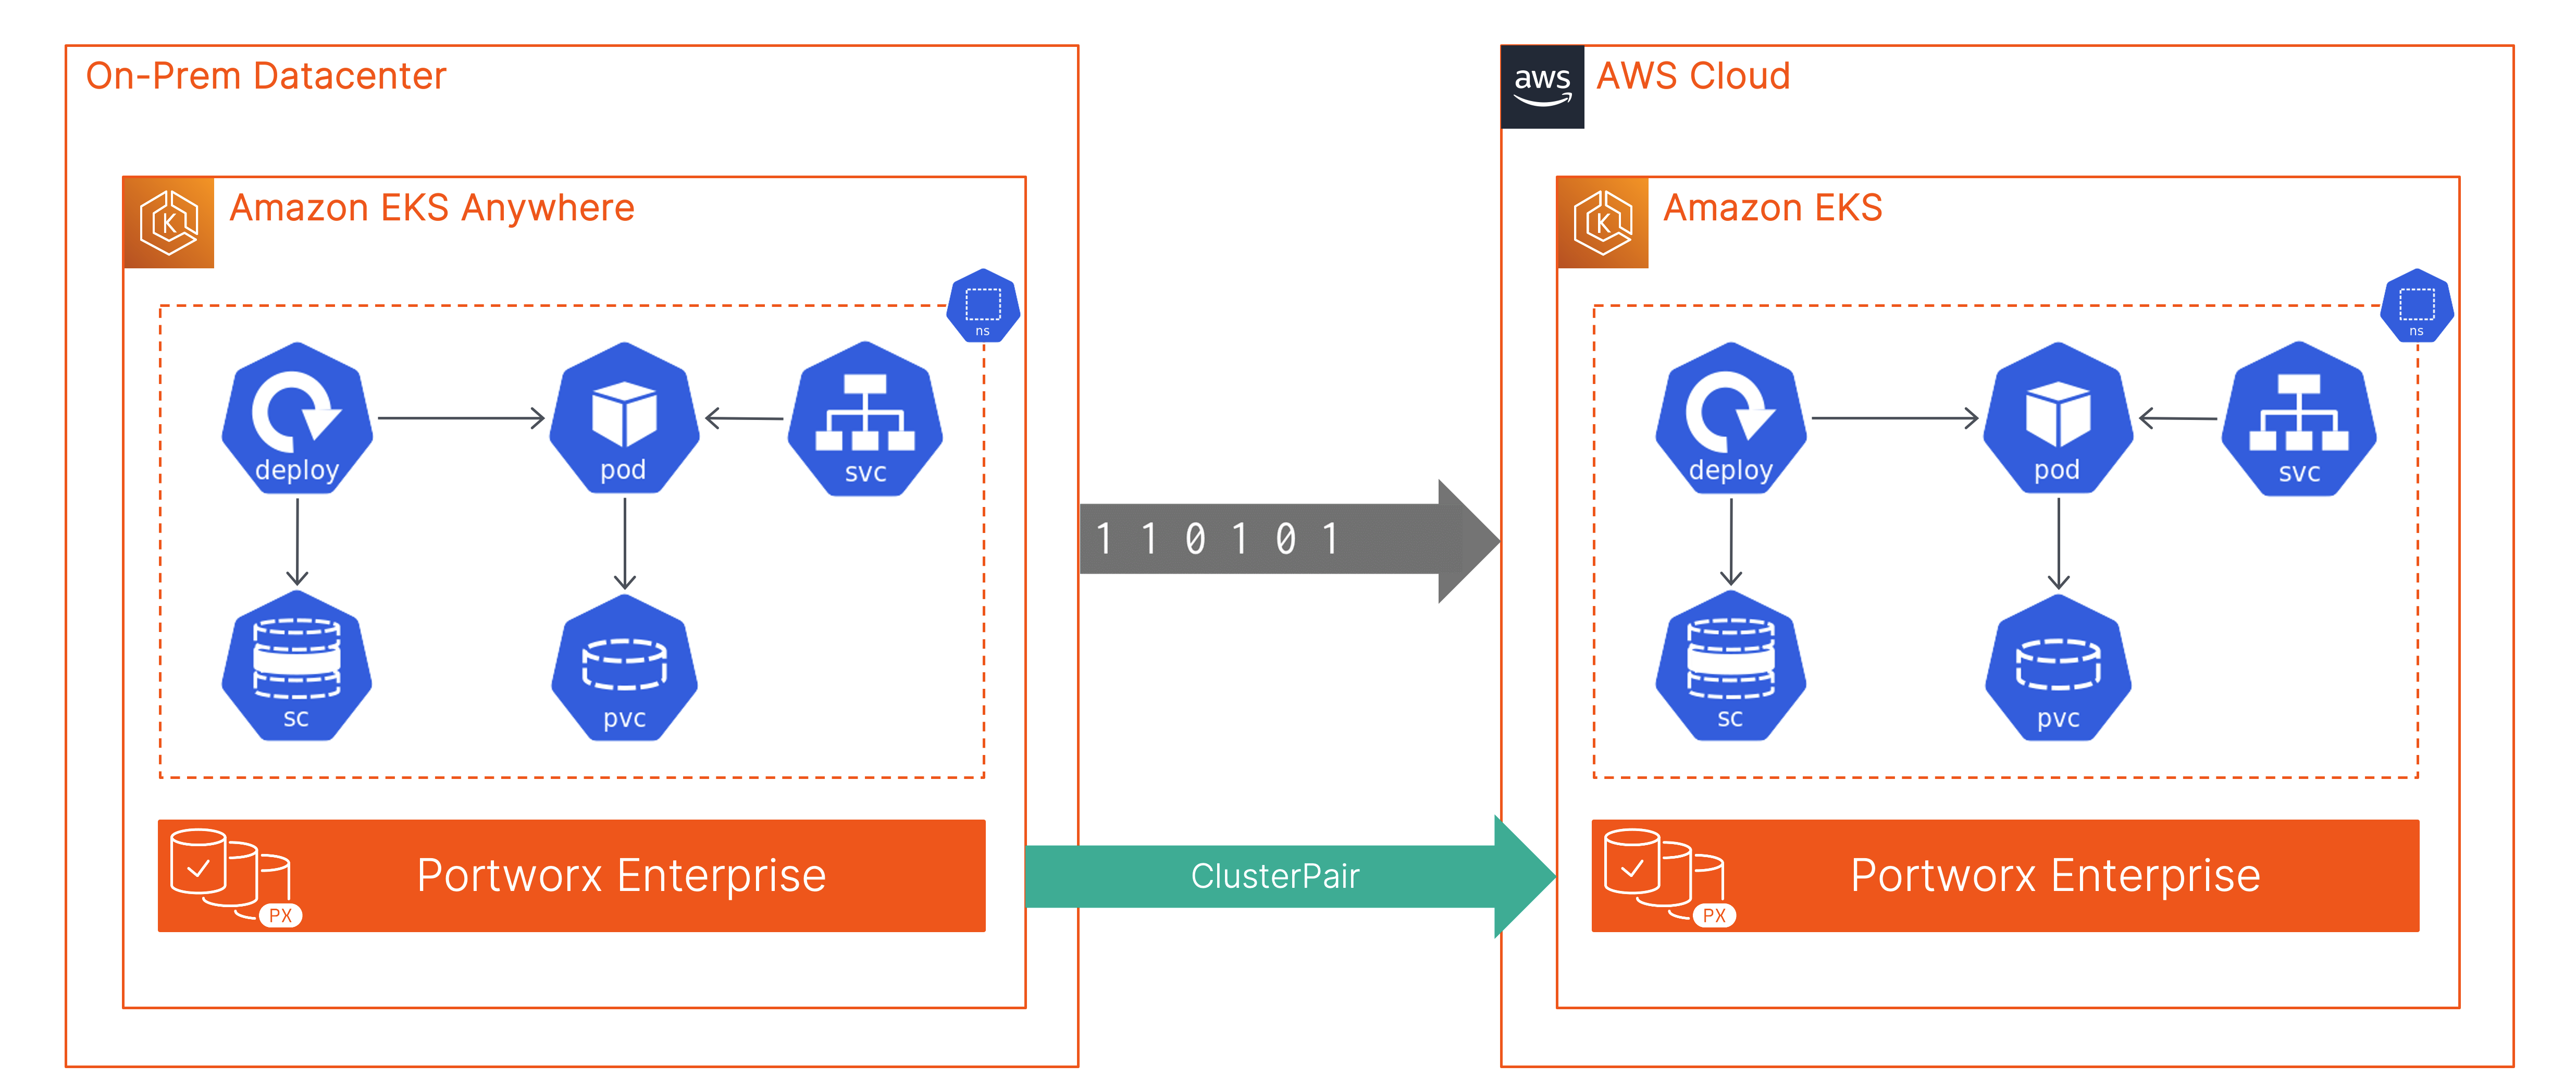
In the last blog, we discussed how Portworx can complement Amazon EKS Anywhere by providing a consistent Kubernetes storage layer across your clusters, whether they are running in the public cloud or on-prem inside your own datacenter environments. In this blog, we will talk about how you can leverage Portworx to migrate your containerized applications across hybrid cloud to achieve the true benefits of data portability promised by Kubernetes.
To configure an application migration solution, you will need an Amazon EKS and an Amazon EKS Anywhere cluster configured with Portworx deployed as the Kubernetes storage layer. Once you have Portworx up and running, follow the next steps to migrate an application running in the “demo” namespace on the Amazon EKS Anywhere cluster (source cluster) to your Amazon EKS cluster (destination cluster).
STORK_POD=$(kubectl get pods -n kube-system -l name=stork -o jsonpath='{.items[0].metadata.name}') &&
kubectl cp -n kube-system $STORK_POD:/storkctl/linux/storkctl ./storkctl
sudo mv storkctl /usr/local/bin &&
sudo chmod +x /usr/local/bin/storkctl
cat > service-account-migration.yaml <<_EOF
apiVersion: v1
kind: ServiceAccount
metadata:
  name: migration
  namespace: demo #Namespace where your app is running
EOF

kubectl apply -f service-account-migration.yaml
cat > cluster-role-binding-migration.yaml <<_EOF
apiVersion: rbac.authorization.k8s.io/v1
kind: ClusterRoleBinding
metadata:
  name: migration-clusterrolebinding
roleRef:
  apiGroup: rbac.authorization.k8s.io
  kind: ClusterRole
  name: cluster-admin
subjects:
- kind: ServiceAccount
  name: migration
  namespace: demo
EOF

kubectl apply -f cluster-role-binding-migration.yaml
SERVICE_ACCOUNT=migration
NAMESPACE=demo
SERVER=https://<SERVER-ADDRESS:PORT> #EKS Endpoint

SERVICE_ACCOUNT_TOKEN_NAME=$(kubectl -n ${NAMESPACE} get serviceaccount ${SERVICE_ACCOUNT} -o jsonpath='{.secrets[].name}')
SERVICE_ACCOUNT_TOKEN=$(kubectl -n ${NAMESPACE} get secret ${SERVICE_ACCOUNT_TOKEN_NAME} -o "jsonpath={.data.token}" | base64 --decode)
SERVICE_ACCOUNT_CERTIFICATE=$(kubectl -n ${NAMESPACE} get secret ${SERVICE_ACCOUNT_TOKEN_NAME} -o "jsonpath={.data['ca\.crt']}")

cat <<END
apiVersion: v1
kind: Config
clusters:
- name: default-cluster
  cluster:
    certificate-authority-data: ${SERVICE_ACCOUNT_CERTIFICATE}
    server: ${SERVER}
contexts:
- name: default-context
  context:
    cluster: default-cluster
    namespace: ${NAMESPACE}
    user: ${SERVICE_ACCOUNT}
current-context: default-context
users:
- name: ${SERVICE_ACCOUNT}
  user:
    token: ${SERVICE_ACCOUNT_TOKEN}
END

#Save the above script in a file called create-migration-config.sh file and then use the following command to generate a kubeconfig file.

chmod +x create-migration-config.sh && ./create-migration-config.sh > ~/.kube/migration-config.conf
export KUBECONFIG=~/.kube/migration-config.conf
storkctl generate clusterpair eks-clusterpair --kubeconfig ~/.kube/migration-config.conf -n demo > eks-clusterpair.yaml
 options:
      ip: "<ip-address-of-node-in-the-destination-cluster>"
      port: "<port_of_remote_px_node_default_9001>"
      token: "<token_generated_from_destination_cluster>"
You can edit the portworx-service in the kube-system namespace to set it to “loadBalancer.” And to generate a cluster token, exec into one of the Portworx pods on the destination cluster and run the following command:
Note: Do not enable load balancing without authorization enabled on the Portworx cluster.
PX_POD=$(kubectl get pods -n kube-system -l name=portworx -o \
jsonpath='{.items[0].metadata.name}')

kubectl exec -it $PX_POD -n kube-system -- /opt/pwx/bin/pxctl cluster token show
kubectl create ns demo

kubectl apply -f eks-clusterpair.yaml -n demo
storkctl get clusterpair -n demo
NAME               STORAGE-STATUS   SCHEDULER-STATUS   CREATED
eks-clusterpair    Ready            Ready              12 Mar 22 03:11 UTC
cat > app-migration.yaml <<_EOF
apiVersion: stork.libopenstorage.org/v1alpha1
kind: Migration
metadata:
name: <YOUR_MIGRATION_OBJECT>
namespace: <YOUR_MIGRATION_NAMESPACE>
spec:
clusterPair: <YOUR_CLUSTER_PAIR>
includeResources: true # If set to false this will migrate only the Portworx volumes. No PVCs, apps, etc will be migrated
startApplications: true # Deploys app pods on the destination cluster
namespaces:
- <NAMESPACE_TO_MIGRATE>
purgeDeletedResources: false # boolean value specifying if STORK should automatically purge a resource from the destination cluster when you delete it from the source cluster.
EOF

kubectl apply -f app-migration.yaml -n demo
storkctl get migrations -n demo
NAME            CLUSTERPAIR     STAGE     STATUS       VOLUMES   RESOURCES   CREATED
appmigration    eks-cluster     Volumes   InProgress   0/1       0/0         12 Mar 22 20:04 UTC
storkctl get migrations -n demo
NAME            CLUSTERPAIR     STAGE     STATUS       VOLUMES   RESOURCES   CREATED
appmigration    eks-cluster     Final     Successful   1/1       3/3         12 Mar 22 20:10 UTC
kubectl get all -n demo

kubectl get pvc -n demo
Application migrations using Portworx allow you to migrate your containerized applications seamlessly across the hybrid cloud (Amazon EKS Anywhere and Amazon EKS). If you want to look at a demo of all this in action, watch the YouTube video below:


