

Portworx recently released a free-forever version of our popular Kubernetes storage platform, Portworx Enterprise, called Portworx Essentials. Portworx Essentials gives you the most essential capabilities for running small scale Kubernetes applications in production. Maybe that is your CICD pipeline or maybe it is a customer facing app that is still in the early stages. Whatever the app is, you need fast storage, high availability, encryption, snapshots, and more. That is what Portworx Essentials provides. But what about backing up and restoring your Kubernetes cluster and all its apps or even just a single Kubernetes app composed of data, app config, and Kubernetes objects like CRDs, secrets, service accounts, and more? Portworx Enterprise customers can use PX-Backup for an end-to-end backup and recovery solution for Kubernetes, but if you are using Portworx Essentials, you can pair Portworx snapshots with the open-source Kubernetes backup solution Velero. Velero, which backs up Kubernetes states such as app config and objects stored in etcd, is designed to be paired with a storage solution like Portworx that backs up data. This is a great solution for your Kubernetes backup needs while you wait to see if you need to increase the scale of your Kubernetes app and want to use Portworx Enterprise and PX-Backup instead. Learn how to use PX-Essentials and Velero with the Portworx snapshot plugin together in this walkthrough.
You can sign up to get your free version of Portworx essentials here. This guide will show you how to set up the open source backup and restore tool Velero with PX-Essentials so you can set up some basic Kubernetes application backups that include the data stored in your Portworx volumes.
If you haven’t spent the time getting up and running with Portworx Essentials, you can follow this getting started blog, which walks you through getting started with it.
In order to use Velero and Portworx together, you must set up server components as well as object storage. For this walkthrough, we are using Amazon S3; you can follow these steps to create S3 bucket.
> Note: We are using S3 for our object store for backups. You may use others, such as Minio, Azure, GCP, and more as long as you configure your credentials and backup locations correctly. However, other providers are not covered in this blog.
After you have your Amazon S3 bucket configured, you can install Velero with the following command, telling it to initially be set up for Amazon. We will add the Portworx plugin after it’s installed.
$ velero install \
--provider aws \
--plugins velero/velero-plugin-for-aws:v1.0.1 \
--bucket $BUCKET \
--backup-location-config region=$REGION \
--snapshot-location-config region=$REGION \
--secret-file ./credentials-velero
Next, since we will also be using Portworx to perform cloud-based snapshots for our PVs, we can go ahead and add the Portworx plugin using the below command.
$ velero plugin add portworx/velero-plugin:1.0.0
Once the above steps are complete without error, you can move on to configurations.
Portworx will be performing block-based CloudSnaps to backup your data. So, we need to configure Portworx with an object storage cloud credential. We do this by interacting with pxctl, the portworx CLI tool. First, setup PX_POD environment with one of the Portworx pods.
PX_POD=$(kubectl get pods -l name=portworx -n kube-system -o jsonpath='{.items[0].metadata.name}')
Next, we want to make sure our cloud snapshots are encrypted, so we can create a secret to use as our encryption passphrase to pass to Portworx. A simple way to do this is to use the base64 hash of a string.
echo "mysupersecret" | base64
bXlzdXBlcnNlY3JldAo=
Next, we instruct pxctl to create a credential based on our Amazon keys and encryption passphrase.
$kubectl exec $PX_POD -n kube-system -- /opt/pwx/bin/pxctl credentials create --s3-access-key  --s3-secret-key  --s3-region us-east-1 --encryption-passphrase bXlzdXBlcnNlY3JldAo= --s3-endpoint s3.amazonaws.com --provider s3 awss3
Credentials created successfully, UUID:f8d2cf6d-ab50-4e42-90b6-9930336ad898
Velero can use both a SnapshotLocation and a BackupLocation for persistent volume data as well as application metadata. We need to setup Velero with the Portworx cloud SnapshotLocation. Use the command below to do that.
> Note: You will need to use the credId, which is the UUID produced from your pxctl credentials create command above.
$ velero snapshot-location create portworx-cloud --provider portworx.io/portworx --config type=cloud,credId=f8d2cf6d-ab50-4e42-90b6-9930336ad898
Snapshot volume location "portworx-cloud" configured successfully.
You can check the volume snapshot locations using the kubectl command line utility.
$ kubectl get volumesnapshotlocation -n velero
NAME AGE
default 17m
portworx-cloud 30s
Now that we’re using Portworx Essentials and Velero, we need an application to add some data and to backup. You can use the following WordPress + MySQL application to deploy into a namespace called WordPress.
>Note: Follow along in the above link for steps on how to deploy WordPress and Mysql.
$ kubectl get po -n wordpress
NAME READY STATUS RESTARTS AGE
pod/wordpress-79c6db4c56-4sjjs 1/1 Running 0 72m
pod/wordpress-79c6db4c56-697rt 1/1 Running 0 72m
pod/wordpress-79c6db4c56-92whn 1/1 Running 0 72m
pod/wordpress-mysql-d8f757c9d-sknz8 1/1 Running 0 76m
You should see two Portworx volumes backing WordPress and MySQL. One will be shared RWX for multiple WordPress pods and the other RWO for a single MySQL database backend.
$ kubectl get pvc -n wordpress
NAME STATUS VOLUME STORAGECLASS AGE
mysql-pvc-1 Bound pvc-45837d2c... portworx-sc-repl3 72m
wp-pv-claim Bound pvc-cb520f93... portworx-sc-repl3-shared 72m
Run through the installation by accessing the service endpoint for WordPress and following the prompts to create your first post. You can get the endpoint information from kubectl get svc -n wordpress. By default, the app can be accessed by NodePort.
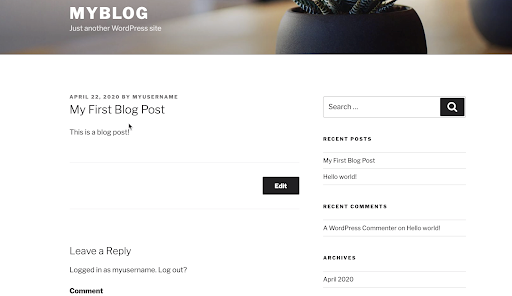
Now that we have some data in the form of a post in our application, let’s take an initial backup of our application and persistent volumes.
> Note: –wait is optional.
$ velero backup create wordpress-backup --include-namespaces=wordpress --snapshot-volumes --volume-snapshot-locations portworx-cloud --wait
Backup request "wordpress-backup" submitted successfully.
Waiting for backup to complete. You may safely press ctrl-c to stop waiting - your backup will continue in the background.
...............................................
Backup completed with status: Completed. You may check for more information using the commands `velero backup describe wordpress-backup` and `velero backup logs wordpress-backup`.
Great! We have successfully created a backup of our application and data with Portworx and Velero.
> Note: As part of the Portworx Essentials features and limitations, it allows one cloud snapshot backup per volume per day. This will make a second backup on the same day fail. Below is an example of the output. Simply wait until the next day, or if you need more frequent backups, consider looking at PX-Backup.
To simulate a failure, we can delete the entire WordPress namespace, as if we did this on purpose as an admin!
$ kubectl delete namespace wordpres
Now our WordPress and Mysql deployments are completely gone, along with our PVs and PVCs that were backing the application. Don’t worry! Just run a restore operation from the backup we took earlier.
$ velero restore create --from-backup wordpress-backup
Restore request "wordpress-backup-20200422153128" submitted successfully.
Run `velero restore describe wordpress-backup-20200422153128` or `velero restore logs wordpress-backup-20200422153128` for more details.
Once this restore completes, you can access your NodePort endpoint again, and all your data that was present at the time of the backup will be there.
> Note, there are other options that can be handy for restorations, such as restoring to a new namespace and more. See the documentation here.
If you want to see a demo video of this in real time, check out the video below. Hopefully this helps you to understand that you can take advantage of tooling such as Portworx Essentials and its Velero plugin to run stateful Kubernetes services at a small production scale with data management and some level of backup and restore. You can use the following links for more information about Essentials and Backup and Restore with Velero.