


For years, organizations have been struggling to migrate applications across different infrastructure stacks or across different cloud environments. One of the key value propositions of Kubernetes is that it allows you to take your containerized applications running on a specific cluster and move them to a different Kubernetes cluster. This is possible because applications are now packaged as containers and orchestrated by Kubernetes across different worker nodes in a cluster. But, when it comes to migration operations, migrating the application data remains a challenge in Kubernetes. According to the 2021 Kubernetes Adoption survey, cross datacenter support is still identified as one of the top 3 challenges that have been the most difficult for organizations to overcome.
Portworx is the gold standard when it comes to Kubernetes storage, and it delivers the perfect solution for enterprises that are looking to migrate their applications across different Kubernetes clusters running either in their on-premises datacenter environments or across their hybrid cloud environments. Portworx allows users to migrate their applications not just across Kubernetes clusters across different cloud environments, but also allows them to migrate their applications across different Kubernetes distributions.
For this blog, we tested four different scenarios to allow users avoid vendor lock-in and move their applications where they need:
In all the above scenarios, your source cluster is either a Red Hat OpenShift cluster or a vanilla Kubernetes cluster, and your destination cluster is either an Amazon EKS Anywhere cluster running on-prem or an Amazon EKS cluster running in the public cloud. For any of these scenarios, use the following steps to configure a migration solution:
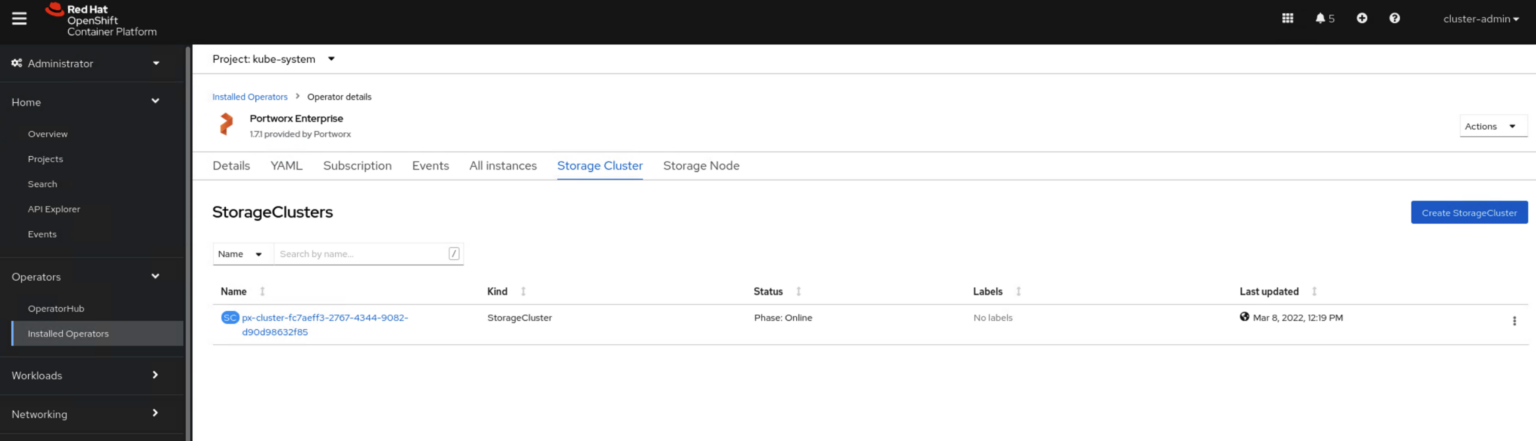
oc get nodes
NAME                                       STATUS   ROLES    AGE   VERSION
bshah-ocp-master-0.ocp-demo.cluster.test   Ready    master   17d   v1.22.3+2cb6068
bshah-ocp-master-1.ocp-demo.cluster.test   Ready    master   17d   v1.22.3+2cb6068
bshah-ocp-master-2.ocp-demo.cluster.test   Ready    master   17d   v1.22.3+2cb6068
bshah-ocp-worker-0.ocp-demo.cluster.test   Ready    worker   17d   v1.22.3+2cb6068
bshah-ocp-worker-1.ocp-demo.cluster.test   Ready    worker   17d   v1.22.3+2cb6068
bshah-ocp-worker-2.ocp-demo.cluster.test   Ready    worker   17d   v1.22.3+2cb6068
bshah-ocp-worker-3.ocp-demo.cluster.test   Ready    worker   17d   v1.22.3+2cb6068

oc get stc -n kube-system
NAME                                              CLUSTER UUID                           STATUS   VERSION   AGE
px-cluster-fc7aeff3-2767-4344-9082-d90d98632f85   6d09bd3e-b1dc-499f-af3d-eeccd29549d2   Online   2.9.1.1   16d
cat > service-account-migration.yaml <<_EOF
apiVersion: v1
kind: ServiceAccount
metadata:
  name: migration
  namespace: demo #Namespace where your app is running
EOF

kubectl apply -f service-account-migration.yaml
cat > cluster-role-binding-migration.yaml <<_EOF
apiVersion: rbac.authorization.k8s.io/v1
kind: ClusterRoleBinding
metadata:
  name: migration-clusterrolebinding
roleRef:
  apiGroup: rbac.authorization.k8s.io
  kind: ClusterRole
  name: cluster-admin
subjects:
- kind: ServiceAccount
  name: migration
  namespace: demo
EOF

kubectl apply -f cluster-role-binding-migration.yaml
SERVICE_ACCOUNT=migration
NAMESPACE=demo
SERVER=https://<SERVER-ADDRESS:PORT> #EKS Endpoint

SERVICE_ACCOUNT_TOKEN_NAME=$(kubectl -n ${NAMESPACE} get serviceaccount ${SERVICE_ACCOUNT} -o jsonpath='{.secrets[].name}')
SERVICE_ACCOUNT_TOKEN=$(kubectl -n ${NAMESPACE} get secret ${SERVICE_ACCOUNT_TOKEN_NAME} -o "jsonpath={.data.token}" | base64 --decode)
SERVICE_ACCOUNT_CERTIFICATE=$(kubectl -n ${NAMESPACE} get secret ${SERVICE_ACCOUNT_TOKEN_NAME} -o "jsonpath={.data['ca\.crt']}")

cat <<END
apiVersion: v1
kind: Config
clusters:
- name: default-cluster
  cluster:
    certificate-authority-data: ${SERVICE_ACCOUNT_CERTIFICATE}
    server: ${SERVER}
contexts:
- name: default-context
  context:
    cluster: default-cluster
    namespace: ${NAMESPACE}
    user: ${SERVICE_ACCOUNT}
current-context: default-context
users:
- name: ${SERVICE_ACCOUNT}
  user:
    token: ${SERVICE_ACCOUNT_TOKEN}
END

#Save the above script in a file called create-migration-config.sh file and then use the following command to generate a kubeconfig file.

chmod +x create-migration-config.sh && ./create-migration-config.sh > ~/.kube/migration-config.conf
export KUBECONFIG=~/.kube/migration-config.conf
storkctl generate clusterpair eks-clusterpair --kubeconfig ~/.kube/migration-config.conf > eks-clusterpair.yaml
options:
  ip: "<ip-address-of-node-in-the-destination-cluster>"
  port: "<port_of_remote_px_node_default_9001>"
  token: "<token_generated_from_destination_cluster>"
PX_POD=$(kubectl get pods -n kube-system -l name=portworx -o \
jsonpath='{.items[0].metadata.name}')

kubectl exec -it $PX_POD -n kube-system -- /opt/pwx/bin/pxctl cluster token show
kubectl create ns demo

kubectl apply -f eks-clusterpair.yaml -n demo
storkctl get clusterpair -n demo

NAME               STORAGE-STATUS   SCHEDULER-STATUS   CREATED
eks-clusterpair    Ready            Ready              12 Mar 22 03:11 UTC
cat > app-migration.yaml <<_EOF
apiVersion: stork.libopenstorage.org/v1alpha1
kind: Migration
metadata:
  name: <YOUR_MIGRATION_OBJECT>
  namespace: <YOUR_MIGRATION_NAMESPACE>
spec:
  clusterPair: <YOUR_CLUSTER_PAIR>
  includeResources: true # This migrates all Kubernetes objects.
  startApplications: true # Deploys app pods on the destination cluster
  namespaces:
    - <NAMESPACE_TO_MIGRATE>
  purgeDeletedResources: false # boolean value specifying if STORK should automatically purge a resource from the destination cluster when you delete it from the source cluster.
EOF

kubectl apply -f app-migration.yaml -n demo
storkctl get migrations -n demo
NAME            CLUSTERPAIR     STAGE     STATUS       VOLUMES   RESOURCES   CREATED
appmigration    eks-cluster     Volumes   InProgress   0/1       0/0         12 Mar 22 20:04 UTC
storkctl get migrations -n demo
NAME            CLUSTERPAIR     STAGE     STATUS       VOLUMES   RESOURCES   CREATED
appmigration    eks-cluster     Final     Successful   1/1       3/3         12 Mar 22 20:10 UTC
kubectl get all -n demo

kubectl get pvc -n demo
You can use the steps listed in this blog to create application migration solutions where Portworx can help you move your containerized apps—not just across different cloud environments, but also across different Kubernetes distributions. We have also recorded these migration scenarios in the demonstrations that are linked below:


