


Disaster recovery and data protection are critical when running your applications on Kubernetes in production. Organizations need to build a resilient and fault-tolerant solution that can minimize application downtime in case of any failure event—such as Node failure, Kubernetes Cluster failure, Cloud Availability Zone, or Region failure.
Portworx PX-DR can help organizations build synchronous and asynchronous disaster recovery solutions to minimize application downtime and, in the case of sync DR, avoid any data loss as well. Portworx PX-DR can give organizations the ability to design and deploy these zero recovery point objective (RPO) solutions for any Kubernetes clusters as long as they can meet the 10 ms roundtrip latency requirement between the clusters. These Kubernetes clusters can be on-prem running inside datacenters or can be running in AWS. In this blog, we will talk about how you can build a zero RPO DR solution for Amazon Elastic Kubernetes Service (EKS) clusters running in the us-east-1 region.
To get started, you need to deploy two EKS clusters: a primary and a secondary cluster in any AWS region of your choice. We have selected the us-east-1 region for this blog. To deploy EKS clusters, you can either use the AWS management console, AWS CLI, or the eksctl utility. Below is an example eksctl config file that can be customized to deploy an EKS cluster.
kind: ClusterConfig
metadata:
  name: siteA
  region: us-east-1
  version: "1.20"
managedNodeGroups:
  - name: storage-nodes
    instanceType: m5.2xlarge
    minSize: 3
    maxSize: 3
    volumeSize: 50
    amiFamily: AmazonLinux2
    labels: {role: worker, "portworx.io/node-type": "storage"}
    tags:
      nodegroup-role: worker
    iam:
      attachPolicyARNs:
        - arn:aws:iam::aws:policy/AmazonEKSWorkerNodePolicy
        - arn:aws:iam::aws:policy/AmazonEKS_CNI_Policy
        - arn:aws:iam::aws:policy/AmazonEC2ContainerRegistryReadOnly
        - arn:aws:iam::aws:policy/ElasticLoadBalancingFullAccess
        - <arn-of-your-portworx-aws-iam-policy>
      withAddonPolicies:
        imageBuilder: true
        autoScaler: true
        ebs: true
        fsx: true
        efs: true
        albIngress: true
        cloudWatch: true
availabilityZones: [ 'us-east-1a', 'us-east-1b', 'us-east-1c' ]

eksctl create cluster -f siteA.yaml
Before we install and configure Portworx, you need to ensure that ports 9001–9020 are allowed in the AWS Security Groups for your EKS clusters. Also, you will need to create a new policy that allows EKS worker nodes to create, modify, attach, and delete EBS volumes. Use the following AWS IAM policy definition to create a new policy and map it to your AWS IAM role for your EKS worker nodes on both clusters.
{
    "Version": "2012-10-17",
    "Statement": [
        {
            "Sid": "<stmt-id>",
            "Effect": "Allow",
            "Action": [
                "ec2:AttachVolume",
                "ec2:ModifyVolume",
                "ec2:DetachVolume",
                "ec2:CreateTags",
                "ec2:CreateVolume",
                "ec2:DeleteTags",
                "ec2:DeleteVolume",
                "ec2:DescribeTags",
                "ec2:DescribeVolumeAttribute",
                "ec2:DescribeVolumesModifications",
                "ec2:DescribeVolumeStatus",
                "ec2:DescribeVolumes",
                "ec2:DescribeInstances",
                "autoscaling:DescribeAutoScalingGroups"
            ],
            "Resource": [
                "*"
            ]
        }
    ]
}
Next, let’s go ahead and configure an external ETCD instance. For Sync DR configuration using Portworx PX-DR, you will need an external ETCD instance. You should deploy a highly available ETCD cluster for production deployments. But, for this blog, we are deploying a single ETCD instance running on an EC2 instance running CentOS. Once you have access to your EC2 instance, you can install and configure ETCD using the following commands:
yum install etcd

#Edit the /etc/etcd/etcd.conf file and set the ETCD_INITIAL_CLUSTER, ETCD_INITIAL_ADVERTISE_PEER_URLS, ETCD_ADVERTISE_CLIENT_URLS, ETCD_LISTEN_CLIENT_URLS parameters

systemctl enable etcd
systemctl start etcd
Next, let’s go ahead and generate Portworx configuration files using our Portworx spec generator. To install Portworx on each EKS cluster, you will need to generate a separate configuration using the Portworx spec generator. Ensure that you use the same Cluster ID (Portworx install argument: -c) and KVDB endpoints (Portworx install argument: -k).
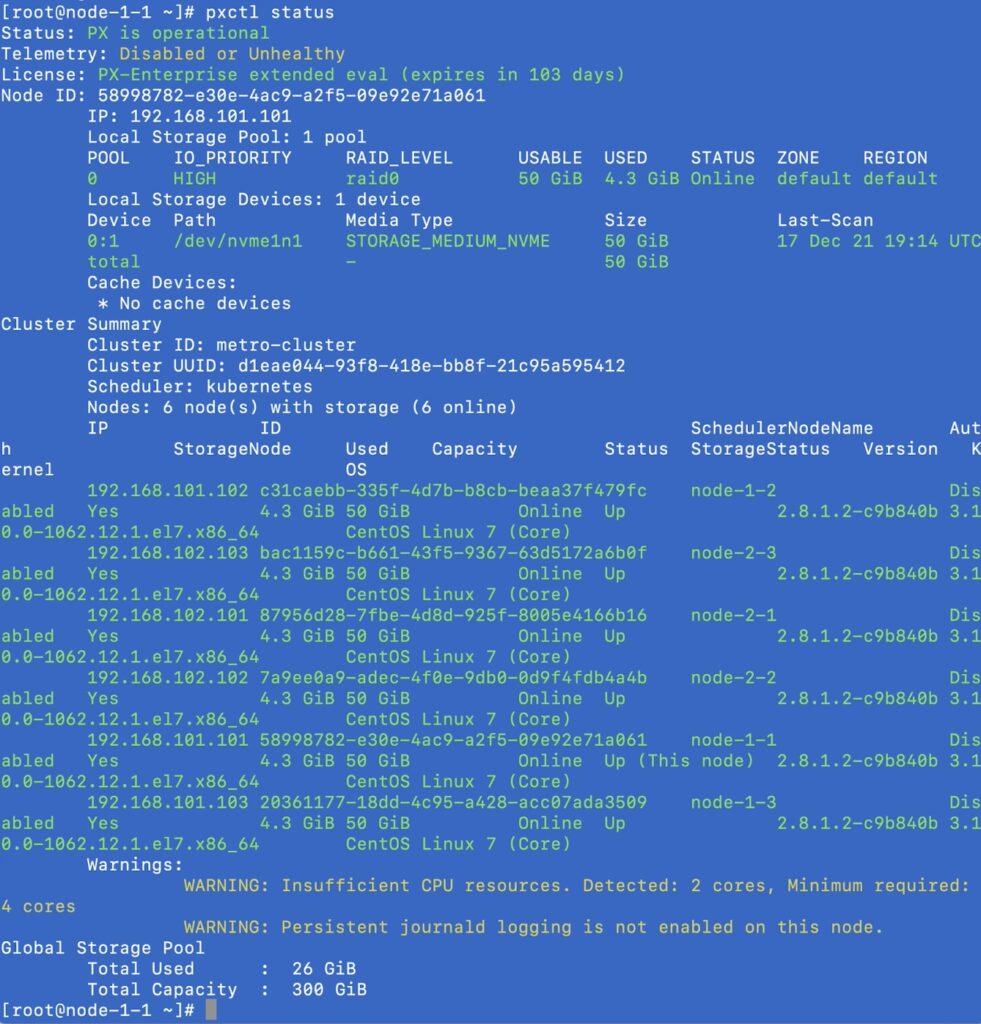
Once you have Portworx up and running on both EKS clusters, you can use the “pxctl status” command to look at your stretched Portworx cluster. For my setup, I have two three-node EKS clusters, so my Portworx cluster consists of six storage nodes distributed across two Portworx cluster domains.
Next, let’s install storkctl on your jumphost using the following commands:
STORK_POD=$(kubectl get pods -n kube-system -l name=stork -o jsonpath='{.items[0].metadata.name}') &&
kubectl cp -n kube-system $STORK_POD:/storkctl/linux/storkctl ./storkctl
sudo mv storkctl /usr/local/bin &&
sudo chmod +x /usr/local/bin/storkctl
Now let’s create object store credentials on the Portworx cluster. You can run the following command by accessing either the primary or the secondary cluster.
kubectl exec <portworx-pod> -n kube-system -it – bash

/opt/pwx/bin/pxctl credentials create \
--provider s3 \
--s3-access-key <aws_access_key> \
--s3-secret-key <aws_secret_key> \
--s3-region us-east-1  \
--s3-endpoint s3.amazonaws.com \
--s3-storage-class STANDARD \
clusterPair_<UUID_of_destination_cluster>
Next, let’s create a ClusterPair object, which Portworx needs to communicate with the secondary EKS cluster. The ClusterPair object is generated on the secondary cluster but applied on the primary cluster.
storkctl generate clusterpair -n migrationnamespace remotecluster > clusterpair.yaml
Once you have the clusterpair.yaml file, go ahead and edit it to update the following options parameters:
options:
     mode: DisasterRecovery
Now that you have the clusterpair.yaml file, go ahead and apply if against your primary EKS cluster:
kubectl apply -f clusterpair.yaml

storkctl get clusterpair -n migrationnamespace
NAME               STORAGE-STATUS   SCHEDULER-STATUS   CREATED
remotecluster      NotProvided      Ready              16 Dec 21 18:16 PDT
You should see a ClusterPair object on the primary EKS cluster, with the Scheduler-Status set to Ready and Storage-Status set to NotProvided. This is because you just have one single Portworx cluster stretched across two EKS clusters. So, any write operation on the primary cluster is replicated at the storage level to the secondary cluster.
Next, let’s go ahead and create SchedulePolicy and MigrationSchedule objects on your primary cluster. The schedule policy defines the time interval when Portworx will sync all the Kubernetes objects from the primary to the secondary cluster and the MigrationSchedule allows you to define things like the namespace where your application is running, which SchedulePolicy to use, and which ClusterPair object to use for the migration operations.
###Schedule Policy
apiVersion: stork.libopenstorage.org/v1alpha1
kind: SchedulePolicy
metadata:
  name: testpolicy
policy:
  interval:
    intervalMinutes: 1
  daily:
    time: "10:14PM"
  weekly:
    day: "Thursday"
    time: "10:13PM"
  monthly:
    date: 14
    time: "8:05PM"

kubectl apply -f testpolicy.yaml

###Migration Schedule
apiVersion: stork.libopenstorage.org/v1alpha1
kind: MigrationSchedule
metadata:
  name: mysqlmigrationschedule
  namespace: migrationnamespace
spec:
  template:
    spec:
      # This should be the name of the cluster pair created above
      clusterPair: remotecluster
      includeResources: true
      startApplications: false
      includeVolumes: false
      namespaces:
      - migrationnamespace
  schedulePolicyName: testpolicy

kubectl apply -f migrationschedule.yaml
Once you apply these configurations, Portworx will start syncing your application from the primary to the secondary cluster. You can monitor the migrations by using the following commands:
kubectl describe migrationschedules -n migrationnamespace
kubectl get migration -n migrationnamespace
At this point, you are ready to perform failover and failback operations for your application that is running on your primary EKS cluster.
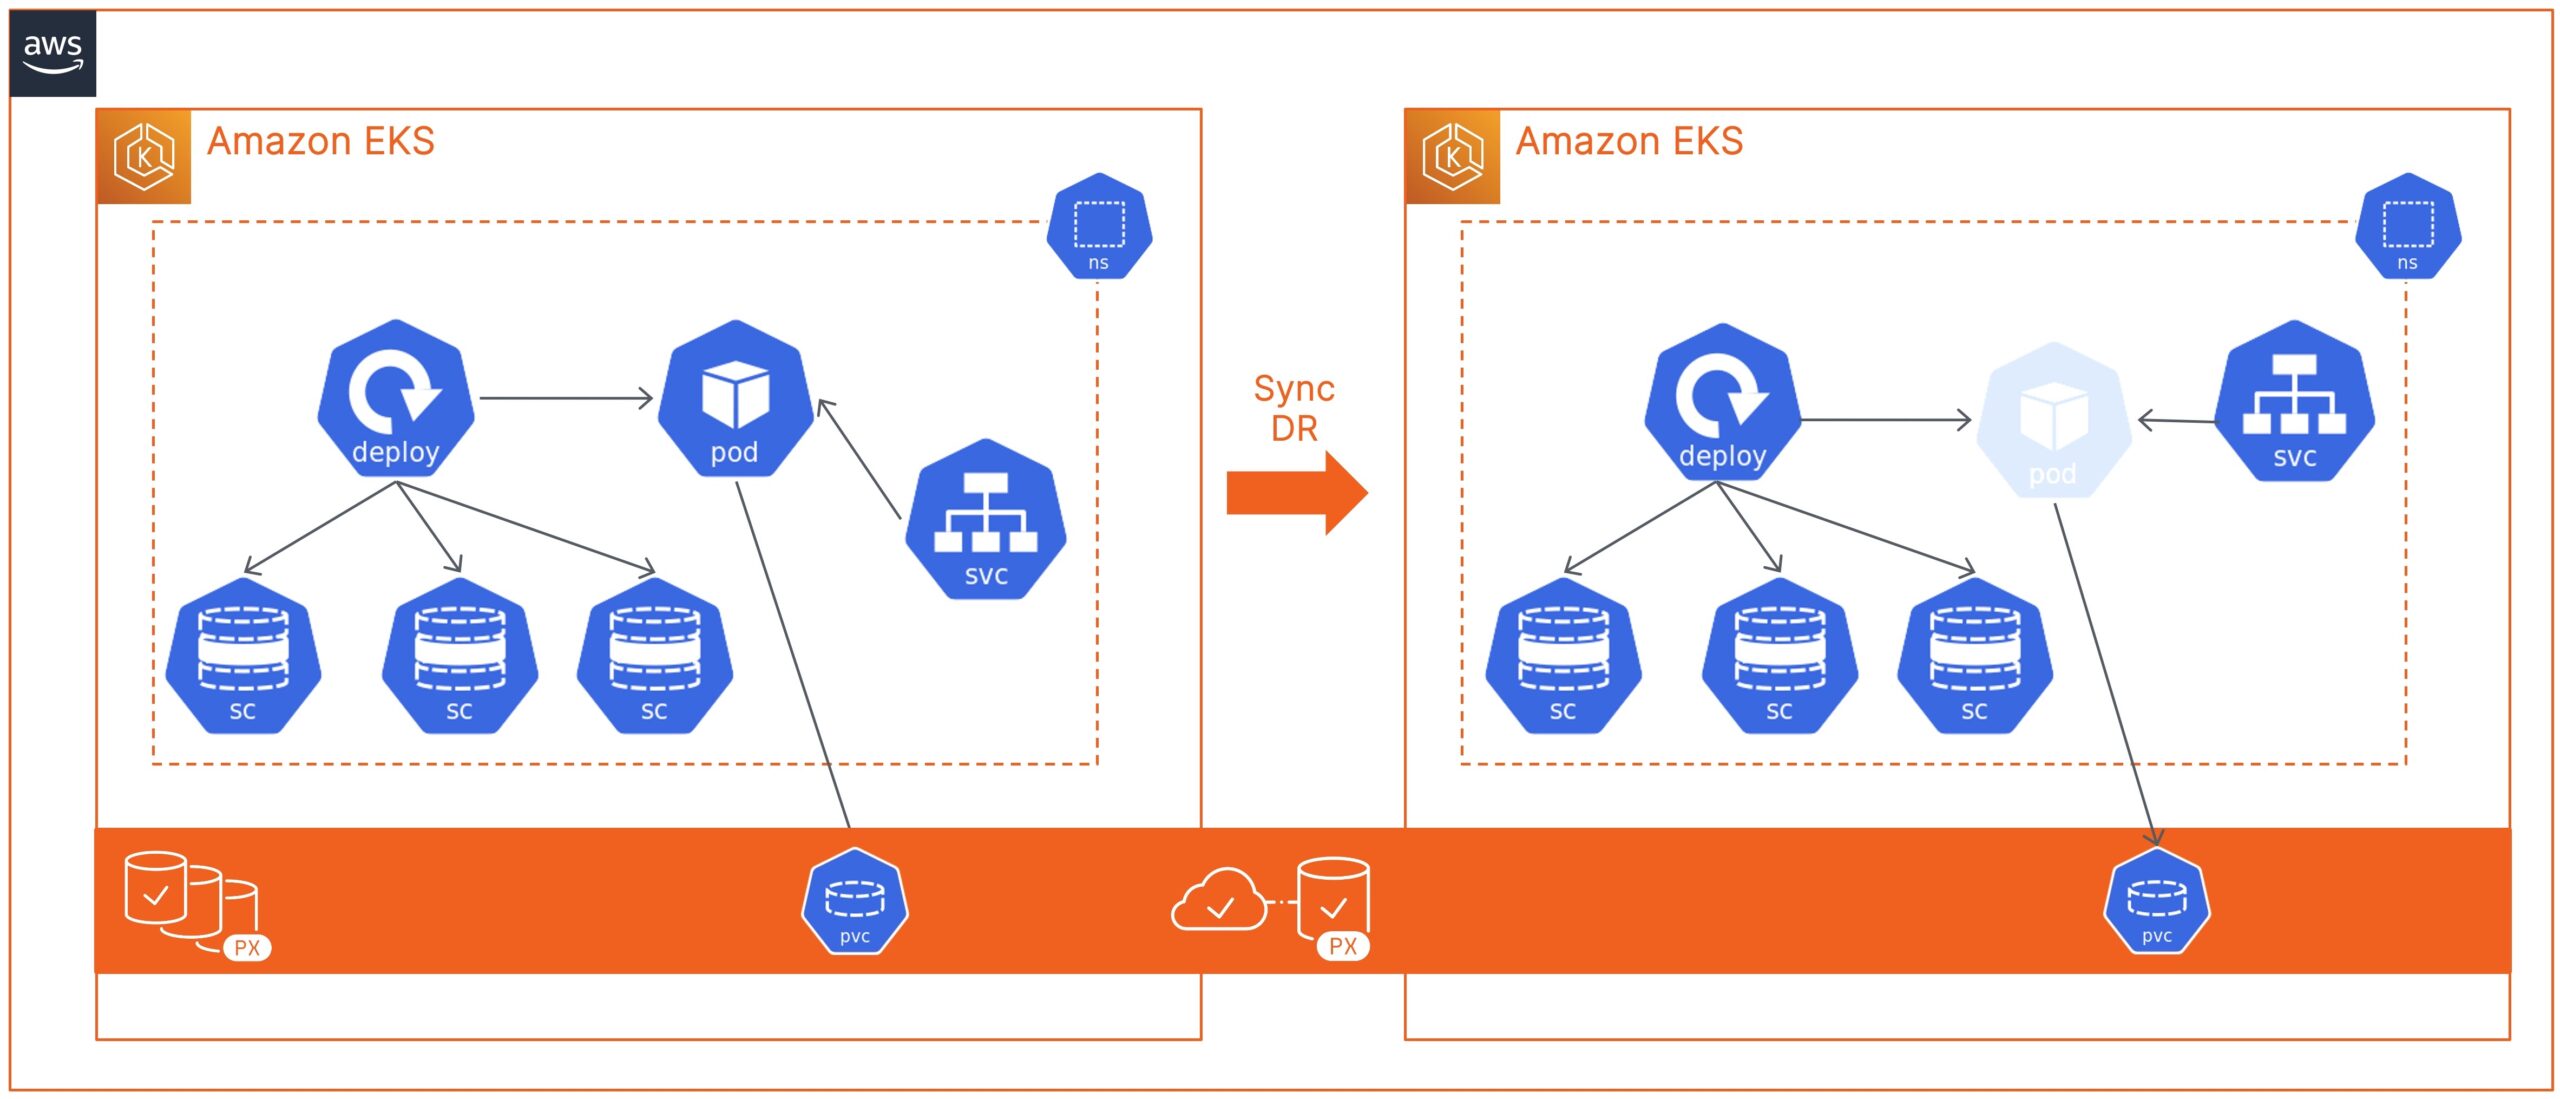
Sync DR using Portworx PX-DR allows you to failover your applications with zero data loss and minimum recovery time. When you configure a migration schedule, PX-DR automatically copies all the Kubernetes objects to your secondary cluster, but it doesn’t deploy any active pods. Once you perform a failover operation and activate the migration on the secondary cluster, PX-DR will start scaling up your deployment objects by deploying your application pods.
If you want to see a failover operation of a simple web application running on an Amazon EKS cluster, look at the following demo.


