


This post is part of our ongoing series on running WordPress on Kubernetes. We’ve published a number of articles about running WordPress on Kubernetes for specific platforms and for specific use cases. If you are looking for a specific Kubernetes platform, check out these related articles.
Running HA WordPress on Amazon Elastic Container Service for Kubernetes (EKS)
Running HA WordPress on Azure Kubernetes Service (AKS)
Running HA WordPress on Red Hat OpenShift
Running HA WordPress on IBM Cloud Kubernetes Service (IKS)
Running HA WordPress with Rancher Kubernetes Engine (RKE)
Running HA WordPress on IBM Cloud Private
And now, onto the post…
In the world of Kubernetes demos, WordPress is one of the canonical examples, but usually, the complexities of WordPress itself is just an afterthought. WordPress is just the container that we deploy to demonstrate some other capability, not a multifaceted application that needs to be deployed, scaled, backup up, and managed. For all the countless examples, rarely do they talk about what it means to run a multi-tenant WordPress environment from the perspective of a service provider selling WordPress sites for profit. The reason? Running a multi-tenant WordPress environment on Kubernetes is actually quite hard and these examples are designed to show simple things. So the complexity is swept under the rug.
Today we discuss some of the hard problems you need to solve in order to run a multi-tenant WordPress deployment as a service provider. Portworx has a lot of experience helping hosting companies and other service providers run lots of WordPress sites for paying customers. This blog is a summary of that work.
In these multi-tenant WordPress deployments, there are a few important capabilities that customers must achieve.
Portworx wasn’t designed with only WordPress in mind, but you might think that it was. First, Portworx supports persistent storage and data management for two critical WordPress components:
Without a solution for both MySQL and NFS-like file storage, a persistent storage solution for Kubernetes cannot claim to be able to handle WordPress workloads. But just persistent storage isn’t enough either.
WordPress is said to run 28% of all websites on the Internet. That is a phenomenal installed base of some 75 million sites. While some of these are massive sites like TechCrunch or The New Yorker, the vast majority of WordPress sites are much smaller. That means as a WordPress hoster, your business probably follows the 80-20 rule. 80% of your revenue comes from 20% of your sites. Or said another way, 80% of your sites only account for 20% of your traffic.
That means that you need to think about your business in two ways:
At the same time, you need a migration path for some sites to move from low-volume to high-volume plan, without disrupting the customer or your own internal operations teams.
Let’s look at how Portworx solves these requirements in turn.
As we have seen, each WordPress site requires 2 persistent volumes. One for MySQL, one for shared storage. A Linux host, however, is limited to 40 volumes maximum when using a solution like Amazon EBS or a traditional SAN. That means that unless you use the same volume for multiple sites, you are limited to 20 sites per host, no matter how large the host is. This is often the choice that WordPress hosters make, but what they gain in density, they lose in isolation. Since multiple sites share the same volumes, you cannot backup and restore only a single site as easily.
With Portworx however, a single block device provided by Amazon, Google, Azure, your existing SAN or even the bare metal server can be divided up in hundreds of virtual volumes, allowing hundreds of sites to run on the same host. Here is how one Portworx customer, Aurea, was able to leverage Portworx for running hundreds of apps on the same host:
“Our clusters are highly dense, meaning we run a lot of containers per host. On AWS, we use huge instances. The recommendation from Kubernetes is 100 pods per VM. Already, we’re running 200-300 pods per host. Also, since most of the apps that we run are stateful, we can easily have 200-300 volumes per host as well. And we’re working to push these limits even further. Because of these densities enabled by Kubernetes and Portworx, we’re easily saving 60-90% on our compute costs. Portworx itself was between 30-50% cheaper than any other storage solution we tested.”
We’ve just seen how Portworx can help service provides increase the density of their WordPress deployments while simplifying operations. Now let’s look at how hosters can solve one of the biggest problems in multi-tenant environments: noisy neighbors.
If you categorically knew which 20% of your customers would account for 80% of your traffic at all times, solving the noisy neighbor problem would be a one-time migration. But, because traffic patterns change over time, this is a hard problem to solve. Portworx does a few critical things to help.
First, in addition to using Kubernetes to limit pod resources like Memory and CPU, you can use Portworx to automatically place different workloads on different storage hardware for different classes of service. For instance, you might sell your customers a premium “performance” plan if they are expecting heavy usage and they are performance sensitive. Alternatively, cost-conscious customers might opt for a “budget” plan that offers reliability but doesn’t guarantee blazing fast performance. On the backend, these plans can be mapped to Portworx “storage classes” that automatically place high-end plans on SSDs and low-end plans on HHDs.
Additionally, since you don’t always know when one a customer site will suddenly experience a spike in traffic draining resources from neighbor sites, Portworx enables you to move applications between environments using PX-Motion. With PX-Motion you can move a single pod or group of pods to a different Kubernetes environment with a single command.
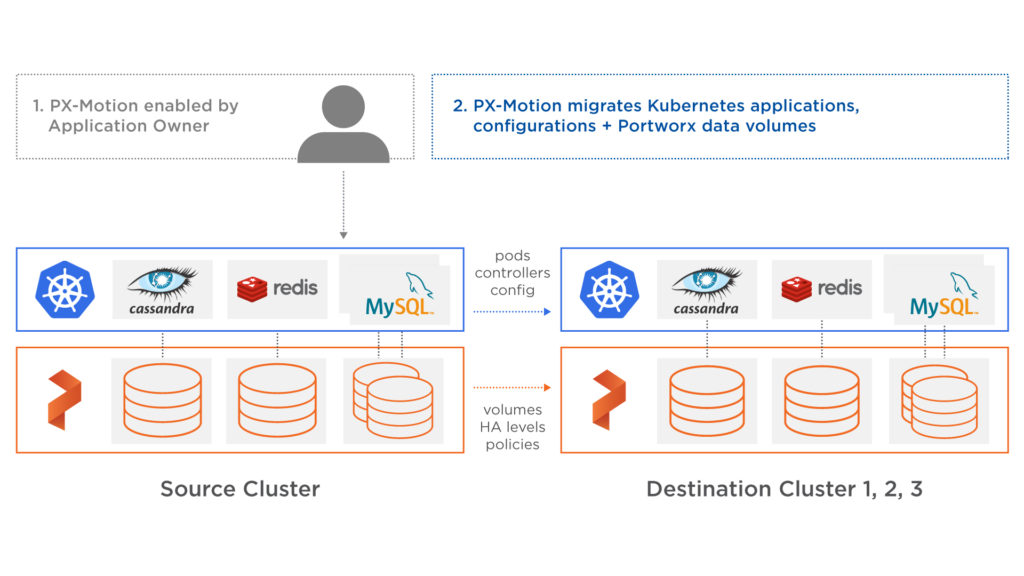
Often a hosting customer will call their service provider the day before they are going to be on a national TV and say “I really need my site to work tomorrow.” This often leads to a lot of scrambling around and manual tuning, but with PX-Motion, moving the customer to an environment with more resources is as easy as kubectl apply -f wp-migration.yaml.
The above described moving one heavy load site off a multi-tenant cluster. This is often the best option if you have some advance warning before a large traffic spike. However, in the middle of a large traffic event, it is often better to move low traffic sites away from the heavy traffic site, instead of vice versa. This is also possible with PX-Motion.
Every WordPress hoster has heard this before. Accidents happen and when they do, your customer calls you, desperate. The problem for large multi-tenant environments is that true site-based isolation is difficult, especially if you have gotten past the 20-sites per host limit described above by pooling storage for multiple sites into the same volume.
With Portworx, these limitations don’t apply. Each WordPress site gets its own MySQL and shared volumes, which can be fully and independently controlled, managed, snapshotted, backed up and migrated. For example, you can easily set up a backup policy that snapshots a single WordPress environment (MySQL and files) every hour and back it up to an object store. Then, if you get that frantic phone call from a customer, you can easily restore just their site, without affecting anyone else. Importantly, using Portworx 3DSnap, these snapshots of MySQL and WordPress files are application consistent, not just crash consistent, ensuring easy recover from backup.
Now that we’ve looked at a high level at how Portworx helps service providers run large scale multi-tenant WordPress environment, let’s go a step deeper and look at how it works on Kubernetes. This post looks at how to run a HA WordPress on Google GKE, a managed Kubernetes offering from Google, which makes it easy to create, configure, and manage a cluster of virtual machines that are preconfigured to run containerized applications. We have other blogs about how to run a similar setup on Amazon EKS and Azure AKS.
In summary, to run HA WordPress on Google Cloud Platform you need to:
When launching a GKE cluster to run Portworx, you need to ensure that the cluster is based on Ubuntu. Due to certain restrictions with GKE clusters based on Container-Optimized OS (COS), Portworx requires Ubuntu as the base image for the GKE Nodes.
The following command configures a 3-node GKE Cluster in zone ap-south-1-a. You can modify the parameters accordingly.
$ gcloud container clusters create "gke-px" \
--zone "asia-south1-a" \
--username "admin" \
--cluster-version "1.9.7-gke.11 \
--machine-type "n1-standard-4" \
--image-type "UBUNTU" \
--disk-type "pd-ssd" \
--disk-size "100" \
--num-nodes "3" \
--enable-cloud-logging \
--enable-cloud-monitoring \
--network "default" \
--addons HorizontalPodAutoscaling,HttpLoadBalancing,KubernetesDashboard
Once the cluster is ready, configure kubectl CLI with the following command:
$ gcloud container clusters get-credentials gke-px --zone asia-south1-a
Portworx requires a ClusterRoleBinding for your user. Without this configuration, the command fails with an error clusterroles.rbac.authorization.k8s.io "portworx-pvc-controller-role" is forbidden.
Let’s create a ClusterRoleBinding with the following command:
$ kubectl create clusterrolebinding cluster-admin-binding \
--clusterrole cluster-admin \
--user $(gcloud config get-value account)
You should now have a three node Kubernetes cluster deployed on Google Cloud Platform.
$ kubectl get nodes
NAME                                    STATUS   ROLES    AGE   VERSION
gke-gke-px-default-pool-528bb0b0-gl8f   Ready    <none>   86m   v1.9.7-gke.11
gke-gke-px-default-pool-528bb0b0-k05x   Ready    <none>   86m   v1.9.7-gke.11
gke-gke-px-default-pool-528bb0b0-r2x9   Ready    <none>   86m   v1.9.7-gke.11

Installing Portworx on GKE is not very different from installing it on a Kubernetes cluster setup through Kops. Portworx GKE documentation has the steps involved in running the Portworx cluster in a Kubernetes environment deployed in GCP.
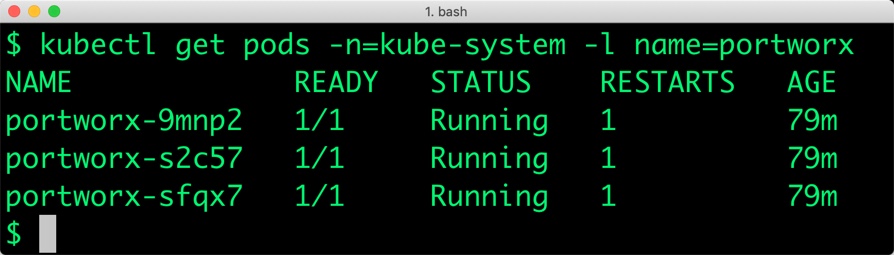
Portworx cluster needs to be up and running on GKE before proceeding to the next step. The kube-system namespace should have the Portoworx pods in Running state.
$ kubectl get pods -n=kube-system -l name=portworx
NAME             READY   STATUS    RESTARTS   AGE
portworx-9mnp2   1/1     Running   1          79m
portworx-s2c57   1/1     Running   1          79m
portworx-sfqx7   1/1     Running   1          79m
Once the GKE cluster is up and running, and Portworx is installed and configured, we will deploy a highly available MySQL database.
Through Kubernetes storage class objects, an admin can define different classes of Portworx volumes that are offered in a cluster. These classes will be used during the dynamic provisioning of volumes. The Storage Class defines the replication factor, I/O profile (e.g., for a database or a CMS), and priority (e.g., SSD or HDD). These parameters impact the availability and throughput of workloads and can be specified for each volume. This is important because a production database will have different requirements than a development Jenkins cluster.
In this example, the storage class that we deploy has a replication factor of 3 with I/O profile set to “db_remote” and priority set to “high.” This means that the storage will be optimized for low latency database workloads like MySQL and automatically placed on the highest performance storage available in the cluster. Notice that we also mention the filesystem, xfs in the storage class.
$ cat > px-mysql-sc.yaml << EOF
kind: StorageClass
apiVersion: storage.k8s.io/v1beta1
metadata:
    name: px-ha-sc
provisioner: kubernetes.io/portworx-volume
parameters:
   repl: "3"
   io_profile: "db_remote"
   priority_io: "high"
   fs: "xfs"
EOF
$ kubectl create -f px-mysql-sc.yaml
storageclass.storage.k8s.io "px-ha-sc" created

$ kubectl get sc
NAME                PROVISIONER                     AGE
px-ha-sc             kubernetes.io/portworx-volume   2s
standard (default)   kubernetes.io/gce-pd            90m
stork-snapshot-sc    stork-snapshot                  80m
We can now create a Persistent Volume Claim (PVC) based on the Storage Class. Thanks to dynamic provisioning, the claims will be created without explicitly provisioning Persistent Volume (PV).
$ cat > px-mysql-pvc.yaml << EOF
kind: PersistentVolumeClaim
apiVersion: v1
metadata:
   name: px-mysql-pvc
   annotations:
     volume.beta.kubernetes.io/storage-class: px-ha-sc
spec:
   accessModes:
     - ReadWriteOnce
resources:
     requests:
       storage: 1Gi
EOF

$ kubectl create -f px-mysql-pvc.yaml
persistentvolumeclaim "px-mysql-pvc" created

$ kubectl get pvc
NAME           STATUS   VOLUME                                     CAPACITY   ACCESS MODES   STORAGECLASS   AGE
px-mysql-pvc   Bound    pvc-b9b4ce6a-ea08-11e8-bb45-42010aa00057   1Gi        RWO            px-ha-sc       29s
Finally, let’s create a MySQL instance as a Kubernetes deployment object. For simplicity’s sake, we will just be deploying a single MySQL pod. This is often sufficient for multi-tenant WordPress environments because each site is small and because Portworx provides synchronous replication for High Availability, a single MySQL instance might be the best deployment option for your MySQL database. Portworx can also provide backing volumes for multi-node MySQL clusters for your larger customers. The choice is yours.
$ cat > px-mysql-app.yaml << EOF
apiVersion: apps/v1
kind: Deployment
metadata:
  name: mysql
spec:
  strategy:
    rollingUpdate:
      maxSurge: 1
      maxUnavailable: 1
    type: RollingUpdate
  replicas: 1
  selector:
    matchLabels:
      app: mysql
  template:
    metadata:
      labels:
        app: mysql
    spec:
      schedulerName: stork
      containers:
      - name: mysql
        image: mysql:5.6
        imagePullPolicy: "Always"
        env:
        - name: MYSQL_ROOT_PASSWORD
          value: password
        ports:
        - containerPort: 3306
        volumeMounts:
        - mountPath: /var/lib/mysql
          name: mysql-data
      volumes:
      - name: mysql-data
        persistentVolumeClaim:
          claimName: px-mysql-pvc
EOF
$ kubectl create -f px-mysql-app.yaml
deployment.extensions "mysql" created
The MySQL deployment defined above is explicitly associated with the PVC, px-mysql-pvc created in the previous step.
This deployment creates a single pod running MySQL backed by Portworx.
$ kubectl get pods
NAME                     READY     STATUS    RESTARTS   AGE
mysql-654cc68f68-w857t   1/1       Running   0          6s
We can inspect the Portworx volume by accessing the pxctl tool running with the MySQL pod.
$ VOL=`kubectl get pvc | grep px-mysql-pvc | awk '{print $3}'`
$ PX_POD=$(kubectl get pods -l name=portworx -n kube-system -o jsonpath='{.items[0].metadata.name}')
$ kubectl exec -it $PX_POD -n kube-system -- /opt/pwx/bin/pxctl volume inspect ${VOL}
Volume	:  515061075716191420
	Name            	 :  pvc-b9b4ce6a-ea08-11e8-bb45-42010aa00057
	Size            	 :  1.0 GiB
	Format          	 :  xfs
	HA              	 :  3
	IO Priority     	 :  MEDIUM
	Creation time   	 :  Nov 17 01:33:15 UTC 2018
	Shared          	 :  no
	Status          	 :  up
	State           	 :  Attached: gke-gke-px-default-pool-528bb0b0-k05x (10.160.0.2)
	Device Path     	 :  /dev/pxd/pxd515061075716191420
	Labels          	 :  pvc=px-mysql-pvc,namespace=default
	Reads           	 :  78
	Reads MS        	 :  104
	Bytes Read      	 :  356352
	Writes          	 :  430
	Writes MS       	 :  17672
	Bytes Written   	 :  166264832
	IOs in progress 	 :  0
	Bytes used      	 :  120 MiB
	Replica sets on nodes:
		Set 0
		  Node 		 : 10.160.0.4 (Pool 0)
		  Node 		 : 10.160.0.2 (Pool 0)
		  Node 		 : 10.160.0.3 (Pool 0)
	Replication Status	 :  Up
	Volume consumers	 :
		- Name           : mysql-654cc68f68-w857t (edb52093-ea08-11e8-bb45-42010aa00057) (Pod)
		  Namespace      : default
		  Running on     : gke-gke-px-default-pool-528bb0b0-k05x
		  Controlled by  : mysql-654cc68f68 (ReplicaSet)
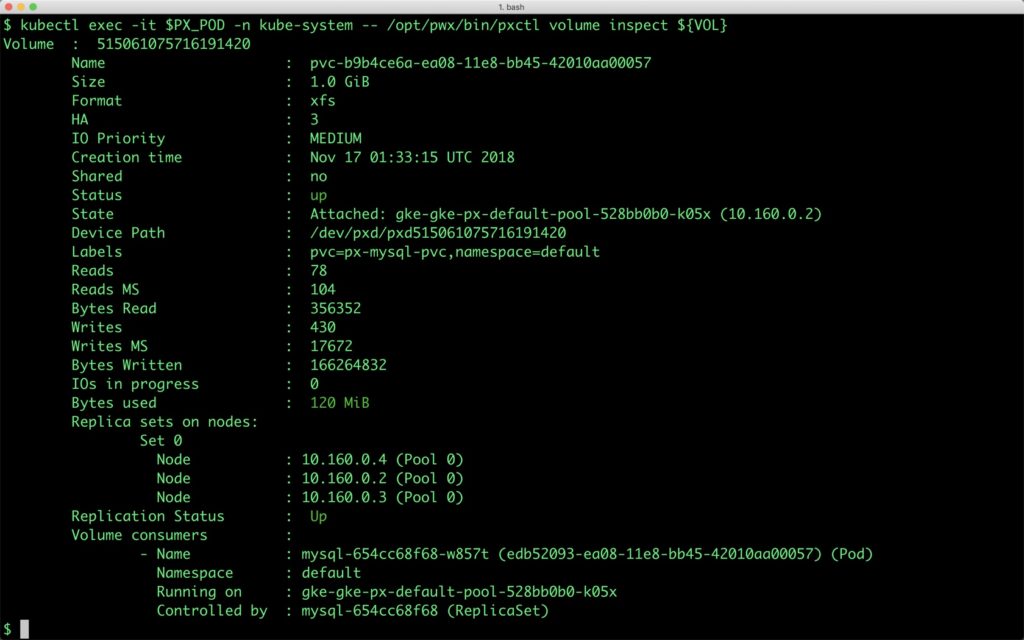
The output from the above command confirms the creation of volumes that are backing MySQL database instance.
To enable WordPress deployment to talk to the MySQL deployment, we need to expose it as a Kubernetes service. Since it is an internal service accessed by name, we will create a headless service that doesn’t assign an IP address. Refer to Kubernetes documentation for more details on the headless service.
The YAML file below has the definition of MySQL headless service.
$ cat > px-mysql-svc.yaml << EOF
apiVersion: v1
kind: Service
metadata:
  name: mysql
  labels:
    app: mysql
spec:
  ports:
  - port: 3306
    name: mysql
  clusterIP: None
  selector:
    app: mysql
EOF
$ kubectl create -f px-mysql-svc.yaml
service/mysql created
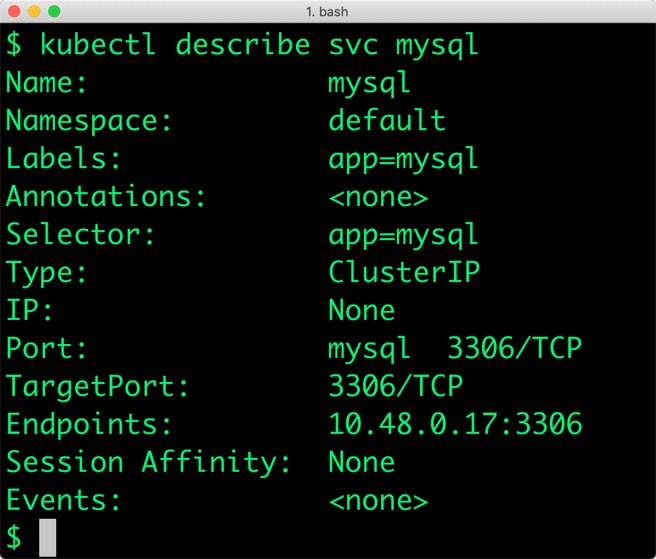
Verify the creation of the service by describing it. Note that the ClusterIP doesn’t have an IP address assigned. The service points to a single MySQL pod that was created earlier.
$ kubectl describe svc mysql
Name:              mysql
Namespace:         default
Labels:            app=mysql
Annotations:
Selector:          app=mysql
Type:              ClusterIP
IP:                None
Port:              mysql  3306/TCP
TargetPort:        3306/TCP
Endpoints:         10.48.0.17:3306
Session Affinity:  None
Events:
Unlike other workloads, the pods running WordPress share the storage backend. This enables different instances of WordPress deployed as pods access the same filesystem.
Portworx has a concept of shared volumes in which multiple pods can share a common storage volume. A shared volume is declared as a part of the storage class.
Additionally, we will specify an io_profile of “cms.”. This is useful for content management systems like WordPress and speeds up site performance by implementing an attribute cache.
Let’s define a separate storage class for WordPress with a shared volume.
$ cat > px-shared-sc.yaml << EOF
kind: StorageClass
apiVersion: storage.k8s.io/v1beta1
metadata:
    name: px-shared-sc
provisioner: kubernetes.io/portworx-volume
parameters:
   repl: "3"
   shared: "true"
  io_profile: "cms"
EOF

$ kubectl create -f px-shared-sc.yaml
storageclass.storage.k8s.io "px-shared-sc" created
We will now create a shared Persistent Volume Claim (PVC) based on the Storage Class that we defined earlier for WordPress. This PVC will be used by all the WordPress pods to store the shared content such as HTML, CSS, JPG etc.
$ cat > px-wp-pvc.yaml << EOF
kind: PersistentVolumeClaim
apiVersion: v1
metadata:
   name: px-wp-pvc
   annotations:
     volume.beta.kubernetes.io/storage-class: px-shared-sc
spec:
   accessModes:
     - ReadWriteMany
   resources:
     requests:
       storage: 1Gi
EOF

$ kubectl create -f px-wp-pvc.yaml
persistentvolumeclaim/px-wp-pvc created
We will now have two PVCs associated with MySQL and WordPress deployments.
$ kubectl get pvc
NAME           STATUS   VOLUME                                     CAPACITY   ACCESS MODES   STORAGECLASS   AGE
px-mysql-pvc   Bound    pvc-35a9f85a-ea1f-11e8-aee2-3eb8d1b34ba8   1Gi        RWO            px-ha-sc       5m46s
px-wp-pvc      Bound    pvc-001a9ebe-ea20-11e8-aee2-3eb8d1b34ba8   1Gi        RWO            px-shared-sc       7s
We are now ready to deploy the WordPress instance that talks to MySQL. Create the following YAML file and submit it to Kubernetes through kubectl.
$ cat > px-wp-app.yaml << EOF
apiVersion: apps/v1
kind: Deployment
metadata:
  name: wordpress
  labels:
    app: wordpress
spec:
  strategy:
    rollingUpdate:
      maxSurge: 1
      maxUnavailable: 1
    type: RollingUpdate
  replicas: 1
  selector:
    matchLabels:
      app: wordpress
  template:
    metadata:
      labels:
        app: wordpress
    spec:
      containers:
      - image: wordpress:latest
        name: wordpress
        env:
        - name: WORDPRESS_DB_HOST
          value: mysql
        - name: WORDPRESS_DB_PASSWORD
          value: password
        ports:
        - containerPort: 80
          name: wordpress
        volumeMounts:
        - name: wp-data
          mountPath: /var/www/html
      volumes:
      - name: wp-data
        persistentVolumeClaim:
          claimName: px-wp-pvc
EOF

$ kubectl create -f px-wp-app.yaml
deployment.extensions/wordpress created
Let’s verify that both MySQL and WordPress pods are up and running.
$ kubectl get pods
NAME                         READY   STATUS    RESTARTS   AGE
mysql-dff54d66d-jxvqq        1/1     Running   0          7m
wordpress-79bcf7bb5f-t9grw   1/1     Running   0          44s
Before accessing the web UI of WordPress, let’s make sure that the Apache server hosting WordPress is running. We can do that by checking the logs of the WordPress pod.
$ kubectl logs wordpress-79bcf7bb5f-t9grw
WordPress not found in /var/www/html - copying now...
Complete! WordPress has been successfully copied to /var/www/html
AH00558: apache2: Could not reliably determine the server's fully qualified domain name, using 192.168.151.67. Set the 'ServerName' directive globally to suppress this message
AH00558: apache2: Could not reliably determine the server's fully qualified domain name, using 192.168.151.67. Set the 'ServerName' directive globally to suppress this message
[Fri Nov 16 23:35:24.830311 2018] [mpm_prefork:notice] [pid 1] AH00163: Apache/2.4.25 (Debian) PHP/7.2.12 configured -- resuming normal operations
[Fri Nov 16 23:35:24.830357 2018] [core:notice] [pid 1] AH00094: Command line: 'apache2 -D FOREGROUND'
In order to access the WordPress UI from the public Internet, we need to expose the deployment through a Kubernetes load balancer service. On GKE, the service will automatically create a TCP Load Balancer and shows the IP address associated with it.
Let’s create the load balancer service to expose WordPress.
$ cat > px-wp-svc.yaml << EOF
apiVersion: v1
kind: Service
metadata:
  name: wordpress
  labels:
    app: wordpress
spec:
  ports:
    - port: 80
  selector:
    app: wordpress
  type: LoadBalancer
EOF
$ kubectl create -f px-wp-svc.yaml
service/wordpress created
We can check the status of the service with the following command:
$ kubectl get svc
$ kubectl get svc
NAME         TYPE           CLUSTER-IP     EXTERNAL-IP     PORT(S)        AGE
kubernetes   ClusterIP      10.51.240.1              443/TCP        106m
mysql        ClusterIP      None                     3306/TCP       9m11s
wordpress    LoadBalancer   10.51.241.72   35.244.46.247   80:31533/TCP   3m23s
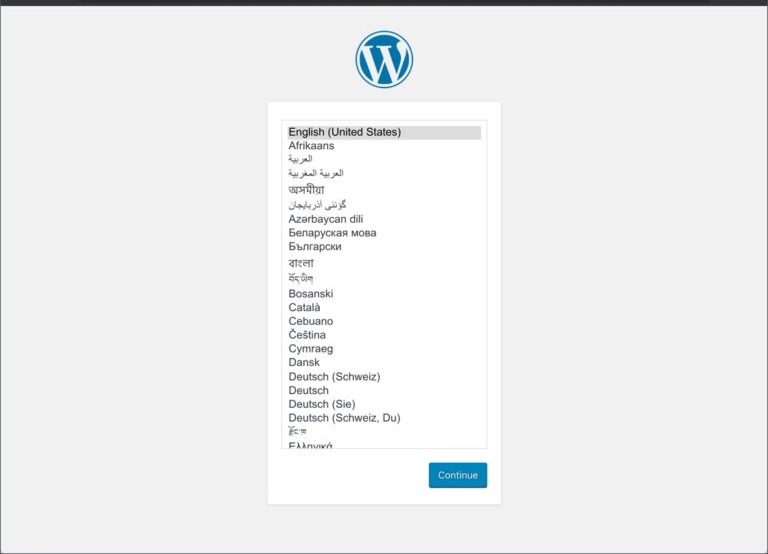
GKE has initiated the creation of load balancer that points to the WordPress service. After a few minutes, you can access the WordPress web UI through the load balancer’s IP address from any browser.
You can scale WordPress by adding more replicas to the deployment. Since all the WordPress pods share the common storage backend based on Portworx shared volume, the deployment can be easily scaled out.
The MySQL deployment is configured to be in HA mode. For details on how to perform failover, a dynamic expansion the volumes, and configuring snapshots, refer to the tutorial on running HA MySQL on GKE.
Portworx can easily be deployed on Google Kubernetes Engine to run stateful workloads in production. It is an ideal storage platform for transactional databases such as MySQL and read-intensive applications such as WordPress.
Through the integration of STORK, DevOps and StorageOps teams can seamlessly run highly-available workloads in GKE. They can perform traditional operations such as volume expansion, snapshots, and backup and recovery for cloud native applications.


