How to build a Machine Learning pipeline using Kubeflow and Portworx
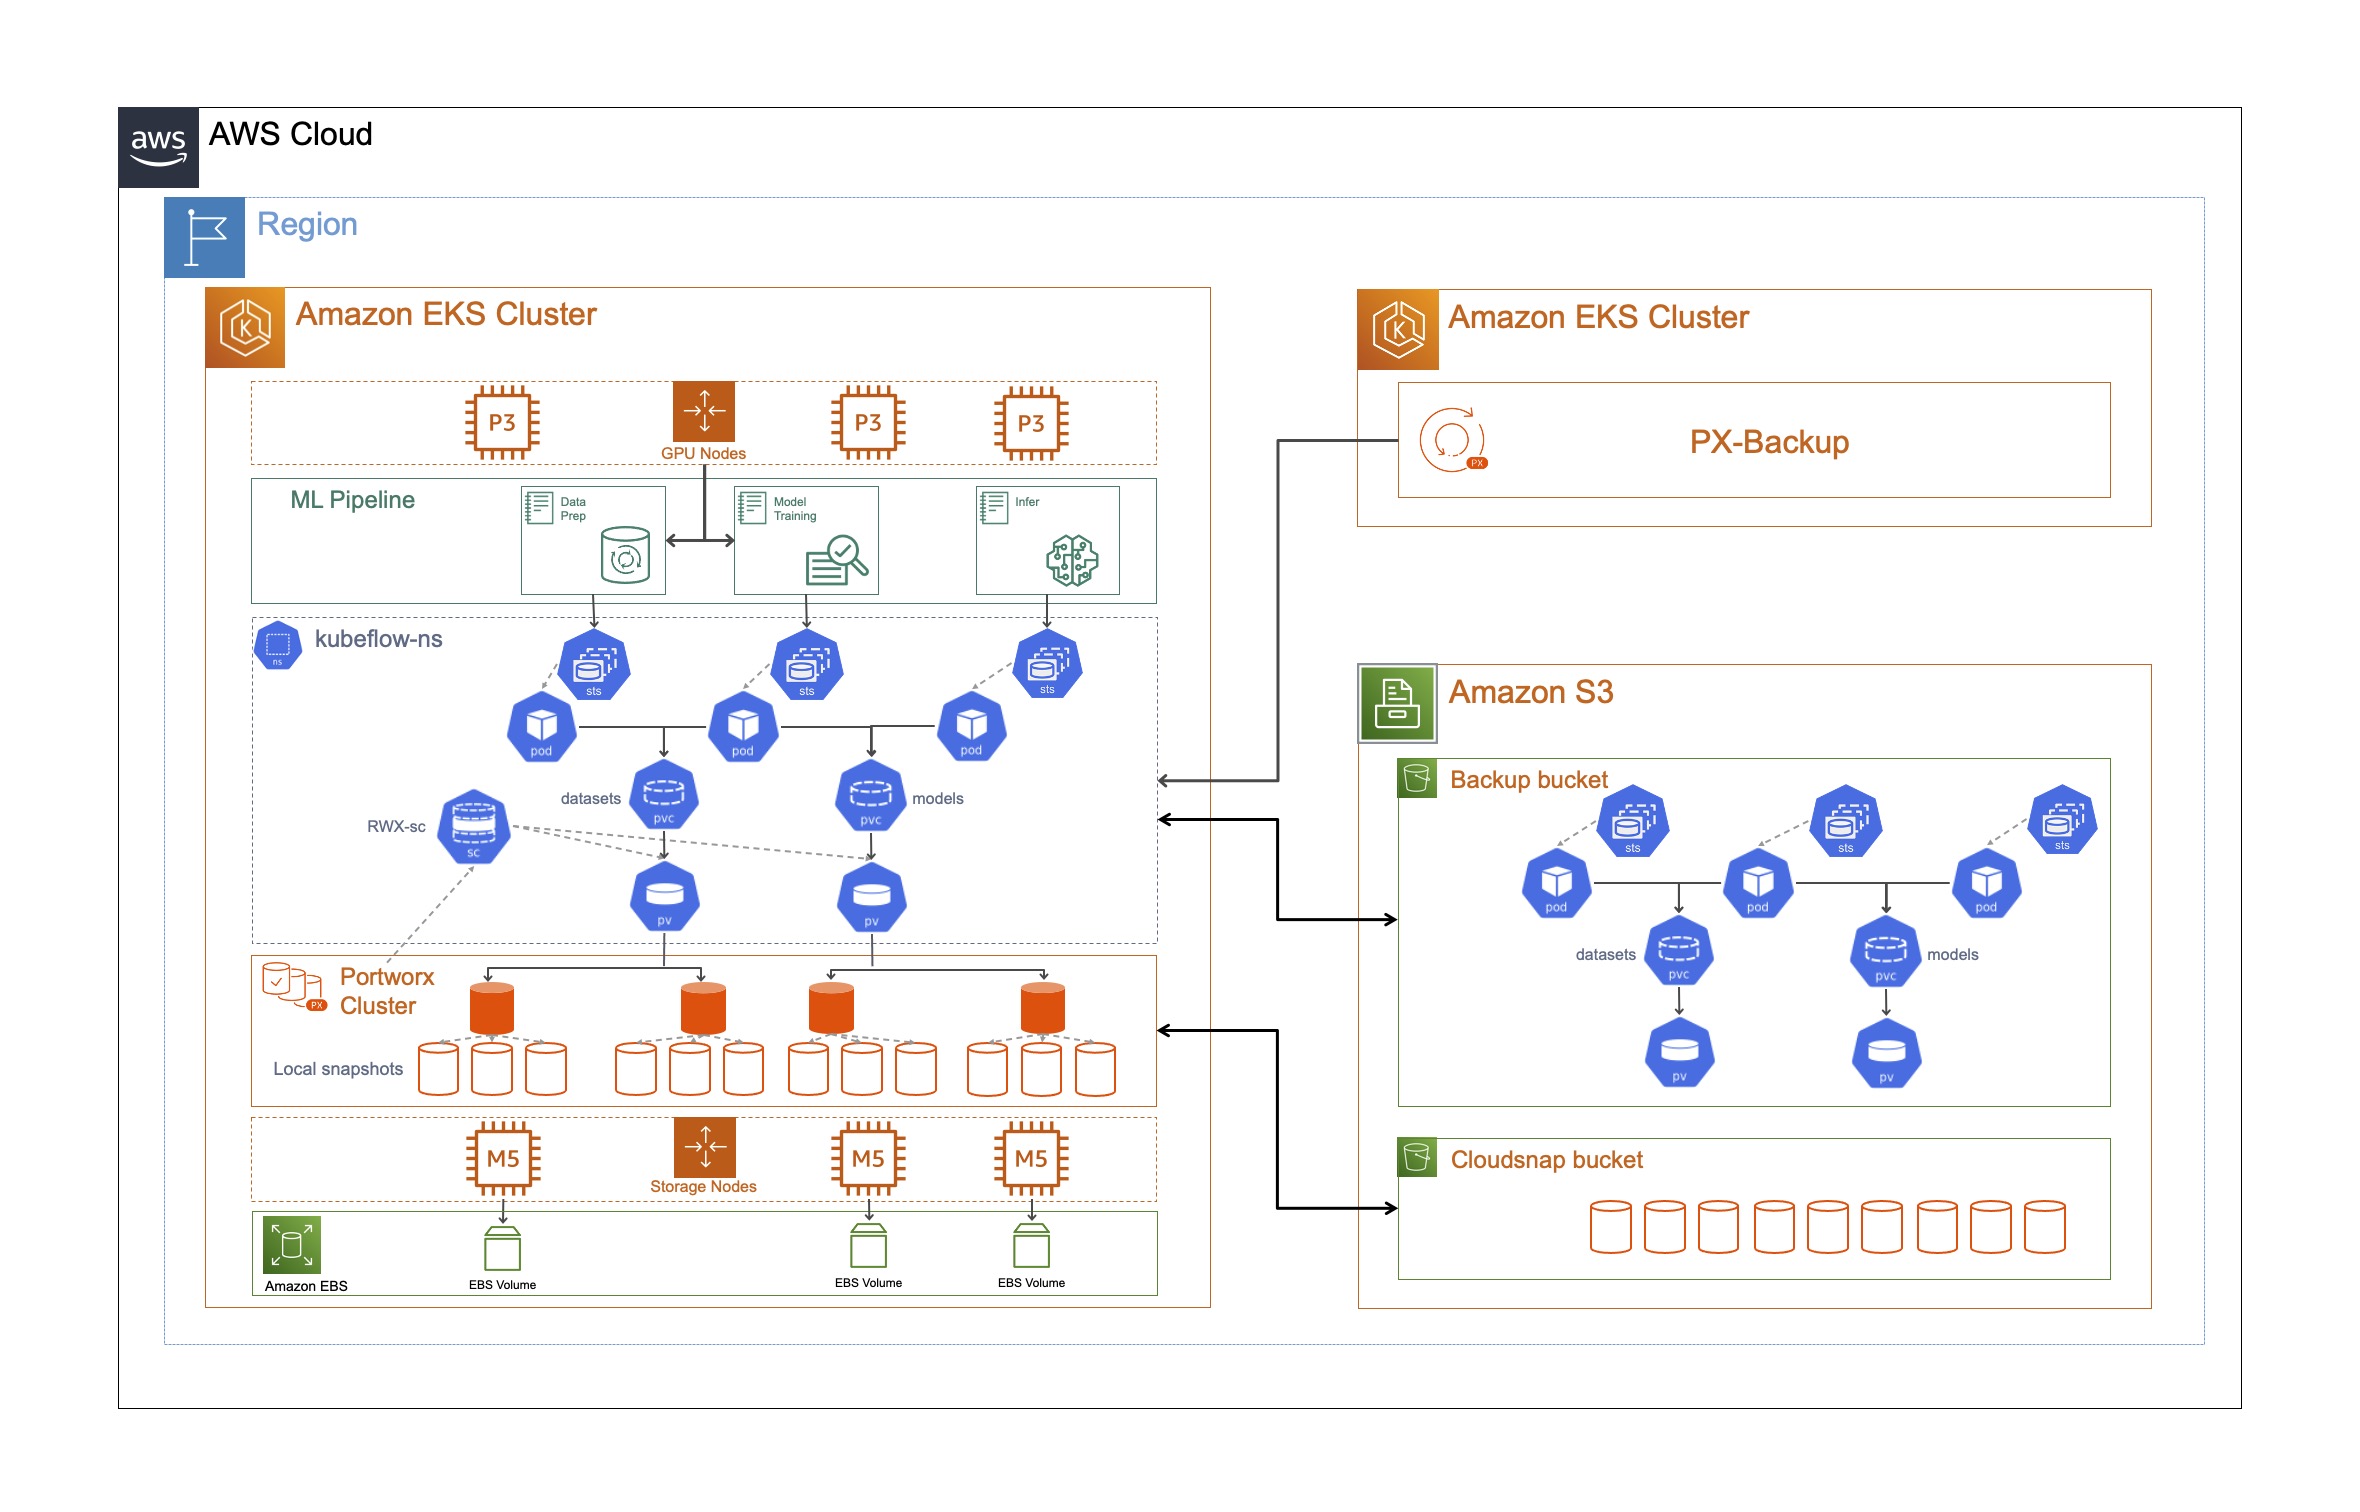
In the previous blog, we looked at what Kubeflow is and how you can install Kubeflow 1.3 on a Portworx-enabled Amazon EKS cluster for your Machine Learning pipelines, and a dedicated PX-Backup EKS cluster for Kubernetes Data Protection. In this blog, we will use the Kubeflow instance for running individual Jupyter notebooks for data preparation, training, and inference operations, and then use Portworx snapshots and PX-Backup to perform restores to the same cluster or a completely new EKS cluster.
Before we go ahead and create Jupyter Notebooks for all these three stages, let’s go ahead and create two ReadWriteMany persistent volumes in the Kubeflow-user-example-com namespace that will be used by our Jupyter Notebooks to store our training data and trained models. Deploying ReadWriteMany persistent volumes helps us share the same data and trained models across different phases in the above pipeline. The data prep stage will take a raw dataset and process it to get ready for model training. This prepped data is then consumed by the model training stage, which then stores the trained model to another shared volume, so our inference notebooks can access our trained models as well. To create these persistent volumes, use the following two yaml files:
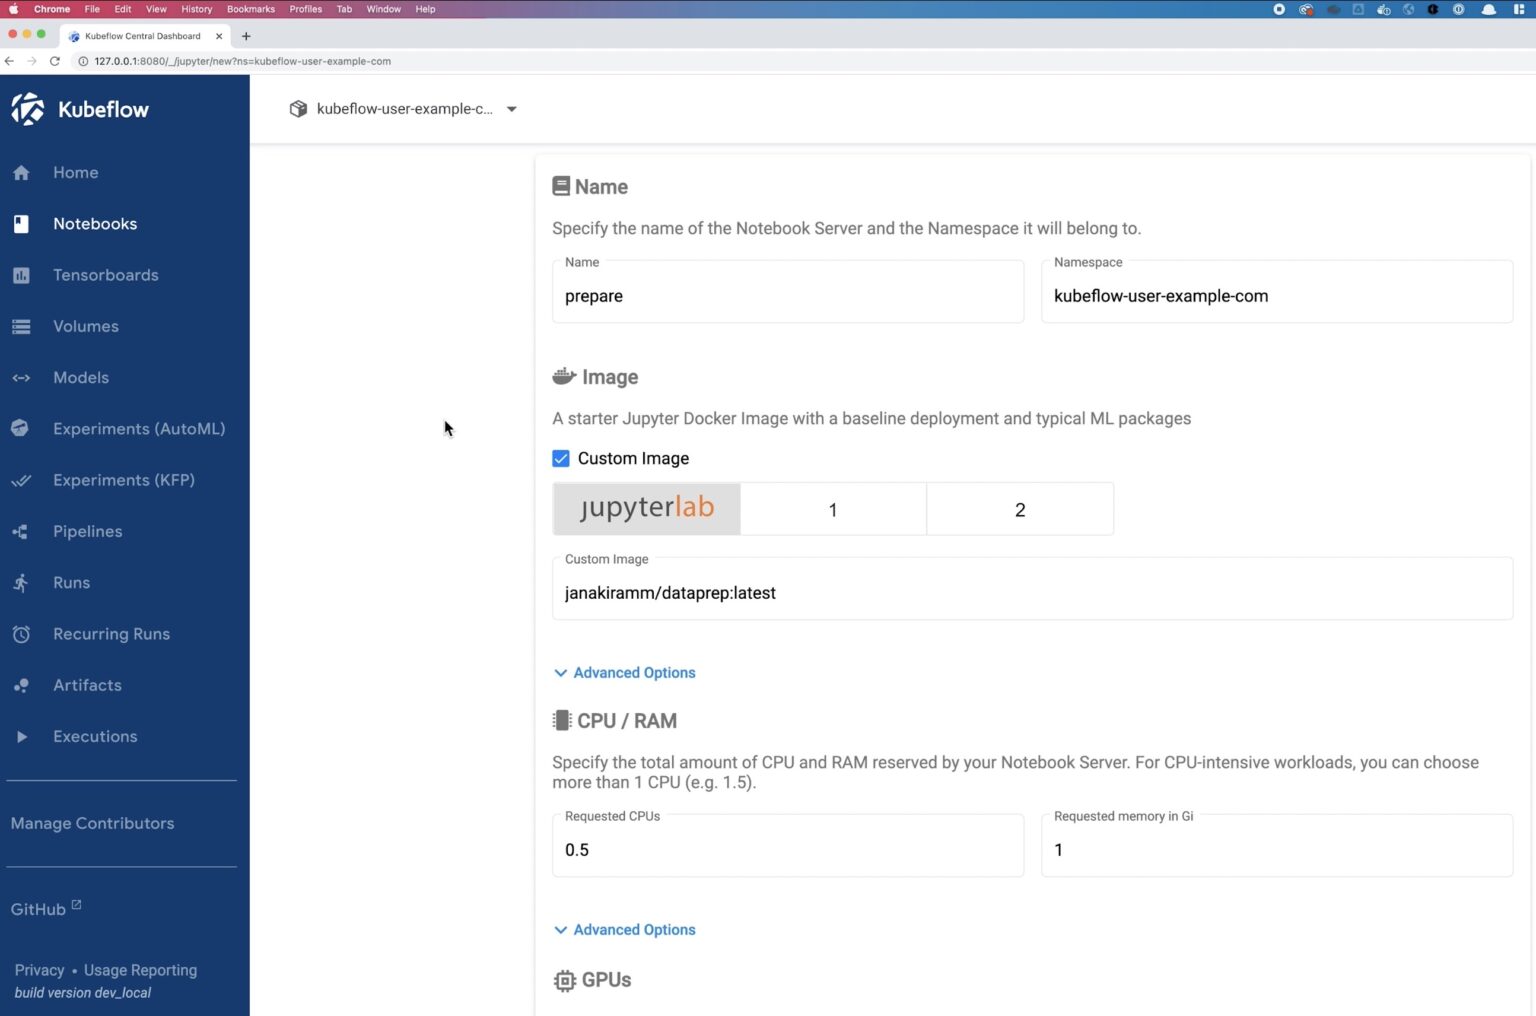
Navigate to the Kubeflow UI using the port forward command that we used in the last blog and log in using “user@example.com” for the username and “12341234” for the password. Select Notebooks from the left pane and click NEW NOTEBOOK. Enter a name for the data preparation notebook and select the namespace. We will use a custom image that Janakiram has built for his Kubeflow blogs. For data preparation, we will use the janakiramm/train:latest image, and select 4 CPU and 4 GB of memory. We won’t select any GPUs for the data preparation stage.
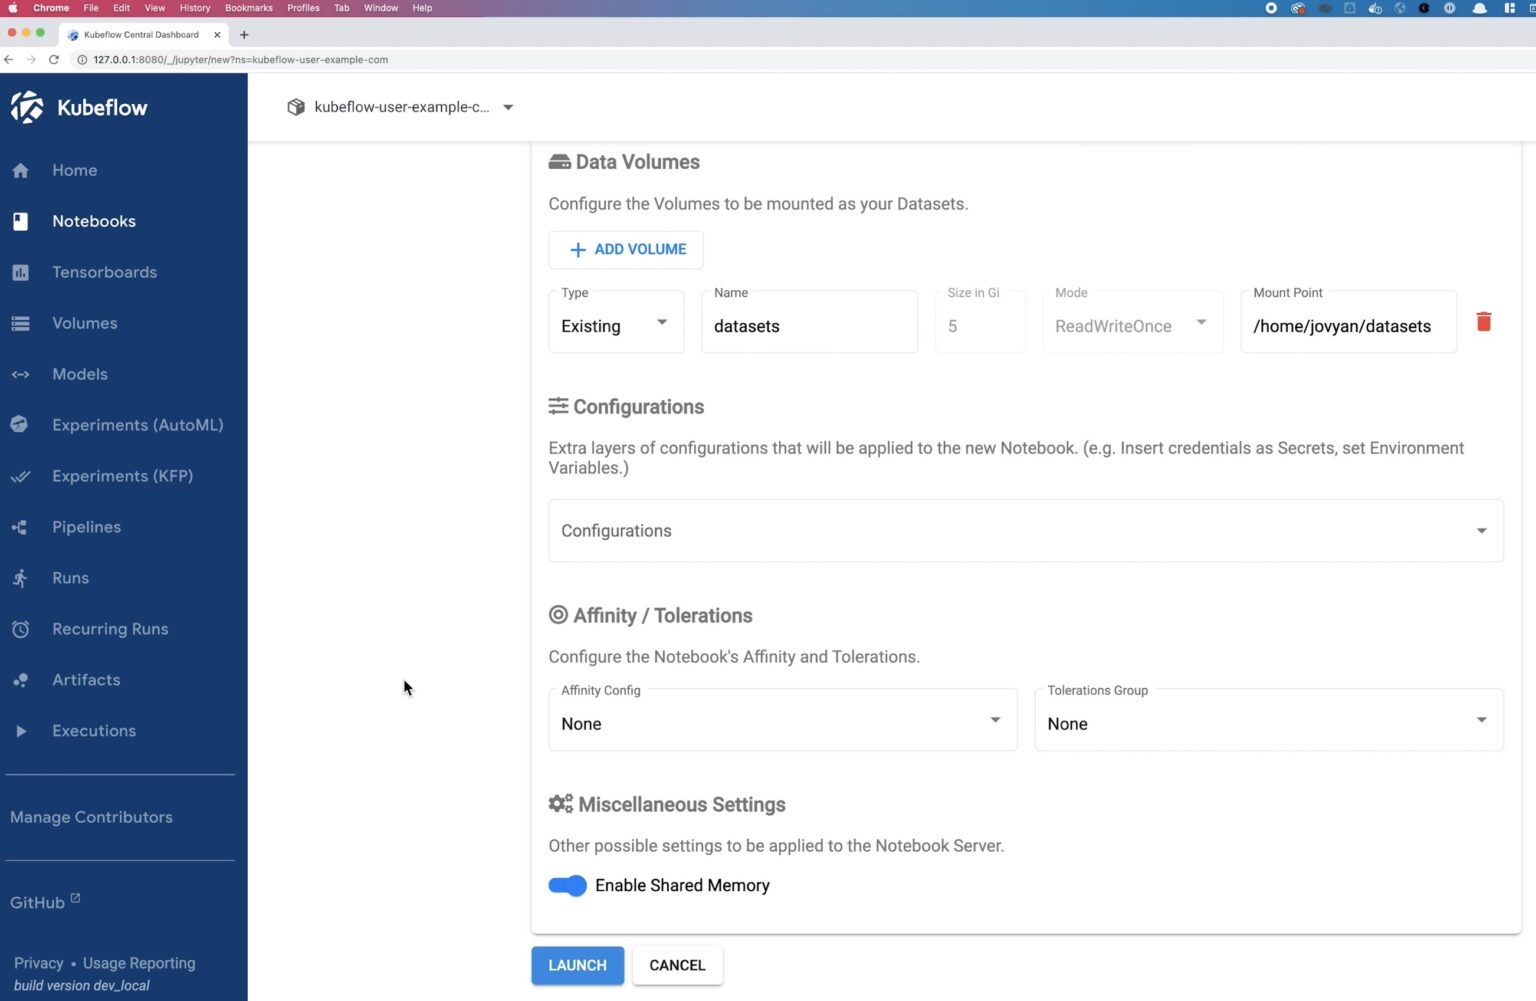
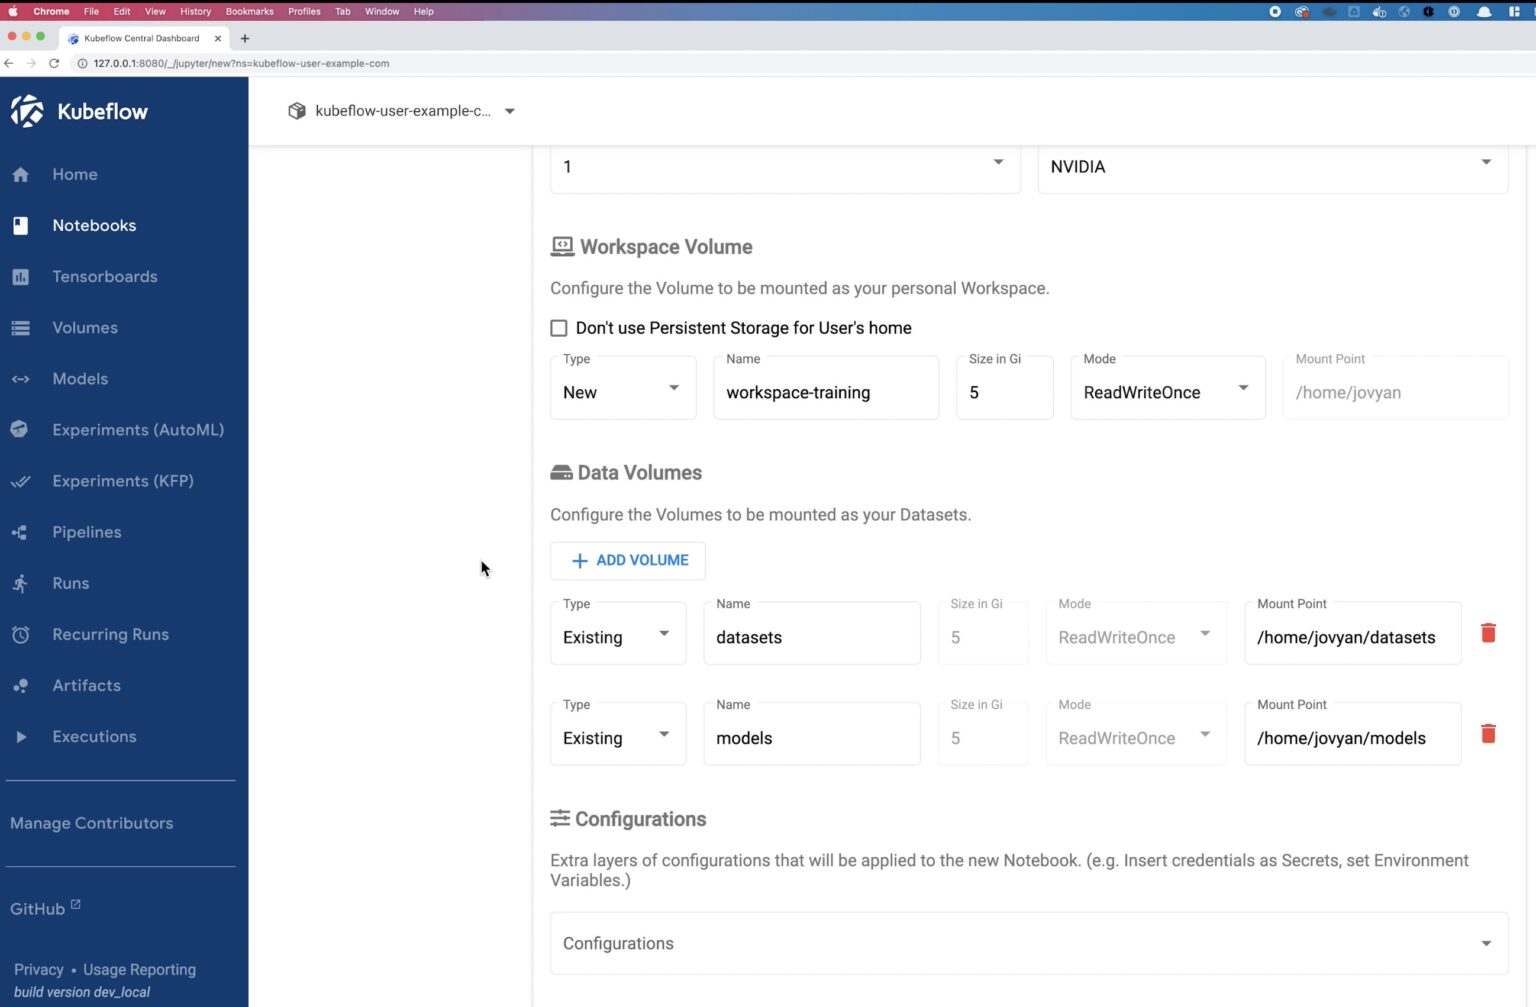
Next, for the Data Volumes, we will map the ReadWriteMany PVC that we created in the previous step called Datasets.
Go ahead and launch this notebook. Kubeflow deploys a Kubernetes StatefulSet for the Jupyter Notebook in our kubeflow-user-example-com namespace. You can monitor the deployment using the Kubeflow UI or by using the following commands:
kubectl get sts -n kubeflow-user-example-com
kubectl get pods -n kubeflow-user-example-com
Once the notebook is up and running, click on CONNECT from the Kubeflow UI. Here we will upload our training data and the dataprep.ipynb file. For our testing, we used the dogs vs cats dataset from Kaggle. Download the zip file, unzip it locally, and then upload the train.zip file in the datasets folder under a new volume called raw. Once the train.zip is uploaded, get the dataprep.ipynb file, download it, and upload it to the root directory of your notebook. Click on the uploaded dataprep.ipynb file, and run all the cells in this notebook. This will inflate your train.zip file and then prep your data for model training. Once all the cells are executed, you can see a couple of new files in the datasets folder called dogs_vs_cat-train.csv and dogs_vs_cats-val.csv.
Model Training
Once your data is prepped, we will create a second notebook to run model training. Navigate to the Kubeflow UI and select Notebooks from the left pane and click NEW NOTEBOOK. Give the notebook a name and use the kubeflow-user-example-com namespace. We will use another custom image janakiramm/train:latest for model training.
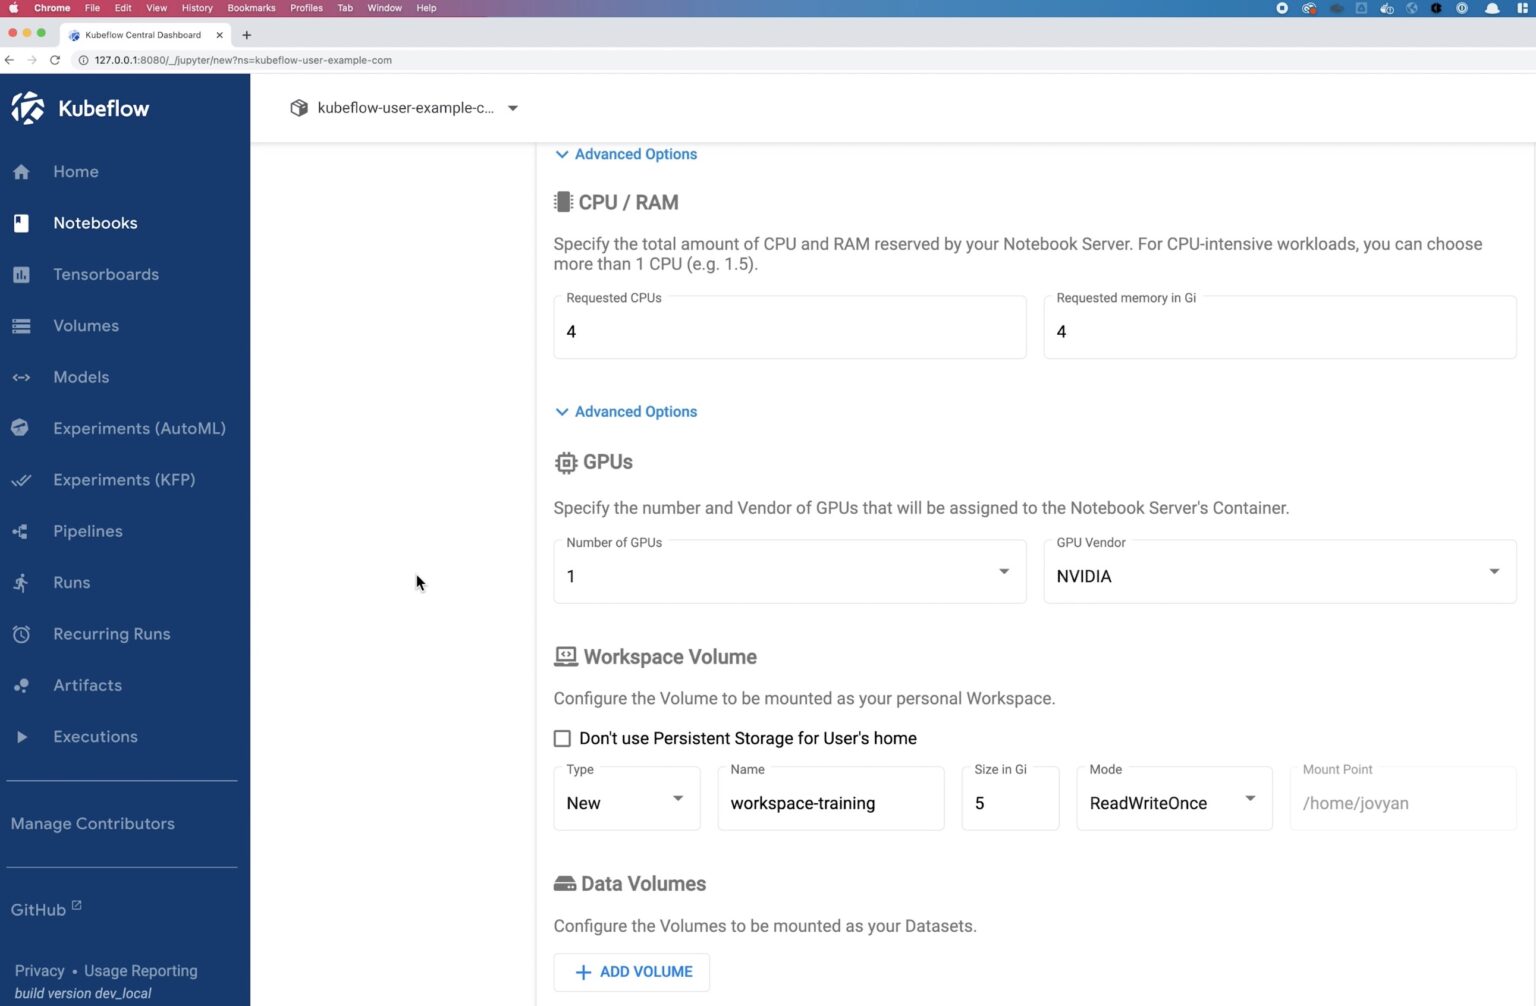
We will select 4 CPUs and 4 GBs of memory with 1 NVIDIA GPU for this notebook.
Next, let’s mount the datasets volume and the model volume to this notebook. We will read the prepared data from the datasets volume and save our trained models in the models volume.
Click Launch to deploy the notebook, and once the pod is up and running, let’s connect to this notebook from the Kubeflow UI.
We will download and upload the train.ipynb file to the root directory of the notebook and then run all the cells in the notebook.
After iterating 20 times as part of the Jupyter Notebook, you will see keras_metadata.pb and saved_metadata.pb files stored in the models persistent volumes.
Now you have a trained model; you can either transfer these to your inference cluster or run inference locally on the same cluster and iterate and improve your trained model.
Inference
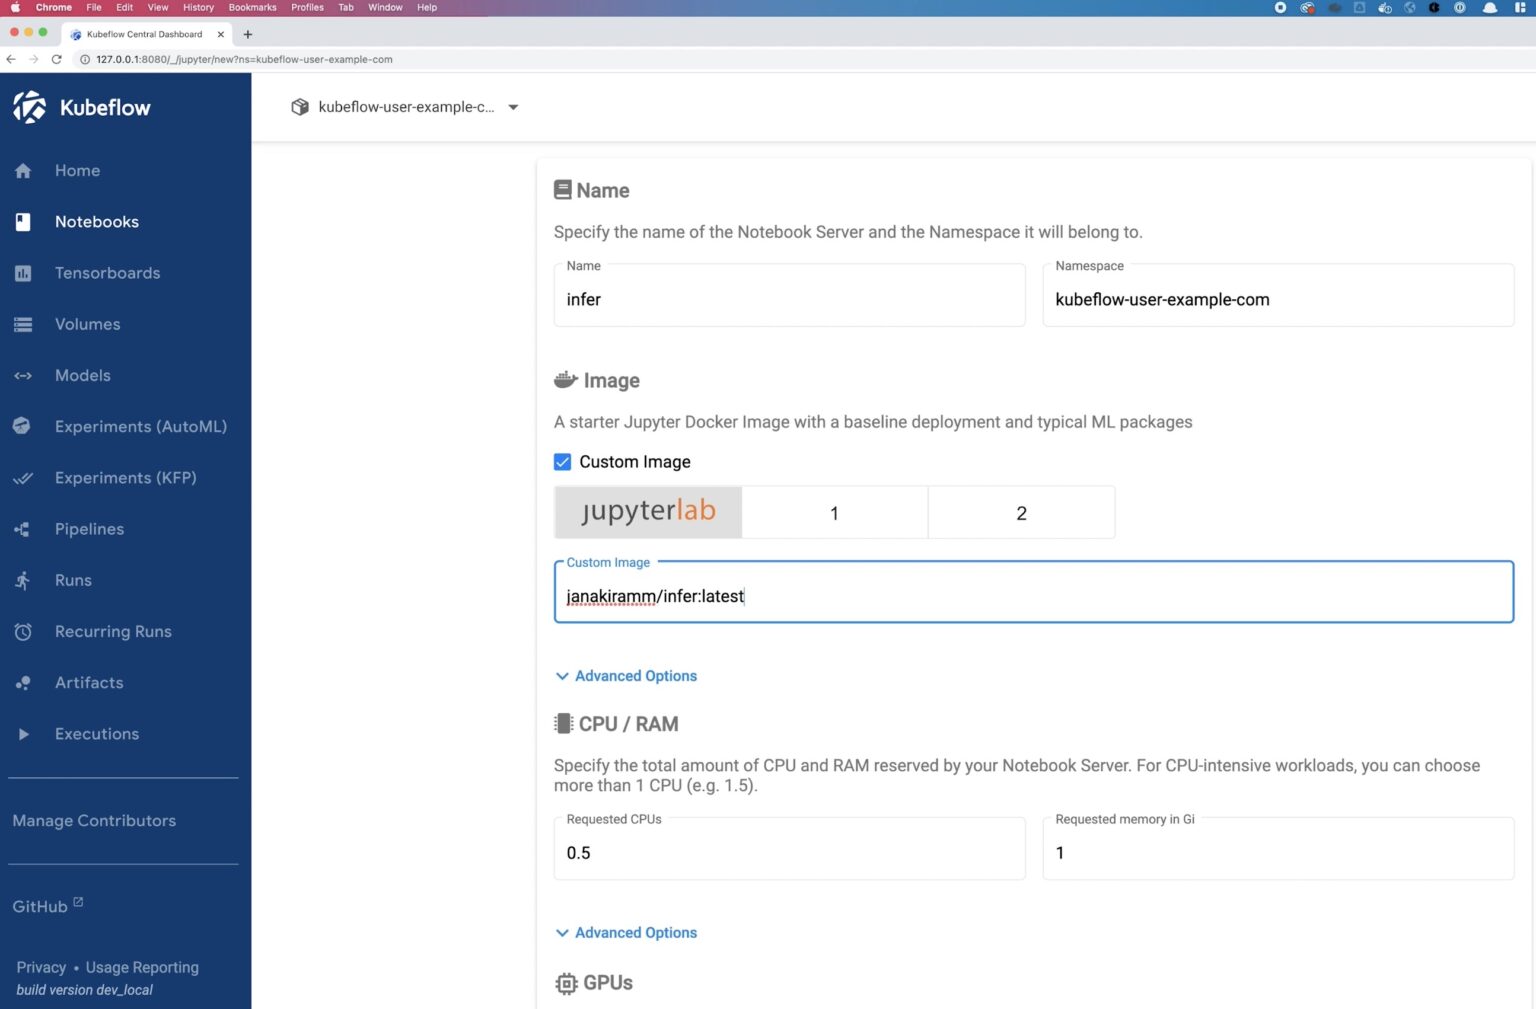
We will deploy a new notebook from the Kubeflow UI to run inference. Select Notebooks from the left pane and click NEW NOTEBOOK. Give the notebook a name and use the kubeflow-user-example-com namespace. We will use another custom image janakiramm/infer:latest for model training.
We will use 1 CPU and 1 GB memory and mount the model persistent volume. Click Launch on the notebook and wait for the deployment to succeed.
Download and upload the infer.ipynb file to the root directory and then run all the cells. This notebook downloads random images of a cat and a dog and tests whether the model categorizes them accurately. You can also link to your own images to run your own test.
Portworx Benefits
Now that you have deployed all three notebooks, let’s talk about a few benefits you get by running Kubeflow on EKS with Portworx.
Dynamic provisioning of block and file volumes: Portworx allows DevOps admins to configure customizable storage classes that can be leveraged by Kubeflow and data scientists to deploy persistent volumes on demand. These persistent volumes can be block volumes (ReadWriteOnce) that you need for each notebook’s workspace volume, or they can be file volumes (ReadWriteMany) that we used for storing our training data and trained models. In addition to ReadWriteOnce and ReadWriteMany, DevOps admins can also specify different io_profiles and io_prioirity for the persistent volumes to get the best storage performance for their applications.
High availability and replication: As part of the storage class configuration, DevOps admins can also select a replication factor, which translates to the number of copies that are stored on your cluster. For our example, we used a replication factor of 3, which means that our data is replicated across three nodes in the EKS cluster, so even if we lose one of the nodes during our data preparation or model training phases, we don’t suffer any data loss.
Local snapshots and cloudsnaps: As part of the storage class configuration, DevOps admins can also configure local snapshots and cloudsnaps using the same or different schedule policies. These snapshots are useful when you want to roll back to a previous version of your trained model or your training data. These snapshots also help you recover from local failure scenarios like accidental persistent volume deletion or any form of data corruption. You can also use the cloudsnaps to move your trained model to new Portworx clusters to run inference at a different location.
Kubernetes backup and restore using PX-Backup: PX-Backup provides a Kubernetes-native data protection solution that can help protect your Kubeflow deployments across any Kubernetes cluster. You can use PX-Backup to protect not just the data but also the application configuration and Kubernetes objects. You can use this end-to-end backup snapshot for performing local restores, or you can also use this to move your Jupyter Notebooks to a different Kubeflow cluster.
If you want to see the entire Kubeflow deployment, model training, and migration operations in action, find the demonstration that we uploaded on YouTube.