Kubernetes operators across all organizations have seen an increase in the number of stateful applications deployed in their production environments. Based on the CNCF survey 2020, out of all the organizations running Kubernetes in production, 55% were already running stateful applications, 12% were evaluating stateful applications, and 11% were planning to use stateful applications in Kubernetes over the next 12 months. There is no denying the importance of persistent storage when it comes to Kubernetes and distributed applications built using containers. Customers adopting VMware Tanzu in their own datacenters to build a Kubernetes platform also need a solution that can help them build a robust Kubernetes data management layer for their applications. Portworx Enterprise can enable administrators to offer a reliable, highly available, easy to deploy, and manage Kubernetes data management layer that works seamlessly with VMware Tanzu to their developers. Portworx Enterprise is a solution that is easy to deploy and enables self-service access to individual developers.
In this blog, we will learn to deploy Portworx Enterprise on a VMware Tanzu Kubernetes cluster. But before we do that, let’s talk about a few capabilities that Portworx Enterprise enables for organizations using VMware Tanzu.
Dynamic provisioning of container-granular volumes: Portworx Enterprise with VMware Tanzu allows developers or operators to dynamically provision volumes for their containerized applications. Portworx allows you to customize your Kubernetes storage classes, so you can provision block or file storage for your applications. You can also choose different IO profiles for your applications, enable encryption, configure high availability, etc.
Automated capacity management: PX-Autopilot allows you to manage your storage capacity without any heavy lifting. You can set Autopilot rules; monitor your persistent volumes, storage pools, and so on; and automatically expand them when certain conditions are met. We covered PX-Autopilot and VMware Tanzu in a previous blog.
Business continuity and disaster recovery: Disaster recovery remains a critical component to ensure business continuity. Even with containerized applications running on VMware Tanzu, Portworx allows you to architect async and sync DR solutions to ensure that your applications can meet predefined SLAs and that you can deliver a better customer experience.
Encryption and Role Based Access Control: Portworx PX-Secure offers cluster-wide encryption or granular container-based or storage class based encryption for the persistent volumes running on your VMware Tanzu Kubernetes clusters. PX-Secure also allows you to define authorization, authentication, and ownership of your data volumes in VMware Tanzu through direct integration with Active Directory and LDAP through OIDC.
Now that you know the benefits of running Portworx with VMware Tanzu, let’s look at a step-by-step guide to deploy Portworx Enterprise v2.8 on your VMware Tanzu clusters.
Let’s start by deploying a VMware Tanzu Kubernetes cluster. Portworx needs at least four cores, 4GB RAM, and 8GB minimum storage on the Tanzu worker nodes. So, we will select a Virtual Machine class that meets those requirements. You can execute the following command against your supervisor cluster to get a list of virtual machine classes in your VMware Tanzu environment; use best-effort-large as the virtual machine class for our Tanzu Kubernetes cluster.
kubectl get virtualmachineclass
Now, let’s look at the yaml file that you can customize and apply against your Tanzu Supervisor cluster to deploy your Tanzu Kubernetes cluster.
Example yaml file:
Let’s run a few commands to verify that your Tanzu Kubernetes cluster is ready for Portworx deployment.
kubectl get nodes
kubectl get pods -n kube-system
kubectl get sc
To deploy Portworx, you will need a storage class that is backed by the VMware CSI driver. In our case, we have a storage class that is backed by a VMFS datastore, backed by a Pure FlashArray. Here is what it looks like:
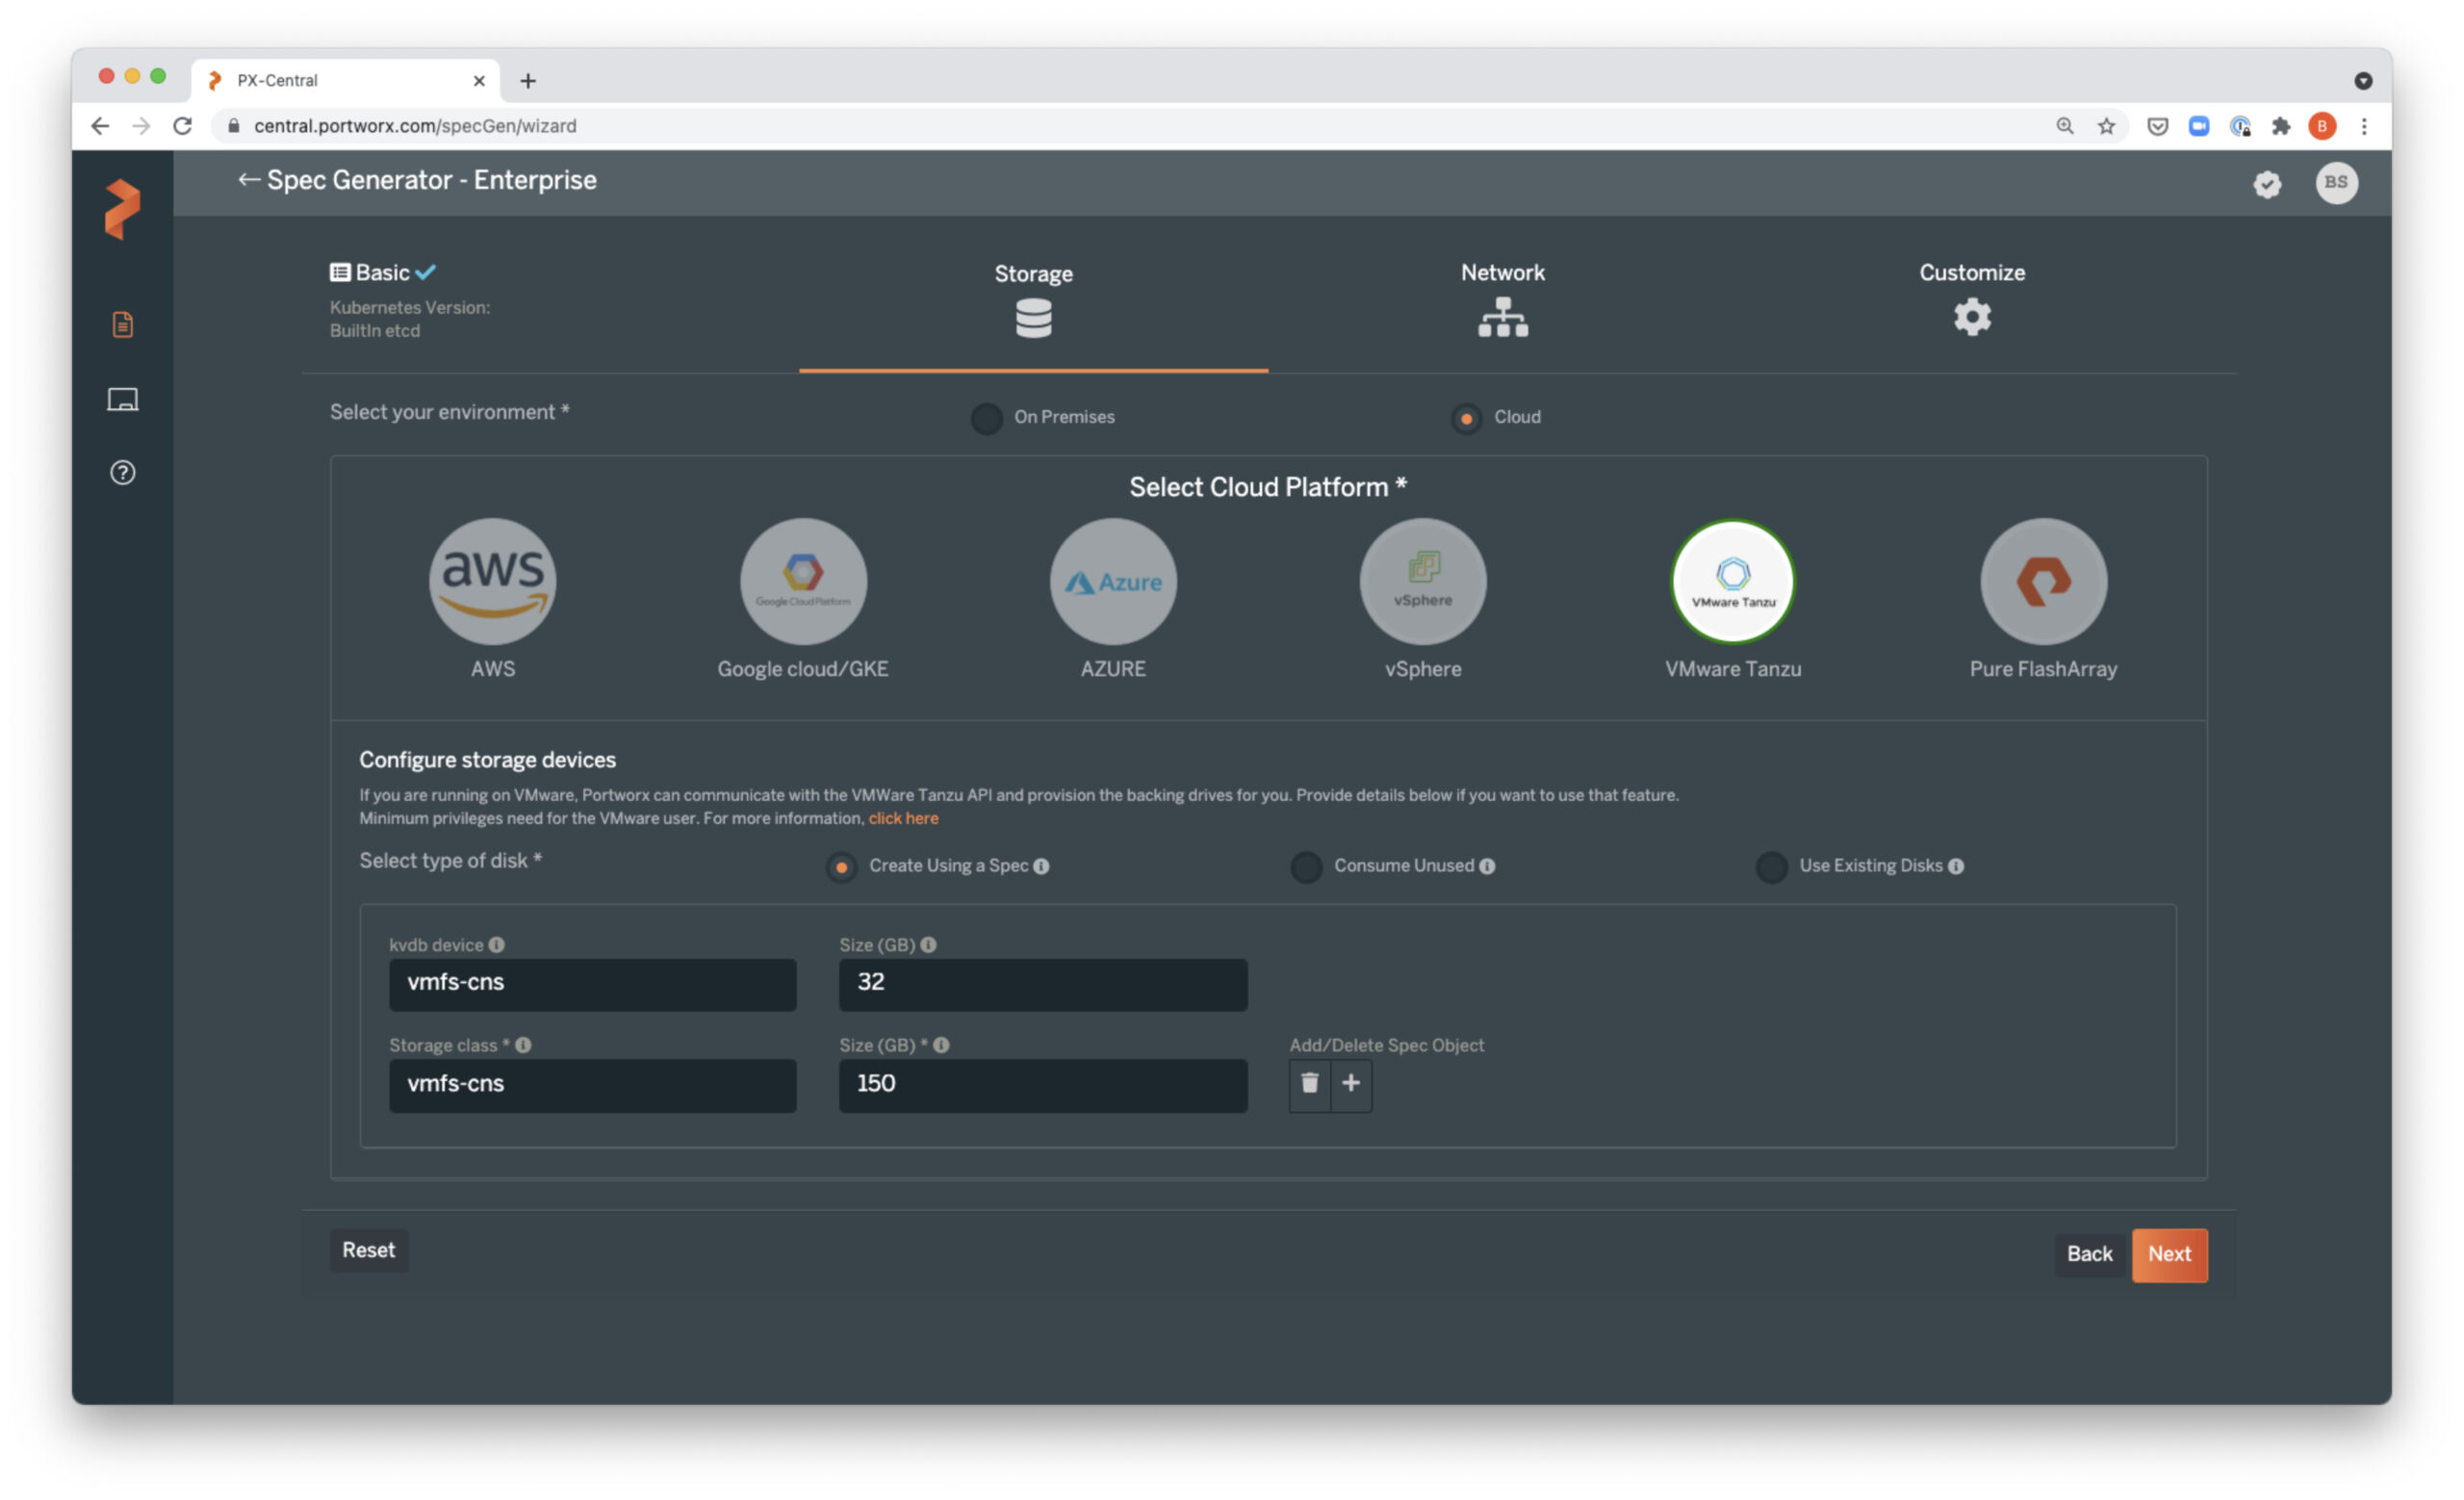
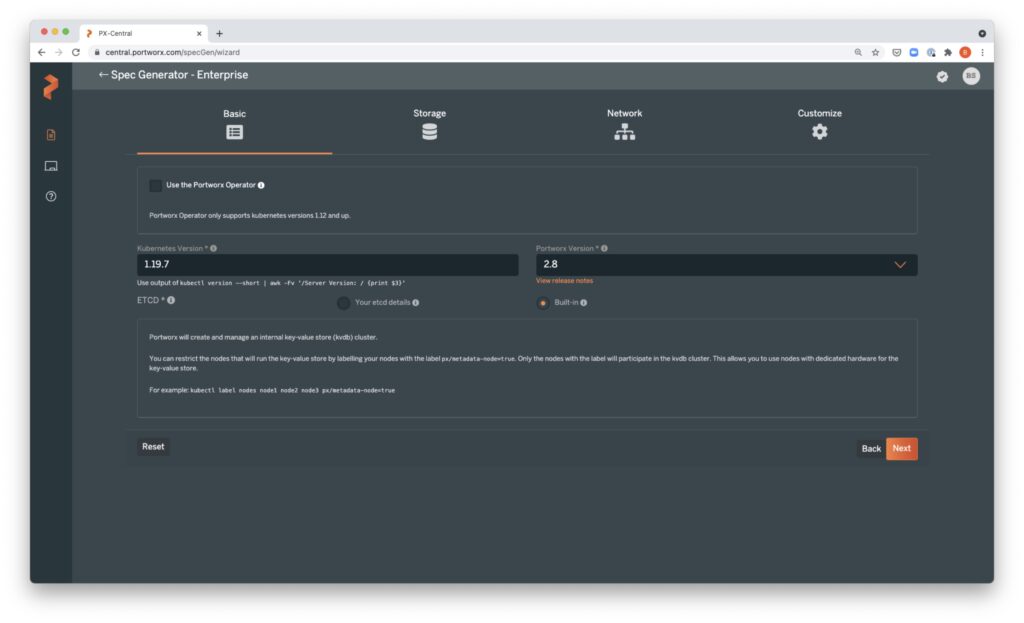
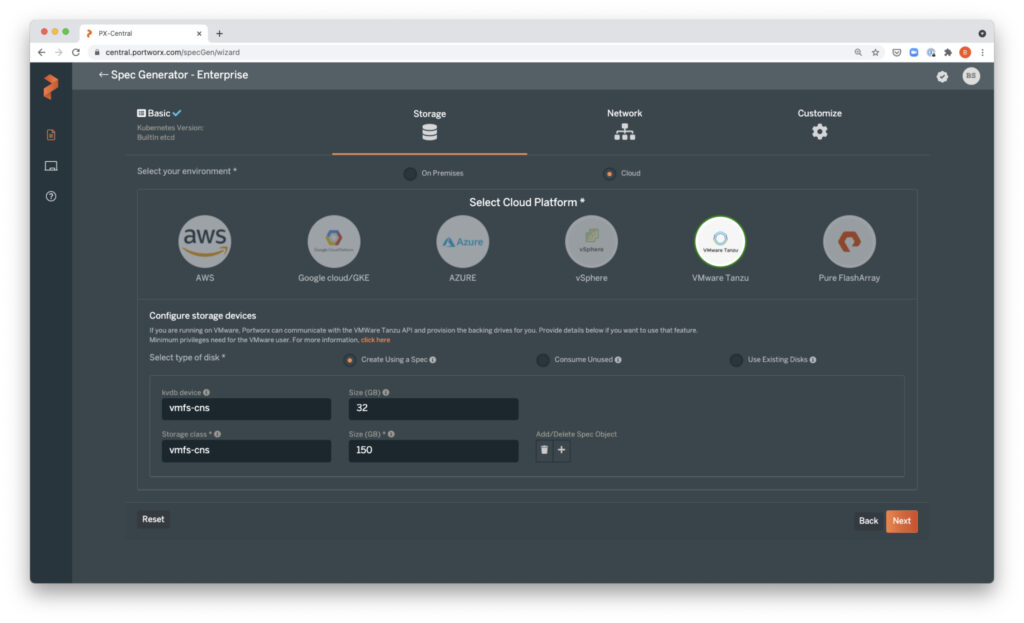
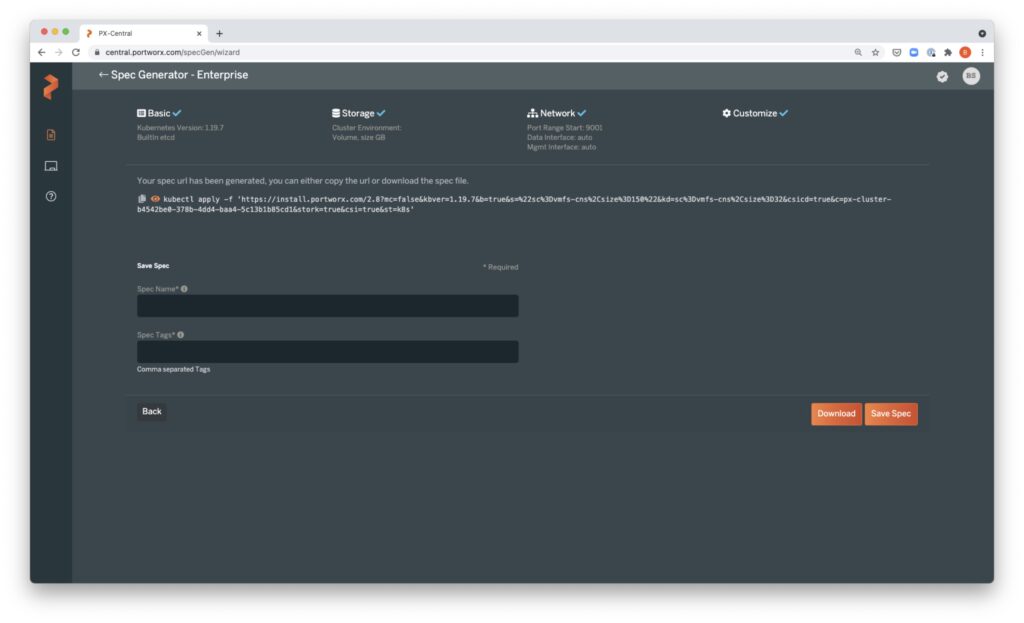
Next, let’s navigate to PX-Central to log in or create an account. Click Install and Run to open the Spec generator. Click on New Spec and select Portworx Enterprise. We are deploying Portworx using the Portworx DaemonSet, so we will keep the Portworx Operator checkbox unselected. Enter the version of Kubernetes running on your Tanzu Kubernetes cluster and select the version of Portworx as 2.8 from the version dropdown. If you are deploying Tanzu Kubernetes cluster for production, we recommend using an external etcd cluster. But, if you are creating a cluster for test/dev purposes, Portworx can also deploy an internal KVDB during installation. Click Next. Select Cloud and VMware Tanzu. In the “Configure Storage Devices” section, enter the name of the storage class that we looked at in step 6, and click Next. You can leave the Network settings as default and click Next. On the Customize tab, choose None, as we are using Tanzu Kubernetes clusters. You can leave all the other settings as they are and click Finish. Read through and Accept the Portworx Enterprise License Agreement.
Copy the kubectl apply command and apply it against your VMware Tanzu Kubernetes cluster.
Once you have applied the configurations, wait for a couple of minutes and open required ports on your worker nodes using the following command:
for pod in $(kubectl get pods -n kube-system -l name=portworx | grep -v NAME | awk '{print $1}');\
do kubectl exec -t $pod -n kube-system -- nsenter --mount=/host_proc/1/ns/mnt bash -c \
  "iptables -A INPUT -p tcp --match multiport --dports 9001:9020 -j ACCEPT";\
done
You can monitor the progress of your Portworx deployment using the following command
watch kubectl get pods -n kube-system -l name=Portworx
Once all the Portworx pods are ready, we can look at the Portworx storage pool by using the following command:
kubectl exec Portworx-34gf4 -n kube-system -- /opt/pwx/bin/pxctl status
You can also look at the storage classes that have been created for you.
Portworx is now successfully deployed on your VMware Tanzu cluster. You can start deploying your applications by using one of the preconfigured Portworx storage classes, or you can use the following template and create your own StorageClass for your application. You can find examples for different stateful applications running on Portworx here