


Kubernetes is built upon a Cloud Native security model, which uses a layered security model with four components: cloud, clusters, containers, and code. In the Cloud Native security model, each layer builds on the layer just outside of it (e.g.,., the container layer builds on the cluster layer). The cloud layer of AWS is responsible for protecting the infrastructure that runs AWS services in the AWS Cloud. For Amazon EKS, AWS is responsible for the Kubernetes control plane, which includes the control plane nodes and etcd database. Third-party auditors regularly test and verify the effectiveness of AWS’s security as part of the AWS compliance programs. Portworx works alongside the cluster layer to provide a secure data management and data protection platform, creating a solid foundation that the containers and code can be built to run on.
According to the 2021 Kubernetes Adoption survey, organizations report security as one of the top three most difficult challenges for them to overcome. In addition, 40% of respondents report not having the correct Kubernetes related skills, including in the security arena, to appropriately manage and operate a production environments
Portworx is the gold standard when it comes to Kubernetes storage and data management, and it delivers the perfect solution for enterprises that require a secure data management and data protection platform. Portworx allows users to build layered security solutions that meet their compliance and/or regulatory requirements.
For this blog, we will discuss how role-based access control (RBAC) and auditing/logging can be used to limit access to resources and then to monitor and audit users.
Portworx Role-based Access Control (RBAC) security is composed of three models:
Portworx RBAC revolves around the ubiquitous JWT-based authentication and authorization model. This technology is currently used by most major internet systems, providing a proven, secure model for user and account identification.
A token is generated by a token authority (TA) and signed using either a private key or a shared secret. Then, the user provides the token to Portworx for identification. No passwords are ever sent to Portworx.
As a result of this secure model, Portworx only has to verify the validity of the token to authenticate the user. Portworx then destroys the token, ensuring tokens are never saved on a Portworx system.
The token contains a section called claims, which identifies the user and provides authorization information in the form of RBAC. Portworx uses the RBAC information to determine if the user is authorized to make the request.
Authentication is based on RBAC for all clients in the stack and an ownership model that is much like the familiar Unix-style permissions. Portworx will determine the validity of a user through a token-based model. The token will be created by the token authority and will contain information about the user in the claims section. When Portworx receives a request from the user, it will check the token validity by verifying its signature, using either a shared secret or public key provided during configuration.
Note: Authentication does not mean a requester has access to do something; the user must be authorized first.
Once the token has been determined to be valid, Portworx then checks if the user is authorized to make the request. The roles claim in the token must contain the name of an existing default or customer registered role in the Portworx system. A role is the name given to a set of RBAC rules that enable access to certain SDK calls.
In this case, an owner is a user, and a user can be a person, system, or admin interacting with the Portworx platform. That owner can manage various aspects of the ownership model, such as who can access an object and how those users can interact with the resource – whether aa volume, snapshot, clone, or another related object.
Owners belong to groups themselves and contain a type of role. In other words, a user can have a specific role—such as an Admin Role, a User Role, a View Only Role, or even a Custom Role—that defines how the user can interact with the resources in the platform.
An owner of a volume can add access via collaborators and groups. Each type of access can be restricted, so by default, a collaborator or group does not have full access. The different types of access are defined below:
Lastly, even with purpose-built security for Kubernetes, administrators should audit security by providing security audit logs. Portworx provides security audit and access logs so organizations can help protect critical data, identify security loopholes, create new security policies, and track the effectiveness of security strategies.
When generating the storageCluster specification on PX-Central in the Customize tab, select Security Settings and Enabling Authorization.
This will add the following section to the YAML prior to creation of the cluster:
kind: StorageCluster
spec:
  security:
    enabled: true
After the Portworx storage cluster has been created, additional information will be added to the spec.security section:
kubectl -n kube-system get storageCluster --all -o yaml
    security:
      auth:
        guestAccess: Enabled
        selfSigned:
          issuer: operator.portworx.io
          sharedSecret: px-shared-secret
          tokenLifetime: 24h
      enabled: true
In addition, the following secrets will be generated in the kube-system namespace:
Now that we have enabled authorization on the Portworx Storage Cluster, we will showcase role-based access control and auditing. We will set up a simple multi-tenancy solution using a self-signed security configuration. To facilitate creation of the tokens, we will utilize the Portworx client, which can be used standalone or as an add-on with kubectl. From the machine where you will be running kubectl commands, it is as easy as downloading the latest version from the Releases page, extracting the files, and copying the executable into your PATH.
Note: The Portworx client is not supported and is provided as-is.
First, we will create a few namespaces that we will utilize to showcase how role-based access control and auditing can be used to configure a secure data management platform:
kubectl create ns system-user-ns
kubectl create ns system-view-ns
kubectl create ns guest-user-ns
We will store the Portworx shared secret in an environment variable for use in signing the generated tokens:
PORTWORX_AUTH_SHARED_SECRET=$(kubectl -n kube-system get \
      secret px-shared-secret -o json \
    | jq -r '.data."shared-secret"' \
    | base64 -d)
Next, we will generate user tokens for each of the namespaces:
SYSTEMUSER_TOKEN=$(kubectl pxc utilities token-generate \
--token-email=system-user@local.net \
--token-name="Kubernetes" \
--token-roles=system.user \
--token-groups=system-user \
--token-duration=7d \
--token-issuer=operator.portworx.io \
--token-subject="system-user@local.net/system-user" \
--shared-secret=$PORTWORX_AUTH_SHARED_SECRET)

kubectl -n system-user-ns create secret \
  generic px-user-token --from-literal=auth-token=$SYSTEMUSER_TOKEN
SYSTEMVIEW_TOKEN=$(kubectl pxc utilities token-generate \
--token-email=system-view@example.com \
--token-name="System-View" \
--token-roles=system.view \
--token-groups=system-view \
--token-duration=7d \
--token-issuer=operator.portworx.io \
--token-subject="system-view@example.com/system-view" \
--shared-secret=$PORTWORX_AUTH_SHARED_SECRET)

kubectl -n system-view-ns create secret \
  generic px-user-token --from-literal=auth-token=$SYSTEMVIEW_TOKEN
We will not be generating a token for the guest-user-ns, as we will utilize it to showcase some additional features of Portworx.
Now we will generate a StorageClass that will utilize the px-user-token in each of our namespaces to authenticate and authorize the users to create persistentVolumeClaims.
px-tenant-sc.yaml
kind: StorageClass
apiVersion: storage.k8s.io/v1
metadata:
  name: px-tenant-sc
provisioner: pxd.portworx.com
parameters:
  repl: "2"
  csi.storage.k8s.io/provisioner-secret-name: px-user-token
  csi.storage.k8s.io/provisioner-secret-namespace: ${pvc.namespace}
  csi.storage.k8s.io/node-publish-secret-name: px-user-token
  csi.storage.k8s.io/node-publish-secret-namespace: ${pvc.namespace}
  csi.storage.k8s.io/controller-expand-secret-name: px-user-token
  csi.storage.k8s.io/controller-expand-secret-namespace: ${pvc.namespace}
kubectl create -f px-tenant-sc.yaml
Notice the *-secret-namespace is using a variable to get the namespace where the persistentVolumeClaim is being requested.
We can create a PersistentVolumeClaim in each of the namespaces and see how each works.
example-pvc.yaml
apiVersion: v1
kind: PersistentVolumeClaim
metadata:
  name: example-pvc
spec:
  accessModes:
    - ReadWriteOnce
  storageClassName: px-tenant-sc
  resources:
    requests:
      storage: 30Gi
kubectl -n system-user-ns create -f example-pvc.yaml
kubectl -n system-view-ns create -f example-pvc.yaml
kubectl -n guest-user-ns create -f example-pvc.yaml
After we have generated each of the PVCs, we can investigate and learn about each of them.
kubectl get pvc -A

kubectl -n system-user-ns describe pvc example-pvc
kubectl -n system-view-ns describe pvc example-pvc
kubectl -n guest-user-ns describe pvc example-pvc
In the next section, we will go into more detail about the output of the above commands and review them as part of the audit logs.
Portworx provides security audit and access logs so organizations can help protect critical data, identify security loopholes, create new security policies, and track the effectiveness of security strategies. We will utilize Amazon CloudWatch Container Insights to aggregate the log information in Amazon CloudWatch using Fluent Bit.
The logs are available on each Portworx node at the following locations:
 /var/lib/osd/log/security/openstorage-audit.log
 /var/lib/osd/log/security/openstorage-access.log
We will also include the systemd logs from the portworx daemon running on each node as part of the fluent-bit configuration.
Enable Amazon Cloudwatch CloudInsights (Fluent Bit). In this example, the region is set to ‘us-east-1’:
ClusterName=$(eksctl get cluster -n <Cluster-Name> -o json | jq -r '.[].Name')
RegionName='us-east-1'
FluentBitHttpPort='2020'
FluentBitReadFromHead='Off'
[[ ${FluentBitReadFromHead} = 'On' ]] && FluentBitReadFromTail='Off'|| FluentBitReadFromTail='On'
[[ -z ${FluentBitHttpPort} ]] && FluentBitHttpServer='Off' || FluentBitHttpServer='On'
curl https://raw.githubusercontent.com/aws-samples/amazon-cloudwatch-container-insights/latest/k8s-deployment-manifest-templates/deployment-mode/daemonset/container-insights-monitoring/quickstart/cwagent-fluent-bit-quickstart.yaml | sed 's/{{cluster_name}}/'${ClusterName}'/;s/{{region_name}}/'${RegionName}'/;s/{{http_server_toggle}}/"'${FluentBitHttpServer}'"/;s/{{http_server_port}}/"'${FluentBitHttpPort}'"/;s/{{read_from_head}}/"'${FluentBitReadFromHead}'"/;s/{{read_from_tail}}/"'${FluentBitReadFromTail}'"/' | kubectl apply -f -
Enable Portworx logging by editing the fluent-bit-config configMap. There are multiple sections to be modified:
kubectl -n amazon-cloudwatch edit cm fluent-bit-config
Add a new @include to the fluent-bit.conf section in the fluent-bit-config configMap for a new portworx-log.conf file:
@INCLUDE portworx-log.conf\n
Create a new configuration file section, portworx-log.conf, in the fluent-bit-config configMap:
  portworx-log.conf: |

    [INPUT]
        Name                systemd
        Tag                 portworx.systemd.*
        systemd_filter      _SYSTEMD_UNIT=portworx-output.service
        DB                  /var/fluent-bit/state/flb_portworx.db
        Path                /var/log/journal
        Read_From_Tail      ${READ_FROM_TAIL}
        Strip_Underscores   true

    [INPUT]
        Name                tail
        Tag                 portworx.tail.*
        Path                /var/lib/osd/log/security/openstorage-access*, /var/lib/osd/log/security/openstorage-audit*
        Parser              logfmt
        DB                  /var/fluent-bit/state/flb_portworx_tail.db
        Mem_Buf_Limit       50MB
        Skip_Long_Lines     On
        Refresh_Interval    10
        Rotate_Wait         30
        storage.type        filesystem
        Read_from_Head      ${READ_FROM_HEAD}

    [FILTER]
        Name                modify
        Match               portworx.systemd.*
        Rename              _HOSTNAME                   hostname
        Rename              _SYSTEMD_UNIT               systemd_unit
        Rename              MESSAGE                     message
        Remove_regex        ^((?!hostname|systemd_unit|message).)*$

    [FILTER]
        Name                aws
        Match               portworx.*
        imds_version        v1

    [OUTPUT]
        Name                cloudwatch_logs
        Match               portworx.*
        region              ${AWS_REGION}
        log_group_name      /aws/containerinsights/${CLUSTER_NAME}/portworx
        log_stream_prefix   ${HOST_NAME}-
        auto_create_group   true
        extra_user_agent    container-insights
Add a new parser to the parsers.conf section in the fluent-bit-config configMap:
    [PARSER]
        Name        logfmt
        Format      logfmt
Add /var/lib to fluentbit daemonSet.
kubectl -n amazon-cloudwatch edit ds fluent-bit

        volumeMounts:
        - mountPath: /var/lib
          name: varlib
          readOnly: true

      volumes:
      - hostPath:
          path: /var/lib
          type: ""
        name: varlib
Navigate to Amazon CloudWatch.
Locate the Log group we created to store the Portworx audit and access logs.
Look for the successful creation of the PVC in the system-user-ns log information:
{
    "time": "2022-09-20T18:23:53Z",
    "level": "info",
    "msg": "Volume 933303703713240483 created",
    "email": "system-user@local.net",
    "groups": "[system-user]",
    "method": "volume.create",
    "name": "Kubernetes",
    "roles": "[system.user]",
    "subject": "system-user@local.net/system-user",
    "username": "system-user@local.net/system-user",
    "az": "us-east-1b",
    "ec2_instance_id": "i-0b0158e7763a52265"
}
{
    "time": "2022-09-20T18:23:53Z",
    "level": "info",
    "msg": "Authorized",
    "email": "system-user@local.net",
    "groups": "[system-user]",
    "method": "volume.create",
    "name": "Kubernetes",
    "roles": "[system.user]",
    "subject": "system-user@local.net/system-user",
    "username": "system-user@local.net/system-user",
    "az": "us-east-1b",
    "ec2_instance_id": "i-0b0158e7763a52265"
}
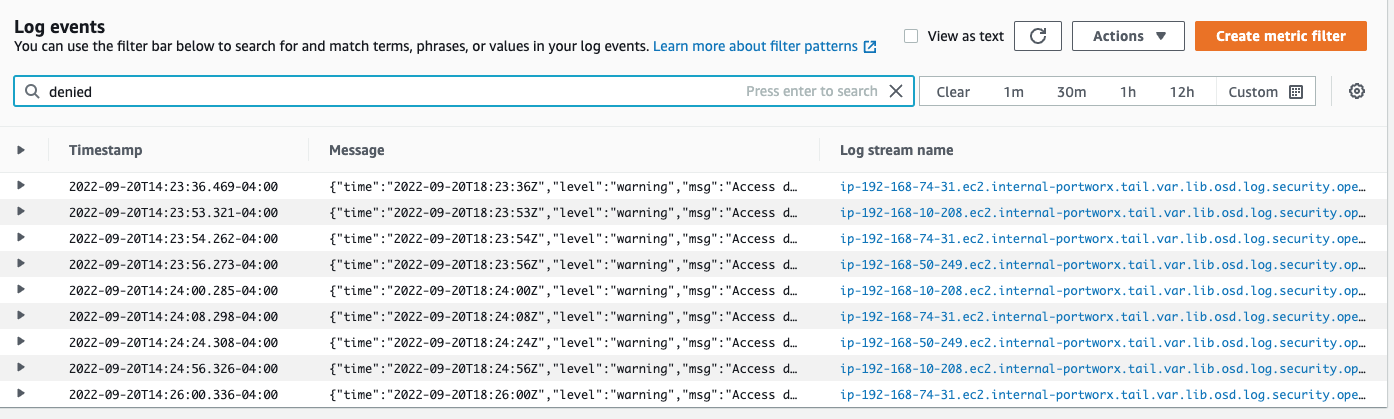
Log output on Access denied to system.view user:
{
    "time": "2022-09-20T18:23:56Z",
    "level": "warning",
    "msg": "Access denied",
    "email": "system-view@example.com",
    "groups": "[system-view]",
    "method": "volume.create",
    "name": "System-View",
    "roles": "[system.view]",
    "subject": "system-view@example.com/system-view",
    "username": "system-view@example.com/system-view",
    "az": "us-east-1b",
    "ec2_instance_id": "i-0b0158e7763a52265"
}
You can create log insights or metric filters for the desired information supplied by the audit and access logs.
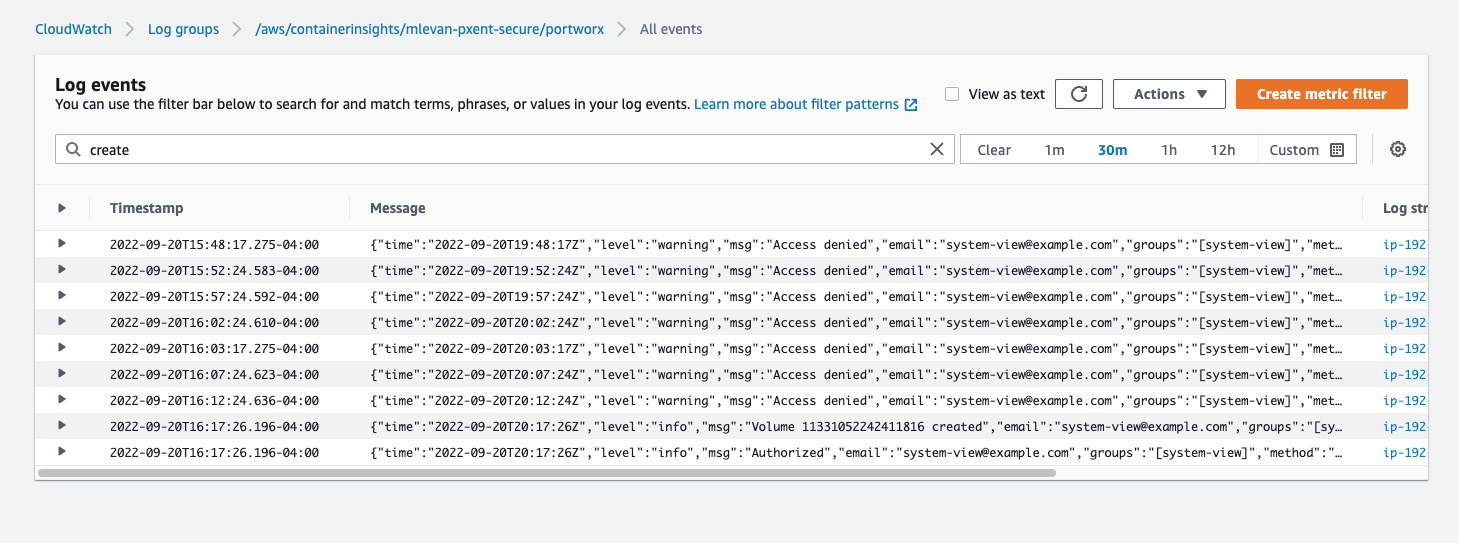
Now that we have showcased that the user with the system.view role is unable to create a volume, we can update his role to system.user and show that he can now create the PVC.
Delete the px-user-token in system-view-ns and recreate it with an updated role:
kubectl -n system-view-ns delete secret px-user-token
SYSTEMVIEW_TOKEN=$(kubectl pxc utilities token-generate \
--token-email=system-view@example.com \
--token-name="System-View" \
--token-roles=system.user \
--token-groups=system-view \
--token-duration=7d \
--token-issuer=operator.portworx.io \
--token-subject="system-view@example.com/system-view" \
--shared-secret=$PORTWORX_AUTH_SHARED_SECRET)

kubectl -n system-view-ns create secret \
  generic px-user-token --from-literal=auth-token=$SYSTEMVIEW_TOKEN
After that change has been made, the PVC will be successfully created. You can see the logs transition from Access Denied to Volume ID created by system-view@example.com.
Role-based access controls allow for integration into a customer’s existing authentication frameworks, making it possible to utilize authorization and ownership. This gives users the ability to deploy mission-critical applications into production.
For example, integrating per container data volume access controls with a corporate authorization and authentication system provides ways for teams to deploy mission-critical applications that have stricter governance, enabling them to get more out of their Kubernetes investment.
The capability to log and audit user access of the volumes allows customers to integrate Portworx into their existing security frameworks and conform to any security requirements. Audit logs are important, as they give customers the capability to detect and react to instances of inappropriate access to or use of information systems or data.
In the following demo, we will showcase these capabilities.


