


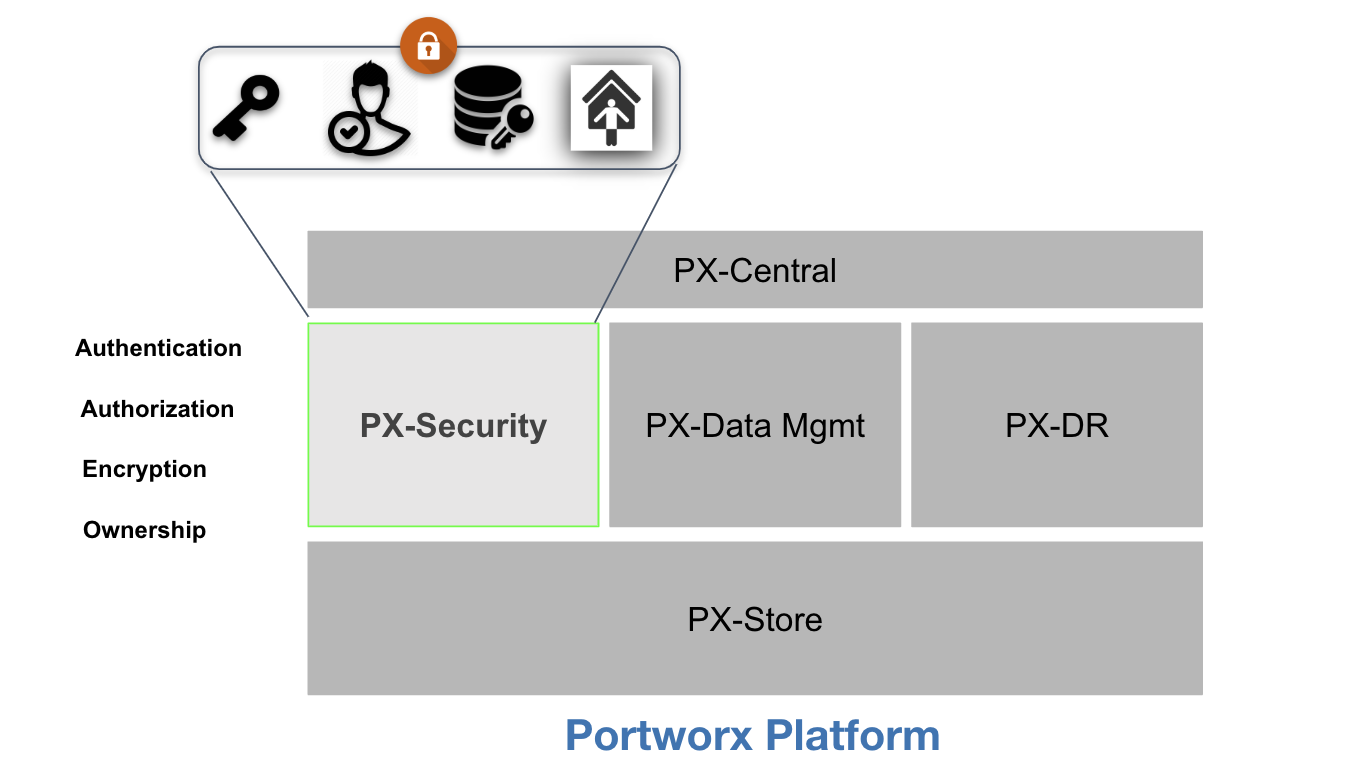

Security is essential in the enterprise and this is no different for microservices based applications running on your Kubernetes infrastructure. Kubernetes provides RBAC authorization to help regulate access to specific resources within Kubernetes based on a set of roles. These mechanisms are great for regulating access to Kubernentes-specific objects such as Services, Namespaces, Quotas and more, however namespaces and pod security policies alone are not enough to restrict who can request changes to the underlying data management system.
Many enterprises plugin to other platforms to provide the substrate for network and storage through APIs such as CNI or CSI. What Kubernetes lacks is the ability to extend the RBAC into these subsystems, it is now the responsibility of the external system to ensure authorization and authentication as well. This is why here at Portworx we work together with Kubernetes to provide RBAC, Encryption and Ownership through roles for the persistent volumes backing your PVCs in Kubernetes. This creates a seamless layer of protection that provides the following for your PVCs:
To get an in depth idea of what Portworx can provide for your Kubernetes platform you can check out Security Reference Architecture.
We’ll focus on some topics such as how to setup Portworx PX-Security and how to use tokens to authenticate users with roles which certain types of access to persistent volumes. Let’s get started.
First, Portworx supports RBAC through the use of tokens. In this blog, Portworx Security will be using tokens stored in Kubernetes Secrets which provide the most flexible option without sacrificing any of the security.
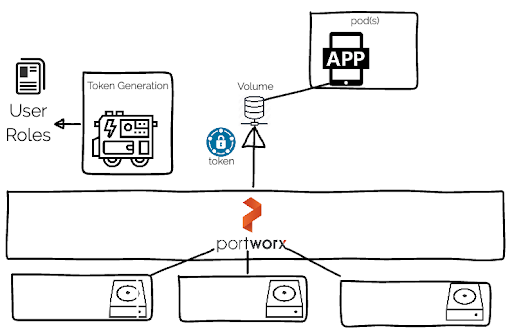
Before we get into what a token is and how to use it, remember that every request to Portworx is authenticated and authorized using information stored in token, which contains all the verified and signed information about the user and roles they have to interact with the system. So once we configure Portworx-Security, we will then create tokens.
Let’s configure Portworx for security. Head over to https://central.portworx.com and click on Install and Run → New Spec and fill out the information the installer is asking for and download your YAML file when completed, save the file somewhere you can edit it.
Next, we’ll create the secure shared secrets needed for PX-Security. We must first create these shared secrets because they will be used to generate and verify tokens by a Storage Admin. For security reasons, these are then stored in Kubernetes secrets in the kube-system namespace where only a limited set of admin users and applications can access.
PORTWORX_AUTH_SYSTEM_KEY=$(cat /dev/urandom | base64 | fold -w 65 | head -n 1)
PORTWORX_AUTH_STORK_KEY=$(cat /dev/urandom | base64 | fold -w 64 | head -n 1)
PORTWORX_AUTH_SHARED_SECRET=$(cat /dev/urandom | base64 | fold -w 64 | head -n 1)
Place these values into a Kubernetes Secret by running the following:.
kubectl -n kube-system create secret generic pxkeys \
    --from-literal=system-secret=$PORTWORX_AUTH_SYSTEM_KEY \
    --from-literal=stork-secret=$PORTWORX_AUTH_STORK_KEY \
    --from-literal=shared-secret=$PORTWORX_AUTH_SHARED_SECRET
You can test that the shared-secret is in Kubernetes by using the following command.
kubectl -n kube-system get secret pxkeys -o json | jq -r '.data."shared-secret"' | base64 -d
Open your YAML file up and find Portworx daemonset where you see args: under the image:portworx/oci-monitor. Underneath here, in this section we will add the security parameters (in bold) with the secrets PX-Security looks for.
        - name: portworx
          image: portworx/oci-monitor:2.1.5
          imagePullPolicy: Always
          args:
            ["-c", "px-cluster",
             "-s", "/dev/xvdf",
             "-secret_type", "k8s",
             "-b",
             "-x", "kubernetes",
            "-jwt_issuer", "example-domain.com"]
          env:
            - name: "AUTO_NODE_RECOVERY_TIMEOUT_IN_SECS"
              value: "1500"
            - name: "PX_TEMPLATE_VERSION"
              value: "v4"
            - name: "PORTWORX_AUTH_JWT_SHAREDSECRET"
              valueFrom:
                secretKeyRef:
                  name: pxkeys
                  key: shared-secret
            - name: "PORTWORX_AUTH_SYSTEM_KEY"
              valueFrom:
                secretKeyRef:
                  name: pxkeys
                  key: system-secret
           - name: "PORTWORX_AUTH_STORK_KEY"
             valueFrom:
               secretKeyRef:
                  name: pxkeys
                  key: stork-secret
We also need to find the Stork deployment and edit the environment to include our shared secret. See below.
        containers:
      - command:
        - /stork
        - --driver=pxd
        - --verbose
        - --leader-elect=true
        - --health-monitor-interval=120
        imagePullPolicy: Always
        image: openstorage/stork:2.2.5
        env:
        - name: "PX_SERVICE_NAME"
          value: "portworx-api"
        - name: "PX_SHARED_SECRET"
          valueFrom:
             secretKeyRef:
                name: pxkeys
                key: stork-secret
Once you have both of these completed, save your YAML file. We now need to create our shared secret that we referenced above in the Portworx installation YAML.
Next, go ahead and create your Portworx cluster with the YAML file you downloaded and edited.
$ kubectl apply-f px-sec-cluster-spec.yaml

$ kubectl get po -n kube-system -l name=portworx
NAME             READY STATUS RESTARTS   AGE
portworx-4vmcx   1/1 Running 0          3m54s
portworx-hwrxh   1/1 Running 0          3m54s
portworx-rbqzk   1/1 Running 0          3m54s
We’re going to need to define a few users which we can generate tokens for. Typically these users have attributes assigned to them which define which type of user they are in an organization
First we’ll create a Storage Admin which has the roles and responsibility of a full-access user. There should only be one or two of these to limit full-access.
Create a file called admin.yaml with the the following:
name: Storage Administrator
email: storageadmin@example.com
sub: storageadmin@example.com/storageadmin
roles: ["system.admin"]
groups: ["*"]
Next, we’ll create a Kubernetes User which has the roles and responsibility of acting as a verifying “user” that Kubernetes is in fact allowed to interact with Portworx and that the request is coming from Kubernetes. Your Storage Admin will need to set this user up.
Create a file called kubernetes.yaml with the the following:
name: Kubernetes
email: kubernetes@local.net
sub: kubernetes@local.net/kubernetes
roles: ["system.user"]
groups: ["kubernetes"]
Lastly, we’ll create a simple view-only user to demonstrate how Portworx can limit access to the underlying data management APIs.
Create a file called viewer.yaml with the the following:
name: Viewer
email: viewer@example.com
sub: viewer@example.com/viewer
roles: ["system.view"]
groups: ["viewers"]
Note: The sub is the unique identifier for this user and must not be shared amongst other tokens according to the JWT standard. This is the value used by Portworx to track ownership of resources. If email is also used as the sub unique identifier, please make sure it is not used by any other tokens.
Note that one user has the role system.admin, another the other has system.user and the last has system.view. These roles are default in Portworx Security but new roles may be created as needed. will dictate what a user can do with the Portworx resources such as create or delete volumes. This happens completely independent of what this user is assigned in Kubernetes RBAC. In other words, the user with system.view may be able to list and create PVC objects in Kubernetes but if they were to try to create a volume directly with Portworx it would fail. We will also show you why a user who can create a PVC object may not actually get a backing PV in this security model because they must have a valid token configured by the storage admin to verify the correct role based access.
Once you have the users defined above, we can generate self-signed certificates for these users using our shared secret and the Portworx client tool pxctl.
Note: You can create your own application to generate tokens, you can base it on our open source golang example application openstorage-sdk-auth
In this scenario, we will use our shared secret along with the pxctl auth token generate command. Let’s create the tokens for the above two users.
First, get the shared secret.
PORTWORX_AUTH_SHARED_SECRET=$(kubectl -n kube-system get secret pxkeys -o json \
    | jq -r '.data."shared-secret"' \
    | base64 -d)
Next, configure the admin token. First SSH, into a Portworx node so you can use the pxctl command.
$ PX_POD=$(kubectl get pods -l name=portworx -n kube-system -o jsonpath='{.items[0].metadata.name}')

$ kubectl exec -it -n kube-system $PX_POD  bash
Then, create the admin token using the admin.yaml configuration file and the shared secret.
Note: Make sure you copy auth_config file and the PORTWORX_AUTH_SHARED_SECRET into the Portworx container where you are using pxctl from.
ADMIN_TOKEN=$(/opt/pwx/bin/pxctl auth token generate \
   --auth-config=admin.yaml \
   --issuer=example-domain.com \
   --shared-secret=$PORTWORX_AUTH_SHARED_SECRET \
   --token-duration=1y)
$ pxctl context create admin--token $ADMIN_TOKEN
Next, configure the Kubernetes token.
KUBE_TOKEN=$(/opt/pwx/bin/pxctl auth token generate \
   --auth-config=kubernetes.yaml \
   --issuer=example-domain.com \
   --shared-secret=$PORTWORX_AUTH_SHARED_SECRET \
   --token-duration=1y)
Next, configure the Viewer token.
VIEWER_TOKEN=$(/opt/pwx/bin/pxctl auth token generate \
   --auth-config=viewer.yaml \
   --issuer=example-domain.com \
   --shared-secret=$PORTWORX_AUTH_SHARED_SECRET \
   --token-duration=1y)
$ pxctl context create viewer --token $VIEWER_TOKEN
Now that we have created the user contexts (like a kubectl context for Portworx) to use for both users, we can go ahead and start interacting with our Portworx system as one of these users.
Note you can list contexts with $pxctl context list
$ pxctl context set viewer

$ pxctl volume create --size 5 myvol
VolumeCreate: Access denied to roles: [system.view]
What just happened? Well, remember we set the user context above for the viewer which has a system.view role. This is a Portworx default role that can only run read-only commands and creating a volume falls in the writebucket, therefore, access was denied.
In order for users in Kubernetes to use Portworx security, one must use their token during requests to the cluster. One way to do this is for you administrator to make the token available within Kubernetes storage class. The admin can set the to the saved secret token in a secret called px-k8s-user in the Portworx namespace.
apiVersion: storage.k8s.io/v1
kind: StorageClass
metadata:
  name: px-storage-repl-1
provisioner: kubernetes.io/portworx-volume
parameters:
  repl: "1"
  openstorage.io/auth-secret-name: px-k8s-user
  openstorage.io/auth-secret-namespace: portworx
allowVolumeExpansion: true
If you are using CSI, make sure to set the extra parameters.
Note: This currently only works when using Portworx with CSI.
parameters:
  repl: "1"
  csi.storage.k8s.io/provisioner-secret-name: px-k8s-user
  csi.storage.k8s.io/provisioner-secret-namespace: portworx
  csi.storage.k8s.io/node-publish-secret-name: px-k8s-user
  csi.storage.k8s.io/node-publish-secret-namespace: portworx
  csi.storage.k8s.io/controller-expand-secret-name: px-k8s-user
  csi.storage.k8s.io/controller-expand-secret-namespace: portworx
Once this is done a user with access to that StorageClass can create volumes.
kind: PersistentVolumeClaim
apiVersion: v1
metadata:
   name: mysql-data
spec:
   storageClass: px-storage-repl-1
  accessModes:
    - ReadWriteOnce
   resources:
     requests:
       storage: 12Gi
When you create the above PVC, it will authenticate using the Kubernetes token as a “user” thus making sure Kubernetes users are the ones making the request. This is great, however multiple tenants can use the storage class, so we need to create a way to use multi-tenant tokens in different namespaces. This is because Kubernetes provides a great way to isolate account resources using namespaces, but you may want a more secure multi tenant solution. Portworx can enhance the multitenant model by providing resource access control for application volumes. To enable a multi-tenancy with PX-Security you can do the following.
First, create a namespace for the tenant.
$ kubectl create namespace tenant-a-ns
Create a file called tenant-a.yaml with the the following:
name: tenant-a
email: tenant@tenant-a.com
sub: tenant@tenant-a.com/tenant
roles: ["system.user"]
groups: ["developers"]
Create a token for the Kubernetes using tenant-name.yaml:
TENANT_A_TOKEN=$(/opt/pwx/bin/pxctl auth token generate \
    --auth-config=b>tenant-a.yaml \
    --issuer=example-domain.com \
    --shared-secret=$PORTWORX_AUTH_SHARED_SECRET \
    --token-duration=1y)
Save the tenant Kubernetes token in a secret called <tenant namespace>/px-k8s-user:
$ kubectl -n tenant-a-ns create secret \
  generic px-k8s-user \
  --from-literal=auth-token=$TENANT_A_TOKEN
Kubernetes storage classes can now be setup to use this secret to get access to the token to communicate with Portworx.
The following CSI StorageClass, once created, will enable your tenants to create volumes using their token stored in a secret in their namespace by looking up the secret within the namespace to use for requests. When using CSI, the storage class references the secret for the three types of supported operations: provision, node-publish (mount/unmount), and controller-expand.
apiVersion: storage.k8s.io/v1
kind: StorageClass
metadata:
  name: px-storage
provisioner: pxd.portworx.com
parameters:
  repl: "1"
  csi.storage.k8s.io/provisioner-secret-name: px-k8s-user
  csi.storage.k8s.io/provisioner-secret-namespace: ${pvc.namespace}
  csi.storage.k8s.io/node-publish-secret-name: px-k8s-user
  csi.storage.k8s.io/node-publish-secret-namespace: ${pvc.namespace}
  csi.storage.k8s.io/controller-expand-secret-name: px-k8s-user
  csi.storage.k8s.io/controller-expand-secret-namespace: ${pvc.namespace}
allowVolumeExpansion: true
Note the value ${pvc.namespace}. This will ensure that the CSI controller gets appropriate token which is tied to the namespace of the PVC and you now have a multi-tenant solution for token based authentication for your persistence.
Another part of PX-Security we didn’t cover in this blog is encryption for Portworx volumes. For more information you can check out our documentation on how to work with Encrypted PVCs. You can combine Portworx RBAC with volume encryption to secure data within Kubernetes even further.
Thanks for reading and good luck securing your Kubernetes workloads! Here is a quick demo of what we discussed above.


