What is Elasticsearch?
The Elasticsearch application is a highly scalable enterprise-grade search engine that can hold massive amounts of data and be used by various other applications for data discovery. One of the most common use cases for Elasticsearch is loading and visualizing source logs for analysis. This is where the term ELK comes in. The acronym stands for projects:
- Elasticsearch
- Logstash
- Kibana
Understanding Kubernetes storage and deployment is crucial for organizations deploying Elasticsearch on Kubernetes. It ensures that the storage solutions are optimized for performance and reliability, essential when handling large volumes of log data.
Moreover, effective Kubernetes Storage Management practices help maintain the integrity and availability of your Elasticsearch indices, allowing for seamless data retrieval and analysis.
What is ELK Stack?
ELK Stack is a suite of tools for real-time data gathering, analysis, and visualization. It enables organizations to aggregate application or system logs for monitoring and real-time debugging issues, identify vulnerabilities, and troubleshoot faster. Let us understand each of the components of the ELK stack.
ELK Stack Components
Elasticsearch
Elasticsearch is an open source database that lets you perform a combination of many types of searches, such as structured, unstructured, geo, metric, and from a piped query language. It indexes any data that it stores, allowing you to search and get results really fast.
Logstash
Logstash is a lightweight open source data collection engine that gathers and transforms data from multiple sources before stashing it in Elasticsearch. You can stash data to other destinations, too. It can handle various input formats and allows integration with numerous plugins. This flexibility allows users to seamlessly process logs, metrics, and other data types.
Kibana
Kibana is the exploration and visualization tool of the ELK stack. Based on the data stored in Elasticsearch, you can create interactive charts that help you navigate large amounts of data in less time. Using it, you can create various analytics such as histograms, pie charts, and line graphs.
Benefits of Elasticsearch
One of the biggest advantages of Elasticsearch is its speed. The main reason Elasticsearch offers this level of speed is that it’s deployed on top of Apache Lucene, which provides powerful searching and indexing features.
Elasticsearch can perform text searches at close to real-time speeds. This allows you to get search results with minimal latency – sometimes as fast as 10 ms. In contrast, the same search in a standard SQL database can take more than 10 seconds, even in optimal conditions.
This setup makes Elasticsearch suitable for search requests in time-critical scenarios like infrastructure monitoring and cybersecurity applications.
Another positive feature of Elasticsearch is its distributed architecture. That means data is duplicated and spread out in different containers, called shards. Not only does this make information redundant and reliable, but it also makes searches super fast. In addition, the distributed nature of Elasticsearch also allows it to handle huge volumes of searches – up to several petabytes at a time.
Because Elasticsearch is distributed, it’s also easy to scale. It can be expanded horizontally by adding any number of servers, nodes, or clusters. This gives it the ability to store and process thousands of gigabytes of information without suffering in performance.
Elasticsearch also uses the JavaScript Object Notation (JSON) format, which is easy for humans to read and machines to parse and interpret. Compared to a regular database, a NoSQL database that uses JSON can realize higher search performance and speeds. JSON is also compatible with a wide array of programming languages, which makes it easy for any developer to integrate into any software project.
Lastly, Elasticsearch is a scheme-free type of storage that doesn’t need data definitions. You also don’t need to specify the data type explicitly because it will either assign a default type or detect it automatically. Overall, this makes managing the data much easier.
What is Kubernetes?
Kubernetes is an open source platform that runs a cluster of worker nodes and master nodes which allows teams to deploy, manage, scale, and automate containerized workloads such as Elasticsearch. Kubernetes can manage many applications at a massive scale including stateful applications such as databases or search platforms. Kubernetes builds on the shoulders of giants such as Google who initially conceived the software after using similar technology to run production workloads for over a decade.
Benefits of Kubernetes
One advantage of Kubernetes is that it speeds up development. The containerized approach means applications can be developed as true microservices that communicate via API calls. Thus, the development team can code, test, and deploy individual components independently and in parallel with the rest of the project.
Kubernetes streamlines the deployment process by offering a consistent API that development teams can use to deploy applications across different environments, such as development, testing, and production. This consistency simplifies application delivery, as containers combine the applications and their dependencies, making them highly portable. As a result, moving an application from one environment to another doesn’t require additional installations or setup. Once built, containerized applications can be reliably deployed across the pipeline, ensuring they behave consistently, regardless of the underlying infrastructure.
The result is that dev teams can shorten their timeframes and even reduce their costs.
Container orchestration solutions like Kubernetes are particularly cost-efficient. Resources can be automatically controlled and allocated to the applications that need the most. Kubernetes also gives unparalleled scalability to organizations with its auto-scaling tools like VPA and HPA. Operations can grow on-demand during peak demand without having to set up and invest in the infrastructure. Kubernetes simply allots new resources to compensate.
Conversely, Kubernetes can re-assign resources to other applications when demand dies down. This can help make your operation incredibly efficient by minimizing wasted resources.
Related to this is Kubernetes’ flexibility in any environment. Thanks to its platform independence, Kubernetes can run in any network infrastructure — whether it be cloud, on-premise, or hybrid.
This flexibility enables enterprises to adopt various migration strategies to move applications to Kubernetes, such as lift-and-shift or re-platforming. By containerizing applications, even traditional monolithic ones, organizations can often redeploy them in Kubernetes with minimal code changes. This approach allows teams to modernize and migrate workloads incrementally, leveraging Kubernetes’ robust container orchestration without needing a full application rewrite.
So in today’s competitive landscape, Kubernetes makes a good home for deploying Elasticsearch.
Why Deploy Elasticsearch on Kubernetes?
The Elasticsearch / Kubernetes combination is a good idea in theory and practice due to the way Elasticsearch is built.
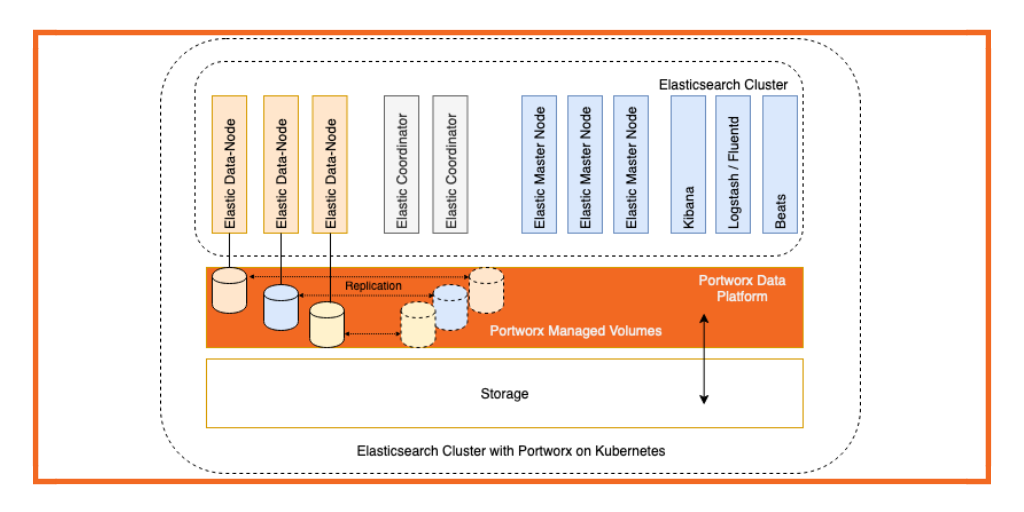
Remember that Elasticsearch has a distributed architecture. Essentially, it’s composed of multiple nodes, where each Elasticseach node is deployed within a cluster across worker nodes as a StatefulSet or via operator. It’s this setup that allows Elasticsearch to perform search queries quite rapidly.
Nodes in Elasticsearch often have different roles. A master node, for instance, is responsible for controlling the entire Elasticsearch cluster. Some nodes are focused on data indexing, while others are primarily for load balancing.
As it turns out, the containerized approach of Kubernetes is the perfect fit for Elasticsearch’s distributed nature.
An Elasticsearch / Kubernetes operator makes configuring, deploying, and monitoring Elasticsearch instances trivial. Using a few commands, you can quickly install it on Kubernetes. You can also opt for other solutions like Helm Charts to further automate the process.
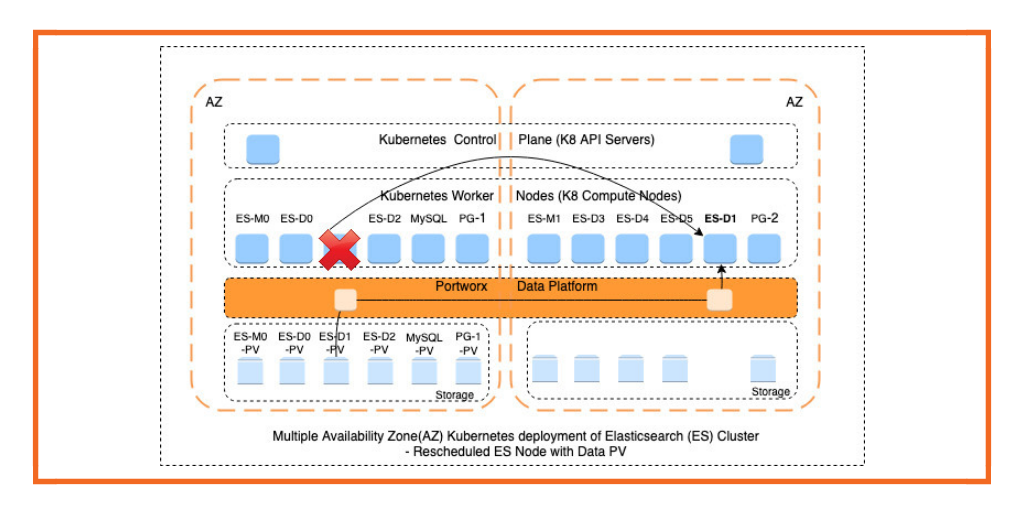
Elasticsearch on Kubernetes gains resiliency primarily due to Kubernetes’ native self-healing and orchestration features like automated pod rescheduling and availability of persistent storage.
The key to making a stateful application (like Elasticsearch) run on a stateless system (like containers) is to use Persistent Volumes (PV). This solution bridges the gap between the two different environments, allowing Elasticsearch to deploy stateful workloads on Kubernetes clusters.
The bottom line is that the Elasticsearch / Kubernetes pairing makes the search engine even more powerful, fast, and efficient.
Benefits of Running Elasticsearch on Kubernetes
Scalability
With Elasticsearch running on Kubernetes, you can easily scale horizontally in case of a surge in incoming data. As the volume grows, you can optimally manage the resources with Kubernetes as an orchestrator. Kubernetes features like `StatefulSet` and `PersistentVolumes` allow you to scale dynamically, avoiding downtime.
High Availability
Stateful applications like Elasticsearch require persistent storage. Using Kubernetes, you can ensure that the Elasticsearch service is always available because of the built-in capabilities like self-healing and auto-restarting nodes. You can also create multiple replicas, each with its Persistent Volume (PV), ensuring data persists even if a pod is rescheduled using `StatefulSet`. Elasticsearch itself provides data redundancy through primary and replica shards, which it distributes across nodes. This redundancy means that if one Elasticsearch node or Kubernetes pod goes down, other nodes containing replica shards can temporarily handle requests, ensuring minimal disruption to services.
Resource Efficiency
Kubernetes can help you set resource quotas and limits so that you never exhaust your resources. It will also help ensure that the Elasticsearch deployments consume only the required resources. With Kubernetes, you can implement auto-scaling for efficient resource utilization. This helps you be dynamic with the Elasticsearch deployment, as during non-peak hours, you can spin fewer nodes.
Ease of Management
With Elasticsearch on Kubernetes deployed with `StatefulSet`, each pod gets a unique identity that remains even after the pod restarts, making it easy for other resources to locate it. With `kubectl` at your hand, you can gain insights into the complete architecture setup of Elasticsearch on Kubernetes, such as pods running, PVCs created, and the status of Elasticsearch nodes which helps reduce operational complexity.
How to Set Up Elasticsearch on Kubernetes
Prerequisites
- A Kubernetes cluster
- kubectl CLI tool
Choosing the Right Kubernetes Distribution
Elastic Cloud on Kubernetes [ECK] is the official Elastic operator for the complete installation and orchestration of the ELK stack. Check the supported versions and verify your cluster is ready based on the Kubernetes cluster provider.
Running ElasticSearch on Kubernetes
If you are architecting an Elasticsearch stack such as ELK to be highly scalable, performant, and secure and want to follow today’s DevOps patterns then Kubernetes is a great place to start. This is because Kubernetes allows organizations to simplify operations such as upgrades, scaling, restarts, and monitoring which are more-or-less built into the Kubernetes platform. Though Kubernetes offers a lot out of the box it is not a silver bullet for what you will need to consider in order to run Elasticsearch.
Proper Worker Configuration
Elasticsearch can be memory-heavy as it sorts and aggregates data, so make sure that your Kubernetes worker nodes have enough memory to run Kubernetes, data management tools, and Elasticsearch itself. Having worker nodes that are labeled for memory-intensive workloads may be a good way to deploy a StatefulSet that demands a certain amount of memory.
Reliable Container Storage and Data Management
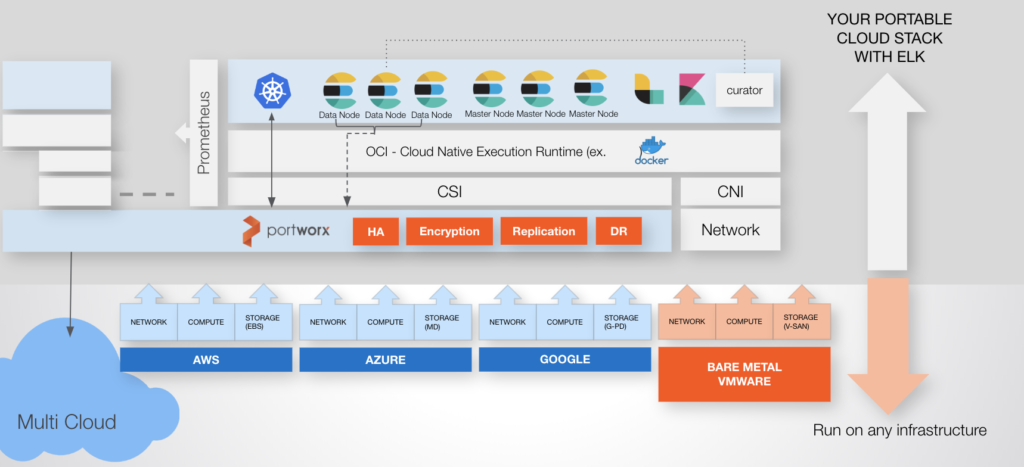
Elasticsearch can be write-heavy which means you need a storage and data management layer that is flexible enough to expand to meet these requirements but that is also closely tied to your Kubernetes cluster for ease of use. With Portworx, you can dynamically provision and manage storage for your Elasticsearch clusters. This flexibility allows you to scale storage in response to changing data requirements without downtime.
Enforcing io profiles optimized for Elasticsearch and storage pool types that use SSDs can help with performance. Additionally, using a container storage and data management layer that enforces data locality (i.e. pod and data volume on the same host) for your Pod’s persistent volume claims even in the event of failover will ensure the best possible configuration.
Data Security
Elasticsearch provides built-in security features which include application-level RBAC, and encryption of data in flight as well as auditing. However, you should also consider if your data on-disk are protected, and which users have access to manipulate these backing stores. Portworx can enhance security by providing encryption for data at rest, ensuring that your on-disk data is protected from unauthorized access. For added security, organizations should protect their data at the application level as well as secure the data layer with encryption and access controls.
Data Protection & Disaster Recovery
Elasticsearch is able to receive and store information in indices, which can be managed with data retention policies using a curator configuration. However, that is just half the battle. Choosing a container storage and data management solution that provides proper data replication, backups, disaster recovery, and off-site backups is essential to ensure recovery from node or site failure and to maximize availability and protection.
Portworx offers automated seamless backups, data protection, and disaster recovery solutions across cloud and on-premises environments, ensuring your Elasticsearch data remains resilient and highly available. The Portworx Data Platform makes spanning fault domains with Elasticsearch possible, helping increase data durability in an Elasticsearch cluster.
Elasticsearch Deployment Strategies on Kubernetes
Single-node Elasticsearch Deployment
In a single-node deployment strategy, only one instance of Elasticsearch is deployed on the cluster. This setup is very easy to deploy if you are looking to explore Elasticsearch on your local machine for testing purposes. All you have to do is set `spec.nodeSets.count` as 1. This strategy is not recommended for production as due to lack of failover the service will not be highly available.
Multi-node Elasticsearch Cluster Deployment
A multi-node strategy is widely used in production environments as it helps ensure high availability and data redundancy. In this deployment, multiple instances of Elasticsearch are running, which can be in different availability zones. If you are planning for production, your deployment can be spread across as many as three separate availability zones, each hosted in its own, separate data center.
Using StatefulSets for Elasticsearch
Elasticsearch can also be deployed on a single node or multi-node using `StatefulSet`, which helps manage stateful applications better. Each Elasticsearch node can have a unique identity and persistent storage. Using the ECK operator, define a `StatefulSet` where `count` will be the number of Elasticsearch nodes, and `podTemplate` will help you customize the Elasticsearch pods. You can leverage Kubernetes features like setting resource usage limits and quotas and adding labels or environment variables.
Configuring Persistent Storage
Stateful applications like Elasticsearch can use Kubernetes Persistent Volumes to ensure that Elasticsearch data persists beyond the lifecycle of individual pods. You could opt for SSD-backed storage to enhance I/O performance, especially important for write-heavy workloads typical of Elasticsearch.
Pod Affinity and Anti-Affinity Rules
Deploying Elasticsearch with pod affinity and anti-affinity rules helps spread Elasticsearch nodes across different physical hosts to enhance resilience. You can use affinity rules to schedule pods on specific nodes based on certain labels, which can help optimize resource utilization and performance. Anti-affinity rules help prevent multiple Elasticsearch pods from being scheduled on the same host, enhancing fault tolerance.
Benefits of ELK on Kubernetes
Elasticsearch stores and indexes large data volumes such as logs and metrics. To be able to visualize this data or gain valuable insights, you are required to transform this data and then obtain visualizations. This is where Logstash and Kibana come into play. They help with data aggregation and for a single searchable repository that can help with faster troubleshooting. With the transition to microservices architecture, the data volume could be very dynamic so deploying this stack on Kubernetes can help you leverage its benefits like ease of horizontal or vertical scaling, updates or rollbacks, and efficient management of resources.
How to Configure Elasticsearch on Kubernetes
Elasticsearch Configuration Options
Elasticsearch provides multiple ways to configure it on Kubernetes using the ECK operator. Here are a few:
- By manually installing the CRDs
- By using the Elastic stack Helm chart
We have our Kubernetes cluster running on EKS. In this setup, we will start with the Elastic stack Helm chart for the ECK operator. Since we plan to show you how to configure the Elasticsearch Heap Size, network setting, and shards and replicas for index, we would customize the installation by creating `values.yaml`.
In this configuration, we will define the deployment strategy as multi-node and use volume claim templates to create PVCs. This PVC would require a `StorageClass`.
In this demo, we will use Portworx to provision storage. Following is the sample storage class yaml. :
```
apiVersion: storage.k8s.io/v1
kind: StorageClass
metadata:
  name: px-csi-db
provisioner: pxd.portworx.com
parameters:
  io_profile: db_remote
  repl: "1"  # Reduced replication factor
allowVolumeExpansion: true
reclaimPolicy: Delete
volumeBindingMode: Immediate

```
You need Portworx installed on the cluster before you can use the above Storage Class. You can refer to the Portworx installation steps here. Follow the steps as per your Kubernetes distribution. After installing Portworx, several storage classes will be created. You can use px-csi-db while installing Elasticsearch.
Let us apply it to the cluster.
```
$ kubectl apply -f storageclass.yaml
storageclass.storage.k8s.io/px-csi-db created
```
With `StorageClass` available, let us now add the Elastic chart and get started with creating custom `values.yaml` that we will use for installing Elasticsearch in the final step.
```
helm repo add elastic https://Helm.elastic.co
helm repo update
```
Helm repo is added successfully. Now in `values.yaml`, we will have to add the number of Elasticsearch nodes that have to be created. We are going to make use of the ‘StorageClass` to define the PVCs template.
```
# values.yaml
replicas: 3

resources:
  requests:
    cpu: "1"
    memory: "2Gi"
  limits:
    cpu: "2"
    memory: "4Gi"

volumeClaimTemplate:
  accessModes: ["ReadWriteOnce"]
  resources:
    requests:
      storage: 30Gi
  storageClassName: px-csi-db  # Use your StorageClass
```
In this configuration, we have defined 3 Elasticsearch nodes that will be created and for each pod, persistent storage will be created using PVCs. We will update the `values.yaml` file for further configuration and then install Elasticsearch at the final step.
Configuring Elasticsearch Heap Size
ElasticSearch runs with the Java Virtual Machine (JVM), and the heap size refers to the memory allocated to the JVM. The heap is used for storing data, indexing, and other memory-related operations. Some of the best practices for setting heap size:
- 50% of the total available RAM of the system. Leave the rest for the OS and the file cache.
- Set the Min/Max heap size to the same value to avoid dynamic adjustment of heap size which affects performance.
- Monitor heap size with Kibana to make sure that ElasticSearch is not experiencing memory pressure.
Add the following configuration to `values.yaml`:
```
# Set heap size for Elasticsearch
esJavaOpts: "-Xms2g -Xmx2g"
```
This will configure the heap size as 2GB.
Configuring Network Settings
Define the following network settings in `values.yaml` for configuring network settings:
```
# Network settings
network:
  host: "0.0.0.0"
```
Here, `network.host` defines the address to bind for both HTTP and transport traffic, typically set to 0.0.0.0 for remote access. We are not changing any default settings in this demo; the above configuration is set by default.
Install Elasticsearch using Helm chart
Here is the complete `values.yaml`configuration file that has all the required changes. We will use this file to install Elasticsearch on our cluster.
```
# values.yaml
replicas: 3

resources:
  requests:
    cpu: "1"
    memory: "2Gi"
  limits:
    cpu: "2"
    memory: "4Gi"

volumeClaimTemplate:
  accessModes: ["ReadWriteOnce"]
  resources:
    requests:
      storage: 30Gi
  storageClassName: px-csi-db  # Use your StorageClass

# Set heap size for Elasticsearch
esJavaOpts: "-Xms2g -Xmx2g"

# Disable node affinity to avoid conflicts (optional)
affinity: {}

# Network settings
network:
  host: "0.0.0.0"
```
As a best practice, it is recommended to create a separate namespace for Elasticsearch so let’s create it and then install Elasticsearch in that namespace. Run the following command:
```
kubectl create namespace elasticsearch
helm install elasticsearch elastic/elasticsearch -f values.yaml --namespace elasticsearch
```
Verify that the installation was successful using the following command.
```
kubectl get all -n elasticsearch
NAME READY STATUS RESTARTS AGE
pod/elasticsearch-master-0 1/1 Running 0 22m
pod/elasticsearch-master-1 1/1 Running 0 22m
pod/elasticsearch-master-2 1/1 Running 0 22m

NAME TYPE CLUSTER-IP EXTERNAL-IP PORT(S) AGE
service/elasticsearch-master ClusterIP 10.43.43.93 <none> 9200/TCP,9300/TCP 22m
service/elasticsearch-master-headless ClusterIP None <none> 9200/TCP,9300/TCP 22m

NAME READY AGE
statefulset.apps/elasticsearch-master 3/3 22m
```
Running Elasticsearch on containers means resources are ready as soon as the containers’ status is Running. Since we had set the replicas count as 3, we can see 3 pods created for the Elasticsearch. The Helm chart has created `StatefulSet` for managing the Elasticsearch and providing it with persistent storage.
Setting Up Elasticsearch Credentials
Once Elasticsearch is successfully deployed, you can communicate with Elasticsearch, check its health status, and create an index using the Elasticsearch credentials.
Check the username and password for Elasticsearch in Secrets. Secret should be present on the cluster by the name: `elasticsearch-master-credentials`
```
kubectl get secret -n elasticsearch elasticsearch-master-credentials
NAME                           	        TYPE 	DATA   AGE
elasticsearch-master-credentials   Opaque   2  	4h57m
```
Let us check the health status of Elasticsearch using these credentials:
```
curl -u <username>:<password> -k "https://<node-ip>:<node-port>/_cat/health?v"
epoch  	timestamp cluster       	status node.total node.data shards pri relo init unassign pending_tasks max_task_wait_time active_shards_percent
1625065602 09:33:22  elasticsearch 	green  3      	3     	2  	1   0	0	0    	0         	0s            	100.0%
```
In the above command, set the following custom values:
- Your Elasticsearch username.
- Your Elasticsearch password.
- The IP of one of the Kubernetes nodes where Elasticsearch is running.
- The NodePort that Elasticsearch is exposed on.
In the output, “green” means that the shards are all assigned. You can check more health status-related details here.
Configuring Shards and Replicas
Shards are subsets of an Elasticsearch index that splits the data into smaller pieces and distributes it across the nodes for horizontal scaling and increased capacity. Primary Shards hold the actual data, and queries are executed across them. The best practice is to adjust the number of shards as per the number of nodes in the cluster and the expected size of the data.
Replicas are copies of primary shards. It provides fault tolerance and high availability. More replicas ensure higher availability but consume more resources. For better performance and fault tolerance, set the higher number of replicas. However, a higher number of replicas consumes more resources.
Let us go ahead and create an index and set a custom number of shards and replicas on the cluster using the following command:
```
curl -u <username>:<password> -k -X PUT "https://<node-ip>:<node-port>/myindex" -H 'Content-Type: application/json' -d'
{
  "settings": {
    "number_of_shards": 3,
    "number_of_replicas": 2
  }
}
'
{"acknowledged":true,"shards_acknowledged":true,"index":"myindex"}
```
The index name is set as “my-index”. It is successfully created since the acknowledged field is set to true in output.
Monitoring Elasticsearch on Kubernetes
Deploying Elasticsearch on Kubernetes allows managing log data effectively. Integrating Prometheus for metrics collection and Grafana for visualization will further enhance the setup. It would provide comprehensive monitoring capabilities, essential for maintaining performance and reliability in dynamic environments.
For detailed guidance on integrating these tools into your Kubernetes environment, you can refer to Elastic Observability Documentation.
Day 2 Operations for Elasticsearch on Kubernetes
Handling Node Failures
A common day 2 operation for Elasticsearch on Kubernetes is handling Elasticsearch node failures to ensure resiliency. Portworx provides the capability to set both synchronous and asynchronous disaster recovery in the cluster to ensure the services recover in the event of a disaster with the least downtime. You can failover your application to mitigate or minimize data loss caused by unforeseen incidents to a destination and then failback when the source is restored and operational again.
Scaling Elasticsearch Cluster
As the volume of data generated grows, you need to figure out how to scale without downtime which is another day 2 operation for a stateful application. With Autopilot supported in Portworx, you can resize PVCs when it is running out of capacity or scale storage pools to accommodate increasing usage. For more detailed guidance on managing these scaling operations effectively, refer to Scaling Elasticsearch on Kubernetes.
How to Secure Elasticsearch on Kubernetes
Securing Data at Rest
With the default installation of Elasticsearch, certificates and keys for TLS are generated for the transport and HTTP layers. These are used to connect a Kibana instance to your secured Elasticsearch cluster and to encrypt internode communication.
Portworx integration support with key management stores can help you configure secret stores for your infrastructure. Portworx also provides Role-based access control (RBAC) for authorization, authentication, and ownership that can help you restrict unauthorized access. For securing data at rest, Portworx offers robust capabilities, including built-in encryption for persistent volumes.
Elasticsearch Backup and Restore Strategies
Elasticsearch allows you to back up the cluster by taking snapshots which can be used to back up with no downtime, recover data after deletion or a hardware failure, and transfer data between clusters.
It stores snapshots in an off-cluster storage location called a snapshot repository. Before taking or restoring snapshots, you must register a snapshot repository on the cluster. Elasticsearch supports several snapshot repository types along with cloud storage options, including AWS S3, Google Cloud Storage (GCS), and Microsoft Azure.
For detailed guidance on setting up and managing your snapshots, refer to How to Backup and Restore Elasticsearch on Kubernetes.
Snapshot and Restore
Snapshots are automatically deduplicated to save storage space and reduce network transfer costs. To back up an index, a snapshot makes a copy of the index’s segments and stores them in the snapshot repository. With Portworx managing the storage that has snapshots, you can ensure that your data is consistently backed up and can be restored quickly in case of failure.
Using Volume Snapshots
With Portworx, you can leverage volume snapshots to create point-in-time copies of your Elasticsearch data. This capability allows for quick recovery from data corruption or accidental deletions. You can schedule the snapshots of your volume or take them on-demand.
Automating Backups
Automating backups is essential for minimizing the risk of data loss and ensuring compliance with backup policies. Portworx simplifies this process through its automated backup features, which allow you to schedule regular backups based on your organization’s needs. With Portworx Backup, you can define detailed backup policies that specify how often backups should occur and where they should be stored.
Best Practices for Running Elasticsearch on Kubernetes
Once you’ve decided to give the Elastic / Kubernetes pipeline a try, here are some tips and best practices to follow.
Regular Updates and Patching
First, make sure you’re using the latest version of Elasticsearch and the Elastic operator for Kubernetes. This ensures you have the latest updates and fixes that can protect you from potential security vulnerabilities and give you access to the latest features.
Before deploying the Elasticsearch operator, make sure your security is established first. Elasticsearch is particularly susceptible to hackers, who can easily find and infiltrate an exposed port, even if you have authentication protocols. Because of this, never expose Elasticsearch directly to the Internet. If you need to, have the Kubernetes environment do it instead.
Resource Quotas and Limits
Implementing resource quotas and limits is essential for managing resource consumption effectively within a Kubernetes cluster. By defining resource requests and limits for your Elasticsearch pods, you can ensure that each pod has the necessary resources while preventing any single pod from monopolizing cluster resources. Setting both `requests` (minimum resources required) and `limits` (maximum resources allowed) helps maintain quality of service (QoS) and can prevent issues like pod eviction due to resource contention. For example, configuring your Elasticsearch pods with appropriate CPU and memory settings can significantly enhance performance and stability.
Effective Use of Namespaces
Now would also be a good time to consider your storage approach with Elasticsearch. An easy way is with a storage platform that handles provisioning in the background. A good option is the data management solutions offered by Portworx Enterprise.
Utilizing namespaces in Kubernetes allows you to organize your Elasticsearch deployment logically. This separation can help manage different environments (e.g., development, testing, production) or different teams within an organization. By default, with ECK operator installation using CRDs, Elasticsearch creates `elastic-system` namespace for easy segregation of Elasticsearch resources. You can define RBAC permissions specific to each namespace.
Keeping Configuration Consistent
Maintaining consistent configurations across your Elasticsearch nodes is vital for operational efficiency and reliability. Use YAML configuration files to define your Elasticsearch settings, including node roles, resource requests, and limits. You can manage them via version control systems like Git and then deploy the resources using configurations from a single source.
You should also enable Elasticsearch’s audit logging. This is crucial for monitoring your clusters and recording what happens during an attack. The latter is useful as it gives you forensic evidence to know how a breach occurred so that you can improve your security.
Now would also be a good time to consider your storage approach with Elasticsearch. An easy way is with a storage platform that handles provisioning in the background. A good option is the data management solutions offered by Portworx Enterprise.
Running stateful applications such as Elasticsearch as a microservice is not a trivial task because of how container orchestrators like Kubernetes treat the lifecycle of containers and pods. In essence, these resources are ephemeral entities with a short life span, depending on cluster state and application load …

