

Kubernetes is the fastest growing open-source project in history but Kubernetes was not designed with stateful applications like databases in mind. For enterprise applications, these systems have non-negotiable business requirements like high availability, data security, disaster recovery, strict performance SLAs and hybrid/multi-cloud operations. As a result, the adoption of Kubernetes for mission-critical enterprise applications is limited unless these requirements can be met.
Today’s post looks at one of these important topics: Disaster Recovery or DR. DR is a trending operations concern in the Kubernetes community as increasingly important business applications are run on the platform. Ultimately, keeping operations flowing in the case of a data center, availability zone, or regional outages is the goal. A recent example of this was the infamous 2016 DNS outage which took out many applications on the east coast of the United States.
The latest Portworx release introduces PX-DR, to provide two additional levels of data protection in the Kubernetes data management layer beyond the single-data-center and multi-availability zone HA that is available today.
First, PX-DR introduces disaster recovery with zero data loss (Zero RPO) between data centers located in a single metropolitan or campus area. In this case, data is synchronously replicated across two sites with less than 15-millisecond latency to enable Zero RPO failover and assist in better RTO using Kubernetes.
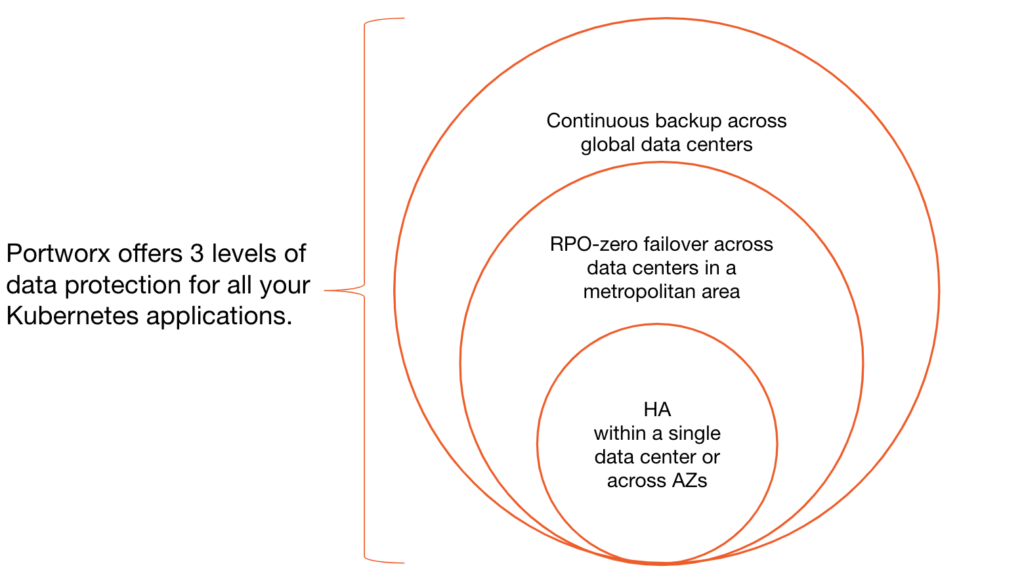
Second, PX-DR also provides an additional level of Disaster Recovery for geographically dispersed data centers with asynchronous replication. Portworx accomplishes this by enabling incremental, asynchronous replication of snapshots and resources from one location to another.
Stateless applications are the most common starting point for the Kubernetes journey. But once an organization has decided to run stateful applications like databases on the Kubernetes platform, issues of data protection come up. PX-DR solves these problems in two main ways. We will look at each in turn.
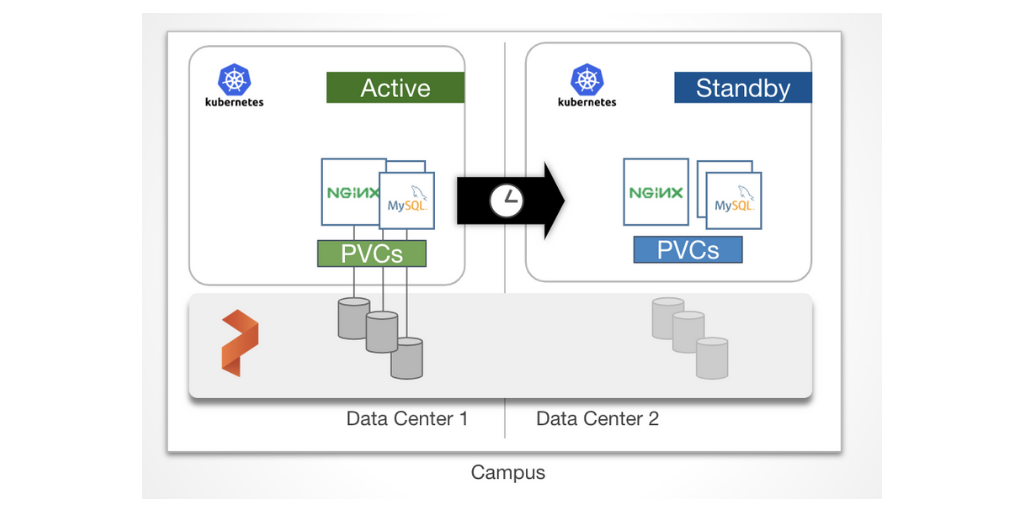
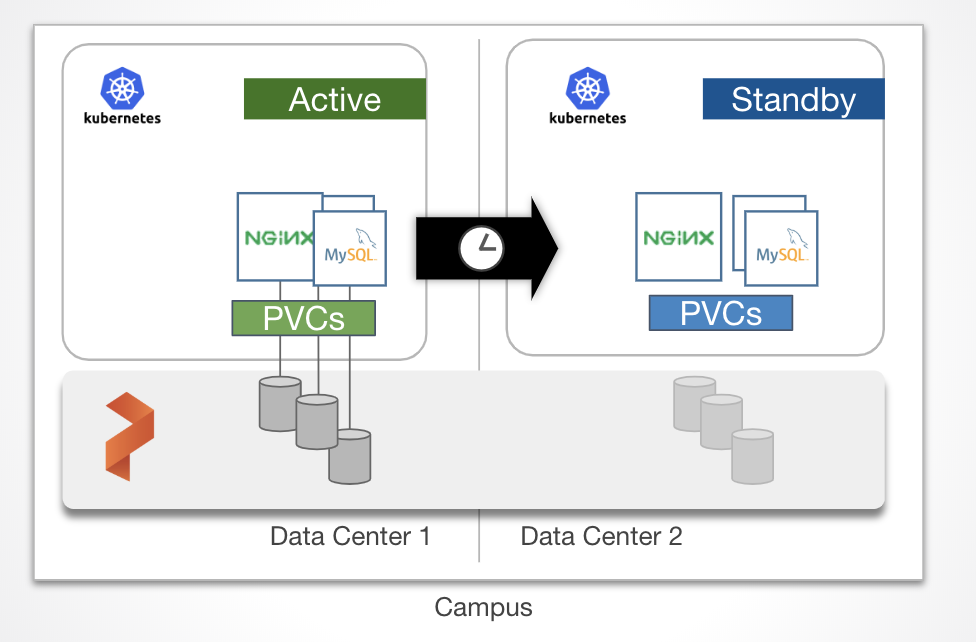
This data protection strategy ensures that every bit of data written to one cluster is replicated to a second cluster. We call this replication strategy “synchronous” because the data must be replicated to the second environment before any other writes are allowed on the first cluster. In this setup, Portworx is configured as a single cluster underlaying two Kubernetes clusters on top. One of the Kubernetes clusters is the active cluster and the other is on standby cluster in another fault domain or datacenter. Because the replication is synchronous, latency is an important consideration. We recommend <15ms round trip between data centers for most applications. When data is written to the application in the primary cluster, replicas are written to both in sites. Then when a failure is detected, the standby cluster can take over as the active cluster for the application with an RPO of zero.
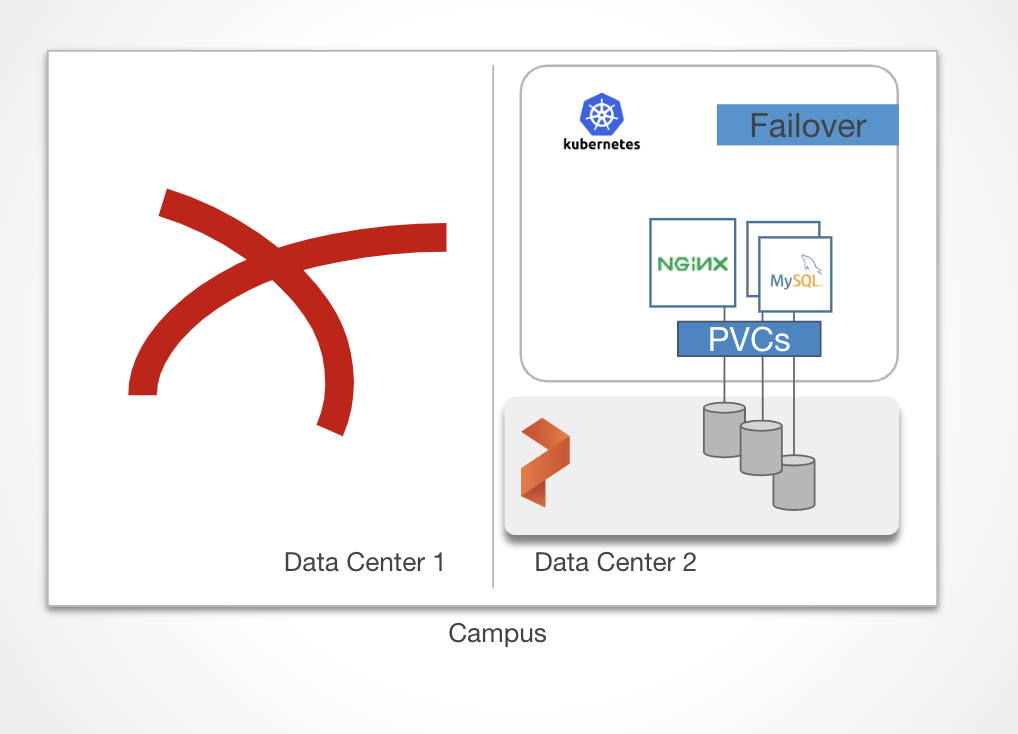 In the case of a complete data center loss, an application can startup with zero data loss in the Standby site.
Asynchronous replication is a mechanism in which two different Portworx clusters can be located in different geographic regions and be paired together. One cluster can be a disaster recovery “warm” cluster by performing continuous asynchronous replication on a given schedule to provide an RPO and RTO in which the organization is comfortable with or may be accountable for in the case of certain regulations or governance.
We’ve showcased during the previous KubeCon how you can migrate Kubernetes resources and volumes from one cluster to another, however, the feature described here goes a step further by letting an application be replicated on a schedule from one cluster to another automatically.
Asynchronous replication needs two Portworx clusters, one cluster in this scenario is a DR site. A cluster pair will be created between the two so PX-DR can properly be configured. After the clusters are paired, asynchronous replication is configured by using two things, a Schedule Policy and a Migration Schedule.
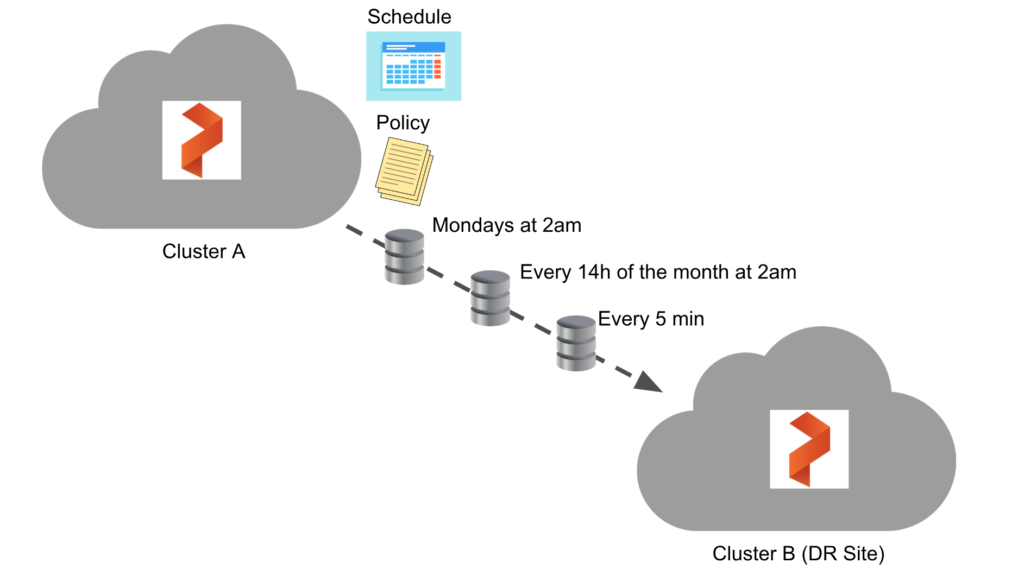
A schedule policy specifies when an action needs to be triggered. In this case, we’re discussing a migration as the action. The policy does not contain any action itself but will be referenced and used by a migration. The schedule policy is also not namespaced and can be consumed by migration schedules in other namespaces. This is similar to the way storage classes are created and consumed where an admin is expected to create it and then it will be consumed by other users.
There are 4 sections in a Schedule Policy:
Below is an example of a schedule policy that targets the mysql namespace and provides input for the interval, daily, weekly, and monthly times for the namespaces to be synched with the DR site. Remember, as mentioned before, SchedulePolicy is not namespaced so the relationship is many-to-one in terms of namespace- to-usage even though one is defined below.
apiVersion: stork.libopenstorage.org/v1alpha1
kind: SchedulePolicy
metadata:
  name: testpolicy
  namespace: mysql
policy:
  interval:
    intervalMinutes: 1
  daily:
    time: "10:14PM"
  weekly:
    day: "Thursday"
    time: "10:13PM"
  monthly:
    date: 14
    time: "8:05PM"
Migration schedules allow the SchedulePolicy to be associated with a Migration. Below is an example that uses the “testpolicy” from above. This migration points at the mysql namespace and will use the “remotepair” clusterpair available in that namespace if it exists. By also setting includeResources, includeVolumes, and startApplications in the spec, you can control what the migration does:
includeResources: Whether or not to include the Kubernetes objects associated with the volume such as Secrets, ConfigMaps, Services and more.includeVolumes: Whether or not to include migration Portworx volumes associated with PVCs.startApplications: Whether or not to start the application on the destination cluster after the resources and or volumes are synched.apiVersion: stork.libopenstorage.org/v1alpha1
kind: MigrationSchedule
metadata:
name: mysqlmigrationschedule
namespace: mysql
spec:
template:
spec:
clusterPair: remotecluster
includeResources: true
includeVolumes: true
startApplications: false
namespaces:
- mysql
schedulePolicyName: testpolicy
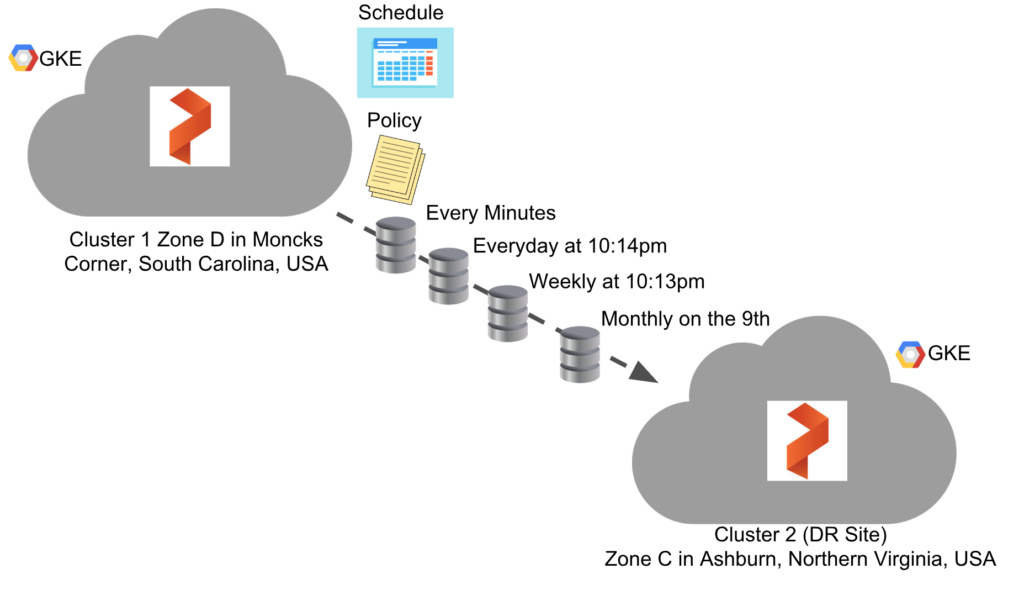
Let’s set up asynchronous replication for a DR site between two sites using Google Kubernetes Engine with Portworx. For the brevity of the blog I chose to skip over the container cluster creation process on GKE, however, if you would like to know where to find this, you can use our docs on how to set this up.
The clusters were created in the following zones. The one that exists in us-east4-c is our “DR Site”. In other words, it will be the cluster that we sync our data and applications too:
To create a pair between cluster #1 and cluster #2, get the token from the destination cluster and at least one available IP address of a Portworx node that the source cluster can access.
> Note: It is recommended that the IP is a load balancer and should have TLS, Authentication as well as firewalling applied to it.
$ kubectl config use-context gke_portworx-cluster-2
$ PX_POD=$(kubectl get pods -l name=portworx -n kube-system -o jsonpath='{.items[0].metadata.name}')\n
$ kubectl exec $PX_POD -n kube-system -- /opt/pwx/bin/pxctl cluster token show
$ kubectl describe no | grep ExternalIP
Next, while still using the destination cluster, generate a clusterpair for the namespace you will to setup DR for using the storkctl helper.
$ storkctl generate clusterpair incremental-dr --namespace mysql
Save the output to a file called pair.yaml and add ip: with the Portworx node IP and token: from previous commands.
Next, apply the pair to the source cluster and verify it is Ready.
$ kubectl config use-context gke_portworx_cluster-1
$ kubectl create -f pair.yaml
$ storkctl get clusterpair
NAME             STORAGE-STATUS   SCHEDULER-STATUS   CREATED
incremental-dr   Ready            Ready              08 Mar 19 15:32 EST
Now that we have our clusters paired together, we can set up asynchronous replication for an application. We’ll show how to do this below using the MySQL Database.
First, create the mysql namespace that our clusterpair is targeting.
$ kubectl create ns mysql
Next, apply the MySQL deployment spec which includes the Portworx volume and MySQL pods.
kind: StorageClass
apiVersion: storage.k8s.io/v1beta1
metadata:
    name: mysql-tester-class
provisioner: kubernetes.io/portworx-volume
parameters:
   repl: "1"
---
##### Portworx persistent volume claim
kind: PersistentVolumeClaim
apiVersion: v1
metadata:
   # Important do not change for testing
   name: mysql-data
   namespace: mysql
   annotations:
     volume.beta.kubernetes.io/storage-class: mysql-tester-class
spec:
   accessModes:
     - ReadWriteOnce
   resources:
     requests:
       storage: 12Gi
---
apiVersion: extensions/v1beta1
kind: Deployment
metadata:
  name: mysql
  namespace: mysql
spec:
  strategy:
    rollingUpdate:
      maxSurge: 1
      maxUnavailable: 1
    type: RollingUpdate
  replicas: 1
  template:
    metadata:
      labels:
        app: mysql
    spec:
      containers:
      - name: mysql
        image: mysql:5.6
        env:
          # Use secret in real usage
        - name: MYSQL_ROOT_PASSWORD
          value: password
        - name: ENVVARTEST
          value: foo
        ports:
        - containerPort: 3306
          name: mysql
        volumeMounts:
        - name: mysql-data
          mountPath: /var/lib/mysql
      volumes:
      - name: mysql-data
        persistentVolumeClaim:
          claimName: mysql-data

$ kubectl apply -f mysql-pwx.yml
Use pxctl to list the Portworx volumes created by the MySQL deployment.
$ kubectl exec $PX_POD -n kube-system -- /opt/pwx/bin/pxctl v l
ID			NAME						SIZE	HA	SHARED	ENCRYPTED	IO_PRIORITY	STATUS				SNAP-ENABLED
911201993725013670	pvc-6ecdbffb-41e3-11e9-918f-42010a8e00c7	12 GiB	1	no	no		LOW		up - attached on 10.142.0.27	no
Next, add some data to the MySQL database.
kubectl exec -it  mysql-7f45c7b6c6-5szcn -n mysql -- /bin/bash -c "mysql -uroot -ppassword -D foo -e 'create database foo;'"

kubectl exec -it  mysql-7f45c7b6c6-5szcn -n mysql -- /bin/bash -c "mysql -uroot -ppassword -D foo -e \"CREATE TABLE pet (name VARCHAR(20), owner VARCHAR(20),species VARCHAR(20), sex CHAR(1), birth DATE, death DATE);\""

kubectl exec -it  mysql-7f45c7b6c6-5szcn -n mysql -- /bin/bash -c "mysql -uroot -ppassword -D foo -e 'SHOW TABLES;'"

kubectl exec -it  mysql-7f45c7b6c6-5szcn -n mysql -- /bin/bash -c "mysql -uroot -ppassword -D foo -e 'DESCRIBE pet;'"

kubectl exec -it  mysql-7f45c7b6c6-5szcn -n mysql -- /bin/bash -c "mysql -uroot -ppassword -D foo -e \"INSERT INTO pet VALUES ('Roscoe','Beau','dog','m','2000-03-30',NULL);\""

kubectl exec -it  mysql-7f45c7b6c6-5szcn -n mysql -- /bin/bash -c "mysql -uroot -ppassword -D foo -e 'select * from pet;'"
+----------+-------+---------+------+------------+-------+
| name     | owner | species | sex  | birth      | death |
+----------+-------+---------+------+------------+-------+
| Puffball | Diane | hamster | f    | 1999-03-30 | NULL  |
+----------+-------+---------+------+------------+-------+
1 row in set (0.00 sec)
First, apply the Schedule Policy.
$ cat policy.yaml
apiVersion: stork.libopenstorage.org/v1alpha1
kind: SchedulePolicy
metadata:
  name: mysql-policy
  namespace: mysql
policy:
  interval:
    intervalMinutes: 1
  daily:
    time: "10:14PM"
  weekly:
    day: "Thursday"
    time: "10:13PM"
  monthly:
    date: 9
    time: "8:05PM"

$ kubectl apply -f policy.yaml
schedulepolicy.stork.libopenstorage.org/mysql-policy created

$ storkctl get schedulepolicy
NAME           INTERVAL-MINUTES   DAILY    WEEKLY               MONTHLY
mysql-policy   1                  10:14PM  Thursday@10:13PM     9@8:05PM
Next, configure the Migration Schedule.
$ cat mig-schedule.yml
apiVersion: stork.libopenstorage.org/v1alpha1
kind: MigrationSchedule
metadata:
  name: mysqlmigrationschedule
  namespace: mysql
spec:
  template:
    spec:
      clusterPair: incremental-dr
      includeResources: true
      includeVolumes: true
      startApplications: false
      namespaces:
      - mysql
  schedulePolicyName: mysql-policy

$ kubectl apply -f mig-schedule.yml

$ kubectl describe migrationschedules mysqlmigrationschedule -n mysql
That’s it! To get a list of active migrations for the current namespace you can use kubectl. This shows that there is an initial sync based on the interval of one minute chosen in the policy. This will show a sync (migration) for each time setting that is configured in the policy.
$ kubectl get migration -n mysql
NAME                                                AGE
mysqlmigrationschedule-interval-2019-03-12-150954   7s
To describe the migration in more detail, use kubectl, this will show events like the ones below that indicate success or failure of migrating volumes and other Kubernetes resources.
$ kubectl describe migration mysqlmigrationschedule-interval-2019-03-12-150954  -n mysql
.
.
.
Events:
  Type    Reason      Age   From   Message
  ----    ------      ----  ----   -------
  Normal  Successful  18s   stork  /v1, Kind=PersistentVolumeClaim mysql/mysql-data: Resource migrated successfully
  Normal  Successful  18s   stork  /v1, Kind=PersistentVolume /pvc-0c067805-44d8-11e9-a638-42010a8e0094: Resource migrated successfully
  Normal  Successful  18s   stork  apps/v1, Kind=Deployment mysql/mysql: Resource migrated successfully
You can also show the migrations that have happened on the schedule using the storkctl helper, this will show information about the migrations, including the Status and Stage which will also tell you about success or failure and progress of the migration.
$ storkctl get migration -n mysql
NAME                                                CLUSTERPAIR      STAGE     STATUS       VOLUMES   RESOURCES   CREATED
mysqlmigrationschedule-interval-2019-03-12-154216   incremental-dr   Final     Successful   1/1       3/3         12 Mar 19 11:42 EDT
mysqlmigrationschedule-interval-2019-03-12-164400   incremental-dr   Volumes   InProgress   0/1       0/0         12 Mar 19 12:44 EDT
Now, let’s restore our application on our DR site using the synced data from our source cluster. First, look at the available volumes in the new cluster. Their Creation time should coincide with the latest sync from the source cluster. Note that they are detached because they are not in use since we specified the startApplications to be set to false.
$ kubectl exec $PX_POD -n kube-system -- /opt/pwx/bin/pxctl v list -l owner=Migration
ID			NAME						SIZE	HA	SHARED	ENCRYPTED	IO_PRIORITY	STATUS		SNAP-ENABLED
696635235911597484	pvc-0c067805-44d8-11e9-a638-42010a8e0094	12 GiB	1	no	no		LOW		up - detached	no
Now, inspect the volumes, and take note of its timestamp.
$ kubectl exec $PX_POD -n kube-system -- /opt/pwx/bin/pxctl v inspect 696635235911597484
Volume	:  696635235911597484
	Name            	 :  pvc-0c067805-44d8-11e9-a638-42010a8e0094
	Size            	 :  12 GiB
      ...

      ...
	Format          	 :  ext4
	HA              	 :  1
	Creation time   	 :  Mar 12 15:44:23 UTC 2019
	Shared          	 :  no
	Status          	 :  up
We set the configuration of the migration to use startApplications equal to false, we can check this is working correctly by looking at the pods and deployments on in DR site cluster. Notice how there are currently no active pods, but there is a deployment. This happens because we set includeResources to true which does, in fact, migrate the Kubernetes objects, however, it does not start them, therefore there are no active replicas of the pods.
> Pro tip: If you wanted ONLY to migrate the Portwox volumes and no kubernetes resources, you can also set
includeResourcestofalse.
$ kubectl get po -n mysql
No resources found.

$ kubectl get deployment -n mysql
NAME      DESIRED   CURRENT   UP-TO-DATE   AVAILABLE   AGE
mysql     0         0         0            0           1h
To recover the application at the DR site, use the storkctl helper to activate the migrations to the most recent sync that has taken place.
$ storkctl_dst activate migrations -n mysql
Updated replicas for deployment mysql/mysql to 1
Now check the pod in the mysql namespace on the DR site.
$ kubectl_dst get po -n mysql
NAME                        READY     STATUS     RESTARTS   AGE
mysql-7f45c7b6c6-xjcb9      1/1       Running    0          6s
Great! We now successfully restored a copy of our application to the DR site within a Kubernetes namespace. Provided below is a video demo of a similar use case using the MySQL+Wordpress blog stack and migrating multiple volumes, services, and objects to the DR site.
With PX-DR’s additional capabilities and configurations for data protection, teams can now be more confident running their mission-critical data services knowing that they can failover from different types of disasters. In future releases, this workflow will continue to become more intuitive including alternative ways to set up and drive cluster pairs and replications types.
Thanks for reading and stay tuned for more on PX-DR!