

Kubernetes makes running ML workflows simple, portable and scalable. However, running Machine Learning jobs at scale requires a strategy for persistent storage and data protection. That’s what we will focus on in today’s blog post.
Kubeflow installs various components to set up a toolbox for your Machine Learning (ML) workflow. Components such as Jupyter Notebooks, Tensorflow, and Seldon for collaborating, training and serving data. Most of these components need to persist and share data between services or workspaces in the Kubernetes cluster. The Kubeflow documents state that the minimum system requirements include 50GB of storage and the community supported deployment configuration also needs a dynamic volume provisioner with an associated storage class to support proper data management for the datasets used in the pipelines. This is where Portworx comes in.
To allow Portworx to provide storage for Kubeflow, first define your storage class and apply it. An example of StorageClass is shown below. A full list of parameters can be seen here, but the most important one for your ML workflows is to make sure there is more than one copy of your data so it remains highly available and for this we set repl=2. We’ll also associate a snapshot schedule so our Kubeflow volumes have protection in the form of snapshot backups.
kind: StorageClass
apiVersion: storage.k8s.io/v1beta1
metadata:
    name: pwx-storage-class
    annotations:
      storageclass.kubernetes.io/is-default-class":"true"
provisioner: kubernetes.io/portworx-volume
parameters:
   repl: "2"
   snapshotschedule.stork.libopenstorage.org/default-schedule: |
     schedulePolicyName: weekly-and-interval
     annotations:
       portworx/snapshot-type: local
Note that we made the above storage class the default storage class by using the “is-default-class” annotation. If you already have an existing storage class, you can patch an existing storage class to become the default by running the following command:
$ kubectl patch storageclass -p '{"metadata": {"annotations":{"storageclass.kubernetes.io/is-default-class":"true"}}}'
Now, we will create the previously mentioned snapshot schedule –weekly-and-interval– used in the storage class that will be used for our snapshots. More on what you can do with these snapshots later in the blog.
apiVersion: stork.libopenstorage.org/v1alpha1
kind: SchedulePolicy
metadata:
  name: weekly-and-interval
policy:
  interval:
    intervalMinutes: 15
  weekly:
    day: "Thursday"
    time: "10:00PM"
Once that is done, you can install Kubeflow knowing that Portworx will handle the dynamic provisioning of your persistent storage. After running through the initial installation of Kubeflow, you will notice that Kubeflow creates several persistent volume claims:
$ kubectl get pvc -n kubeflow
NAME STATUS VOLUME CAPACITY ACCESS MODES STORAGECLASS AGE
katib-mysql Bound pvc-3d53d530-e9ce-42b4-b2a1-62dd92727b9c 10Gi RWO pwx-storage-class 19m
metadata-mysql Bound pvc-49ce2e61-d95e-4f71-a8e8-406ad86231fa 10Gi RWO pwx-storage-class 19m
minio-pv-claim Bound pvc-48f28593-93af-4904-8b5f-ea09c0606a9e 20Gi RWO pwx-storage-class 19m
mysql-pv-claim Bound pvc-1ae46f8d-0de3-45da-98f1-94195d2fee80 20Gi RWO pwx-storage-class 19m
Once you have installed Kubeflow with Portworx, you can access the dashboard by looking up the Ingress or NodePort available for the dashboard.
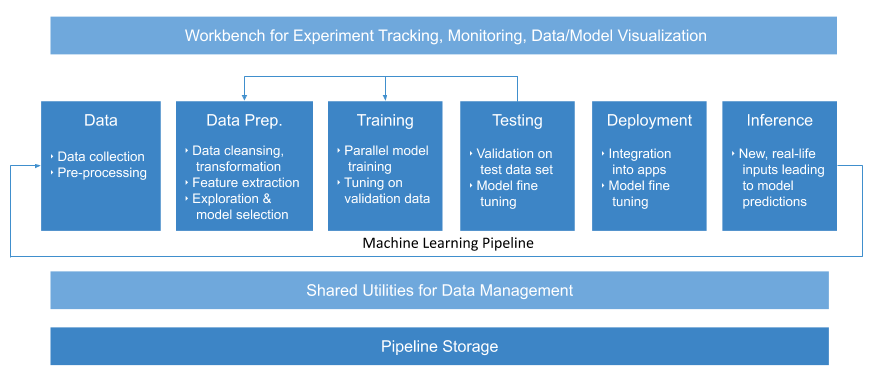
We’ll go through an example that will train a sequence-to-sequence model to summarize text found in GitHub issues. Most pipelines have a data processing, prepping, training and serving stages, see below for components and stages for a pipeline. Note that Portworx will aid in the data management and pipeline storage aspects of this process.
We’ll need to create a Jupyter Notebook to enable us to share our code and datasets. To do this, we can use the Kubeflow Dashboard and click the “Notebook Servers” menu and create a new server.
Here is the example configuration of our Notebook. First, we select the image and namespace along with the amount of CPU and memory we want it to run with. For this demo, the image should be docker.io/wallnerryan/githubissues-jupyterlab:v1.
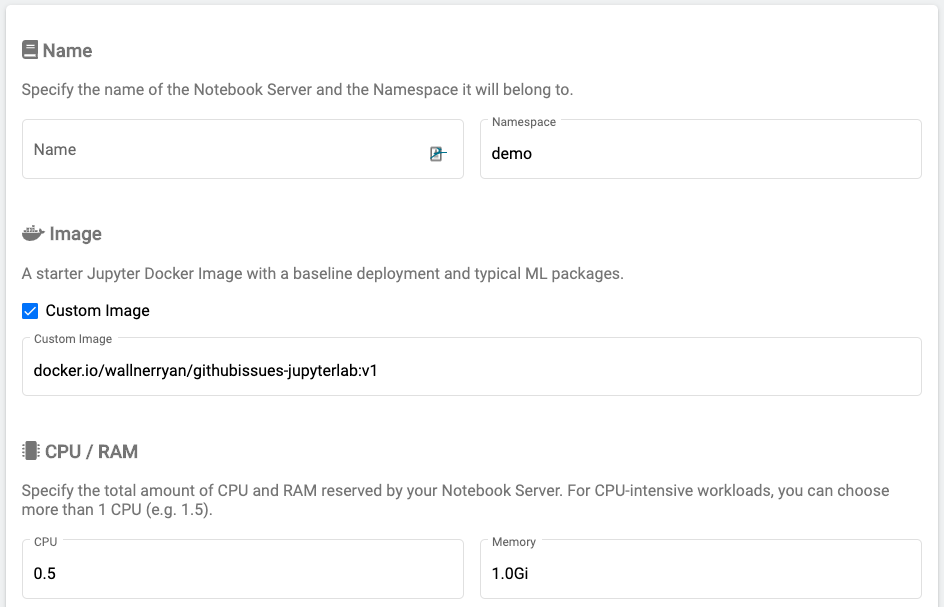
Next, we’ll create a new workspace volume as well as one data volume to keep our datasets. These will both be backed by Portworx because we set it as the default StorageClass.
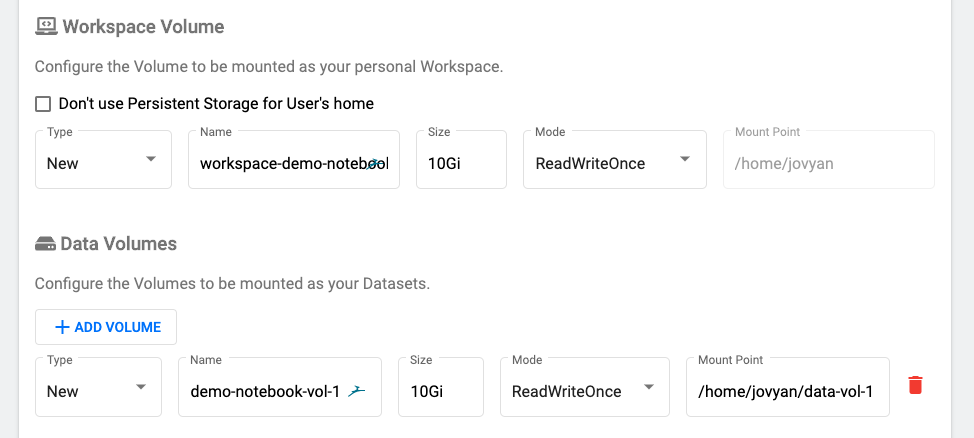
Note: Kubeflow uses a default storage class which is one type of volume. We set the default storage class above as a block-based storage class which means only one JupyterHub instance will be able to use the “Data Volumes” volume at a time. If you want to be able to access this data from multiple instances, you can pre-create “
demo-notebook-vol-1” as a Portworx shared volume and use the same name when creating the notebooks. Portworx will allow you to use both shared and block volumes for what suits your workloads best. Create the following file and apply it before creating the above example for multiple notebooks to be able to access the data volumes.
apiVersion: storage.k8s.io/v1
kind: StorageClass
metadata:
  name: portworx-repl3-shared
provisioner: kubernetes.io/portworx-volume
parameters:
  repl: "3"
  priority_io: "high"
  shared: "true"
---
apiVersion: v1
kind: PersistentVolumeClaim
metadata:
  name: demo-notebook-vol-1
  annotations:
    volume.beta.kubernetes.io/storage-class: portworx-repl3-shared
spec:
  accessModes:
    - ReadWriteMany
  resources:
    requests:
      storage: 10Gi
To view the volumes in our Kubernetes cluster and see they are backed by Portworx, we can perform the following. First, we can see our two PVCs backed by Portworx using kubectl.
$ kubectl get pvc -n demo
NAME STATUS VOLUME STORAGECLASS AGE
demo-notebook-vol-1 Bound pvc-163241aa-1295-43cf-95fb-c0be7510be87 portworx-repl3-shared 35m
workspace-demo-notebook Bound pvc-93f113b0-192f-4232-a4d0-b8b6ff633526 pwx-storage-class
 35m
We can also see them using the pxctl to interact with Portworx directly.
$ kubectl exec $PX_POD -n kube-system -- /opt/pwx/bin/pxctl v l --name pvc-163241aa-1295-43cf-95fb-c0be7510be87
NAME SIZE HA SHARED ENCRYPTED STATUS
pvc-163241aa-1 10GiB 1 no no up - attached on 172.31.61.118

$ kubectl exec $PX_POD -n kube-system -- /opt/pwx/bin/pxctl v l --name pvc-93f113b0-192f-4232-a4d0-b8b6ff633526
NAME SIZE HA SHARED ENCRYPTED STATUS
pvc-93f113b0-1... 10GiB 1 no no up - attached on 172.31.61.118
Next, we can open a terminal in Jupyter Hub and download our sample datasets so we can open the training material. We can also install any dependencies for our pipeline that we may have from here.
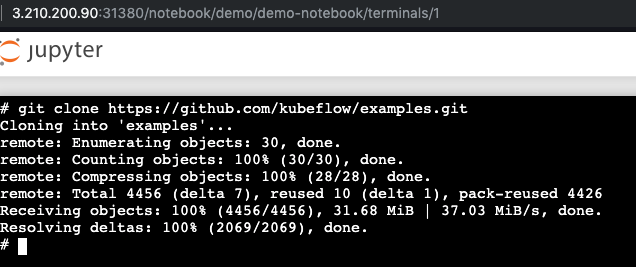
Notice how we have the examples folder in our Portworx backed home directory and we can navigate to the GitHub issue summarization pipeline and open our workflow.
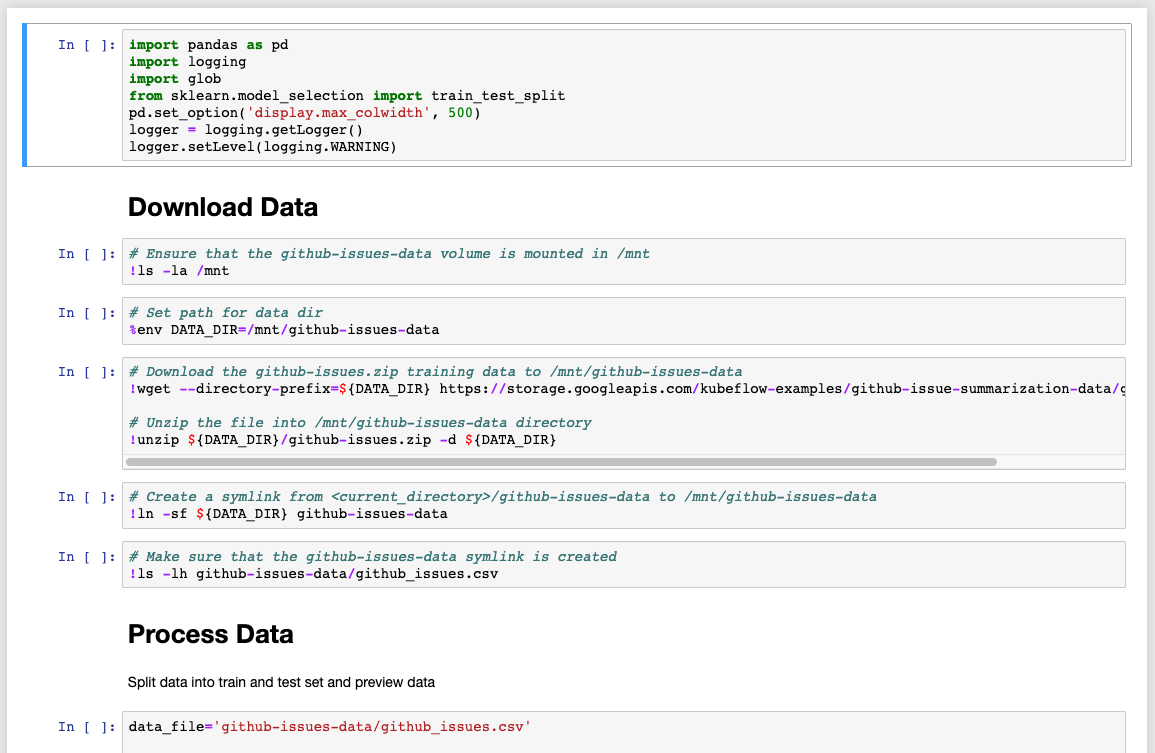
Run through the steps in the sample notebook with the following change. First, update the DATA_DIR to our Portworx volume mount.

We do this because earlier we created a Portworx volume to store data just like this. We can run “df -h” on our Jupyter Notebook to see the `pxd` device mounted at /home/jovyan/data-vol-1/ where we want our data to reside and persist.
![]()
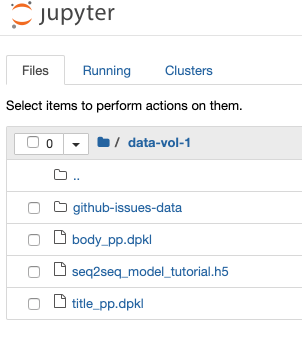
Continue through the directions to process and train the Github issues data using Python and Tensorflow. After you complete the training you will have the following files.
We can copy those to our Portworx volume to make sure the datasets and models remain available to other notebooks in the event of failures.
# cp seq2seq_model_tutorial.h5 /home/jovyan/data-vol-1/
# cp title_pp.dpkl /home/jovyan/data-vol-1/
# cp body_pp.dpkl /home/jovyan/data-vol-1/
You can package this into a model to serve with seldon-core which comes pre-installed with Kubeflow. There are various ways to do this, however once completed you can place your model image into the SeldonDeployment Custom Resource Definition (CRD).
apiVersion: machinelearning.seldon.io/v1alpha2
kind: SeldonDeployment
metadata:
  name: seldon-model
spec:
  name: test-deployment
  predictors:
  - componentSpecs:
    - spec:
        containers:
        - name: classifier
          image: docker.io/wallnerryan/issue-summarization-model:0.1
    graph:
      children: []
      endpoint:
        type: REST
      name: classifier
      type: MODEL
    name: example
    replicas: 1
Deploy this, then check the status.
$ kubectl get sdep -n demo
NAME AGE
seldon-model 59s

$ kubectl get po -n demo
NAME READY STATUS RESTARTS AGE
notebook-demo-0 2/2 Running 0 98m
test-deployment-example-0baab7e-77df6fbd84-767kv 3/3 Running 0 8m22s
Next, we’ll take a look at the available service where our prediction model is running.
$ kubectl get svc -n demo
NAME TYPE CLUSTER-IP EXTERNAL-IP PORT(S) AGE
notebook-demo ClusterIP 10.233.44.91 80/TCP 94m
seldon-12e46cd73bf23ad5214ba9c9c65e3397 ClusterIP 10.233.29.144 9000/TCP 4m42s
test-deployment-seldon-model ClusterIP 10.233.45.104 8000/TCP,5001/TCP 4m42s
Great! So now we can run predictions on our model that will output the machine learning generated summaries of GitHub issues.
$ curl 10.233.29.144:9000/predict --data-urlencode 'json={"data":{"ndarray":[["issue overview add a new property to disable detection of image stream files those ended with -is.yml from target directory. expected behaviour by default cube should not process image stream files if user doesnot set it. current behaviour cube always try to execute -is.yml files which can cause some problems in most of cases, forexample if you are using kuberentes instead of openshift or if you use together fabric8 maven plugin with cube"]]}}'
{"data":{"names":["t:0"],"ndarray":[["add a way to disable image detection"]]},"meta":{}}

$ curl 10.233.29.144:9000/predict --data-urlencode 'json={"data":{"ndarray":[["try to stop flask from using multiple threads"]]}}'
{"data":{"names":["t:0"],"ndarray":[["flask app crashes"]]},"meta":{}}
At the beginning of this post, we created a default storage class to support Kubeflow. Notice that it had a snapshot schedule associated with it. Note that these snapshots can be local or be stored in object storage such as Amazon S3 so we can use them to restore our data.
The output below shows the snapshots of the Jupyter Notebook workspace and data volumes as well as all the volumes that support running Kubeflow itself.
kubeflow: kubectl get volumesnapshot -n kubeflow
NAME AGE
katib-mysql-default-schedule-interval-2019-09-04-155542 17s
metadata-mysql-default-schedule-interval-2019-09-04-155542 17s
minio-pv-claim-default-schedule-interval-2019-09-04-155541 18s
mysql-pv-claim-default-schedule-interval-2019-09-04-155442 77s

kubeflow: kubectl get volumesnapshot -n demo
NAME AGE
demo-nb-vol-1-default-schedule-interval-2019-09-04-155541 42s
workspace-demo-nb-default-schedule-interval-2019-09-04-155541 42s
For a visual demo of the above use case, you can watch the video below.