With the Portworx 1.6 release, we are announcing the availability and integration of the OpenStorage SDK into the Portworx portfolio. This blog will help you understand what OpenStorage is and what the SDK can do. Specifically, this blog goes into details about how to use the Python SDK but the SDK is also available for Go and many other languages.
What is Open Storage?
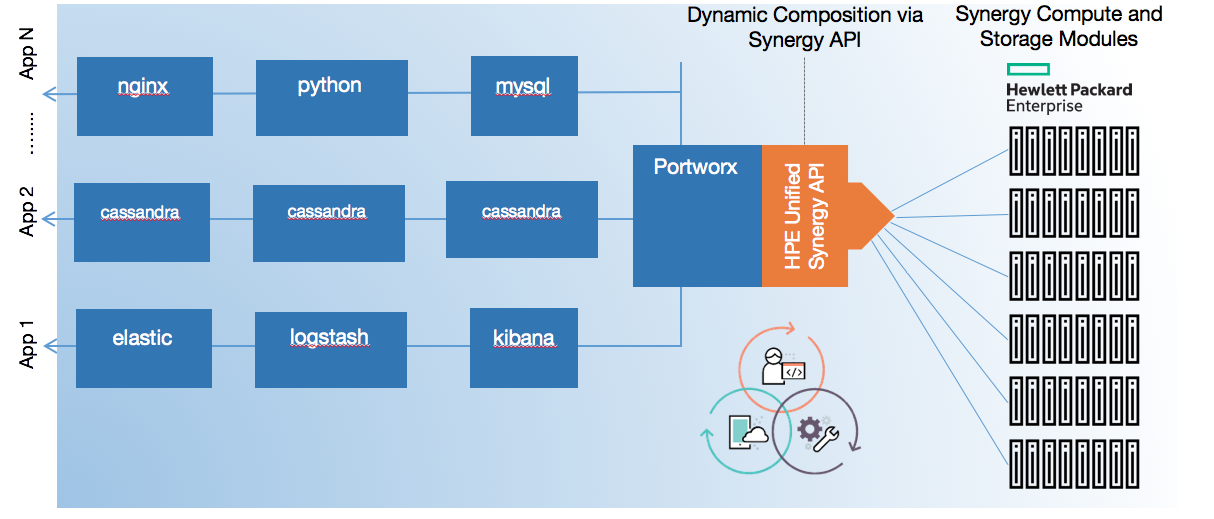
OpenStorage is an open-source project maintained by Portworx which facilitates the provisioning of cloud native volumes for Kubernetes. It allows you to run stateful services in Linux Containers in a multi host, multi zone and multi region environment. It plugs into CSI and Docker volumes to provide storage to containers and plugs into Kubernetes to allow for dynamic and programmatic provisioning of volumes.
What does the SDK do for me?
Using the OpenStorage SDK gives DevOps teams the ability to control and automate their cloud native storage volumes via APIs in a flexible manner. Teams can take advantage of version-controlled, infrastructure-as-code for the data management layer of their stack just like the rest of the infrastructure.
One of our customer testaments about the SDK:
“Operational firefighting kills innovation because you are always focused on yesterday’s problem instead of looking towards the future,” said Sunil Pentapati, Director of Platform Operations at Fractal Industries. “The way past constant firefighting is automation, which leads to more resilient, more secure, and more flexible applications. This is especially important for industries like cybersecurity and financial services where real-time data management is critical. Manual operations and real-time just don’t mix. That is why I am so excited about the release of the PX-Enterprise SDK. With the ability to control every aspect of our cloud native storage via APIs, we can fully automate data management in real time as easily as the rest of our infrastructure.”
Enough talk, how does it work!?
The rest of this blog post will cover the following:
- Using the Python OpenStorage SDK in a real world Kubernetes environment.
Introduction
The first thing you want to do as a developer is head over to https://libopenstorage.github.io/ and take a look around. There are resources on how to use the SDK with both Go and Python and some information worth reading.
To setup your python environment, check out the OpenStorage Python Tutorial.
Note: To follow along with this post, make sure you are using Python3 so asyncio works as expecrted. Here is an example of using mkvirtualenv if you need to specify you want python3 in your virtualenv. Note also, the SDK will generally work with Python2 or Python3.
mkvirtualenv --python=/usr/local/bin/python3 python3-openstorage
Let’s move onto using the SDK in a real scenario with real Kubernetes StatefulSets!
Automating the data-layer with Kubernetes and Portworx
To follow along, or to make a copy of what is used in this blog post, clone this OpenStorage Python Examples repository.
Next, you will need a Kubernetes Cluster. You can setup one up using your favorite deployment method such as EKS, or vagrant, just make sure you have at least 3 worker nodes that have at least one free disk so that Portworx can consume it.
Once you have a Kubernetes Cluster ready, we can install Portworx on the cluster so we can use the SDK. First, get the nodes in the cluster using kubectl, we want to make sure there are at least 3 workers, since Portworx needs a quorum of three nodes for a storage cluster.
[ryan@server kubeup]$ kubectl get no
NAME      STATUS ROLES     AGE VERSION
master    Ready master    3h v1.11.3
node0     Ready <none>    3h v1.11.3
node1     Ready <none>    3h v1.11.3
node2     Ready <none>    3h v1.11.3
Next, let’s install Portworx.
You should produce a DaemonSet spec that is appropriate for your environment. One way to do that is to walk through the steps at https://install.portworx.com/, which will give you an option to download the spec locally or run `kubectl apply -f` directly against a produced URL.
(optionally) You can produce the DaemonSet Spec via Curl. Here is an example below.
Note that the SDK is only available in Portworx versions 1.6 and above.
Notice that there are certain variable such as c= for cluster name, and kbver= for kubernetes version. Find a list of available variables here.
$ curl -L -o px-spec.yml "https://install.portworx.com/1.6?kbver=1.11.2&b=true&f=true&c=px-cluster-01ac9cb3-0b04-45c1-9469-6fc1e2f1c094&stork=true"
Once you have the spec, you should apply it to your Kubernetes cluster which will create the resources, DeamonSets and other Kubernetes objects needed to run Portworx. Example output below.
[ryan@server kubeup]$ kubectl create -f px-spec.yml
configmap "stork-config" created
serviceaccount "stork-account" created
clusterrole.rbac.authorization.k8s.io "stork-role" created
clusterrolebinding.rbac.authorization.k8s.io "stork-role-binding" created
service "stork-service" created
deployment.extensions "stork" created
storageclass.storage.k8s.io "stork-snapshot-sc" created
serviceaccount "stork-scheduler-account" created
clusterrole.rbac.authorization.k8s.io "stork-scheduler-role" created
clusterrolebinding.rbac.authorization.k8s.io "stork-scheduler-role-binding" created
deployment.apps "stork-scheduler" created
service "portworx-service" created
serviceaccount "px-account" created
clusterrole.rbac.authorization.k8s.io "node-get-put-list-role" created
clusterrolebinding.rbac.authorization.k8s.io "node-role-binding" created
namespace "portworx" created
role.rbac.authorization.k8s.io "px-role" created
rolebinding.rbac.authorization.k8s.io "px-role-binding" created
daemonset.extensions "portworx" created
Now that we have Portworx Installed, let’s interact with the cluster. First we need to access the Portworx CLI, so let us setup access to the pxctl cli via kubectl.
[ryan@server kubeup]$ PX_POD=$(kubectl get pods -l name=portworx -n kube-system -o jsonpath='{.items[0].metadata.name}')
[ryan@server kubeup]$ alias pxctl="kubectl exec $PX_POD -n kube-system -- /opt/pwx/bin/pxctl"
Now we can execute commands such as pxctl status and pxctl volume list locally without using kubectl.
[ryan@PDC4-SM26-N8 ~]$ pxctl status
Status: PX is operational
Node ID: node1
        IP: 192.168.121.11
        Local Storage Pool: 1 pool
        POOL IO_PRIORITY     RAID_LEVEL USABLE USED    STATUS ZONE REGION
        0 HIGH            raid0 3.0 TiB 10 GiB  Online default default
        Local Storage Devices: 3 devices
        Device Path            Media Type Size            Last-Scan
        0:1 /dev/vdb        STORAGE_MEDIUM_MAGNETIC 1.0 TiB         12 Sep 18 16:56 UTC
        0:2 /dev/vdc        STORAGE_MEDIUM_MAGNETIC 1.0 TiB         12 Sep 18 16:56 UTC
        0:3 /dev/vdd        STORAGE_MEDIUM_MAGNETIC 1.0 TiB         12 Sep 18 16:56 UTC
        total                - 3.0 TiB
Cluster Summary
        Cluster ID: px-cluster-01ac9cb3-0b04-45c1-9469-6fc1e2f1c094
        Cluster UUID: 3c1f81db-71c8-4e5f-9aa9-16dc8b9049b6
        Scheduler: kubernetes
        Nodes: 3 node(s) with storage (3 online)
        IP              ID    StorageNode Capacity       Status  StorageStatus Version         Kernel                          OS
        192.168.121.245 node2 Yes         10 GiB 3.0 TiB Online  Up            1.6.0.0-2c1a0c6 3.10.0-862.2.3.el7.x86_64       CentOS Linux 7 (Core)
        192.168.121.11  node1 Yes         10 GiB 3.0 TiB Online  Up(This node) 1.6.0.0-2c1a0c6 3.10.0-862.2.3.el7.x86_64       CentOS Linux 7 (Core)
        192.168.121.4   node0 Yes         10 GiB 3.0 TiB Online  Up            1.6.0.0-2c1a0c6 3.10.0-862.2.3.el7.x86_64       CentOS Linux 7 (Core)
Global Storage Pool
        Total Used      : 31 GiB
        Total Capacity  : 9.0 TiB
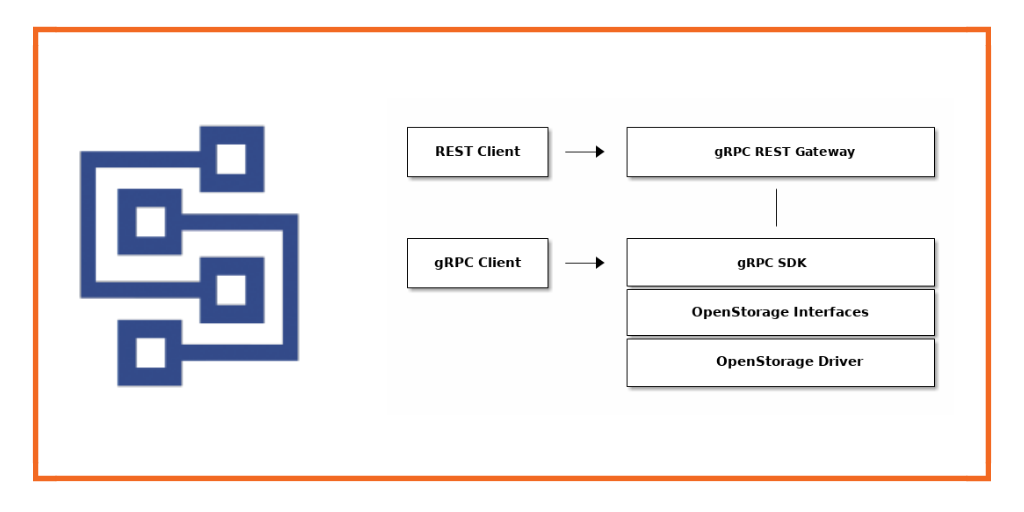
Now that we have Portworx up, we can interact with the newly available OpenStorage gRPC API at port 9020. (The HTTP API is available at 9021 and you can visit the Swagger API at 9021/swagger-ui/) What you will want to do first in order to use the examples is export the endpoint (any node in your Portworx cluster or a load-balancer endpoint to N portworx nodes will do) so that our scripts can use it.
$ export PWX_GRPC_ENDPOINT="70.0.0.129:9220"
Let’s create a small application called create_vol.py which will create a volume and create a snapshot of the clean state volume.
#!/usr/bin/env python

import os
import grpc
from openstorage import api_pb2
from openstorage import api_pb2_grpc

portworx_grpc = os.getenv('PWX_GRPC_ENDPOINT', 'localhost:9100')
print("Connecting to %s" % portworx_grpc)
channel = grpc.insecure_channel(portworx_grpc)

try:
    # Cluster connection
    clusters = api_pb2_grpc.OpenStorageClusterStub(channel)
    ic_resp = clusters.InspectCurrent(api_pb2.SdkClusterInspectCurrentRequest())
    print('Connected to {0} with status {1}'.format(
        ic_resp.cluster.id,
        api_pb2.Status.Name(ic_resp.cluster.status)
    ))

    # Create a volume
    volumes = api_pb2_grpc.OpenStorageVolumeStub(channel)
    v_resp = volumes.Create(api_pb2.SdkVolumeCreateRequest(
        name="myvol",
        spec=api_pb2.VolumeSpec(
            size=100*1024*1024*1024,
            ha_level=3,
        )
    ))
    print('Volume id is {0}'.format(v_resp.volume_id))

    # Create a snapshot
    snap = volumes.SnapshotCreate(api_pb2.SdkVolumeSnapshotCreateRequest(
        volume_id=v_resp.volume_id,
        name="mysnap"
    ))
    print('Snapshot created with id {0}'.format(snap.snapshot_id))

except grpc.RpcError as e:
    print('Failed: code={0} msg={1}'.format(e.code(), e.details()))
Now let’s run it.
[ryan@server ~]$ python examples/kubernetes/create_vol.py
Connecting to 70.0.0.129:9220
Connected to px-cluster-01ac9cb3-0b04-45c1-9469-6fc1e2f1c094 with status STATUS_OK
Volume id is 1092544082683393316
Snapshot created with id 944375150127854116
Awesome, now let’s see if that output translates to our Portworx cluster running on our Kubernetes cluster.
[ryan@server ~]$ pxctl volume list
ID                      NAME SIZE HA SHARED  ENCRYPTED IO_PRIORITY STATUS HA-STATE
944375150127854116      mysnap  100 GiB 3       no no        LOW up - detached   Detached
1092544082683393316     myvol   100 GiB 3       no no        LOW up - detached   Up
Awesome! It does. Now let’s write a small app called list_volumes.py which, exactly as it sounds, list the volumes. Here we’ll use the Enumerate function of the OpenStorageVolume service from the gRPC API along with the api_pb2.SdkVolumeEnumerateRequest() Message.
#!/usr/bin/env python

import os
import grpc
from openstorage import api_pb2
from openstorage import api_pb2_grpc

portworx_grpc = os.getenv('PWX_GRPC_ENDPOINT', 'localhost:9100')
print("Connecting to %s" % portworx_grpc)
channel = grpc.insecure_channel(portworx_grpc)

try:
    # Cluster connection
    clusters = api_pb2_grpc.OpenStorageClusterStub(channel)
    ic_resp = clusters.InspectCurrent(api_pb2.SdkClusterInspectCurrentRequest())
    print('Connected to {0} with status {1}'.format(
        ic_resp.cluster.id,
        api_pb2.Status.Name(ic_resp.cluster.status)
    ))

    # List Volumes
    volumes = api_pb2_grpc.OpenStorageVolumeStub(channel)
    vols = volumes.Enumerate(api_pb2.SdkVolumeEnumerateRequest())
    for vol in vols.volume_ids:
        print('Volume id vol: {0}'.format(vol))

except grpc.RpcError as e:
    print('Failed: code={0} msg={1}'.format(e.code(), e.details()))
Let’s try it.
(python-openstorage) $ python examples/kubernetes/list_volumes.py
Connecting to 70.0.0.129:9220
Connected to px-cluster-01ac9cb3-0b04-45c1-9469-6fc1e2f1c094 with status STATUS_OK
Volume id vol: 1092544082683393316
Volume id vol: 944375150127854116
Awesome, the ID’s match the IDs from the pxctl command! Now that you can start to see how this can be used against a real Portworx cluster running on Kubernets, let’s put together a real life workflow.
Whether you have an end-user perspective or an operator’s, here are a few examples of how the SDK could be used.
- Design an operator or an application which watches or listens to events from Kubernetes such as volume creation. As a company policy, you can enforce that with every new volume, a certain snapshot schedule be applied to it, or that an initial snapshot or cloud backup should be taken.
- Automate the creations of Pods, PVCs, and application workflows all through code! This is powerful because the creation of applications through spec files can be combined with code that takes actions on your data-management layer all in version-control.
- Simply design a workflow in Python to interact with your Kubernetes+Portworx cluster in code.
Putting it all together
Let’s put a sample workflow into action that does a few useful things.
- Create a MongoDB Cluster on top of Kubernetes using Dynamic Provisioning
- “Watch” the Kubernetes Cluster for events and capture the creation of your database and associated volumes.
- When a PV creation event is found, asynchronously take a clean snapshot of the portworx volume associated with it using the SDK .
- Asynchronously take a CloudSnap to AWS S3 of MongoDB’s volumes using the SDK
- Check the Status of your Backup using the SDK.
First, you will need to make sure you Portworx cluster is setup to use Kubernetes Secrets, you can do this during installation time, but the above instruction will work if you didn’t initially setup your cluster up to do so.
Next, let’s setup our environment. We’ll need to install some dependencies and export environment variables to tell our workflow example where our kubernetes configuration is.
(python3-openstorage) $ pip install kubernetes asyncio
(python3-openstorage) $ export KUBECONFIG_FILE=/your/kubeconfig
(python3-openstorage) $ export AWS_ACCESS_KEY=<YOUR_KEY>
(python3-openstorage) $ export AWS_SECRET_KEY=<YOUR_SECRET_KEY>
Next, let’s create our Cloud Credential and capture it’s ID so we can use it later to upload our CloudSnaps. Make sure and export the ID for use in our workflow.
(python3-openstorage) $ python create_cred.py
Connecting to 70.0.0.129:9220
Credential id is 51f31813-3bc8-473c-afcd-02416c363d9c
(python3-openstorage) $ export AWS_BACKUP_CRED_ID=51f31813-3bc8-473c-afcd-02416c363d9c
Next, we’ll create our storage class. You can learn more about what parameters are available in Portworx StorageClasses here.
kind: StorageClass
apiVersion: storage.k8s.io/v1beta1
metadata:
  name: px-mongo-sc
provisioner: kubernetes.io/portworx-volume
parameters:
  repl: "3"
  io_profile: "db"
  io_priority: "high"
  group: "mongogroup"
  fg: "true"
  label: "name=mongovol,app=sdkdemo"
  snap_schedule: "daily=12:00,4"
Then, create the StorageClass in your Kubernetes cluster:
(python3-openstorage) $ kubectl create -f mongo-storageclass.yaml
storageclass.storage.k8s.io "px-mongo-sc" created
Next, we’ll start our control loop “watcher” application. This “watcher” will monitor Kubernetes PersistentVolume (PV) events for Portworx volume creation messages and apply a series of actions to a volume once one has been identified.
In this case, these action are snapshotting the new volume and making an initial cloud backup to AWS. This is only an example, but you can see how this type of “apply action on events” workflow could be applied to many other scenarios.
#!/usr/bin/env python

import os
import grpc
import asyncio
import signal
import sys
from datetime import datetime
from openstorage import api_pb2
from openstorage import api_pb2_grpc
from kubernetes import client, config, watch

# Get Portworx gRPC API
portworx_grpc = os.getenv('PWX_GRPC_ENDPOINT', 'localhost:9100')
print("Connecting to %s" % portworx_grpc)
channel = grpc.insecure_channel(portworx_grpc)

# Gather and set the kubernetes connection config
kubeconfig = os.getenv('KUBECONFIG_FILE', '~/.kube/kubeconfig')
backup_cred = os.getenv('AWS_BACKUP_CRED_ID', None)
config.load_kube_config(config_file=kubeconfig)

# Set the API, Watcher and Async Loop.
v1 = client.CoreV1Api()
w = watch.Watch()
loop = asyncio.get_event_loop()
pvcs_action_taken = []

# A asynchronous function to snapshot
@asyncio.coroutine
def px_create_snapshot(portworx_volume_id, pvc_name):
    try:
        print("Creating a snapshot per company policy of %s!" % portworx_volume_id)
        # Create a snapshot
        volumes = api_pb2_grpc.OpenStorageVolumeStub(channel)
        snap = volumes.SnapshotCreate(api_pb2.SdkVolumeSnapshotCreateRequest(
           volume_id=portworx_volume_id,
           name="%s-%s" % (pvc_name,"{:%B-%d-%Y-%s}".format(datetime.now()))
        ))
        print('Snapshot created with id {0}'.format(snap.snapshot_id))
    except grpc.RpcError as e:
        print('Failed: code={0} msg={1}'.format(e.code(), e.details()))

# A asynchronous function to backup
@asyncio.coroutine
def px_create_cloud_backup(portworx_volume_id, backup_cred):
    if backup_cred is not None:
        try:
            # Create backup
            backups = api_pb2_grpc.OpenStorageCloudBackupStub(channel)
            backup_resp = backups.Create(api_pb2.SdkCloudBackupCreateRequest(
                volume_id=portworx_volume_id,
                credential_id=cred_resp.credential_id,
                full=False
            ))
        except grpc.RpcError as e:
            print('Failed: code={0} msg={1}'.format(e.code(), e.details()))
    else:
        print('Failed, no backup credential set')

# Signal Handler to exit safely from CTRL+C
def signal_handler(sig, frame):
        print('You pressed Ctrl+C!')
        w.stop()
        loop.close()
        sys.exit(0)
signal.signal(signal.SIGINT, signal_handler)

# Only watch events related to Persistent Volumes
for event in w.stream(v1.list_persistent_volume, _request_timeout=(30,None)):
    # Let's only look at "new" ADDED volumes.
    if event['type'] == "ADDED":
        # Let's make sure Portworx is provisioning this volume
        if event['object'].metadata.annotations['kubernetes.io/createdby'] == "portworx-volume-dynamic-provisioner":
                # Have we already taken action on this pvc?
                pvc = event['object'].metadata.name
                if pvc not in pvcs_action_taken:
                    px_vol_id = event['object'].spec.portworx_volume.volume_id
                    print("Found a new pvc: %s px-volume: %s" % (pvc, px_vol_id))
                    print("We're going to do things using the portworx SDK!")
                    # Create a snapshot and CloudSnap Backup
                    tasks = [
                        asyncio.ensure_future(px_create_snapshot(px_vol_id, pvc)),
                        asyncio.ensure_future(px_create_cloud_backup(px_vol_id, backup_cred))]
                    loop.run_until_complete(asyncio.wait(tasks))
                    # Add PVC to the list of PVCs we've taken action on
                    pvcs_action_taken.append(pvc)
Then, let’s start the program.
Warning: There should be no output unless you have some existing Portworx volumes. In this case, the logic in this script will snapshot and backup any “replayed” events of added volumes and create snapshots and backups for each of them.
(python3-openstorage)$ python workflow.py
Connecting to 70.0.0.129:9220
Next, let’s create our MongoDB StatefulSet and watch the magic happen. A StatefulSet example spec is below:
apiVersion: apps/v1
kind: StatefulSet
metadata:
  name: mongo
spec:
  selector:
    matchLabels:
      app: mongo
  serviceName: "mongo"
  replicas: 3
  podManagementPolicy: Parallel
  template:
    metadata:
      labels:
        app: mongo
    spec:
      terminationGracePeriodSeconds: 10
      affinity:
         podAntiAffinity:
           requiredDuringSchedulingIgnoredDuringExecution:
           - labelSelector:
               matchExpressions:
               - key: "app"
                 operator: In
                 values:
                 - mongo
             topologyKey: "kubernetes.io/hostname"
      containers:
      - name: mongo
        image: mongo
        command:
        - mongod
        - "--bind_ip_all"
        - "--replSet"
        - rs0
        ports:
        - containerPort: 27017
        volumeMounts:
        - name: mongo-data
          mountPath: /data/db
  volumeClaimTemplates:
  - metadata:
      name: mongo-data
    spec:
      accessModes:
        - ReadWriteOnce
      resources:
        requests:
          storage: 8Gi
      storageClassName: px-ha-sc
---
apiVersion: v1
kind: Service
metadata:
  name: mongo
  labels:
    app: mongo
spec:
  ports:
  - name: mongo
    port: 27017
    targetPort: 27017
  clusterIP: None
  selector:
    app: mongo
Create the MongoDB StatefulSet
$ kubectl create -f openstorage-python-examples/specs/mongo-statefulset.yaml
statefulset.apps "mongo" created
service "mongo" created
View that the MongoDB StatefulSet have come up.
$  kubectl get po NAME      READY STATUS RESTARTS   AGE
mongo-0   1/1 Running   0 27m
mongo-1   1/1 Running   0 27m
mongo-2   1/1 Running   0 27m

List the PVCs that the StatefulSet created.
$  kubectl get pvc
NAME                 STATUS VOLUME                                CAPACITY ACCESS MODES STORAGECLASS AGE
mongo-data-mongo-0   Bound pvc-2946661c-ba8f-11e8-8538-525400a2ed19   8Gi RWO px-mongo-sc <invalid>
mongo-data-mongo-1   Bound pvc-294b2c2c-ba8f-11e8-8538-525400a2ed19   8Gi RWO px-mongo-sc <invalid>
mongo-data-mongo-2   Bound pvc-2951c45a-ba8f-11e8-8538-525400a2ed19   8Gi RWO px-mongo-sc <invalid>
Now, you should see some output from our program which detected the new volumes and took action on these volumes using the OpenStorage SDK.
Found a new pvc: pvc-a9374555-baa5-11e8-8538-525400a2ed19 px-volume: 697115714207147996
We're going to do things using the OpenStorage SDK!
Creating a snapshot per company policy of 697115714207147996!
Snapshot created with id 445775518743167419
Cloud Backup Started for Volume ID 697115714207147996


Found a new pvc: pvc-a932c67f-baa5-11e8-8538-525400a2ed19 px-volume: 397645254196029208
We're going to do things using the OpenStorage SDK!
Creating a snapshot per company policy of 397645254196029208!
Snapshot created with id 45101781850666238
Cloud Backup Started for Volume ID 397645254196029208


Found a new pvc: pvc-a9308470-baa5-11e8-8538-525400a2ed19 px-volume: 675886615386978767
We're going to do things using the OpenStorage SDK!
Creating a snapshot per company policy of 675886615386978767!
Snapshot created with id 411499605141680462
Cloud Backup Started for Volume ID 675886615386978767
Next, we can take a look at the status of any of our CloudSnaps by using a small python program called “show_cloudsnap.py” that uses the SDK to list the status of a cloud backup of a particular volume. We can use the output from above to view the status. See below.
Note: that the stats is “SdkCloudBackupStatusTypeDone” which means it is done.
$ python show_cloudsnap.py 675886615386978767
Connecting to 70.0.0.129:9220
Status of the backup is SdkCloudBackupStatusTypeDone
Backup history for volume 675886615386978767
Time Taken: 2018-09-17T18:22:43.177557985Z, Source Volume: 675886615386978767
We can also now list the snapshots related to the parent volume by its PVC name using pxctl. See below.
Notice the “clmanual” in the name of our CloudSnap.
$ pxctl v l --parent  pvc-a9308470-baa5-11e8-8538-525400a2ed19 -s
ID NAME SIZE HA SHARED ENCRYPTED IO_PRIORITY STATUS HA-STATE
935214057337756593 pvc-a9308470-baa5-11e8-8538-525400a2ed19-September-17-2018-1537208079 8 GiB 2 no no LOW up - detached Detached
411499605141680462 pvc-a9308470-baa5-11e8-8538-525400a2ed19-September-17-2018-1537208492 8 GiB 2 no no LOW up - detached Detached
416571389751336168 pvc-a9308470-baa5-11e8-8538-525400a2ed19_675886615386978767_clmanual_2018-09-17T18-22-36 8 GiB 2 no no LOW up - detached Detached
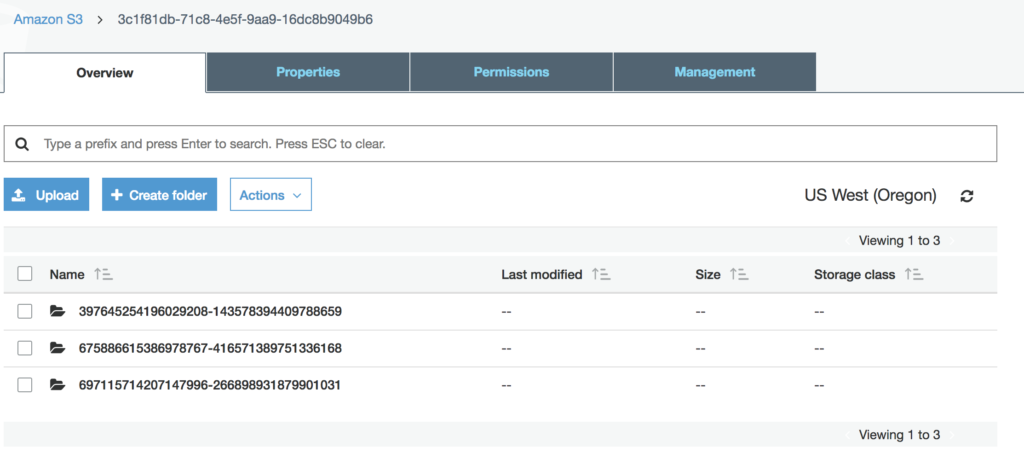
Next, let’s get the ID of the cluster so we can view our cloudsnaps in the AWS Console.
$ pxctl status | grep Cluster
Cluster Summary
Cluster ID: px-cluster-01ac9cb3-0b04-45c1-9469-6fc1e2f1c094
Cluster UUID: 3c1f81db-71c8-4e5f-9aa9-16dc8b9049b6
First, search by the Cluster UUID
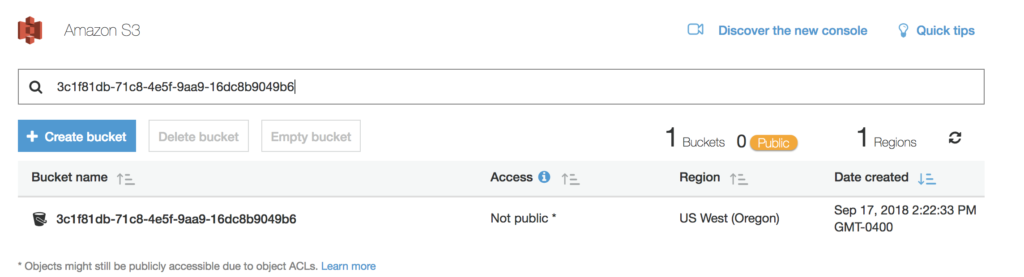
Then, we can double click into the UUID and see all three of our volumes all automatically snapshots and cloudsnaps by using the OpenStorage SDK combined with and Event Watcher for Kubernetes.
Conclusion
Todays DevOps centric world includes initiatives such as “Infrastructure as Code” allowing teams to check-in code that manages VMs, Networks, Clusters and more. What we’ve shown here is a way to add to that portfolio of code using the OpenStorage SDK, letting teams automate their data management layer instead of using CLIs and GUIs. Here at Portworx, we use this SDK internally so we battle test and trust the solution. You’ll be well on your way getting the automation, control and flexibility our of your data layer in minutes.
Remember, you can find more information at the OpenStorage github website. Here are links to the Python Tutorial , Swagger API, and API documentation.
You can also find all the examples used here today available at this github link.
Feel free to try out the SDK with the release of 1.6 or by using the Mock Server. We are happy to collaborate and feel free to stop by the github page with issues and concerns. Happy coding!
Share
Subscribe for Updates
About Us
Portworx is the leader in cloud native storage for containers.
Thanks for subscribing!

Ryan Wallner
Portworx | Technical Marketing ManagerExplore Related Content:
- kubernetes
- OpenStorage
- SDK