Background
Today there are a number of different MySQL Kubernetes Operators available for use, many providing similar functionality with varying development effort and support offerings, for example Percona, PressLabs, GrdsCloud, Moco to name a few.
However, for the purpose of this post I am going to be using the official MySQL Kubernetes Operator developed by the Oracle MySQL team to manage the setup of a MySQL InnoDB Cluster.
Using MySQL operators, Kubernetes users can manage MySQL InnoDB database connections from within clusters. This includes use of the common operators MySQL logical operator, MySQL comparison operator, MySQL ‘and’ operator, and standard SQL operations.
Please note at the time of writing (Sept 21) this is in a ‘preview state’ and therefore should not be considered for Production usage, the GA release is expected later this year.
Kubernetes Environment
Before applying the MySQL Custom Resource Definition (CRD) and Operator, let’s have a quick look at my Oracle Cloud Infrastructure (OCI) Oracle Container Engine for Kubernetes (OKE) environment.
The Kubernetes version with kubectl version
% kubectl version --short | awk -Fv '/Server Version: / {print $3}'
1.20.8
Number of nodes, operating system, and container runtime in the Kubernetes Cluster with kubectl get nodes.
% kubectl get nodes -o wide
NAME        STATUS ROLES AGE VERSION INTERNAL-IP EXTERNAL-IP OS-IMAGE                KERNEL-VERSION                 CONTAINER-RUNTIME
10.0.10.173 Ready  node  41h v1.20.8 10.0.10.173 <none>     Oracle Linux Server 7.6 4.14.35-1902.2.0.el7uek.x86_64 cri-o://1.20.2
10.0.10.225 Ready  node  41h v1.20.8 10.0.10.225 <none>     Oracle Linux Server 7.6 4.14.35-1902.2.0.el7uek.x86_64 cri-o://1.20.2
10.0.10.68  Ready  node  41h v1.20.8 10.0.10.68  <none>     Oracle Linux Server 7.6 4.14.35-1902.2.0.el7uek.x86_64 cri-o://1.20.2
And Portworx version using pxctl –version
% pxctl --version
pxctl version 2.8.0.0-1ef62f8
Storage Class
Let’s start by creating a Portworx Kubernetes Container Storage Interface (CSI) storage class.
% cat px-mysql-csi-sc.yaml
kind: StorageClass
apiVersion: storage.k8s.io/v1
metadata:
  name: px-mysql-csi-sc
provisioner: pxd.portworx.com
parameters:
  repl: "1"
  io_profile: "auto"
And apply with kubectl apply
% kubectl apply -f px-mysql-csi-sc.yaml
storageclass.storage.k8s.io/px-mysql-csi-sc created
We can examine the settings with kubectl describe, for example, from the below you can see I have a replication factor of 1 and io_profile of auto.
% kubectl describe sc/px-mysql-csi-sc
Name:            px-mysql-csi-sc
IsDefaultClass:  No
Annotations:     kubectl.kubernetes.io/last-applied-configuration={"apiVersion":"storage.k8s.io/v1","kind":"StorageClass","metadata":{"annotations":{},"name":"px-mysql-csi-sc"},"parameters":{"io_profile":"auto","repl":"1"},"provisioner":"pxd.portworx.com"}
Provisioner:           pxd.portworx.com
Parameters:            io_profile=auto,repl=1
AllowVolumeExpansion:  <unset>
MountOptions:          <none>
ReclaimPolicy:         Delete
VolumeBindingMode:     Immediate
Events:                <none>
You can list the StorageClasses in your cluster with kubectl get sc, the default StorageClass is marked with (default) for example:
% kubectl get sc
NAME                           PROVISIONER                     RECLAIMPOLICY VOLUMEBINDINGMODE    ALLOWVOLUMEEXP AGE
oci (default)                 oracle.com/oci                  Delete        Immediate            false          20h
oci-bv                         blockvolume.csi.oraclecloud.com Delete        WaitForFirstConsumer false          20h
px-csi-sc                      pxd.portworx.com                Delete        Immediate            false          20h
px-db                          kubernetes.io/portworx-volume   Delete        Immediate            true           20h
px-db-cloud-snapshot           kubernetes.io/portworx-volume   Delete        Immediate            true           20h
px-db-cloud-snapshot-encrypted kubernetes.io/portworx-volume   Delete        Immediate            true           20h
px-db-encrypted                kubernetes.io/portworx-volume   Delete        Immediate            true           20h
px-db-local-snapshot           kubernetes.io/portworx-volume   Delete        Immediate            true           20h
px-db-local-snapshot-encrypted kubernetes.io/portworx-volume   Delete        Immediate            true           20h
px-mysql-csi-sc                pxd.portworx.com                Delete        Immediate            false          17m
px-replicated                  kubernetes.io/portworx-volume   Delete        Immediate            true           20h
px-replicated-encrypted        kubernetes.io/portworx-volume   Delete        Immediate            true           20h
stork-snapshot-sc              stork-snapshot                  Delete        Immediate            true           20h
Out-of-the box the Kubernetes MySQL Operator will use the default storage class, however it can be stored at an alternative StorageClass by changing the default by using kubectl patch to set is-default-class.
First set is-default-class for the current default Storage Class to false, for example.
% kubectl patch storageclass oci -p '{"metadata": {"annotations":{"storageclass.kubernetes.io/is-default-class":"false"}}}'
storageclass.storage.k8s.io/oci patched
And then update the preferred Storage Class is-default-class to true.
% kubectl patch storageclass px-mysql-csi-sc -p '{"metadata": {"annotations":{"storageclass.kubernetes.io/is-default-class":"true"}}}'
storageclass.storage.k8s.io/px-mysql-csi-sc patched
We can see the change with kubectl get storageclass
% kubectl get storageclass
NAME                           PROVISIONER                     RECLAIMPOLICY VOLUMEBINDINGMODE    ALLOWVOLUMEEXP AGE
...
oci                            oracle.com/oci                  Delete        Immediate            false          20h
px-mysql-csi-sc (default)      pxd.portworx.com                Delete        Immediate            false          28m
Installation
OK now let’s install the Oracle MySQL Custom Resource Definition (CRD) and Operator.
For this blog I will install directly into my OKE Kubernetes Cluster using kubectl apply.
% kubectl apply -f https://raw.githubusercontent.com/mysql/mysql-operator/trunk/deploy/deploy-crds.yaml

customresourcedefinition.apiextensions.k8s.io/innodbclusters.mysql.oracle.com created
customresourcedefinition.apiextensions.k8s.io/mysqlbackups.mysql.oracle.com created
customresourcedefinition.apiextensions.k8s.io/clusterkopfpeerings.zalando.org created
customresourcedefinition.apiextensions.k8s.io/kopfpeerings.zalando.org created

And again using kubectl apply to deploy operator.

% kubectl apply -f https://raw.githubusercontent.com/mysql/mysql-operator/trunk/deploy/deploy-operator.yaml

serviceaccount/mysql-sidecar-sa created
clusterrole.rbac.authorization.k8s.io/mysql-operator created
clusterrole.rbac.authorization.k8s.io/mysql-sidecar created
clusterrolebinding.rbac.authorization.k8s.io/mysql-operator-rolebinding created
clusterkopfpeering.zalando.org/mysql-operator created
namespace/mysql-operator created
serviceaccount/mysql-operator-sa created
deployment.apps/mysql-operator created
From the above we can see a number of service accounts and a new namespace called mysql-operator has been created.
GitHub method
Alternatively, the Oracle MySQL CRD and Operator can also be downloaded from GitHub
# git clone https://github.com/mysql/mysql-operator
Cloning into 'mysql-operator'...
remote: Enumerating objects: 1065, done.
remote: Counting objects: 100% (1065/1065), done.
remote: Compressing objects: 100% (370/370), done.
remote: Total 1065 (delta 682), reused 1064 (delta 681), pack-reused 0
Receiving objects: 100% (1065/1065), 4.60 MiB | 677.00 KiB/s, done.
Resolving deltas: 100% (682/682), done.
# cd /root/mysql-operator/deploy
# ls -l
total 20
-rw-r--r-- 1 root root 8888 Jul 20 09:25 deploy-crds.yaml
-rw-r--r-- 1 root root 2905 Jul 20 09:25 deploy-operator.yaml
-rwxr-xr-x 1 root root 3347 Jul 20 09:25 patch_deployment.py
And then install using the kubectl apply as before.
Custom Resource Definitions
If we use kubectl get crd to list all Custom Resource Definitions, we can now see the four new CRDs
% kubectl get crd
NAME                                                         CREATED AT
actionapprovals.autopilot.libopenstorage.org                 2021-08-16T16:24:48Z
applicationbackups.stork.libopenstorage.org                  2021-08-16T16:25:44Z
applicationbackupschedules.stork.libopenstorage.org          2021-08-16T16:26:00Z
applicationclones.stork.libopenstorage.org                   2021-08-16T16:25:55Z
applicationregistrations.stork.libopenstorage.org            2021-08-16T16:25:39Z
applicationrestores.stork.libopenstorage.org                 2021-08-16T16:25:50Z
autopilotruleobjects.autopilot.libopenstorage.org            2021-08-16T16:24:43Z
autopilotrules.autopilot.libopenstorage.org                  2021-08-16T16:24:43Z
backuplocations.stork.libopenstorage.org                     2021-08-16T16:25:34Z
clusterdomainsstatuses.stork.libopenstorage.org              2021-08-16T16:25:24Z
clusterdomainupdates.stork.libopenstorage.org                2021-08-16T16:25:29Z
clusterkopfpeerings.zalando.org                              2021-08-17T12:32:41Z
clusterpairs.stork.libopenstorage.org                        2021-08-16T16:25:14Z
groupvolumesnapshots.stork.libopenstorage.org                2021-08-16T16:25:09Z
innodbclusters.mysql.oracle.com                              2021-08-17T12:32:39Z
kopfpeerings.zalando.org                                     2021-08-17T12:32:41Z
migrations.stork.libopenstorage.org                          2021-08-16T16:25:19Z
migrationschedules.stork.libopenstorage.org                  2021-08-16T16:25:19Z
mysqlbackups.mysql.oracle.com                               2021-08-17T12:32:40Z
namespacedschedulepolicies.stork.libopenstorage.org          2021-08-16T16:24:53Z
rules.stork.libopenstorage.org                               2021-08-16T16:24:43Z
schedulepolicies.stork.libopenstorage.org                    2021-08-16T16:24:48Z
storageclusters.core.libopenstorage.org                      2021-08-16T16:23:10Z
storagenodes.core.libopenstorage.org                         2021-08-16T16:23:16Z
volumeplacementstrategies.portworx.io                        2021-08-16T16:24:01Z
volumesnapshotdatas.volumesnapshot.external-storage.k8s.io   2021-08-16T16:24:58Z
volumesnapshotrestores.stork.libopenstorage.org              2021-08-16T16:25:04Z
volumesnapshots.volumesnapshot.external-storage.k8s.io       2021-08-16T16:24:58Z
volumesnapshotschedules.stork.libopenstorage.org             2021-08-16T16:24:59Z
Review details
Use kubectl get deployment / deploy to confirm we have an mysql-operator deployment.
% kubectl get deployment -n mysql-operator
NAME             READY   UP-TO-DATE   AVAILABLE   AGE
mysql-operator   1/1     1            1           27m
And kubectl get pod to get the the MySQL operator pod name
% kubectl get pods -n mysql-operator
NAME                              READY   STATUS    RESTARTS   AGE
mysql-operator-6fd4df855f-zqmgh   1/1     Running   0          28m
Using kubectl describe we can see the deployment is using a MySQL 8.0.25 image from the Docker Hub repository.
% kubectl describe deployment/mysql-operator -n mysql-operator
Name:                   mysql-operator
Namespace:              mysql-operator
CreationTimestamp:      Tue, 17 Aug 2021 13:33:16 +0100
Labels:                 version=1.0
Annotations:            deployment.kubernetes.io/revision: 1
Selector:               name=mysql-operator
Replicas:               1 desired | 1 updated | 1 total | 1 available | 0 unavailable
StrategyType:           RollingUpdate
MinReadySeconds:        0
RollingUpdateStrategy:  25% max unavailable, 25% max surge
Pod Template:
  Labels:           name=mysql-operator
  Service Account:  mysql-operator-sa
  Containers:
   mysql-operator:
    Image:      mysql/mysql-operator:8.0.25-2.0.1
    Port:       <none>
    Host Port:  <none>
    Args:
      mysqlsh
      --log-level=@INFO
      --pym
      mysqloperator
      operator
    Environment:  <none>
    Mounts:       <none>
  Volumes:        <none>
Conditions:
  Type           Status  Reason
  ----           ------  ------
  Available      True    MinimumReplicasAvailable
  Progressing    True    NewReplicaSetAvailable
OldReplicaSets:  <none>
NewReplicaSet:   mysql-operator-6fd4df855f (1/1 replicas created)
Events:
  Type    Reason             Age   From                   Message
  ----    ------             ----  ----                   -------
  Normal  ScalingReplicaSet  29m   deployment-controller  Scaled up replica set mysql-operator-6fd4df855f to 1
Creating InnoDB Cluster
Now we have a MySQL Operator deployed, so we can create an InnoDB Cluster.
Create Kubernetes Secret
Create a Kubernetes secret to store the MySQL root password using the kubectl create secret command or the example yaml file below to create a secret called mypwds
# cat mysql-secret.yaml
apiVersion: v1
kind: Secret
metadata:
  name: mypwds
stringData:
  rootUser: root
  rootHost: '%'
  rootPassword: MySQL202!

% kubectl apply -f mysql-secret.yaml
secret/mypwds created
Setup MySQL InnoDB Cluster
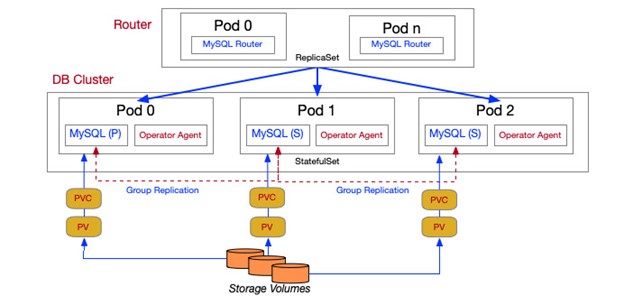
The MySQL operator will create:
- A statefulset and service for the MySQL server called mycluster.
- pods mycluster-0..2
- sidecar container agents
- A replicaSet for the MySQL router called mycluster-router
- pods mycluster-router-0, mysqlcluster-router-1
- A service for the MySQL InnoDB Cluster called mycluster
The example below will create a 3 node MySQL InnoDB Cluster with 2 MySQL routers using the secret previously created.
% cat mysql-cluster.yaml

apiVersion: mysql.oracle.com/v2alpha1
kind: InnoDBCluster
metadata:
  name: mycluster
spec:
  secretName: mypwds
  instances: 3
  router:
    instances: 2

MySQL Architecture
% kubectl apply -f mysql-cluster.yaml
innodbcluster.mysql.oracle.com/mycluster created
Use –watch or -w flag to start watching updates, from here we can see the 3 instances and 2 routers previously defined.
% kubectl get innodbcluster --watch
NAME        STATUS   ONLINE   INSTANCES   ROUTERS   AGE
...
mycluster   ONLINE   3        3           2         9m30s
Persistent Volume Claims
We can see the MySQL Operator created multiple 2GB ‘DATA’ Persistent Volume Claim (PVC) using the px-mysql-csi-sc StorageClass.
% kubectl get pvc
NAME                  STATUS   VOLUME                                     CAPACITY   ACCESS MODES   STORAGECLASS      AGE
datadir-mycluster-0   Bound    pvc-25ffa7e2-fb1f-4261-a26d-2fec8e2e5d89   2Gi        RWO            px-mysql-csi-sc   47m
datadir-mycluster-1   Bound    pvc-d702b083-86c6-4355-afa1-67f8a7876dad   2Gi        RWO            px-mysql-csi-sc   40m
datadir-mycluster-2   Bound    pvc-f54d399d-afca-4ff7-9bc5-0b1317d57ed4   2Gi        RWO            px-mysql-csi-sc   18m
We can also see the newly provisioned volume from Portworx using pxctl volume list.
% pxctl volume list
ID NAME SIZE HA SHARED ENCRYPTED PROXY-VOLUME IO_PRIORITY STATUS SNAP-ENABLED
876981642026201908 pvc-25ffa7e2-fb1f-4261-a26d-2fec8e2e5d89 2 GiB 1 no no no LOW up - attached on 10.0.10.68 no
372385243185435194 pvc-d702b083-86c6-4355-afa1-67f8a7876dad 2 GiB 1 no no no LOW up - attached on 10.0.10.225 no
120683905232179905 pvc-f54d399d-afca-4ff7-9bc5-0b1317d57ed4 2 GiB 1 no no no LOW up - attached on 10.0.10.173 no
MySQL InnoDB Cluster
We can use kubectl get service to determine ports being used.
% kubectl get service mycluster

NAME        TYPE        CLUSTER-IP    EXTERNAL-IP   PORT(S)                               AGE
mycluster   ClusterIP   10.96.4.210   <none>        6446/TCP,6448/TCP,6447/TCP,6449/TCP   8m23s
% kubectl describe service mycluster
Name:              mycluster
Namespace:         kube-system
Labels:            mysql.oracle.com/cluster=mycluster
                   tier=mysql
Annotations:       <none>
Selector:          component=mysqlrouter,mysql.oracle.com/cluster=mycluster,tier=mysql
Type:              ClusterIP
IP Families:       <none>
IP:                10.96.4.210
IPs:               10.96.4.210
Port:              mysql  6446/TCP
TargetPort:        6446/TCP
Endpoints:         10.244.0.136:6446,10.244.1.8:6446
Port:              mysqlx  6448/TCP
TargetPort:        6448/TCP
Endpoints:         10.244.0.136:6448,10.244.1.8:6448
Port:              mysql-ro  6447/TCP
TargetPort:        6447/TCP
Endpoints:         10.244.0.136:6447,10.244.1.8:6447
Port:              mysqlx-ro  6449/TCP
TargetPort:        6449/TCP
Endpoints:         10.244.0.136:6449,10.244.1.8:6449
Session Affinity:  None
Events:            <none>
Summary
In this post I have shared how we can use Oracle MySQL Kubernetes Operator to create an MySQL InnoDB cluster on Kubernetes with Portworx storage.
Share
Subscribe for Updates
About Us
Portworx is the leader in cloud native storage for containers.
Thanks for subscribing!

Ron Ekins
Principal Field Solutions Architect | Office of the CTO, Pure Storage
Portworx Sharedv4 Service Volumes: Machine Learning with Keras Using Tensorflow and GPUs on Amazon EKS


