
In this article, we provide a step-by-step guide to deploying a MongoDB database on Kubernetes. This guide uses a Kubernetes cluster managed by Amazon EKS, and will walkthrough how to configure MongoDB with Portworx for persistent storage.
What is MongoDB?
MongoDB is one of the most popular NoSQL databases available today. It’s exceptionally developer-friendly, and offers considerable flexibility in data management due to its JSON-like format. Altogether, this makes MongoDB a popular database to support cloud-native development.
Running MongoDB on Kubernetes
Running MongoDB on Kubernetes allows users to take advantage of the automated scaling, self-healing, and management capabilities inherent in Kubernetes. In simple terms, Kubernetes ensures that MongoDB is easily managed and resilient. Notably, databases like MongoDB on Kubernetes are quite common: 72% of organizations using Kubernetes today use it to run databases, making it one of the most common Kubernetes workloads today.
Storage for Databases on Kubernetes
Like all stateful, containerized applications, MongoDB requires persistent storage. Managed options like Amazon EBS can work, but they come with limitations, especially when it comes to handling failures or scaling quickly.
This is where Portworx comes into play. Portworx is a software-defined, container-native storage solution that goes beyond basic data persistence. It offers advanced features such as automated capacity management, multi-AZ replication, dynamic volume provisioning, tunable I/O, as well as built-in disaster recovery and container-granular backup capabilities.
Prerequisites
For this walkthrough, the following are needed:
- AWS Account with EKS cluster: You must have the necessary permissions or admin access to manage IAM roles and your EKS Cluster.
- AWS CLI, eksctl, kubectl, and Helm should be installed on the machine used to interact with the cluster.
- Portworx Enterprise : You can use Portworx Enterprise via a free trial or a paid license. Note: The free trial covers Portworx Enterprise only, which is sufficient for this tutorial. However, advanced features like backup and disaster recovery require a paid license.
Setting Up an EKS Cluster
Now that you have prerequisites, It’s important to start with a supported Kubernetes cluster. If you already have an EKS cluster that meets the requirements, you can skip this section. However, if you need to set one up, here’s a quick and easy way to do it using eksctl.
Step 1: Create Your EKS Cluster
eksctl create cluster \

  --name mongodb-cluster \

  --region us-east-1 \

  --nodegroup-name mongodb-nodes \

  --node-type t3.xlarge \

  --nodes 3 \

  --nodes-min 3 \

  --nodes-max 5 \

  --managed \

  --version 1.28
This command creates an AWS EKS cluster named ‘mongodb-cluster’ in the ‘us-east-1’ region with a managed node group called ‘mongodb-nodes’ running 3(min) to 5(max) t3.xlarge instances distributed across multiple availability zones for high availability.
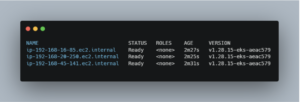
Step 2: Verify the Cluster
After creation, verify your cluster’s status with:
kubectl get nodes
This command should list all your worker nodes along with their status, confirming that your cluster is up and running.
Your output should be similar to this:
Make sure that your kubectl context is set to your new EKS cluster. The following command automatically updates your kubeconfig file:
aws eks --region us-east-1 update-kubeconfig --name mongodb-cluster
Now you’re ready to start deploying applications on your EKS cluster.
Installing Portworx on AWS EKS
Portworx is a powerful storage solution that brings high availability and dynamic provisioning to your Kubernetes workloads. In this section, you’ll install Portworx on your AWS EKS cluster. Even if you’re using the free trial (which provides access to the storage features), you’ll benefit from its robust, production-grade capabilities. Before installing Portworx, ensure your AWS environment meets the necessary prerequisites (such as IAM policies, etc.).
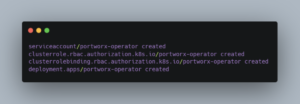
Step 3: Deploying the Portworx Operator
The first step is to deploy the Portworx Operator. Think of the operator as a smart manager inside your cluster; it handles the installation and ongoing management of Portworx for you.
Run this command to apply the operator manifest:
kubectl apply -f 'https://install.portworx.com/3.2?comp=pxoperator&kbver=1.28.5&ns=kube-system'
Note: This command is for EKS cluster version (v1.28) and Portworx version. If you’re using different versions, you should follow this link to generate the specs for you.
This command downloads and installs the Portworx Operator directly from Portworx’s official source. The operator simplifies tasks like upgrades, scaling, and configuration changes. Once applied, it continuously monitors the cluster and manages Portworx resources automatically.
Your output should be similar to this:
Step 4: Deploying the Portworx StorageCluster
After the operator is up and running, the next step is to deploy the Portworx StorageCluster. The StorageCluster custom resource defines the Portworx cluster itself and how it manages the underlying storage on your EKS nodes—detailing device specifications, replication factors, and integration settings (including integration with AWS EBS if needed)
Create a YAML file:
cat <<EOF | tee px-cluster.yaml | kubectl apply -f -
apiVersion: core.libopenstorage.org/v1
kind: StorageCluster
metadata:
  name: px-cluster
  namespace: kube-system
spec:
  image: portworx/oci-monitor:3.2.1.2
  imagePullPolicy: Always
  kvdb:
    internal: true
  cloudStorage:
    deviceSpecs:
      - type=gp2,size=100
    maxStorageNodesPerZone: 3
  secretsProvider: k8s
  stork:
    enabled: true
    args:
      webhook-controller: "true"
  autopilot:
    enabled: true
  runtimeOptions:
    default-io-profile: "6"
  csi:
    enabled: true
  monitoring:
    telemetry:
      enabled: true
    prometheus:
      enabled: true
      exportMetrics: true
EOF
This above configuration sets the Portworx image version, uses an internal KVDB (key-value store) for coordination, defines AWS EBS gp2 backend storage settings with a per-AZ node limit, and enables STORK (Storage Orchestrator for Kubernetes) for dynamic volume operations like migration and failover.
After the successful creation of StorageCluster, your output should be similar to this:
storagecluster.core.libopenstorage.org/px-cluster created
Step 5: Verifying the Installation
After deploying the StorageCluster, verify that Portworx is running properly on your cluster:
kubectl get pods -n kube-system -l name=portworx
You’ll get a similar output to this:
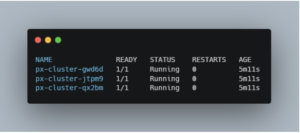
You should see a list of pods, one for each node where Portworx is installed. Each pod should be in a “Running” state. This confirms that your EKS cluster now has a resilient, highly available storage layer managed by Portworx.
Configure Portworx Storage for MongoDB
Now, let’s learn how you can configure Portworx Storage for MongoDB:
Step 6: Create a Portworx StorageClass
A StorageClass in Kubernetes defines how storage should be provisioned. With Portworx, you can customize your storage settings to fit the needs of a database like MongoDB. This includes setting parameters such as the replication factor, I/O profile, and whether the volume can automatically expand.
Create a StorageClass:
cat <<EOF | tee px-ha-sc.yaml | kubectl apply -f -

apiVersion: storage.k8s.io/v1
kind: StorageClass
metadata:
  name: px-ha-sc
provisioner: pxd.portworx.com
parameters:
  repl: "2"             # Replicates data across two nodes for high availability
  io_profile: "db"      # Optimized for database workloads
  priority_io: "high"   # Ensures high-performance I/O
allowVolumeExpansion: true

EOF
This StorageClass configures Portworx to synchronously replicate data across two nodes using a ‘db’ I/O profile with high-priority I/O, while enabling auto-expansion for dynamic scaling and high availability.
After the successful creation of StoargeClass, you should see:
storageclass.storage.k8s.io/px-ha-sc created
Step 7: Create a PersistentVolumeClaim (PVC)
Once the StorageClass is set up, the next step is to create a PersistentVolumeClaim (PVC). The PVC is what your MongoDB deployment will use to request storage. It binds to the StorageClass and provides a way for Kubernetes to dynamically provision a volume with the defined parameters.
Create PVC for MongoDB:
cat <<EOF | tee mongo-pvc.yaml | kubectl apply -f -

apiVersion: v1
kind: PersistentVolumeClaim
metadata:
  name: mongo-pvc
spec:
  accessModes:
    - ReadWriteOnce
  storageClassName: px-ha-sc
  resources:
    requests:
      storage: 10Gi

EOF
This PVC requests a 10Gi volume from the Portworx StorageClass ‘px-ha-sc’ with a ‘ReadWriteOnce’ access mode, ensuring it is mounted as read-write on a single node at a time.
After the creation of PVC, you should see:
persistentvolumeclaim/mongo-pvc created
Deploying MongoDB on Kubernetes with Portworx Storage
Now let’s deploy MongoDB on Kubernetes with Portworx Storage:
Step 8: Deploying MongoDB as a StatefulSet
When running databases like MongoDB on Kubernetes, you can use StatefulSet. StatefulSets ensures that each pod gets a stable, unique identity and maintains persistent storage even across restarts or rescheduling, resulting in data consistency.
However, it’s increasingly common to see organizations use database operators such as the MongoDB Kubernetes Operator to automatically deploy and manage these StatefulSets on their behalf.
It’s important to note that Portworx fully supports these operator-based methods. Whether you choose to deploy MongoDB via a StatefulSet or through a database operator, Portworx will ensure that your persistent storage is robust, scalable, and highly available.
Create YAML for StatefulSet:
cat <<EOF | tee mongo-statefulset.yaml | kubectl apply -f -

apiVersion: apps/v1
kind: StatefulSet
metadata:
  name: mongo
spec:
  serviceName: mongo
  replicas: 3
  selector:
    matchLabels:
      app: mongo
  template:
    metadata:
      labels:
        app: mongo
    spec:
      containers:
      - name: mongo
        image: mongo:5.0
        args:
          - "--replSet"
          - "rs0"
        ports:
          - containerPort: 27017
        volumeMounts:
          - name: mongo-storage
            mountPath: /data/db
  volumeClaimTemplates:
  - metadata:
      name: mongo-storage
    spec:
      accessModes: [ "ReadWriteOnce" ]
      storageClassName: px-ha-sc  # This references the Portworx StorageClass
      resources:
        requests:
          storage: 10Gi

EOF
Your output should be similar to:
statefulset.apps/mongo created
The above configuration uses a headless service (via the serviceName field) to assign stable network identities to each pod, deploys three MongoDB instances as a replica set using the –replSet flag, and ensures each pod gets its own dynamically provisioned 10Gi volume from Portworx for high availability.
Create YAML for service:
cat <<EOF | tee mongo-service.yaml | kubectl apply -f -
apiVersion: v1
kind: Service
metadata:
  name: mongo
  labels:
    app: mongo
spec:
  ports:
    - name: mongodb
      port: 27017
      targetPort: 27017
  clusterIP: None  # Headless service for StatefulSet
  selector:
    app: mongo
EOF
After the creation of the service, you should get this output:
service/mongo created
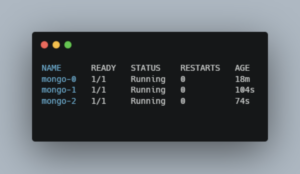
Verify your MongoDB pods are running:
kubectl get pods -l app=mongo
Step 9: Configure MongoDB Replica Sets for High Availability
Portworx provides storage-level high availability by replicating volumes across nodes and availability zones, while MongoDB’s built-in replica sets deliver application-level high availability. This raises an important question: how should we balance the replicas managed by MongoDB and the replication provided by Portworx?
For example, a MongoDB replica set might include one primary and two secondaries, allowing the database to tolerate one node failure while keeping a primary available. At the storage layer, Portworx can replicate data anywhere from one to three copies. If you set both MongoDB and Portworx to replicate three times, you may introduce unnecessary redundancy and performance overhead.
A more optimized approach might be to deploy a three-node MongoDB replica set while configuring Portworx with a replication factor of one (repl=1). Since each MongoDB pod is scheduled on a different node, this setup still delivers data redundancy and high availability without extra storage replication. However, the ideal level of redundancy depends on your specific workload and failure tolerance. For example, setting Portworx replication to two (repl=2) can provide additional redundancy if needed. Additionally, you can use Portworx Volume Placement Strategies to further safeguard your data by controlling which nodes store the replicas, making sure that they are distributed across your Kubernetes cluster.
- Initiate the Replica Set:
Choose one MongoDB pod (for example, mongo-0) and open a shell into it:
kubectl exec -it mongo-0 -- mongo
- Run the Initiation Command:
In the Mongo shell, initialize the replica set:
rs.initiate({
  _id: "rs0",
  members: [
    { _id: 0, host: "mongo-0.mongo:27017" },
    { _id: 1, host: "mongo-1.mongo:27017" },
    { _id: 2, host: "mongo-2.mongo:27017" }
  ]
})
After running the command, use rs.status() in the shell to confirm that all members are added and replication is working properly.
Your output should be similar to this:
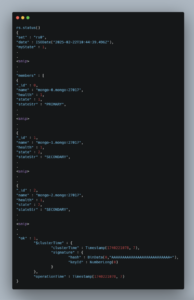
Note: The output has been shortened for readability and the blog.
With this setup, you ensure that MongoDB remains highly available while optimizing storage replication using Portworx.
Scaling and Managing MongoDB Storage with Portworx
MongoDB’s best practices highlight factors like journaling, I/O scheduling, and disk latencies as important to database performance. With Portworx’s features, you can optimize these aspects by setting the right I/O performance (io_profile, priority_io), using dynamic scaling, and using automated recovery features.
Let’s discuss some of these features:
-
- Dynamic Volume Expansion
As your MongoDB database grows, the storage requirements will increase. Portworx allows for seamless, online volume expansion without any downtime. This means you can adjust your storage allocations on the fly to accommodate data growth.
Example: Expanding a PersistentVolumeClaim (PVC)
Assuming you have a PVC named mongo-pvc that initially requests 10Gi of storage, and you need to expand it to 20Gi:
You can simply modify the storage request to the desired size:
apiVersion: v1
kind: PersistentVolumeClaim
metadata:
  name: mongo-pvc
spec:
  accessModes:
    - ReadWriteOnce
  storageClassName: px-ha-sc
  resources:
    requests:
      storage: 20Gi
Portworx will handle the underlying volume expansion automatically, ensuring that your MongoDB instance continues to operate without interruption.
Note: In addition to manual resizing, Portworx Autopilot can automatically grow your PVCs based on predefined rules, ensuring that your storage adjusts dynamically to meet workload demands without any manual intervention. This allows your system to adapt to storage demands in real-time.
-
- Managing I/O Performance
Optimizing I/O performance is important for database efficiency. Portworx provides configurable parameters to design storage behavior to your workload needs.
Example: Setting I/O Profiles and Priorities
When defining a StorageClass for MongoDB, you can specify parameters such as io_profile and priority_io to enhance performance:
apiVersion: storage.k8s.io/v1
kind: StorageClass
metadata:
  name: px-db-sc
provisioner: kubernetes.io/portworx-volume
parameters:
  repl: "3"             # Replicates data across three nodes for high availability
  io_profile: "db"      # Optimized for database workloads
  priority_io: "high"   # Ensures high-performance I/O
allowVolumeExpansion: true
This configuration ensures that the storage is optimized for database operations, providing low latency and high throughput for your MongoDB deployment.
-
- Automated Recovery and Failover
Having data availability and resilience against failures is important. Portworx offers automated recovery and failover mechanisms to maintain database uptime.
Example: Multi-AZ Replication and Failover
Portworx can replicate data across multiple Availability Zones (AZs), providing resilience against zone failures. In the event of a node or AZ failure, Portworx automatically reattaches the affected volumes to healthy nodes, minimizing downtime.
To configure multi-AZ replication, ensure that your StorageClass specifies the desired replication factor and zones:
apiVersion: storage.k8s.io/v1
kind: StorageClass
metadata:
  name: px-multi-az-sc
provisioner: kubernetes.io/portworx-volume
parameters:
  repl: "3"             # Replicates data across three nodes in different AZs
  zones: "us-east-1a,us-east-1b,us-east-1c"  # Specify the AZs
  io_profile: "db"
  priority_io: "high"
allowVolumeExpansion: true
This setup ensures that your MongoDB data is distributed across multiple zones, providing high availability and automated failover capabilities.
- Sharding with Portworx
MongoDB supports sharding as a strategy for horizontal scaling, distributing data across multiple instances to improve performance and manage large datasets. When combined with Portworx, sharding gains additional durability through volume replication, ensuring that each shard remains highly available and resilient against failures.
In a typical sharded MongoDB cluster, data is distributed across multiple instances. By configuring Portworx with a replication factor of two (repl=2), each MongoDB shard is stored redundantly across nodes. This setup ensures that even if a node fails, the affected shard remains accessible without requiring additional MongoDB replicas. This approach enhances durability while optimizing resource usage, as only the shards need replication rather than the entire database.
A key benefit of this architecture is maintaining shard availability even during failures, reducing the need for additional MongoDB nodes while improving data resilience. By using Portworx’s storage capabilities, organizations can achieve a balance between performance and fault tolerance without over-provisioning database instances.
Why Choose Portworx?
While the best Kubernetes storage solution depends on your specific use case, Portworx offers several advantages that make it a strong choice for supporting MongoDB deployments on Kubernetes:
- Container-Native: Portworx is built specifically for containerized environments, and integrated tightly with Kubernetes and other cloud-native and DevOps tooling.
- Multi- and Hybrid-Cloud Support: Unlike managed cloud solutions, Portworx supports deployments across multiple clouds and hybrid environments.
- Integrated Backup and Disaster Recovery: Portworx provides granular backup capabilities and container-level disaster recovery, helping you protect your applications and data from failures and other disruptions.
- Automated Operations and Flexibility: With features such as dynamic provisioning, autoscaling, and performance tuning, Portworx adapts to the evolving demands of your MongoDB workloads.
Configuring MongoDB deployments with Portworx storage results in high availability, improved performance, and storage flexibility across various environments.
Summary
In this article, you’ve learned how to deploy a MongoDB instance on Kubernetes using Amazon EKS and Portworx. Portworx features, such as seamless storage scaling, performance optimization, and automated recovery, make it an excellent choice to support MongoDB on Kubernetes. To explore more about Portworx’s capabilities, explore the documentation and start with a free trial to experience its features firsthand.