To jump directly to Elasticsearch specific backup information. Jump to the below section.
Kubernetes runs mission critical applications in production; that is a fact. Running applications—especially stateful applications in production—requires care and planning. We have covered how to run a highly-available service on Elasticsearch Kubernetes in production already, and now we are going to focus on the best way to protect your data services in production with backup and restore.
Here are some of the things you need to ask yourself when protecting Elasticsearch with backup and restore on Kubernetes in production:
- What Kubernetes objects do I need to backup?
- How can I backup my PersistentVolumes (PVs)?
- Where do my backup files live?
- How long do my backups remain available?
- Can I restore to another Kubernetes cluster?
- Who has access to my backups?
- Who can take a backup?
- Can I take backups on a set schedule?
- How long will my backups take?
- Are my backups secure?
This blog post will aim to answer most of the questions you may be asking and provide a clear guide on how to backup Elasticsearch on Kubernetes in production.
The essential steps to backup Elasticsearch on Kubernetes
When you are creating a backup and restore strategy, it is important to remember that not every data service needs the same level of protection. In production, we typically need the best level of protection that fits our business needs as well as those of our customers. Given this, it’s best to understand the essential steps for creating a backup and restore plan in production.
- Understand WHO will be responsible for creating backups.
- Know what level of RPO (recovery point objective) you require.
- Make sure you know where your backup targets will be located.
- Plan out what type of schedule and retention plan your backups need.
- Make sure any application-aware hooks are in place so your backups are app-consistent.
We’ll walk through and explain these critical steps for backing up Elasticsearch in production in more detail as well as provide examples and screenshots below.
Performing backup and restore for Elasticsearch
Before we can backup Elasticsearch, we must first configure PX-Backup with the access to the cluster which it is running in.
> Note, this blog does not go into installing PX-Backup; for this, please reference our documentation.
Within the PX-Backup interface, select Add Cluster from the navigation.

Then you will need to provide a cluster name and a Kubeconfig for the Kubernetes cluster you are using as well as the Portworx details if you have access to them. Keep in mind that the Kubeconfig is what controls the type of access you have to the cluster, and the same is true within PX-Backup. If you only have access to one namespace, you will only be able to set up backup and restore for that namespace. Also, if you do not have access to the Portworx cluster details or are not using Portworx for volumes, you can leave that section blank.

Once you have done this, you should see your cluster added to the main screen. There should be a green backup icon in the cluster tile that will bring you to the backup view for the cluster.

If your backup icon is not green, double check that you are running Stork 2.4+ in the cluster you added.
> Refer to the Add Cluster screen within the backup UI. You can easily copy the command to add stork to your cluster.
(Running Portworx)
KBVER=$(kubectl version --short | awk -Fv '/Server Version: /{print $3}') curl -fsL -o stork-spec.yaml "https://install.portworx.com/2.5?kbver=${KBVER}&comp=stork" kubectl apply -f stork-spec.yaml(Not running Portworx)
curl -fsL -o stork-spec.yaml "https://install.portworx.com/2.5?comp=stork&storkNonPx=true"

kubectl apply -f stork-spec.yaml
Configure your backup targets
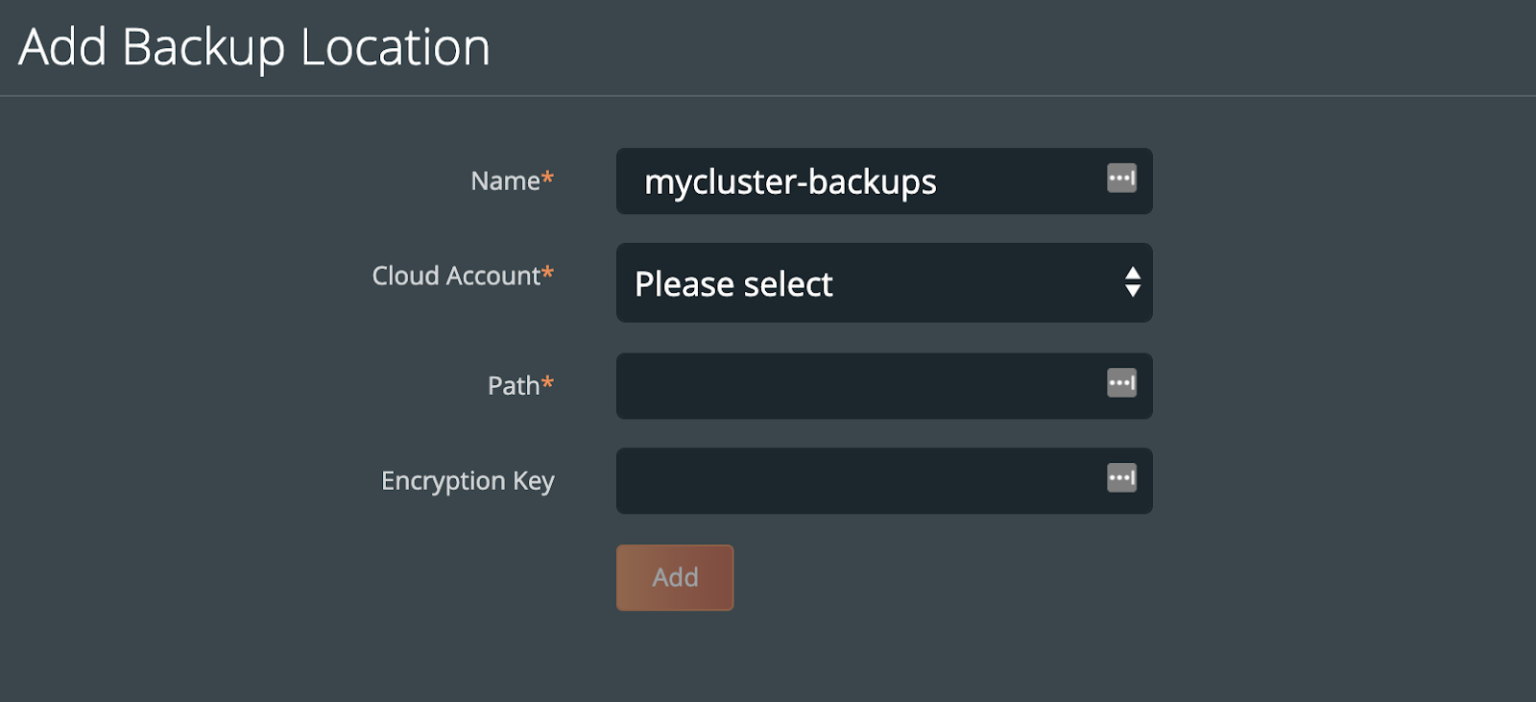
Before we can backup PostgreSQL from our cluster, we must create a backup target location. Click on Cloud Settings to be taken to the location where you can input your target credentials and bucket information.
You can follow our documentation on how to set up various backup targets. At a minimum, you will need to create both a single Cloud Account (e.g., AWS, Azure, Google) and a Backup Location (e.g., bucket in cloud object store).

![]()
When you create a backup location, you will select the previously created Cloud Account and then fill in the bucket information accordingly for your backup target provider.
Consider characteristics of the backup location. Retention of data within the backup location as well as the geographic location of the location are not configured by PX-Backup and thus should be carefully configured prior to using the location.
To make sure backups are encrypted within the backup location, enter an encryption key of your choice.
Create a backup schedule
This step is optional. However, using a schedule enables point in time recovery (PITR) of applications. Using a schedule will provide the PITR points that can be used.
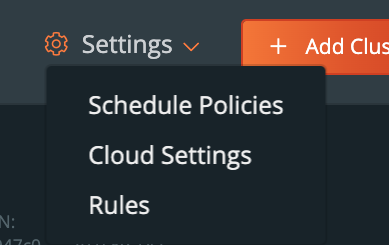
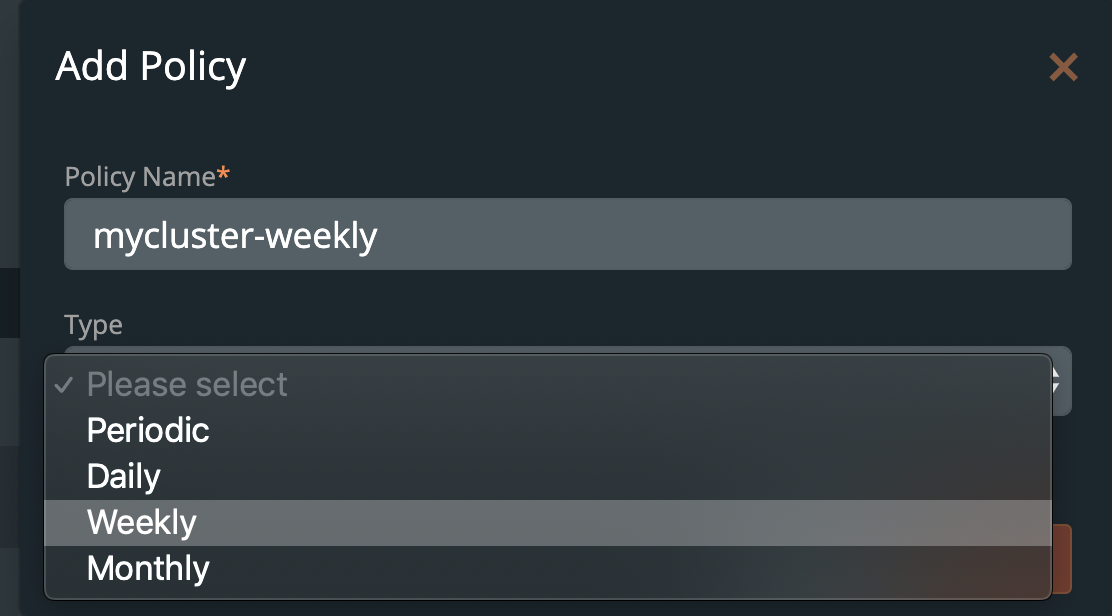
You may want to create a schedule specifying how often your backup takes place (that allows you to meet your RPO objectives) and how many copies of the backup are to be kept (if you need RPO zero, check out kubernetes disaster recovery). Click Schedule Policies from the settings navigation, and this will bring you to a view where you can configure your schedules.
Click the Add button in the navigation bar.
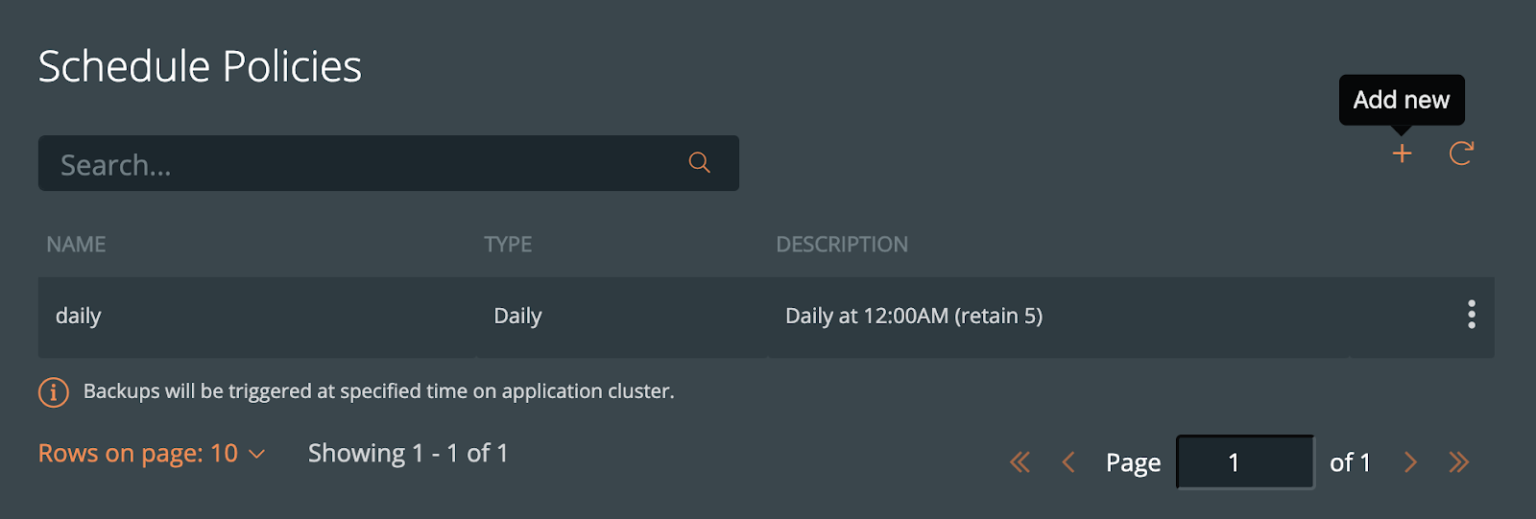
From here, create your desired schedule. When you choose Periodic, Daily, Weekly, or Monthly, you will then be able to select the number of retained copies. Later, you will be able to select this schedule when we create our backup for Elasticsearch.
Pre- and post- rules for creating application-consistent Elasticsearch backups
Backups should be taken when the system can verify that the data service is ready for a backup. This is called application awareness. For this reason, we may want to control logic that happens before and after a backup is triggered to help control consistency based on the above information. With PX-Backup, we configure pre- and post- rules that can run arbitrary commands inside one or more pods of the data service to achieve these goals.
First, we need to understand how Elasticsearch stores states. This will ultimately help provide a blueprint for our backup policies and rules in production.
Elasticsearch allows users to configure persistence by letting users configure PersistentVolumeClaims (PVC) for the Elasticsearch data directory. Per Elastic documentation, this is to prevent the “high likelihood of permanent data loss.” Following the documentation for using volume claim templates we can mount portworx volumes for this purpose to /user/share/elasticsearch/data inside the Kubernetes pod. Users have to configure PVCs using the volume name of elasticsearch-data. See the example below.
apiVersion: elasticsearch.k8s.elastic.co/v1
kind: Elasticsearch
metadata:
  name: elasticsearch
spec:
  version: 7.8.0
  nodeSets:
  - name: default
    count: 3
    podTemplate:
      metadata:
        labels:
          appname: "elastisearch-app"
      spec:
        containers:
          - name: elasticsearch
            volumeMounts
            - name: elasticsearch-backups
              mountPath: /usr/share/elasticsearch/backup
        volumes
        - name: elasticsearch-backup
          persistentVolumeClaim
            claimName: elasticsearch-backups
    volumeClaimTemplates:
    - metadata:
        name: elasticsearch-data
      spec:
        accessModes:
        - ReadWriteOnce
        resources:
          requests:
            storage: 5Gi
        storageClassName: elastic-pwx-storage-class
    config:
      node.master: true
      node.data: true
      node.ingest: true
      node.store.allow_mmap: fals
      path.repo: ["/usr/share/elasticsearch/backups"]
Elasticsearch can also create a snapshot repository to store index snapshots produced by the internal snapshot and restore API. For this, we can set up a Portworx shared volume and create a shared file system repository to be shared across all Elasticsearch nodes to be used to store these index snapshots.
For application consistency, we can use a couple different tools to make Elasticsearch backups application-consistent. The first, Elasticsearch has an API to flush indices so that data is permanently stored. Calling flush will do the following.
“Flushing an index is the process of making sure that any data that is currently only stored in the transaction log is also permanently stored in the Lucene index.”
The second, is to use a suggested way to create index snapshots using a snapshot and restore API. Using this API you can perform the following actions.
“A snapshot is a backup taken from a running Elasticsearch cluster. You can take snapshots of an entire cluster, including all its indices. You can also take snapshots of only specific indices in the cluster.”
We can combine the best practices of the Elastic index flushing and snapshot and restore APIs with Portworx. All of the above configuration and tools enable Elasticsearch the following benefits:
- High availability of data during node failures. Node rebuilds do not have to rebuild over the network.
- Apply application awareness to backups by flushing indices prior to backup.
- Make use of snapshot and restore APIs via PX-Backup pre-exec rules to store flexible index snapshots on a shared Portworx volume used as a snapshot repository.
- Offload index snapshots created by the snapshot API to off-site object storage in case of disaster.
- Backup elasticsearch on a schedule, producing application aware backups and elasticsearch snapshots incrementally over time.
- Create point in time, atomic snapshots of data directories for added level of data protection which are also offloaded to off-site object storage.
This solution gives Elasticsearch the best of both worlds by using fast local Portworx volumes with built in replication and the power of PX-Backup combined with the use of Elasticsearch best practices. WIth this, Elasticsearch is protected from the following scenarios:
- Pod Failure
- Node Failure
- Cluster Failure
- Availability zone failure
- Datacenter failure
- Accidental deletions
- Cyber crimes and hacking
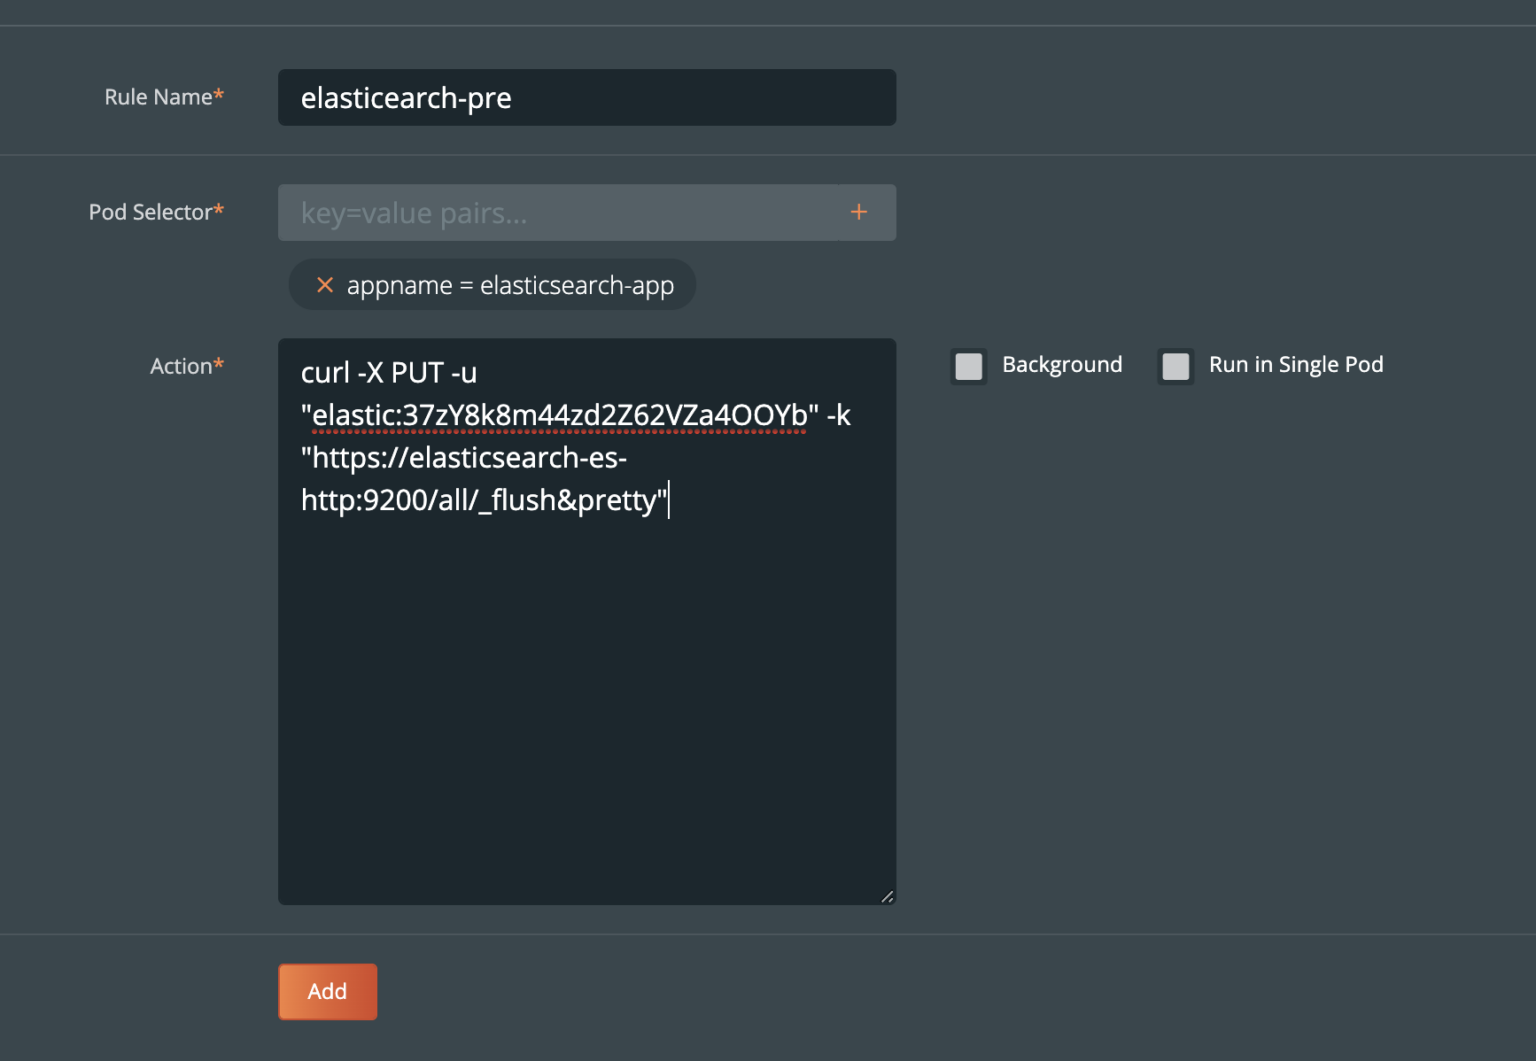
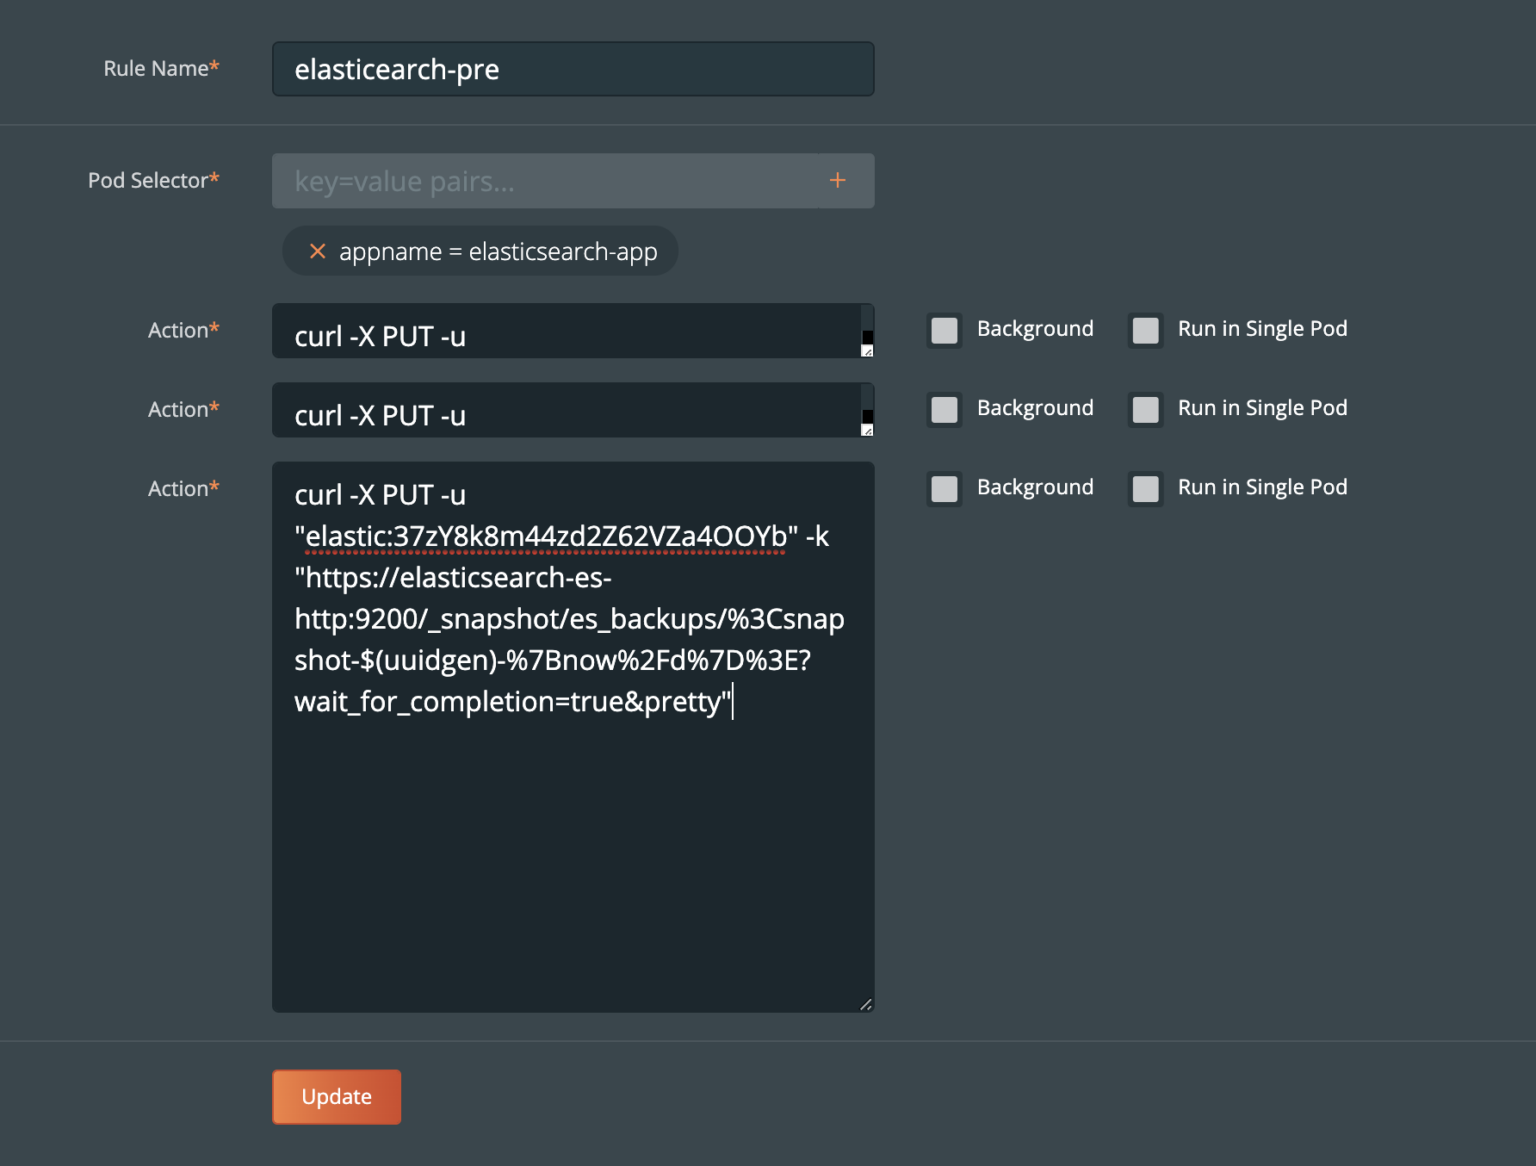
Pre- rule for Elasticsearch
Let’s create a pre-exec rule that does the following actions:
- Freeze the index
- Flush all indices in Elasticsearch
- Create an Elasticsearch index snapshot of all indices
Note that the snapshot process is efficient, so using the shared volume for the target location keeps backups fast and local while also protected when uploaded to object storage. The snapshot process is defined as the following
“The snapshot process is incremental. In the process of making the snapshot, Elasticsearch analyses the list of the index files that are already stored in the repository and copies only files that were created or changed since the last snapshot. This process allows multiple snapshots to be preserved in the repository in a compact form.
First, we freeze the customer index we are working with so that it is read only.
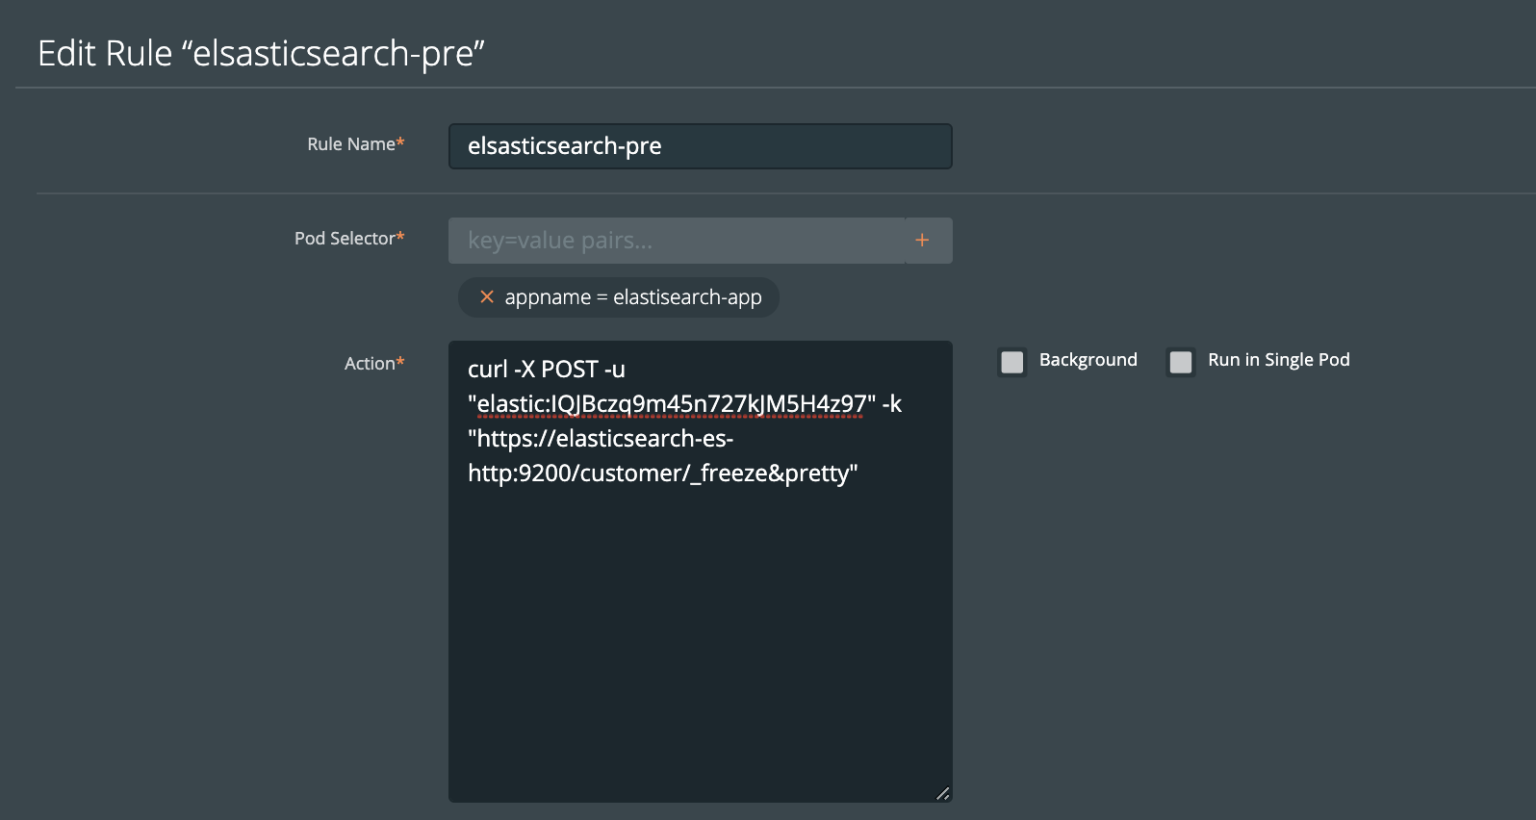
Second, we make sure the customer index is flushed to disk from the transaction log
Then, we create an Elasticsearch index snapshot. This will get stored in the shared file system backup location.
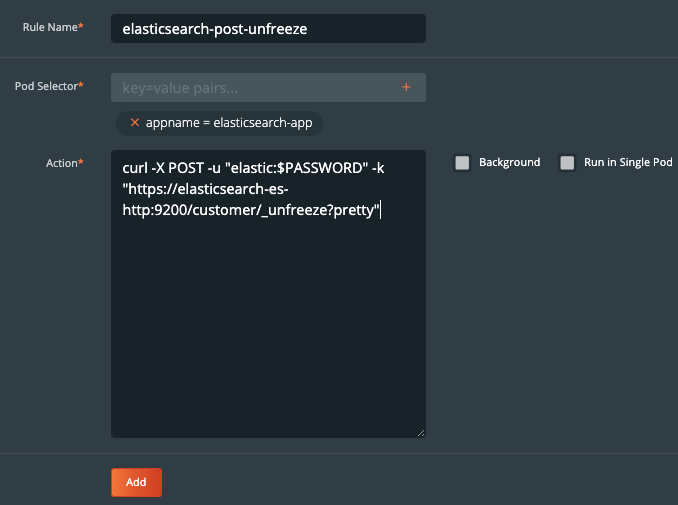
Post- rule for Elasticsearch
Performing the _freeze and _flush on our index and calling the snapshot API gives us all that we need for flexible and accurate restores
Since we used freeze , you will want a post exec rule to provide a rule to run _unfreeze. Below is a post-exec rule which runs _unfreeze on customer index.
Create the backup for Elasticsearch
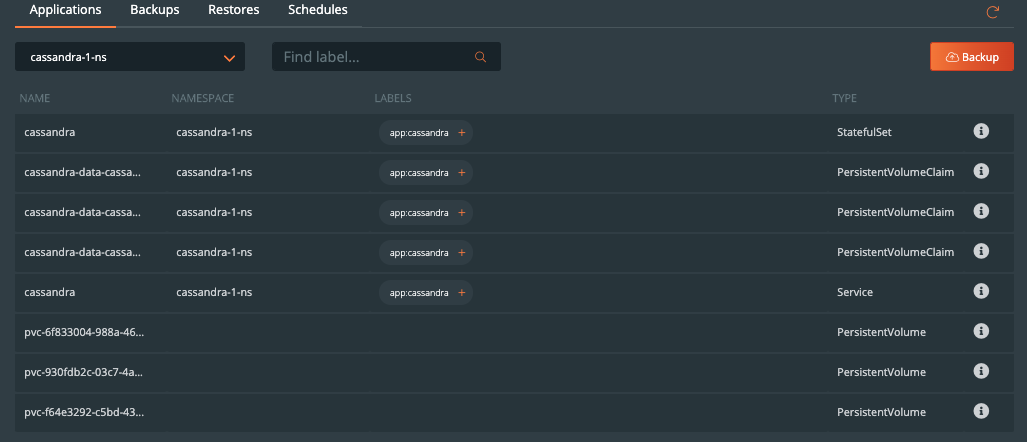
Now that configuration is done and we have created rules for our application, we are ready to start backing up Elasticsearch. What we need to do is enter the backup view of the cluster our service is running in and select the namespace that our application is running in.
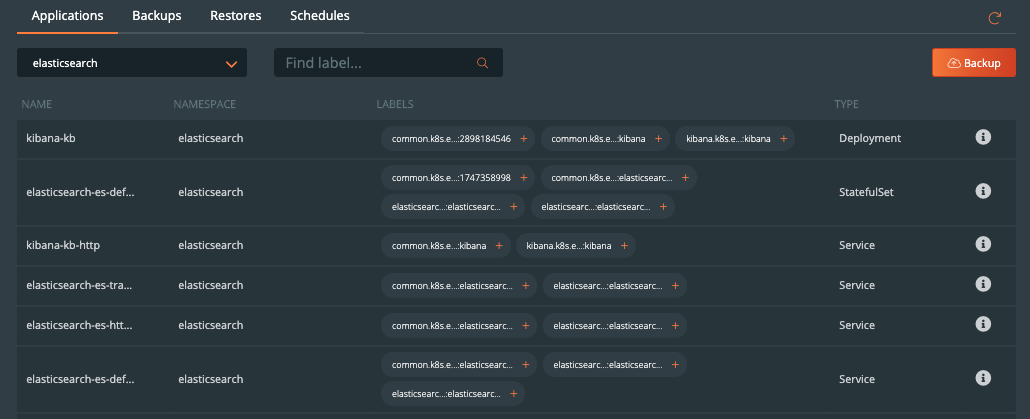
Once you are in the namespace, you can select the labels associated with PostgreSQL to only backup certain objects with the label or backup the entire namespace by selecting the Backup button in the top right corner of the namespace backup view.

Once you are into the backup-specific input, give the backup the following information in the pop out menu:
- Name
- Backup Target
- Backup Now or On a schedule
- Provide Pre- and Post- rules
- Optional backup labels for accounting
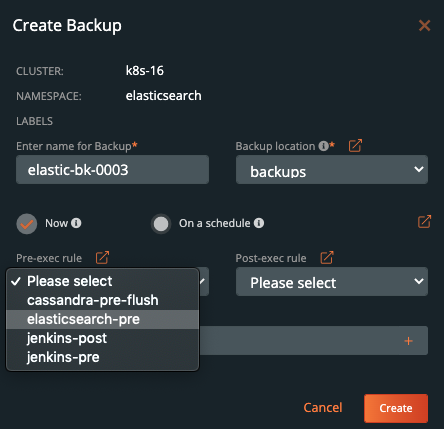
Once you complete this information, click Create.

Once created, the backup will enter a Pending and then an In Progress state. The backup icon will look like the below example.

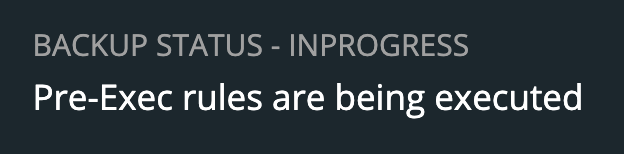
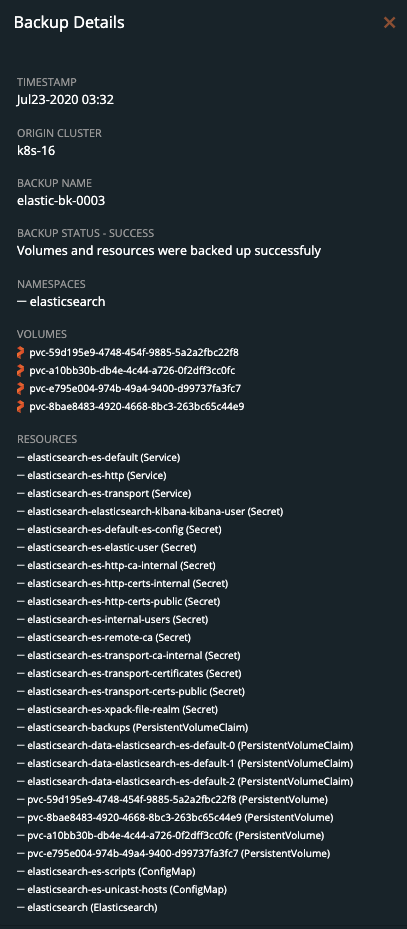
To view the progress of what is happening in the backup, you can select the navigation to the right side of the backup and select the Show Details button. This will allow you to view the current status and metadata of the associated backup. Any progress or errors will be reported within this screen.

Part of this information will be the status of the pre- and post- rules we created earlier. When they are being executed, it will be reported as in progress, and any output or errors will be present within this screen if there is an issue.
Once the rule is executed, it will continue and start to back up the volumes, and the details will change. An example of these details can be seen below.
Upon successful completion of the backup, the icon will look like the below example.

If something goes wrong, you will notice the icon turn red, and details of the failure will be available in the Show Details section of the backup.

Restoring Elasticsearch from backup
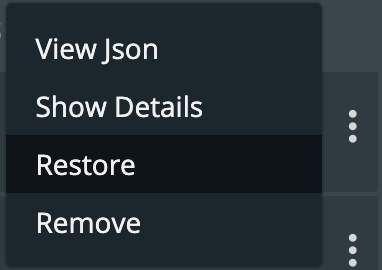
To start a restore, select Backups from the top navigation bar.

Then find the backup you wish to restore and select the Restore selection from the right navigation.
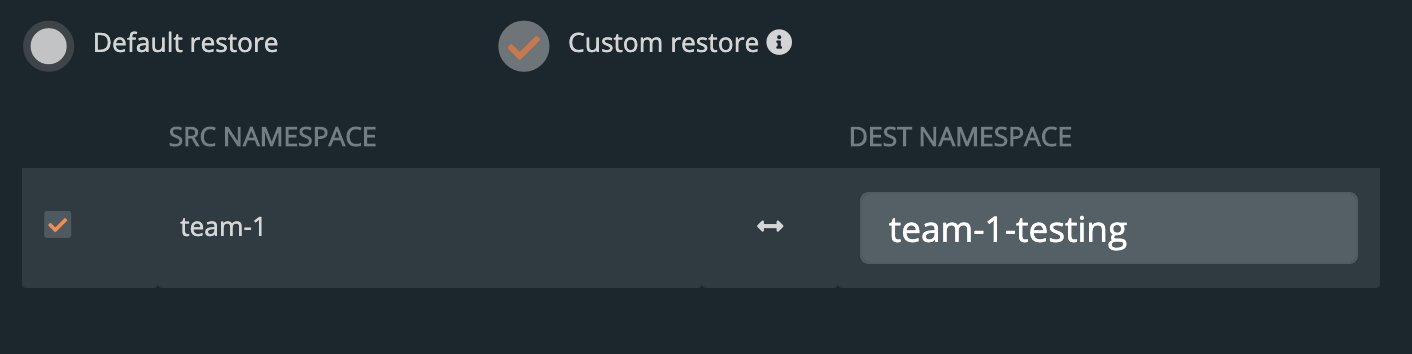
From here you can provide a name for your restore and a destination cluster as well as the following options.
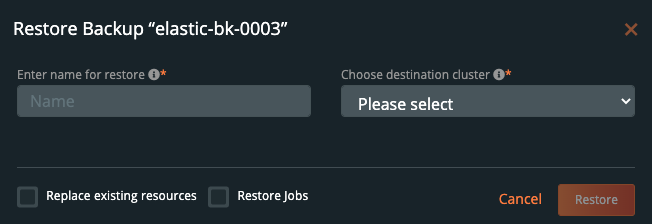
- Default restore
- This will restore the backup to the namespace which it came from. Take note of the “replace existing resources” option when using this method.
- Custom restore
- This will allow you to provide a new namespace name to restore your backup to. Note that this namespace does not need to pre-exist.
- Replace existing resources
- This will make sure the restore operation overwrites the objects that may already exist. Note that objects will be deleted then re-created.
- Restore Jobs
- Jobs often run once and complete. It is not always necessary to run these jobs again—especially when restoring to the same cluster where the backup was taken. However, it may be necessary when restoring to a new cluster or new namespace.
You should see a similar transition in the UI from Pending to Success, and you can select Show Details from the menu—just like with the backup—to get the active information about the backup.
→
In this case, once Elasticsearch and all the backups are restored, you will have a running Elasticsearch cluster based on the latest point in time data in `/usr/share/elasticsearch/data` and this may be all you need.
However, you may wish to take the extras step by also restoring certain indices or cluster states by restoring from a specific snapshot in the `/usr/share/elasticsearch/backups` directory which are produced by the pre-exec rule.
First, List the snapshots available by using the snapshot monitoring APIs.
kubectl -n elasticsearch exec elasticsearch-es-default-0 -- /bin/sh -c "curl -X GET -u \"elastic:$PASSWORD\" -k \"https://elasticsearch-es-http:9200/_snapshot/es_backups/_all?pretty;verbose=false\""
{
  "snapshots" : [
    {
      "snapshot" : "snapshot_5c80b0b9-74a1-43cf-b64c-4be58057470d",
      "uuid" : "OJzHQsyQTummTTtWBlwQxQ",
      "indices" : [
        "customer"
      ],
      "state" : "SUCCESS"
    }
  ]
}
To restore specific indices from the snapshot. In this example, we’re restoring `customer` to a new index `restored_customer`. There are also other available options for restores.
kubectl  -n elasticsearch exec elasticsearch-es-default-0 -- curl -u "elastic:$PASSWORD" -k -X POST "https://elasticsearch-es-http:9200/_snapshot/es_backups/snapshot_5c80b0b9-74a1-43cf-b64c-4be58057470d/_restore?pretty" -H 'Content-Type: application/json' -d'
   "indices":"customer",
   "ignore_unavailable":true,
   "include_global_state":false,
   "rename_pattern":"customer",
   "rename_replacement":"restored_customer",
   "include_aliases":false
}'
List the indexes after restore to show that we have also successfully used snapshots to restore an index produced by our PB-Backup pre-exec rule.
$ kubectl -n elasticsearch exec elasticsearch-es-default-0 -- /bin/sh -c "curl -X GET -u \"elastic:$PASSWORD\" -k \"https://elasticsearch-es-http:9200/_cat/indices?v&pretty\"
health status index                     uuid                   pri rep docs.count docs.deleted store.size pri.store.size
green  open   restored_customer         YI0838tuQYm_L4m4wJwUsw   1   1          1            0      7.3kb          3.6kb
green  open   customer                  pjtPstlwRRK_YNfFLSKgNg   1   1          1            0      7.3kb          3.6kb
Demo
Conclusion
As we’ve just seen, backup and restore is a critical piece of the data protection plan for any application in Kubernetes today. PX-Backup makes it simple to understand who, when, where, and how the backup takes place—all while making it hyper configurable to specific data services for extra consistency and application awareness. Remember to check out the documentation on backup—as well as take advantage of a free trial.
Share
Subscribe for Updates
About Us
Portworx is the leader in cloud native storage for containers.
Thanks for subscribing!

Ryan Wallner
Portworx | Technical Marketing ManagerExplore Related Content:
- backup
- elasticsearch
- kubernetes
- restore