If you missed the first post in this series, check out part 1 to learn about the “why” of Secure Application Workspaces.
Secure Application Workspaces (SAW) for container-based applications leverage Pure Storage’s Secure Multi-Tenancy (SMT) to create a comprehensive solution for isolating and controlling access to Kubernetes workloads. This setup allows for effective separation between Kubernetes clusters and also isolates container-based workloads from other types of workloads.
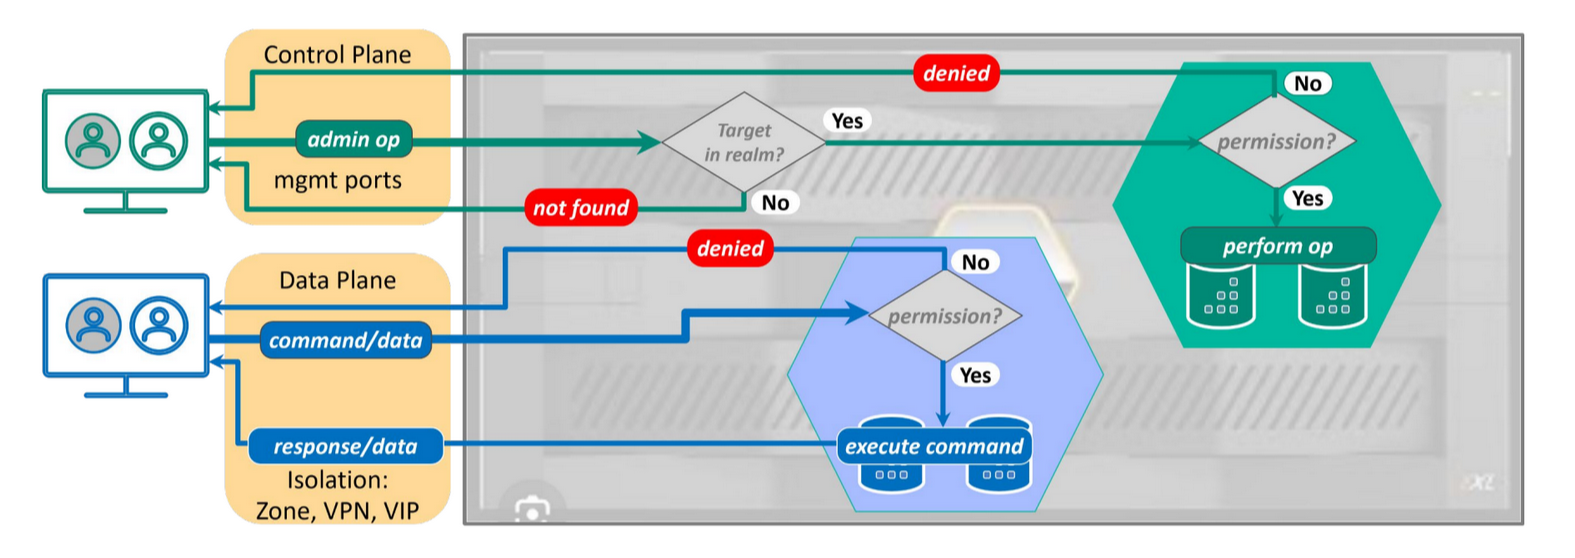
Secure Application Workspaces are built on Pure Storage’s SMT, designed to provide varying levels of isolation for different user groups. SMT enables isolation to ensure storage space, performance guarantees, and even network separation. Additionally, it facilitates administrative partitioning for purposes like auditing, reporting, and cost management. In the past, achieving workload isolation required dedicating an entire FlashArray to each tenant, leading to high costs and operational complexities. SMT now offers a more efficient way to prevent “data leakage” across tenant boundaries while keeping costs down.
Pure Storage’s high availability and performance make it an ideal platform for multi-tenant environments. With non-disruptive hardware upgrades, Pure Storage minimizes downtime across generations. Quality of Service (QoS) controls further ensure that each tenant receives fair access to resources.
While SMT can benefit various applications, it’s particularly valuable in Kubernetes environments, which have unique challenges. Kubernetes workloads are often provisioned automatically via API by developers and platform engineers. For this reason, Portworx integration with SMT is crucial to support workload isolation, maintain resource limits, and ensure security for Kubernetes clusters sharing a single FlashArray.
Implementing Secure Access Workspaces
Implementing SAW requires some knowledge of Pure Storage FlashArrays, as well as Kubernetes and Portworx. My hope is to provide an introduction on how I configured my lab.
Requirements
To use Secure Access Workspaces, we have to meet a set of requirements:
Portworx Version – We need to be running Portworx version 3.2 or higher
Purity – We need to be running Purity version 6.6.11 or higher
Our cluster must use FC, iSCSI, or NVMe/RoCE as the access protocol. In this blog, we will be using iSCSI.
Our worker nodes must also have multipath utilities installed, including kpartx. We will cover the configuration of multipath.
For a full list of requirements, see the Portworx documentation.
Physical network configuration
Although configuring the network is outside of the scope of this blog, I want to ensure I included a few tips for folks so they understand what is possible. FlashArrays support VLANs which provide network isolation to tenants. Administrators can bind host objects to VLANs to ensure that we isolate a tenants traffic.
It is sometimes necessary to specify which network adapters will be carrying iSCSI traffic in an environment. It is possible to provide a list of interfaces to Portworx to ensure that only those interfaces will connect to the FlashArray. Details on this configuration can be found here.
Pure FlashArrays have a management interface that can be used to connect to a web interface, SSH daemon, or or REST API. This traffic is separate from the data-plane. Our Kubernetes cluster will need access to this interface to provision volumes.

Preparing our FlashArray
I’m going to start by creating a new realm for my Kubernetes cluster. A realm should be thought of as a tenant. It is acceptable to have multiple Kubernetes clusters in a realm, but the realm provides space quotas, and IO shaping to the tenant.
We first need to log in to our array as an administrative user (pureuser by default).
ssh pureuser@<ManagementIP>
# Create the realm
pureuser@FA-6115-luis-ct0:~$ purerealm create customer1
Name       Quota Limit
customer1  -
A realm describes a tenant of our infrastructure. It will contain all of the pods, users, policies and volumes that a tenant can access. Only one realm is supported per array per cluster.
We will now need create a pod that will contain our volumes. Remember, we cannot use this pod for ActiveCluster or ActiveDR.
pureuser@FA-6115-luis-ct0:~$ purepod create customer1::pod
Name            Source  Array         Status  Frozen At  Member     Promotion Status  Link Count  Quota Limit
customer1::pod  -       FA-6115-luis  online  -          customer1  promoted          0           -
A pod is a structure that holds multiple volumes for a tenant. This should not be confused with a Kubernetes pod. A FlashArray pod holds a collection of volumes.
We will now create the policy for our new user. This policy will restrict the user to storage functions within our new realm. I will create a roll called pxrole:
pureuser@FA-6115-luis-ct0:~$ purepod create customer1::pod
Name            Source  Array         Status  Frozen At  Member     Promotion Status  Link Count  Quota Limit
customer1::pod  -       FA-6115-luis  online  -          customer1  promoted          0           -
A role is a set of user permissions. Roles have been used in FlashArrays in the past to allow users to have read-only permission, or administrative controls of our arrays. Roles can now be associated with realms to limit what our users can do.
We will now create a new user and assign it to the newly created policy:
pureeng@FA-6115-luis-ct0:~$ pureadmin create --access-policy pxrole user1
Enter password:
Retype password:
Name   Type   Access Policy
user1  local  pxrole
NOTE: This new user will not be able to log in to the web interface of the FlashArray. This is by design as we only need console and API access for this user.
Lastly, we need to generate an API token for the new user:
ssh user1@10.0.1.231
user1@FA-6115-luis> pureadmin create --api-token
Name   Type   API Token                             Created                  Expires
user1  local  19ead418-bec7-09cb-83bb-e679a9307788  2024-11-04 23:07:09 UTC  -
I included the actual access token to make sure that the expected output is clear, don’t worry, this will not work anywhere!
Preparing our Kubernetes nodes
Review the requirements for the Kubernetes nodes to ensure your image has the required packages. For reference, my environment runs the cloud image of Ubuntu 22.04 (kernel 5.15.0-78-generic). This image contained all of the required packages in my environment.
This blog will not cover the variety of multipath configurations, but I want to provide examples to get folks started. In my enviroment, I only have a FlashArray available, so there is no need for a more complex multipath configuration. Modify /etc/multipath.conf with the following:
defaults {
    user_friendly_names no
    find_multipaths yes
}
blacklist {
      devnode "^pxd[0-9]*"
      devnode "^pxd*"
      device {
        vendor "VMware"
        product "Virtual disk"
      }
}
And restart multipathd when done:
sudo systemctl restart multipathdThis ensures we will not use user friendly names (which are not supported by SAW). We are also going to blacklist Portworx virtual volumes, as well as VMware VMDKs
When using cloudinit images, you may have noticed that our iSCSI initiator name (which is contained in the file /etc/iscsi/initiatorname.iscsi) will be set to GenerateName=yes. We need to specify a unique name, or simply test our iSCSI connection to generate one. I’m going to test our connection to the FlashArray:
$ sudo iscsiadm -m discovery -t st -p 10.0.1.233
10.0.1.233:3260,1 iqn.2010-06.com.purestorage:FlashArray.4b7a2f782baacadf
10.0.1.232:3260,1 iqn.2010-06.com.purestorage:FlashArray.4b7a2f782baacadf
We can now see that our initiator name has been set:
cat /etc/iscsi/initiatorname.iscsi
## DO NOT EDIT OR REMOVE THIS FILE!
## If you remove this file, the iSCSI daemon will not start.
## If you change the InitiatorName, existing access control lists
## may reject this initiator.  The InitiatorName must be unique
## for each iSCSI initiator.  Do NOT duplicate iSCSI InitiatorNames.
InitiatorName=iqn.2004-10.com.ubuntu:01:264ad56c91e
Install Portworx
We can now install Portworx. Before we generate a spec file, we need to provide authentication information in the form of a Kubernetes secret. Remember the API token we generated earlier? We will need that in addition to the realm name.
Create the secret
Create a new file called pure.json (NOTE, the value in the Kubernetes secret is required to be pure.json) with the following contents:
{
  "FlashArrays": [
    {
      "MgmtEndPoint": "10.0.1.231",
      "APIToken": "19ead418-bec7-09cb-83bb-e679a9307788",
      "Realm": "customer1"
    }
  ]
}
Again, this token won’t actually work, but I have included it for verisimilitude.
Create a secret:
kubectl create ns portworx
kubectl create secret generic px-pure-secret --namespace portworx --from-file=pure.json=/home/ccrow/temp/pure.json
It is important that we create the secret in the same namespace where we will be creating the storage cluster. By default, this will be the portworx namespace.
Generate the StorageCluster spec
Although this blog is not meant to be a complete guide to installing Portworx, I figure it would be helpful to show people how I configured my environment.
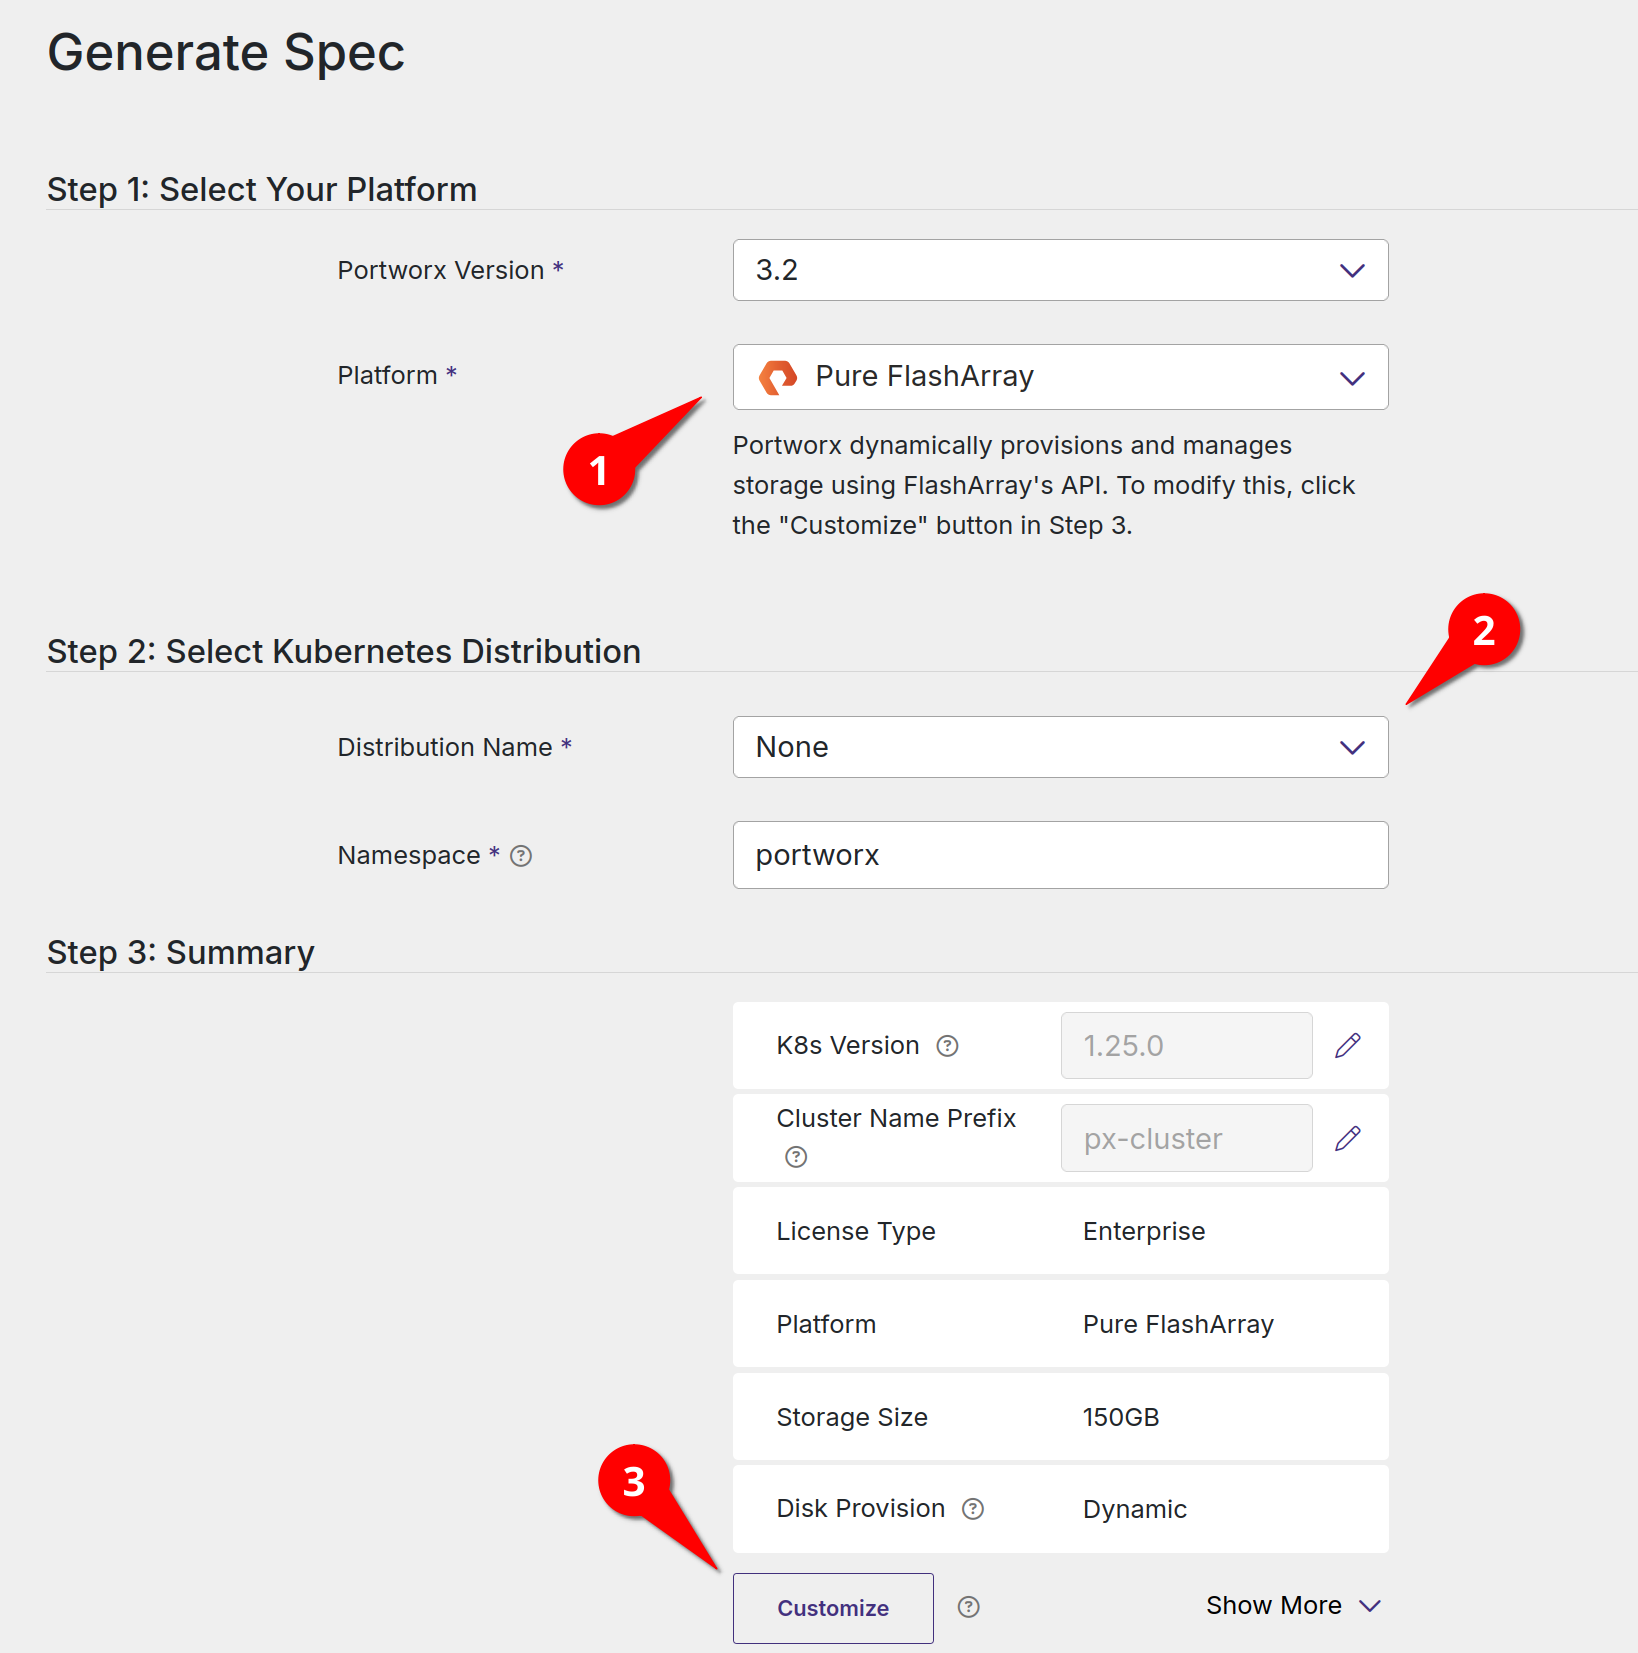
Head over to central.portworx.com and create a new Portworx Enterprise configuration by clicking on the Get Started button, and then continue under the Portworx Enterprise panel.
Select Pure FlashArray as the platform. Select your Kubernetes distribution (mine is set to none, which is suitable if your specific distribution isn’t listed). Click the Customize button

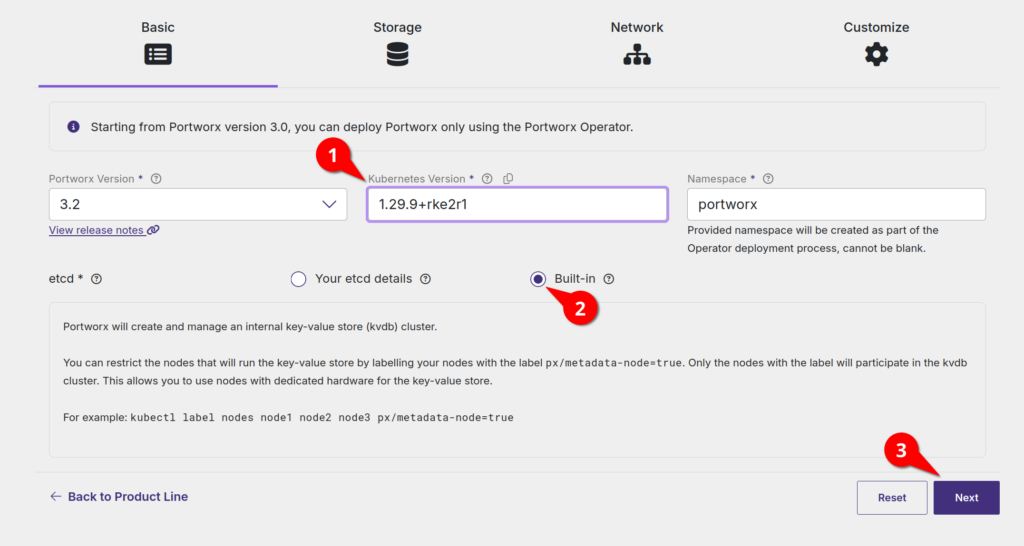
Enter in your Kubernetes version number (including the identifier). Select Built-in for the etcd configuration and click Next

Select the storage area network type (iSCSI in my case). Check the Enable multitenancy checkbox. Set the size of the disks you want to attach to your nodes (remember, this will be one disk per node that makes our storage pool). Enter the pod name that we created when configuring our FlashArray above (pod in my case, I’m that creative) and click Next

The next screen allows you to specify data and management interfaces. The defaults will suffice in my lab. We then have the option to customize our installation with settings such as private registries and enabling environment variables. Click the Finish button.
Install Portworx
Portworx installs in two ports:
First, we will install an operator and CRDs (custom resource definitions) in to our cluster:
kubectl apply -f 'https://install.portworx.com/3.2?comp=pxoperator&kbver=1.29.9+rke2r1&ns=portworx'After a few moments, our operation installation will be complete. We can then install our Portworx cluster by creating a new StorageCluster object:
kubectl apply -f 'https://install.portworx.com/3.2?operator=true&mc=false&kbver=1.29.9%2Brke2r1&ns=portworx&b=true&iop=6&s=%22size%3D50%2Cpod%3Dpod%22&pureSanType=ISCSI&ce=pure&c=px-cluster-8651b065-4e6e-4cd6-921e-9f0ad69ba9b1&stork=true&csi=true&mon=true&tel=true&st=k8s&promop=true'For reference, here is my StorageCluster.yaml:
# SOURCE: https://install.portworx.com/?operator=true&mc=false&kbver=1.29.9%2Brke2r1&ns=portworx&b=true&iop=6&s=%22size%3D50%2Cpod%3Dpod%22&pureSanType=ISCSI&ce=pure&c=px-cluster-8651b065-4e6e-4cd6-921e-9f0ad69ba9b1&stork=true&csi=true&mon=true&tel=true&st=k8s&promop=true
kind: StorageCluster
apiVersion: core.libopenstorage.org/v1
metadata:
  name: px-cluster-8651b065-4e6e-4cd6-921e-9f0ad69ba9b1
  namespace: portworx
  annotations:
    portworx.io/install-source: "https://install.portworx.com/?operator=true&mc=false&kbver=1.29.9%2Brke2r1&ns=portworx&b=true&iop=6&s=%22size%3D50%2Cpod%3Dpod%22&pureSanType=ISCSI&ce=pure&c=px-cluster-8651b065-4e6e-4cd6-921e-9f0ad69ba9b1&stork=true&csi=true&mon=true&tel=true&st=k8s&promop=true"
spec:
  image: portworx/oci-monitor:3.2.0
  imagePullPolicy: Always
  kvdb:
    internal: true
  cloudStorage:
    deviceSpecs:
    - size=50,pod=pod
  secretsProvider: k8s
  stork:
    enabled: true
    args:
      webhook-controller: "true"
  autopilot:
    enabled: true
  runtimeOptions:
    default-io-profile: "6"
  csi:
    enabled: true
  monitoring:
    telemetry:
      enabled: true
    prometheus:
      enabled: true
      exportMetrics: true
  env:
  - name: PURE_FlashArray_SAN_TYPE
    value: "ISCSI"
It is possible to specify multiple pods and disks in our specification, but only one realm.
Verify the installation
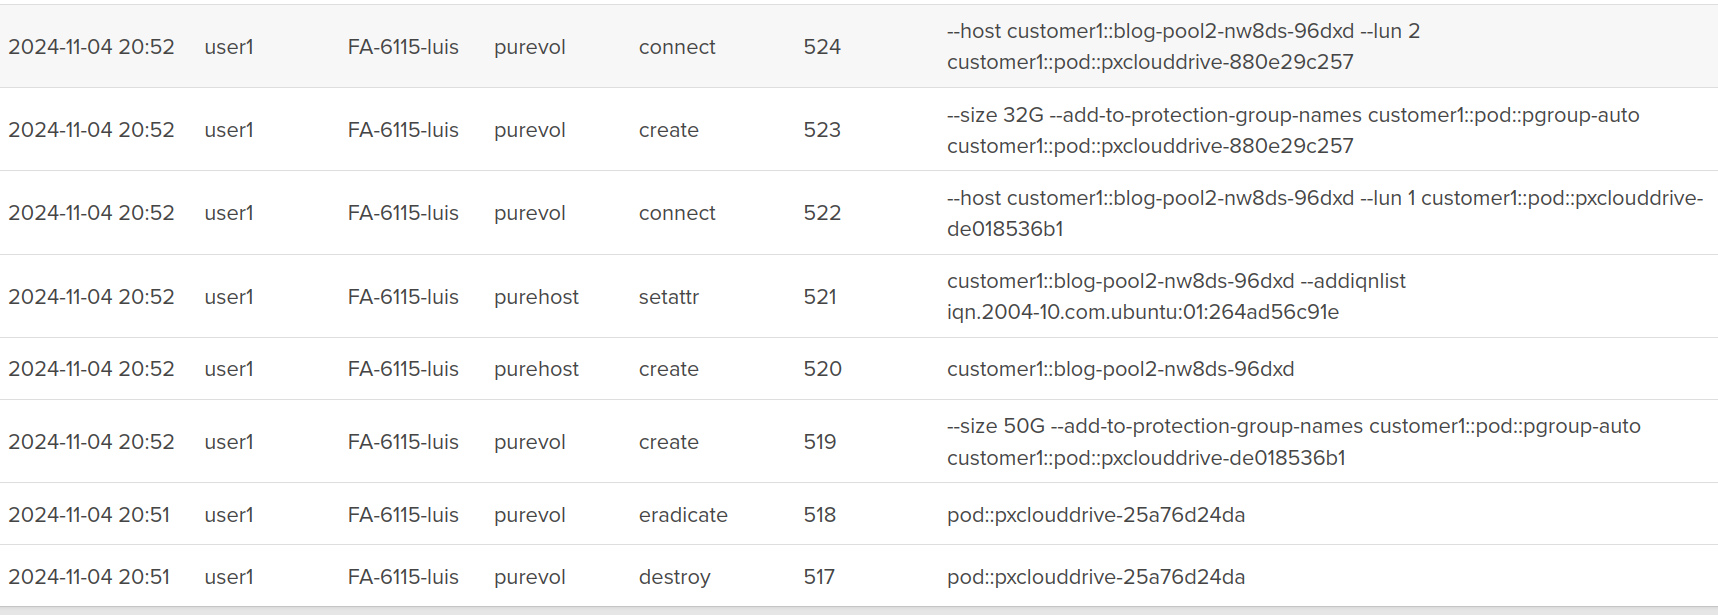
After a few minutes, we will see Portworx start to create disks on our FlashArray:

Notice that all of the volumes are created as the user1 user.
We can see these volumes on our worker nodes as well:
root@blog-pool2-nw8ds-96dxd:~# multipath -l
3624a9370f05c1c201ede431a000113fe dm-0 PURE,FlashArray
size=50G features='0' hwhandler='1 alua' wp=rw
`-+- policy='service-time 0' prio=0 status=active
  |- 4:0:0:1 sdc 8:32 active undef running
  `- 3:0:0:1 sdb 8:16 active undef running
3624a9370f05c1c201ede431a000113ff dm-1 PURE,FlashArray
size=32G features='0' hwhandler='1 alua' wp=rw
`-+- policy='service-time 0' prio=0 status=active
  |- 4:0:0:2 sde 8:64 active undef running
  `- 3:0:0:2 sdd 8:48 active undef running
NOTE: You will see an additional 32G volume connected to three of your nodes. This is used for Portworx’s configuration database (KVDB)
Let’s look at our storage pool by running pxctl:
ccrow@ccrow-kubuntu:~/personal/homelab$ pxctl status
Status: PX is operational
Telemetry: Healthy
Metering: Disabled or Unhealthy
License: Trial (expires in 30 days)
Node ID: 3772b5d3-7390-4cc8-99d3-36d853ff5838
       IP: 10.0.1.158
       Local Storage Pool: 1 pool
       POOL    IO_PRIORITY     RAID_LEVEL      USABLE  USED    STATUS  ZONE    REGION
       0       HIGH            raid0           50 GiB  4.0 GiB Online  default default
       Local Storage Devices: 1 device
       Device  Path                                            Media Type              Size            Last-Scan
       0:1     /dev/mapper/3624a9370f05c1c201ede431a000113fb   STORAGE_MEDIUM_SSD      50 GiB          04 Nov 24 20:49 UTC
       total                                                   -                       50 GiB
       Cache Devices:
        * No cache devices
       Kvdb Device:
       Device Path                                     Size
       /dev/mapper/3624a9370f05c1c201ede431a000113fc   32 GiB
        * Internal kvdb on this node is using this dedicated kvdb device to store its data.
Cluster Summary
       Cluster ID: px-cluster-21f2996a-3ea4-4bbe-98a6-46fac21eb2af
       Cluster UUID: 9980c800-decf-4b4b-9dfb-73ceaf70a819
       Scheduler: Kubernetes
       Total Nodes: 3 node(s) with storage (3 online)
       IP              ID                                      SchedulerNodeName       Auth            StorageNode     Used    Capacity        Status  StorageStatus   Version         Kernel                  OS
       10.0.1.98       8b1ff2bc-7cbb-4e08-abe6-68301cd4842e    blog-pool2-nw8ds-96dxd  Disabled        Yes             4.0 GiB 50 GiB          Online  Up              3.2.0.0-2ded0fe 5.15.0-78-generic       Ubuntu 22.04.2 LTS
       10.0.1.92       78f3d8fa-708f-491a-ba1c-2890e15eb1d9    blog-pool2-nw8ds-v7s5x  Disabled        Yes             4.0 GiB 50 GiB          Online  Up              3.2.0.0-2ded0fe 5.15.0-78-generic       Ubuntu 22.04.2 LTS
       10.0.1.158      3772b5d3-7390-4cc8-99d3-36d853ff5838    blog-pool2-nw8ds-ldmdq  Disabled        Yes             4.0 GiB 50 GiB          Online  Up (This node)  3.2.0.0-2ded0fe 5.15.0-124-generic      Ubuntu 22.04.2 LTS
Global Storage Pool
       Total Used      :  12 GiB
       Total Capacity  :  150 GiB
Collected at: 2024-11-05 00:01:18 UTC
Lastly, let’s verify that multi-tenancy is functioning:
If we log in to our FlashArray as a user from a different tenant, we will not see our Portworx volumes:
user2@FA-6115-luis> purevol list
user2@FA-6115-luis>
No volumes are visible!
Support for FlashArray Direct Access
Let’s move on to configuring FlashArray Direct Access (FADA) volumes! FADA volumes can be used when we want to hand a workload an entire volume. This can be useful for performance reasons, as well as providing our storage administrator with an object that they can apply QoS shaping to. Keep in mind that FADA volumes do not support a number of Portworx features, such as replication and read-write-many support.
To configure FADA volumes, we first need to create a StorageClass:
cat << EOF | kubectl apply -f -
kind: StorageClass
apiVersion: storage.k8s.io/v1
metadata:
  name: fada-pod-sc
provisioner: pxd.portworx.com
volumeBindingMode: Immediate
allowVolumeExpansion: true
parameters:
  backend: "pure_block"
  pure_fa_pod_name: "pod"
EOF
Notice that we need to provide a pod name to our StorageClass.
Let’s spin up a StatefulSet that uses our new StorageClass:
cat << EOF | kubectl apply -f -
apiVersion: apps/v1
kind: StatefulSet
metadata:
  name: mongo
  labels:
    app.kubernetes.io/name: mongo
    app.kubernetes.io/component: backend
  namespace: default
spec:
  serviceName: "mongo"
  selector:
    matchLabels:
      app.kubernetes.io/name: mongo
      app.kubernetes.io/component: backend
  replicas: 1
  template:
    metadata:
      labels:
        app.kubernetes.io/name: mongo
        app.kubernetes.io/component: backend
    spec:
      containers:
      - name: mongo
        image: mongo:7.0.9
        env:
        - name: MONGO_INITDB_ROOT_USERNAME
          value: porxie
        - name: MONGO_INITDB_ROOT_PASSWORD
          value: "porxie"
        args:
        - "--bind_ip"
        - "0.0.0.0"
        resources:
          requests:
            cpu: 100m
            memory: 100Mi
        ports:
        - containerPort: 27017
        volumeMounts:
        - name: mongo-data-dir
          mountPath: /data/db
        livenessProbe:
          exec:
            command: ["mongosh", "--eval", "db.adminCommand({ping: 1})"]
          initialDelaySeconds: 30  # Give MongoDB time to start before the first check
          timeoutSeconds: 5
          periodSeconds: 10  # How often to perform the probe
          failureThreshold: 3
  volumeClaimTemplates:
  - metadata:
      name: mongo-data-dir
    spec:
      accessModes: [ "ReadWriteOnce" ]
      resources:
        requests:
          storage: 1Gi
      storageClassName: fada-pod-sc
EOF
We can check to see that our PVC is bound:
ccrow@ccrow-kubuntu:~$ kubectl get pvc
NAME                     STATUS   VOLUME                                     CAPACITY   ACCESS MODES   STORAGECLASS   VOLUMEATTRIBUTESCLASS
mongo-data-dir-mongo-0   Bound    pvc-7f6a9833-0ff2-428d-9858-08fce67593c4   1Gi        RWO            fada-pod-sc    <unset>
And that our volume was created on the Pure Storage FlashArray:
![]()
Conclusion
Implementing Secure Application Workspaces (SAW) with Portworx and Pure Storage FlashArray offers a powerful solution for managing multi-tenancy in Kubernetes environments. By leveraging features like Pure Storage’s Secure Multi-Tenancy (SMT) and Portworx’s automated volume provisioning through Clouddrives and FlashArray Direct Access Volumes (FADA), you can efficiently isolate workloads, enforce security policies, and maintain resource allocation for different tenants.
The process of configuring SAW involves setting up realms, pods, and roles within the FlashArray, creating the necessary Kubernetes secrets, and ensuring correct network and multipath configurations. While the steps outlined in this blog provide a practical guide for setting up the environment, it’s important to consider your specific use case and ensure all requirements are met for smooth integration. By following these procedures, you’ll be able to harness the benefits of secure and scalable storage management in a multi-tenant Kubernetes architecture, ensuring that each tenant has the resources and isolation they need without compromising the integrity of the system.
Share
Subscribe for Updates
About Us
Portworx is the leader in cloud native storage for containers.
Thanks for subscribing!

Chris is a Technical Marketing Engineer Supporting Portworx


