


This post is part of our ongoing series on running PostgreSQL on Kubernetes. We’ve published a number of articles about running PostgreSQL on Kubernetes for specific platforms and for specific use cases. If you are looking for a specific Kubernetes platform, check out these related articles.
Running HA PostgreSQL on Amazon Elastic Container Service for Kubernetes (EKS)
Running HA PostgreSQL on Azure Kubernetes Service (AKS)
Running HA PostgreSQL on Google Kubernetes Engine (GKE)
Running HA PostgreSQL on Red Hat OpenShift
Running HA PostgreSQL on IBM Cloud Private
Running HA PostgreSQL with Rancher Kubernetes Engine (RKE)
Kubernetes Persistent Volume Tutorial by Portworx
And now, onto the post…
IBM Cloud Kubernetes Service is a managed Kubernetes offering running in IBM Cloud. It is designed to deliver powerful tools, intuitive user experience, and built-in security for rapid delivery of applications that can be bound to cloud services related to IBM Watson, IoT, DevOps and data analytics. As a CNCF certified Kubernetes provider, IBM Cloud Kubernetes Service provides intelligent scheduling, self-healing, horizontal scaling, service discovery and load balancing, automated rollouts and rollbacks, and secret and configuration management. The service also has advanced capabilities around simplified cluster management, container security, and isolation policies, the ability to design a cluster with a custom configuration and integrated operational tools for consistency in deployment.
Portworx is a Kubernetes storage and data management platform that enables enterprises to confidently run mission-critical data services on IKS (as well as IBM Cloud Private). The addition of primitives such as stateful sets and persistent volumes to Kubernetes has made it possible in theory to run stateful services like databases on Kubernetes. But these primitives alone do not address the core business challenges associated with running data-rich applications on Kubernetes: high availability, backup and recovery, data security, SLA-management and more. Portworx provides a single data management layer for all stateful services that directly addresses these challenging topics.
This tutorial is a walk-through of the steps involved in deploying and managing a highly available PostgreSQL cluster on IBM Cloud Kubernetes Service (IKS).
In summary, to run HA PostgreSQL on IKS you need to:
For running stateful workloads in a production environment backed by Portworx, it is highly recommended to launch an IKS cluster based on bare metal servers and software-defined storage. The minimum requirements of a worker node to successfully run Portworx include:
For details on launching a Kubernetes cluster with bare metal worker nodes, please refer to the documentation of IBM Cloud Kubernetes Service.
We are using an IKS cluster with 4 nodes out of which 3 nodes are running bare metal servers with SDS based on the instance type ms2c.4x32.1.9tb.ssd.encrypted. Only these machines that meet the prerequisite would be used by Portworx.
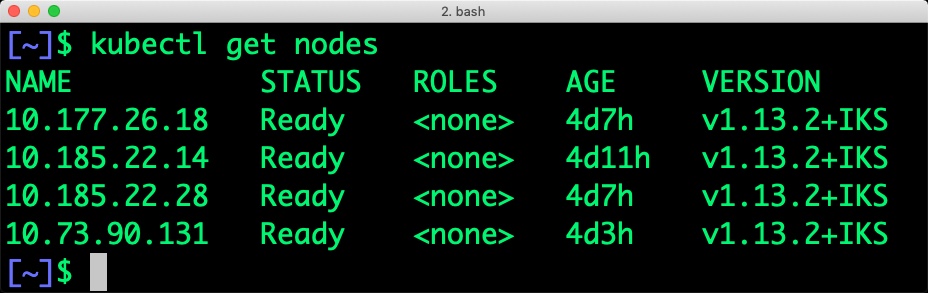
When we filter the nodes based on the label, we see the below nodes:
$ kubectl get nodes -l beta.kubernetes.io/instance-type=ms2c.4x32.1.9tb.ssd.encrypted
NAME           STATUS   ROLES    AGE    VERSION
10.177.26.18   Ready    <none>   4d7h   v1.13.2+IKS
10.185.22.28   Ready    <none>   4d7h   v1.13.2+IKS
10.73.90.131   Ready    <none>   4d3h   v1.13.2+IKS
To exclude nodes that don’t meet Portworx prerequisites, you can apply a label to skip the installation of Portworx. For example, the below command applies a label on the node with name 10.185.22.14 which doesn’t run on a bare metal server.
$ kubectl label nodes 10.185.22.14 px/enabled=false --overwrite
Installing Portworx on IKS is not very different from installing it on any other Kubernetes cluster. It is recommended that you create an etcd instance through Compose for etcd. You can use the Helm Chart to install Portworx cluster in IKS. Portworx documentation for IKS has the prerequisites and instructions to install and configure Portworx, STORK, and other components.
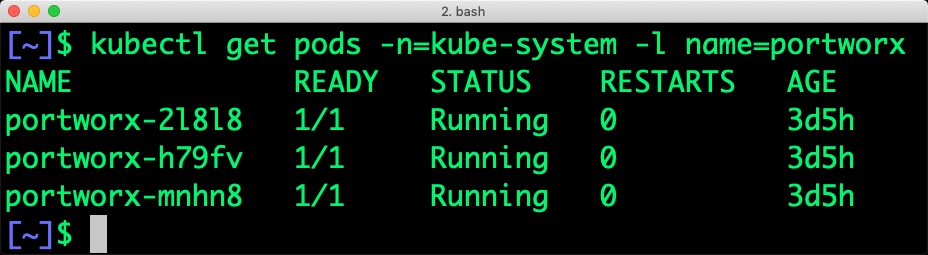
At the end of the installation, we will have Portworx DaemonSet running on the nodes excluding those that are filtered out in the previous step.
Once the IKS cluster is up and running, and Portworx is installed and configured, we will deploy a highly available PostgreSQL database.
Through Storage Class objects, an admin can define different classes of Portworx volumes that are offered in a cluster. These classes will be used during the dynamic provisioning of volumes. The Storage Class defines the replication factor, IO profile (e.g. for a database or a CMS), and priority (e.g. SSD or HDD). These parameters impact the availability and throughput of workload and can be specified for each volume. This is important because a production database will have different requirements than a development Jenkins cluster.
In this example, the Storage Class that we deploy has a replication factor of 3 with IO profile set to “db_remote”, and priority set to “high”. This means that the storage will be optimized for low latency database workloads like Postgres and automatically placed on the highest performance storage available in the cluster.
$ cat > px-repl3-sc.yaml <<EOF
kind: StorageClass
apiVersion: storage.k8s.io/v1beta1
metadata:
    name: px-repl3-sc
provisioner: kubernetes.io/portworx-volume
parameters:
   repl: "3"
   io_profile: "db_remote"
   priority_io: "high"
EOF
$ kubectl create -f px-repl3-sc.yaml
storageclass "px-repl3-sc" created
We can now create a Persistent Volume Claim (PVC) based on the Storage Class. Thanks to dynamic provisioning, the claims will be created without explicitly provisioning Persistent Volume (PV).
$ cat > px-postgres-pvc.yaml <<EOF
kind: PersistentVolumeClaim
apiVersion: v1
metadata:
   name: px-postgres-pvc
   annotations:
     volume.beta.kubernetes.io/storage-class: px-repl3-sc
spec:
   accessModes:
     - ReadWriteOnce
   resources:
     requests:
       storage: 1Gi
EOF
$ kubectl create -f px-postgres-pvc.yaml
persistentvolumeclaim "px-postgres-pvc" created
The password for PostgreSQL will be created as a secret. Run the following commands to create the secret in the correct format.
$ echo postgres123 > password.txt
$ tr -d '\n' .strippedpassword.txt && mv .strippedpassword.txt password.txt
$ kubectl create secret generic postgres-pass --from-file=password.txt
secret "postgres-pass" created
Finally, let’s create PostgreSQL instance as a Kubernetes deployment object. For simplicity sake, we will just be deploying a single Postgres pod. Because Portworx provides synchronous replication for High Availability, a single Postgres instance might be the best deployment option for your Postgres database. Portworx can also provide backing volumes for multi-node Postgres deployments. The choice is yours.
$ cat > postgres-app.yaml <<EOF
apiVersion: apps/v1
kind: Deployment
metadata:
  name: postgres
spec:
  strategy:
    rollingUpdate:
      maxSurge: 1
      maxUnavailable: 1
    type: RollingUpdate
  replicas: 1
  selector:
    matchLabels:
      app: postgres
  template:
    metadata:
      labels:
        app: postgres
    spec:
      schedulerName: stork
      containers:
      - name: postgres
        image: postgres:9.5
        imagePullPolicy: "Always"
        ports:
        - containerPort: 5432
        env:
        - name: POSTGRES_USER
          value: pgbench
        - name: PGUSER
          value: pgbench
        - name: POSTGRES_PASSWORD
          valueFrom:
            secretKeyRef:
              name: postgres-pass
              key: password.txt
        - name: PGBENCH_PASSWORD
          value: superpostgres
        - name: PGDATA
          value: /var/lib/postgresql/data/pgdata
        volumeMounts:
        - mountPath: /var/lib/postgresql/data
          name: postgredb
      volumes:
      - name: postgredb
        persistentVolumeClaim:
          claimName: px-postgres-pvc
EOF
$ kubectl create -f postgres-app.yaml
deployment "postgres" created
Make sure that the Postgres pods are in Running state.
$ kubectl get pods -l app=postgres -o wide --watch
NAME                        READY   STATUS    RESTARTS   AGE   IP             NODE           NOMINATED NODE   READINESS GATES
postgres-596d7744f5-zd6bp   1/1     Running   0          69s   172.30.59.76   10.177.26.18
Wait until the Postgres pod is in Running state.

We can inspect the Portworx volume by accessing the pxctl tool running with the Postgres Pod.
$ VOL=`kubectl get pvc | grep px-postgres-pvc | awk '{print $3}'`
$ PX_POD=$(kubectl get pods -l name=portworx -n kube-system -o jsonpath='{.items[0].metadata.name}')
$ kubectl exec -it $PX_POD -n kube-system -- /opt/pwx/bin/pxctl volume inspect ${VOL}
Volume	:  577990381692856209
	Name            	 :  pvc-2934288b-2e85-11e9-aa17-32e4785d9ba0
	Size            	 :  1.0 GiB
	Format          	 :  ext4
	HA              	 :  3
	IO Priority     	 :  HIGH
	Creation time   	 :  Feb 12 05:15:07 UTC 2019
	Shared          	 :  no
	Status          	 :  up
	State           	 :  Attached: b8b1f98b-13c2-4719-b76d-de1abed11fec (10.177.26.18)
	Device Path     	 :  /dev/pxd/pxd577990381692856209
	Labels          	 :  namespace=default,pvc=px-postgres-pvc
	Reads           	 :  12
	Reads MS        	 :  32
	Bytes Read      	 :  49152
	Writes          	 :  2258
	Writes MS       	 :  28812
	Bytes Written   	 :  64897024
	IOs in progress 	 :  0
	Bytes used      	 :  36 MiB
	Replica sets on nodes:
		Set 0
		  Node 		 : 10.185.22.28 (Pool 0)
		  Node 		 : 10.177.26.18 (Pool 0)
		  Node 		 : 10.73.90.131 (Pool 0)
	Replication Status	 :  Up
	Volume consumers	 :
		- Name           : postgres-596d7744f5-zd6bp (9be8f690-2e85-11e9-b299-a6db67e221f9) (Pod)
		  Namespace      : default
		  Running on     : 10.177.26.18
		  Controlled by  : postgres-596d7744f5 (ReplicaSet)
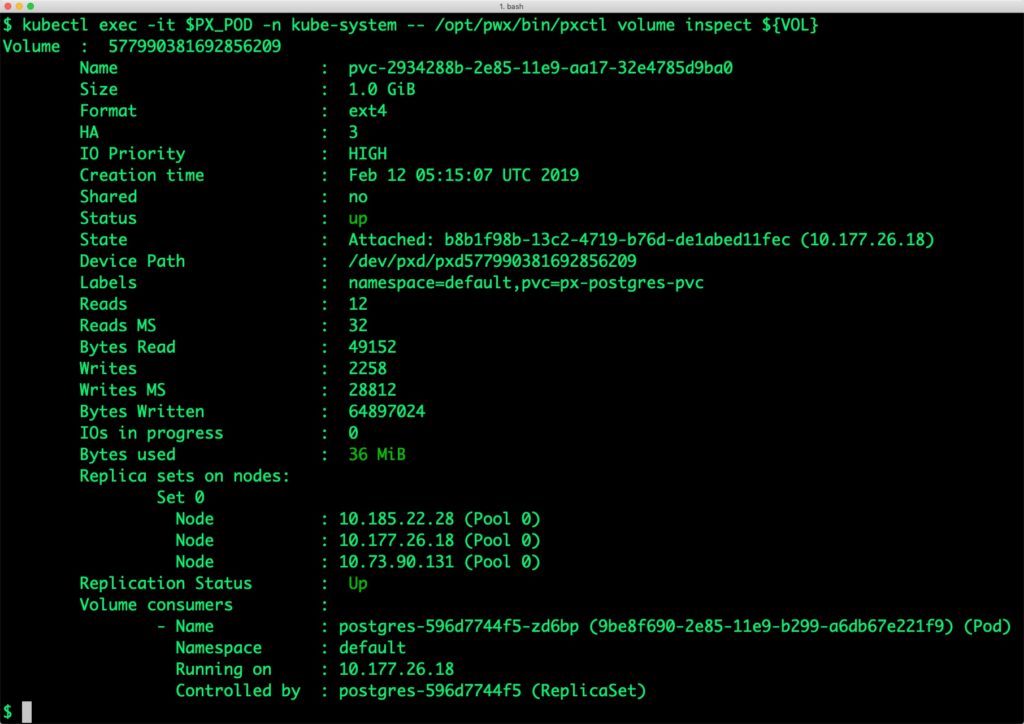
The output from the above command confirms the creation of volumes that are backing PostgreSQL database instance.
Let’s populate the database will 5 million rows of sample data.
We will first find the pod that’s running PostgreSQL to access the shell.
$ POD=`kubectl get pods -l app=postgres | grep Running | grep 1/1 | awk '{print $1}'`
$ kubectl exec -it $POD bash
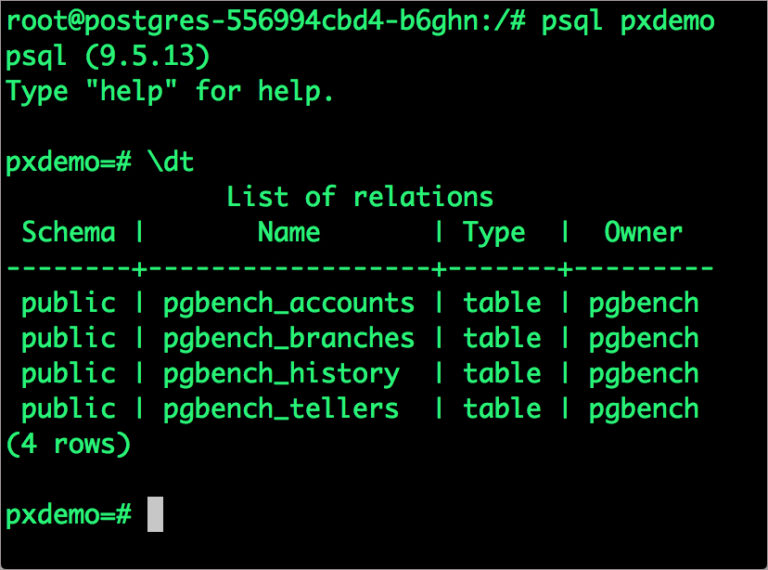
Now that we are inside the pod, we can connect to Postgres and create a database.
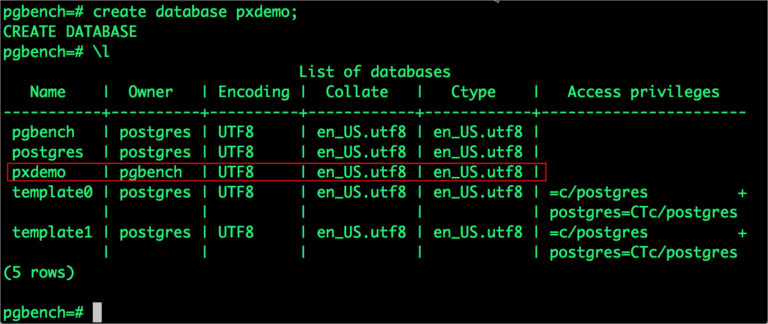
# psql
pgbench=# create database pxdemo;
pgbench=# \l
pgbench=# \q
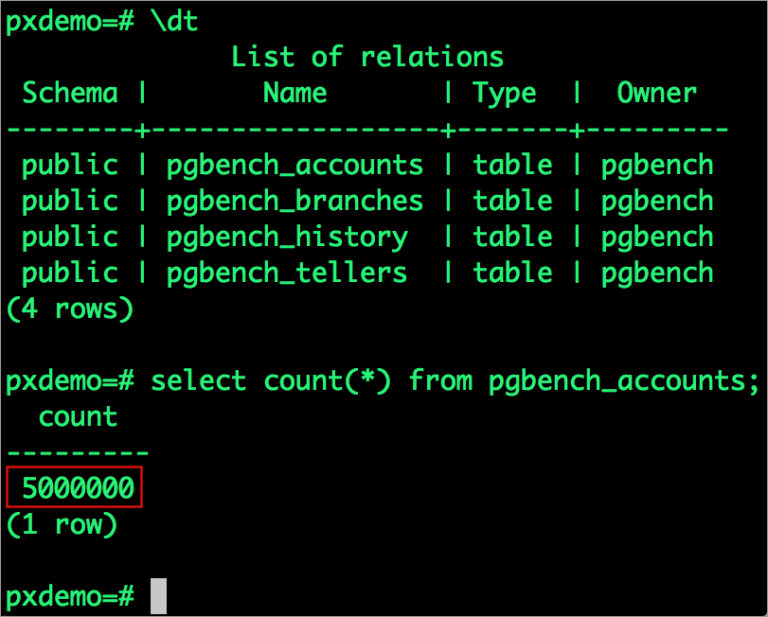
By default, pgbench will create 4 tables (pgbench_branches, pgbench_tellers, pgbench_accounts, and pgbench_history) with 100,000 rows in the main pgbench_accounts table. This creates a simple 16MB database.
The -s option is used for multiplying the number of rows entered into each table. In the command below, we enter a “scaling” option of 50. This tells pgbench to create a database with 50 times the default size.
What this means is our pgbench_accounts table now has 5,000,000 records. It also means our database size is now 800MB (50 x 16MB).
# pgbench -i -s 50 pxdemo;
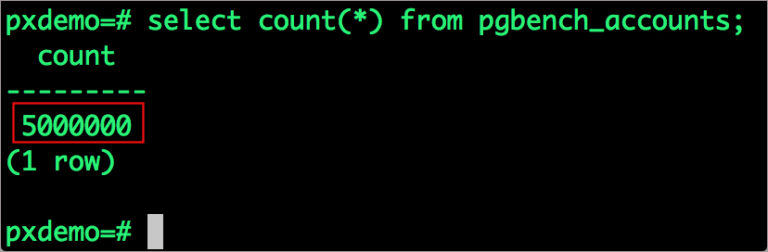
Wait for pgbench to finish populating the table. After that’s done, let’s verify that the pgbench_accounts is populated by 5 million rows.
# psql pxdemo
\dt
select count(*) from pgbench_accounts;
  count
---------
 5000000
(1 row)
\q
exit
Now, let’s simulate the node failure by cordoning off the node on which PostgreSQL is running.
$ NODE=`kubectl get pods -l app=postgres -o wide | grep -v NAME | awk '{print $7}'`
$ kubectl cordon ${NODE}
node/10.177.26.18 cordoned
Executing kubectl get nodes confirms that scheduling is disabled for one of the nodes.
$ kubectl get nodes
NAME           STATUS                     ROLES    AGE     VERSION
10.177.26.18   Ready,SchedulingDisabled      4d8h    v1.13.2+IKS
10.185.22.14   Ready                         4d11h   v1.13.2+IKS
10.185.22.28   Ready                         4d8h    v1.13.2+IKS
10.73.90.131   Ready                         4d4h    v1.13.2+IKS

We will now go ahead and delete the PostgreSQL pod.
$ POD=`kubectl get pods -l app=postgres -o wide | grep -v NAME | awk '{print $1}'`
$ kubectl delete pod ${POD}
pod "postgres-596d7744f5-zd6bp" deleted
As soon as the pod is deleted, it is relocated to the node with the replicated data. STorage ORchestrator for Kubernetes (STORK), Portworx’s custom storage scheduler allows co-locating the pod on the exact node where the data is stored. It ensures that an appropriate node is selected for scheduling the pod.
Let’s verify this by running the below command. We will notice that a new pod has been created and scheduled in a different node.
$  kubectl get pods -l app=postgres -o wide
NAME                        READY   STATUS    RESTARTS   AGE   IP              NODE           NOMINATED NODE   READINESS GATES
postgres-596d7744f5-qqmhd   1/1     Running   0          34s   172.30.42.140   10.185.22.28
Let’s find the pod name and exec into the container.
$ POD=`kubectl get pods -l app=postgres | grep Running | grep 1/1 | awk '{print $1}'`
$ kubectl exec -it $POD bash
Now use psql to make sure our data is still there.

# psql pxdemo
pxdemo=# \dt
pxdemo=# select count(*) from pgbench_accounts;
pxdemo=# \q
pxdemo=# exit
After testing end-to-end failover of the database, let’s perform StorageOps on our IKS cluster.
We will now run a bigger benchmark to run out of space to show how easy it is to add space to a volume dynamically.
Open a shell inside the container.
$ POD=`kubectl get pods -l app=postgres | grep Running | awk '{print $1}'`
$ kubectl exec -it $POD bash
Let’s use pgbench to run a baseline transaction benchmark which will try to grow the volume to more than 1 Gib and fail.
$ pgbench -c 10 -j 2 -t 10000 pxdemo
$ exit
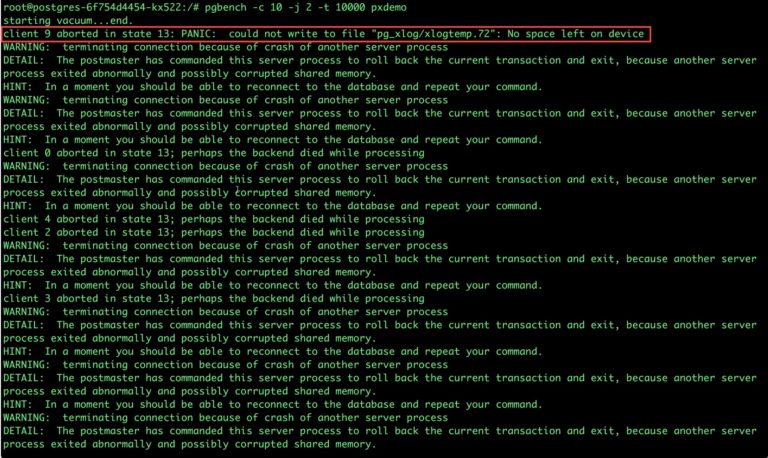
There may be multiple errors during the execution of the above command. The first error indicates that Pod is running out of space.
PANIC: could not write to file "pg_xlog/xlogtemp.73": No space left on device
Since Kubernetes doesn’t support modifying the PVC after creation, we perform this operation directly on Portworx with the pxctl CLI tool.
Let’s get the volume name and inspect it through the pxctl tool.
$ VOL=`kubectl get pvc | grep px-postgres-pvc | awk '{print $3}'`
$ PX_POD=$(kubectl get pods -l name=portworx -n kube-system -o jsonpath='{.items[0].metadata.name}')
$ kubectl exec -it $PX_POD -n kube-system -- /opt/pwx/bin/pxctl volume inspect ${VOL}
Volume	:  577990381692856209
	Name            	 :  pvc-2934288b-2e85-11e9-aa17-32e4785d9ba0
	Size            	 :  1.0 GiB
	Format          	 :  ext4
	HA              	 :  3
	IO Priority     	 :  HIGH
	Creation time   	 :  Feb 12 05:15:07 UTC 2019
	Shared          	 :  no
	Status          	 :  up
	State           	 :  Attached: 9e196794-db38-4d46-af98-cff91329825b (10.185.22.28)
	Device Path     	 :  /dev/pxd/pxd577990381692856209
	Labels          	 :  namespace=default,pvc=px-postgres-pvc
	Reads           	 :  14253
	Reads MS        	 :  12212
	Bytes Read      	 :  221360128
	Writes          	 :  16029
	Writes MS       	 :  46484
	Bytes Written   	 :  322125824
	IOs in progress 	 :  0
	Bytes used      	 :  899 MiB
	Replica sets on nodes:
		Set 0
		  Node 		 : 10.185.22.28 (Pool 0)
		  Node 		 : 10.177.26.18 (Pool 0)
		  Node 		 : 10.73.90.131 (Pool 0)
	Replication Status	 :  Up
	Volume consumers	 :
		- Name           : postgres-596d7744f5-qqmhd (3ea3d2d5-2e87-11e9-b299-a6db67e221f9) (Pod)
		  Namespace      : default
		  Running on     : 10.185.22.28
		  Controlled by  : postgres-596d7744f5 (ReplicaSet)

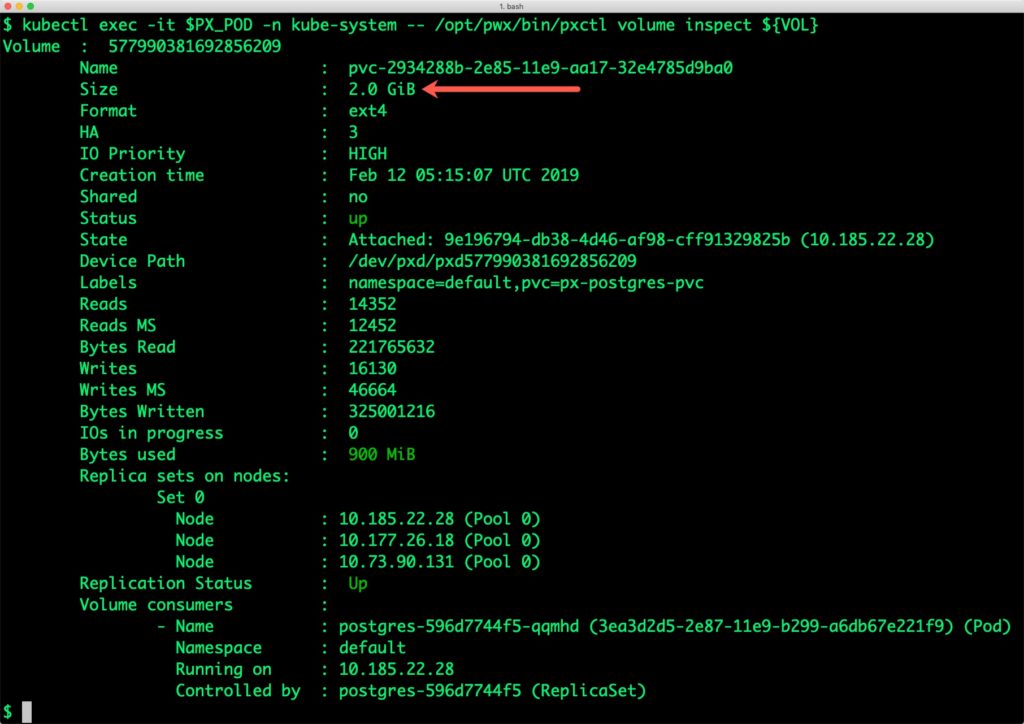
Notice that the volume is within 10% of being full. Let’s expand it using the following command.
$ kubectl exec -it $PX_POD -n kube-system -- /opt/pwx/bin/pxctl volume update $VOL --size=2
Update Volume: Volume update successful for volume pvc-2934288b-2e85-11e9-aa17-32e4785d9ba0
Let’s verify that the volume has additional space.
$ kubectl exec -it $PX_POD -n kube-system -- /opt/pwx/bin/pxctl volume inspect ${VOL}
Volume	:  577990381692856209
	Name            	 :  pvc-2934288b-2e85-11e9-aa17-32e4785d9ba0
	Size            	 :  2.0 GiB
	Format          	 :  ext4
	HA              	 :  3
	IO Priority     	 :  HIGH
	Creation time   	 :  Feb 12 05:15:07 UTC 2019
	Shared          	 :  no
	Status          	 :  up
	State           	 :  Attached: 9e196794-db38-4d46-af98-cff91329825b (10.185.22.28)
	Device Path     	 :  /dev/pxd/pxd577990381692856209
	Labels          	 :  namespace=default,pvc=px-postgres-pvc
	Reads           	 :  14352
	Reads MS        	 :  12452
	Bytes Read      	 :  221765632
	Writes          	 :  16130
	Writes MS       	 :  46664
	Bytes Written   	 :  325001216
	IOs in progress 	 :  0
	Bytes used      	 :  900 MiB
	Replica sets on nodes:
		Set 0
		  Node 		 : 10.185.22.28 (Pool 0)
		  Node 		 : 10.177.26.18 (Pool 0)
		  Node 		 : 10.73.90.131 (Pool 0)
	Replication Status	 :  Up
	Volume consumers	 :
		- Name           : postgres-596d7744f5-qqmhd (3ea3d2d5-2e87-11e9-b299-a6db67e221f9) (Pod)
		  Namespace      : default
		  Running on     : 10.185.22.28
		  Controlled by  : postgres-596d7744f5 (ReplicaSet)
Portworx supports creating snapshots for Kubernetes PVCs. Let’s create a snapshot of the PVC we created for PostgreSQL.
cat > px-snap.yaml << EOF
apiVersion: volumesnapshot.external-storage.k8s.io/v1
kind: VolumeSnapshot
metadata:
  name: px-postgres-snapshot
  namespace: default
spec:
  persistentVolumeClaimName: px-postgres-pvc
EOF
$ kubectl create -f px-snap.yaml
volumesnapshot.volumesnapshot.external-storage.k8s.io/px-postgres-snapshot created
Verify the creation of volume snapshot.
$ kubectl get volumesnapshot
NAME                AGE
px-postgres-snapshot   57s
$ kubectl get volumesnapshotdatas
NAME                                                       AGE
k8s-volume-snapshot-e449079f-2e89-11e9-8b43-e294577028f8   1m
With the snapshot in place, let’s go ahead and delete the database.
$ POD=`kubectl get pods -l app=postgres | grep Running | grep 1/1 | awk '{print $1}'`
$ kubectl exec -it $POD bash
psql
drop database pxdemo;
\l
\q
exit
Since snapshots are just like volumes, we can use it to start a new instance of PgSQL. Let’s create a new instance of PgSQL by restoring the snapshot data.
cat > px-snap-pvc.yaml << EOF
apiVersion: v1
kind: PersistentVolumeClaim
metadata:
  name: px-postgres-snap-clone
  annotations:
    snapshot.alpha.kubernetes.io/snapshot: px-postgres-snapshot
spec:
  accessModes:
     - ReadWriteOnce
  storageClassName: stork-snapshot-sc
  resources:
    requests:
      storage: 2Gi

EOF
$ kubectl create -f px-snap-pvc.yaml
persistentvolumeclaim/px-postgres-snap-clone created
From the new PVC, we will create a Postgres pod.
$ cat > postgres-app-restore.yaml <<EOF
apiVersion: apps/v1
kind: Deployment
metadata:
  name: postgres-snap
spec:
  strategy:
    rollingUpdate:
      maxSurge: 1
      maxUnavailable: 1
    type: RollingUpdate
  replicas: 1
  selector:
    matchLabels:
      app: postgres-snap
  template:
    metadata:
      labels:
        app: postgres-snap
    spec:
      affinity:
        nodeAffinity:
          requiredDuringSchedulingIgnoredDuringExecution:
            nodeSelectorTerms:
            - matchExpressions:
              - key: px/running
                operator: NotIn
                values:
                - "false"
              - key: px/enabled
                operator: NotIn
                values:
                - "false"
      containers:
      - name: postgres
        image: postgres:9.5
        imagePullPolicy: "IfNotPresent"
        ports:
        - containerPort: 5432
        env:
        - name: POSTGRES_USER
          value: pgbench
        - name: PGUSER
          value: pgbench
        - name: POSTGRES_PASSWORD
          valueFrom:
            secretKeyRef:
              name: postgres-pass
              key: password.txt
        - name: PGBENCH_PASSWORD
          value: superpostgres
        - name: PGDATA
          value: /var/lib/postgresql/data/pgdata
        volumeMounts:
        - mountPath: /var/lib/postgresql/data
          name: postgredb
      volumes:
      - name: postgredb
        persistentVolumeClaim:
          claimName: px-postgres-snap-clone
EOF
$ kubectl create -f postgres-app-restore.yaml
deployment "postgres-snap" created
Verify that the new pod is in a Running state.
$  kubectl get pods -l app=postgres-snap
NAME                            READY   STATUS    RESTARTS   AGE
postgres-snap-95554fc69-f8wwm   1/1     Running   0          96s
Finally, let’s access the sample data created earlier in the walk-through.
$ POD=`kubectl get pods -l app=postgres-snap | grep Running | awk '{print $1}'`
$ kubectl exec -it $POD bash
root@postgres-snap-95554fc69-f8wwm:/# psql pxdemo
psql (9.5.15)
Type "help" for help.

pxdemo=# select count(*) from pgbench_accounts;
  count
---------
 5000000
(1 row)
Notice that the collection is still there with the data intact. We can also push the snapshot to an Amazon S3-compatible object storage service if we want to create a disaster recovery backup in another region or location. Since Portworx snapshots work with any S3 compatible object storage, the backup can go to a different cloud or even an on-premises data center.
Portworx can be easily deployed on IBM Cloud Kubernetes Service to run stateful workloads in production. Through the integration of STORK, DevOps and StorageOps teams can seamlessly run highly available database clusters in IKS. They can perform traditional operations such as volume expansion, backup, and recovery for the cloud native applications in an automated and efficient manner.


