Knowledge Hub
What is KubeVirt? Understanding Virtual Machines on Kubernetes
Summarize Blog With
Table of Content
Today, applications run a variety of workloads, on diverse infrastructure and backends. Particularly complex applications are difficult to fully containerize, which limits organizations from fully leveraging the benefits of Kubernetes, such as enhanced operational efficiency, scalability, and high availability. Managing VM-based and containerized workloads without refactoring the application code requires a specialized platform.
KubeVirt has empowered the organization to reevaluate its traditional monolithic architecture applications. They can now seamlessly transition their applications to microservices-based cloud native or hybrid environments without any downtime and leverage Kubernetes features.
Introduction to KubeVirt
What is KubeVirt?
KubeVirt is an open source project that enables virtual machine management on Kubernetes. With KubeVirt, organizations can run traditional KubeVirt virtual machines alongside containerized applications within a Kubernetes cluster, providing a single control plane for all workload types. It extends the Kubernetes API by introducing additional virtualization resources of Kind `VirtualMachine` as CRDs.
For developers learning to love Stateful Apps in Kubernetes, and who have VM-based workloads that can’t be easily containerized, KubeVirt helps migrate VM-based applications to Kubernetes.
KubeVirt is currently a CNCF Incubating project. As of November 2025, KubeVirt is applying for CNCF Graduation status, demonstrating production-ready maturity with 41 documented adopters and ranking in the Top 20 CNCF projects by activity.
The Need for KubeVirt
KubeVirt simplifies operations by supporting VM-based workloads in a Kubernetes environment. Let us understand why this is important.
- Support hybrid environments: By leveraging platforms like OpenShift KubeVirt, organizations can build, modify, and deploy workloads on containers and VMs seamlessly, ensuring enterprise-grade support during the transition to cloud-native infrastructure. They can assess which VM-based workloads can be containerized while utilizing the remaining workloads in the same hybrid environment without service disruption.
- Legacy applications migration: If an organization has already invested in VM infrastructure, KubeVirt can preserve them and migrate legacy applications to hybrid cloud solutions. Large deployments like Multi-Tenant WordPress on GKE require a highly available database during migration.
Benefits of KubeVirt
KubeVirt enables organizations to modernize infrastructure while maintaining VM workloads by bringing powerful virtualization capabilities to Kubernetes. By running virtual machines alongside containers, teams gain operational efficiency, cost savings, and unified management – without the complexity of maintaining separate platforms.
Core Features and Architecture of KubeVirt
Key Features
Let’s look at some of the key features of KubeVirt that make it a suitable choice for many organizations:
- VM Lifecycle Management: KubeVirt provides a declarative API to create, manage, and delete VMs. You can define VM configurations using Kubernetes CRDs, use custom images, and configure cloud-init to customize initial deployment.
- Resource Allocation: KubeVirt uses the Kubernetes resource management system to allocate CPU, memory, and storage resources to VMs, providing the same granular resource management as containers.
- Network Management: KubeVirt supports various network configurations, including bridged networking, NAT, SR-IOV, and Kubernetes networking solutions.
- Storage Management: VMs can leverage enterprise-grade Kubernetes storage solutions like Portworx to manage their storage needs, ensuring data persistence and high availability across the cluster.
- GPU Passthrough: Enable VMs to directly access GPU resources from NVIDIA, AMD, and Intel for high-performance computing—ideal for specialized training tasks that complement containerized Kubeflow workflows. Also, it supports configurable GPU resource allocation and sharing.
- Live Migration: KubeVirt supports Live Migration of VMs, which helps migrate running VMs between nodes within the cluster without downtime.
These features help address some challenges mentioned in the Real-World Guidance for Stateful Kubernetes webinar while deploying stateful applications on Kubernetes.
KubeVirt Architecture
KubeVirt extends Kubernetes functionality via CRDs and core components; users interact with KubeVirt through its Virtualization API, which communicates with the Kubernetes cluster to schedule and manage Virtual Machine Instances (VMIs). A VMI is created when a VM starts. For reference, you can understand this as a container in a pod. Each `VirtualMachine` has a single associated `VirtualMachineInstance`. Once a VM stops, the associated VMI is deleted.
This approach allows KubeVirt to delegate critical functions like scheduling, networking, and storage to Kubernetes while focusing on delivering specialized virtualization functionality. Let’s look at the architecture and how each component works together.
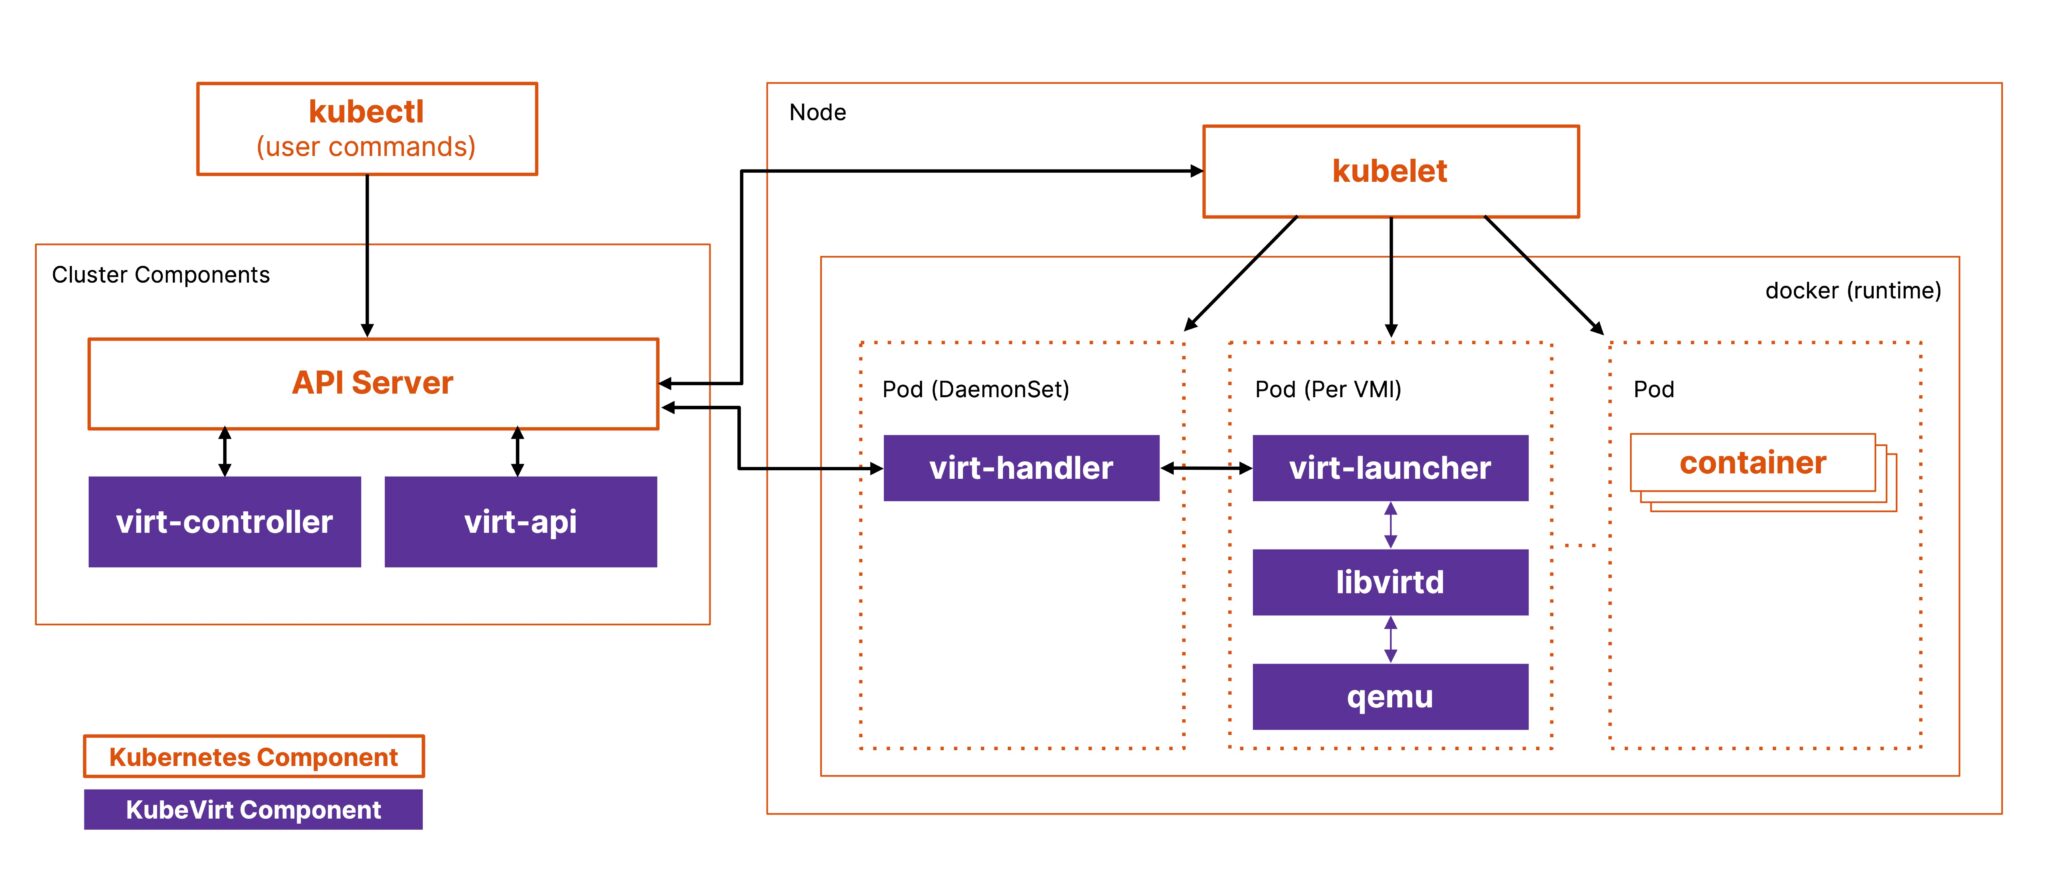
Virt-Operator
virt-operator installs the required components and controllers to work with KubeVirt in Kubernetes. It also helps with rolling updates of KubeVirt’s components and minimizes workload disruption.
Virt-Controller
virt-controller manages the entire VM lifecycle, from initial power-on through operations like shutdown and reboot to eventual deletion. It orchestrates complex operations such as live migrations, coordinating between source and target nodes to ensure smooth transitions.
Virt-Handler
virt-handler runs on each node as a DaemonSet, where a VM is scheduled and handles communication between the node and VM. It provides instructions to virt-launcher on launching the VM and the required dependencies. It also sends the telemetry data from VMs to virt-controller.
Virt-Launcher
virt-launcher is a special pod for each VM that contains the actual process that runs the VM using QEMU. It ensures pod isolation and that each VM gets the required resources. Lastly, it updates the VM’s status to the virt-handler.
Setting Up KubeVirt
KubeVirt can be deployed on a local or remote Kubernetes cluster. Let’s check the prerequisites and install KubeVirt on a Kubernetes cluster.
Prerequisites
- A Kubernetes cluster with at least 2 CPUs and 4096MB memory.
- kubectl and kubeconfig configured.
Installation Steps
Installing on Minikube
Enable a Container Network Interface (CNI) like Flannel to ensure that Minikube works with VMs that use a masquerade-type network interface. This setup provides a shared network and allows pods to communicate across hosts. We will discuss this in detail in the Networking section. Here are the steps to install KubeVirt.
1. Start a Minikube Cluster.
$ minikube start --profile portworx-kubevirt --memory=4096 --cni=flannel
2. Get the latest release version of KubeVirt.
$ export VERSION=$(curl -s https://storage.googleapis.com/kubevirt-prow/release/kubevirt/kubevirt/stable.txt) $ echo $VERSION
3. Deploy KubeVirt operator and CRDs.
$ kubectl create -f

https://github.com/kubevirt/kubevirt/releases/download/${VERSION}/kubevirt-operator.yaml
$ kubectl create -f

https://github.com/kubevirt/kubevirt/releases/download/${VERSION}/kubevirt-cr.yaml
To install KubeVirt on cloud computing providers like AWS, Azure, GCP, and AliCloud, follow installation steps 2 and 3.
Verifying Installation
KubeVirt creates a namespace `kubevirt` for all related resource management.
$kubectl get all -n kubevirt
NAME                                  READY   STATUS    RESTARTS   AGE
pod/virt-api-f47bb7cdb-4l7dq          1/1     Running   0          110s
pod/virt-controller-cdbd7fb54-2xrr4   1/1     Running   0          74s
pod/virt-controller-cdbd7fb54-zpgfx   1/1     Running   0          74s
pod/virt-handler-x6bxz                1/1     Running   0          74s
pod/virt-operator-567c586847-5vw28    1/1     Running   0          2m58s
pod/virt-operator-567c586847-ghrhz    1/1     Running   0          2m58s

NAME                                  TYPE        CLUSTER-IP       EXTERNAL-IP   PORT(S)   AGE
service/kubevirt-operator-webhook     ClusterIP   10.100.229.95            443/TCP   112s
service/kubevirt-prometheus-metrics   ClusterIP   None                     443/TCP   112s
service/virt-api                      ClusterIP   10.105.136.213           443/TCP   112s
service/virt-exportproxy              ClusterIP   10.106.120.72            443/TCP   112s

NAME                          DESIRED  CURRENT  READY  UP-TO-DATE AVAILABLE NODE SELECTOR        AGE
daemonset.apps/virt-handler   1        1        1      1           1      kubernetes.io/os=linux 74s

NAME                              READY   UP-TO-DATE   AVAILABLE   AGE
deployment.apps/virt-api          1/1     1            1           110s
deployment.apps/virt-controller   2/2     2            2           74s
deployment.apps/virt-operator     2/2     2            2           2m58s

NAME                                        DESIRED   CURRENT   READY   AGE
replicaset.apps/virt-api-f47bb7cdb          1         1         1       110s
replicaset.apps/virt-controller-cdbd7fb54   2         2         2       74s
replicaset.apps/virt-operator-567c586847    2         2         2       2m58s

NAME                            AGE     PHASE
kubevirt.kubevirt.io/kubevirt   2m15s   Deployed
On successful installation of KubeVirt:
- `kubevirt.kubevirt.io/kubevirt` phase is `Deployed`.
- Deployment and replica set for `virt-operator`, virt-api and `virt-controller` is created.
- `virt-handler` daemon set is created.
- All pods are running.
Enabling backup of your infrastructure for high availability is always advisable. You can explore Portworx Backup, built for Kubernetes, to protect data anywhere.
Managing Virtual Machines in KubeVirt
While `kubectl` is helpful in deployment, KubeVirt provides a binary called `virtctl` for quick management of virtual machines. Here is a guide to installing it.
Creating and Managing VMs
In this section, we will deep-dive into YAML configuration and use `virtctl` to operate a virtual machine.
Using YAML Configuration
KubeVirt provides `VirtualMachine` resource Kind to create a VM. Let us understand its configurations for VM manifest creation.
- Set `apiVersion` as `kubevirt.io/v1`.
- Provide `name` of the VM.
- Define resource utilization limits like memory or CPU.
- Set ‘ spec. running ‘ to false to control the starting of a VM automatically on resource creation. It defaults to true.
- Add persistent or ephemeral storage using `spec.volumes` and `spec.domain.devices.disks`.
For a minimal manifest, you only need to set `apiVersion`, `name`, and `kind`. The rest of the fields help enhance the configuration and benefit from the features of KubeVirt. Here is a VM YAML configuration:
apiVersion: kubevirt.io/v1
kind: VirtualMachine
metadata:
  name: portworx-vm        # Name of the VM
spec:
  running: false           # VM should not start automatically.
  template:
    metadata:
      labels:
        kubevirt.io/size: small
    spec:
      domain:
        devices:
          disks:
            - name: containerdisk   # A disk device for the VM
        resources:
          requests:
            memory: 64M             # Specifies that the VM requests 64MB of memory.
      volumes:
        - name: containerdisk       # Volume corresponding to the disk defined above.
          containerDisk:
            image: quay.io/kubevirt/cirros-container-disk-demo
                   #Container image to be used as the disk, here is a CirrOS demo image.
In this configuration, we have set:
- `spec.running` as false, so the VM will not start automatically.
- `spec.volumes` as `containerDisk`. It is ephemeral storage by KubeVirt.
- `spec.domain.devices.disks` to use the disk mentioned in `spec.volumes`.
For the `containerDisk`, we have set the image as `quay.io/kubevirt/cirros-container-disk-demo` which will be used by the storage. We will learn more about this in the Storage section. Portworx provides storage services for Kubernetes environments.
Let us apply the YAML configuration on our Minikube cluster and check its status.
$ kubectl apply -f portworx-vm.yaml
virtualmachine.kubevirt.io/portworx-vm created

$ kubectl get vms
NAME               AGE     STATUS    READY
portworx-vm        14s     Stopped   False
Here you can see the `portworx-vm` resource is created but not running as we have set `spec.running` as false in the configuration. This setting allows developers to shut down instances from inside the VM. Otherwise, KubeVirt will restart it automatically.
Command Line Tools
`virtctl create vm` is used to create a manifest of VirtualMachine Kind.
$ virtctl create vm --name portworx-test-vm
apiVersion: kubevirt.io/v1
kind: VirtualMachine
metadata:
  creationTimestamp: null
  name: portworx-test-vm
spec:
  runStrategy: Always
  template:
    metadata:
      creationTimestamp: null
    spec:
      domain:
        devices: {}
        memory:
          guest: 512Mi
        resources: {}
      terminationGracePeriodSeconds: 180
status: {}
This manifest can be directly applied to the cluster to create a VM.
$ virtctl create vm --name portworx-test-vm | kubectl create -f -
virtualmachine.kubevirt.io/portworx-test-vm created
$ kubectl get vmis
NAME               AGE   PHASE     IP            NODENAME            READY
portworx-test-vm   8s    Running   10.244.0.39   portworx-kubevirt   True
The `portworx-test-vm` `VirtualMachineInstance` is created and running. This means VM is automatically started on `portworx-kubevirt` Kubernetes cluster using the default configuration provided by `virtctl create vm`.
Operating VMs
VMs can be easily operated using the `virtctl` CLI. Let us check the status of VMs.
$ kubectl get vms
NAME               AGE     STATUS    READY
portworx-test-vm   8m26s   Running   True
portworx-vm        14s     Stopped   False
In the above output, `portworx-vm` has `Stopped` status, meaning the VM is not running. Let us check the VMIs:
$ kubectl get vmis
NAME               AGE   PHASE     IP            NODENAME            READY
portworx-test-vm   11m   Running   10.244.0.39   portworx-kubevirt   True
No VMI is running for the `portworx-vm` VM.
- Start a VM: Use `virtctl start` to start a VM.
$ virtctl start portworx-vm
VM portworx-vm was scheduled to start
$ kubectl get vmis
NAME             AGE PHASE   IP          NODENAME                                                                     READY
portworx-test-vm 14m Running 10.244.0.39 portworx-kubevirt True portworx-vm 11s Running 10.244.0.40 portworx-kubevirt True
The `portworx-vm` VM has now started, and a VMI is associated.
- Access the VM: This VM can be accessed using `virtctl console`.
$ virtctl console portworx-vm
Successfully connected to portworx-vm console. The escape sequence is ^]

login as 'cirros' user. default password: 'gocubsgo'. use 'sudo' for root.
cirros login: cirros
Password:
$ echo "Hello World"
Hello World
- Cloning a VM: Some pre-configurations are required to clone a VM. KubeVirt uses Kubernetes feature gates that help manage its features like snapshots or live migration. The `clone.kubevirt.io` API Group defines resources for cloning KubeVirt objects and is guarded by the `Snapshot` feature gate. Activate it by adding `Snapshot` to `featureGates`.
$ kubectl edit kubevirt kubevirt -n kubevirt
kubevirt.kubevirt.io/kubevirt edited
Here is the updated configuration:
spec:
    certificateRotateStrategy: {}
    configuration:
      developerConfiguration:
        featureGates:
          - Snapshot
Once done, create a clone configuration using `VirtualMachineClone` Kind with `source` and `target` defined.
kind: VirtualMachineClone
apiVersion: "clone.kubevirt.io/v1alpha1"
metadata:
  name: clonevm
spec:
  # source & target definitions
  source:
    apiGroup: kubevirt.io
    kind: VirtualMachine
    name: portworx-vm
  target:
    apiGroup: kubevirt.io
    kind: VirtualMachine
    name: portworx-vm-clone
Apply on Kubernetes cluster and check the status.
$ kubectl get vms
NAME              AGE     STATUS   READY
portworx-test-vm  45m     Running  True
portworx-vm       37m     Running  True
portworx-vm-clone 20s     Stopped  False
KubeVirt creates a clone of the VM, and this is also not running by default. You can start it using `virtctl`.
- Stop VM: Use `virtctl stop` to stop a VM.
$ virtctl stop portworx-vm
VM testvm was scheduled to stop
Networking and Storage in KubeVirt
KubeVirt supports defining virtual network interfaces, network policies, cloning, hotplugging network interfaces and volumes, and containerized data importers that help enable PVCs.
Networking
To connect a virtual machine to a network, you need to define:
- Backend: Network is specified in `spec.networks`. It supports two types:
- `pod`: the default Kubernetes network, which represents the default pod eth0 interface
- `multus`, a secondary network using Multus.
- Frontend: The interfaces backed by the networks are added to the VM by defining them in `spec.domain.devices.interfaces`. KubeVirt supports the following types of interfaces:
- `masquerade`: Provide internet access to the VMI using Iptables.
- `bridge`: Direct access to the physical network by bridging the VMI’s interface to a physical interface on the node.
- `slirp`: Connects to the network backend using QEMU user networking mode.
- `sriov`: VMs are directly exposed to SR-IOV PCI devices for high network performance.
Here is an example of `portworx-vm` VM that uses the backend as `pod` and the frontend as `masquerade`:
apiVersion: kubevirt.io/v1
kind: VirtualMachine
metadata:
  name: portworx-vm
spec:
...
    spec:
      domain:
        devices:
          disks:
            - name: containerdisk
              disk:
                bus: virtio
          interfaces:
          - name: default
            masquerade: {}
        resources:
          requests:
            memory: 64M
      networks:
      - name: default
        pod: {}
      volumes:
      ...
With this, you can control how you connect your VMs to the network.
Network policies help you control the incoming and outgoing VM’s traffic flow. Here is an example of `NetworkPolicy`:
kind: NetworkPolicy
apiVersion: networking.k8s.io/v1
metadata:
    name: deny-label
spec:
   podSelector:
       matchLabels:
         size: small
    ingress: []
The VMIs labeled `size: small` will deny traffic from all other VMIs.
Storage
KubeVirt provides various storage capabilities that help with data persistence in stateful applications or temporary storage for stateless applications. Let’s understand them in detail.
- Ephemeral: KubeVirt has a `containerDisk` feature that allows the distribution of VM disks in the container image registry. `containerDisks` are ephemeral storage devices capable of being assigned to any number of VMIs.
- Persistent: For persistent storage, KubeVirt allows connecting a `PersistentVolumeClaim` to a VM disk. A `PersistentVolume` could be in “filesystem” or “block” mode.
Here is an example of a VM that attaches a PVC as a `disk` device. KubeVirt also supports lun, cdrom, and filesystems disk types.
kind: VirtualMachineInstance
  spec:
     domain:
        resources:
           requests:
              memory: 64M
     devices:
        disks:
        - name: portworxpvcdisk
        # This makes it a disk
        disk: {}
     volumes:
        - name: portworxpvcdisk
        persistentVolumeClaim:
           claimName: portworx-pvc
For data migration, use the `DataVolume` custom resource provided by the CDI. DataVolumes simplify importing, cloning, and uploading data to PVCs.
Security in KubeVirt
Security is an important aspect of any virtualization platform, and KubeVirt is no exception. KubeVirt, which brings VMs into Kubernetes, ensures that these VMs are secure by extending Kubernetes native security features, providing additional layers of protection.
Security Features
Role-Based Access Control
KubeVirt authorization is performed using Kubernetes’ RBAC. RBAC allows cluster admins to grant access to resources by binding RBAC roles to users. Admins can grant users targeted access to various KubeVirt features.
It provides three default RBAC ClusterRoles:
- kubevirt.io:view: allows one to view all the KubeVirt resources.
- kubevirt.io:edit: permits users to modify all KubeVirt resources in the cluster.
- kubevirt.io:admin: grants users full permissions to all KubeVirt resources.
To learn more about Kubernetes Multi-Tenant Authorization and RBAC.
Secure boot
KubeVirt allows secure boot in a VM by changing a flag for Secure Boot in the UEFI/OVMF configuration. It prevents the execution of unauthorized code and protects VMs from low-level threats such as rootkits.
VM encryption
KubeVirt supports running confidential VMs on AMD EPYC hardware with the SEV feature, which allows a VM’s memory to be encrypted on the fly.
To learn more about the Security in KubeVirt read about KubeVirt Security Fundamentals.
Monitoring and Advanced Topics
KubeVirt offers monitoring capabilities through the integration with Prometheus. KubeVirt components expose metrics via the `/metrics` endpoint, which can be accessed to monitor the system’s performance and health.
When we installed KubeVirt on a Kubernetes cluster, it created a `kubevirt-prometheus-metrics` service of the `ClusterIP` type.
$ kubectl get svc -A
kubevirt      kubevirt-operator-webhook     ClusterIP   10.100.229.95          443/TCP      7h21m
kubevirt      kubevirt-prometheus-metrics   ClusterIP   None                   443/TCP      7h21m
All the pods that expose metrics, it’s labeled with `prometheus.kubevirt.io` and collected by the service `kubevirt-prometheus-metrics`. These can be viewed by accessing the endpoint on port 8443(default) as shown below:
# curl -k https://:8443/metrics
# HELP go_gc_duration_seconds A summary of the pause duration of garbage collection cycles.
# TYPE go_gc_duration_seconds summary
go_gc_duration_seconds{quantile="0"} 4.0653e-05
go_gc_duration_seconds{quantile="0.25"} 0.000121122
go_gc_duration_seconds{quantile="0.5"} 0.000444676
go_gc_duration_seconds{quantile="0.75"} 0.000736686
go_gc_duration_seconds{quantile="1"} 0.001201584
go_gc_duration_seconds_sum 0.00645155
go_gc_duration_seconds_count 14
For debugging purposes, you can configure the logging by setting `logVerbosity` for each component of the architecture in the KubeVirt resource, as shown below:
spec:
  configuration:
    developerConfiguration:
       logVerbosity:
       virtLauncher: 2
       virtHandler: 3
       virtController: 4
       virtOperator: 6
These values are log levels. For more information, check log verbosity.
Advanced Features
KubeVirt has many advanced features that enhance the management of VMs within Kubernetes environments, such as live migrations and IOThreads for high availability and performance tuning.
- Live migrations allow VMIs to be moved across hosts without downtime. This ensures dynamic workload management without disruption of services. Live migration is a stable and fully mature service as of v1.5.0. However, for versions prior to v0.56, it must be enabled in the feature gates. To initiate the live migration, create a `VirtualMachineInstanceMigration` resource and define the `spec.vmiName` as the VM name. You can also use the following command for live migration:
virtctl migrate
Please check the limitations before initiating the live migration for a VM.
- IOThreads help enhance the performance of KubeVirt. These are dedicated threads for disk access that improve scalability on SMP systems. The `ioThreadsPolicy` setting determines how these threads are allocated, with options for `shared` or `auto` policies.The shared policy uses one thread for all disks, while the auto policy allocates disks to a pool of IOThreads in a round-robin manner, limited by the number of vCPUs. Disks can also have a `dedicatedIOThread` for heavy I/O workloads. Additionally, KubeVirt can pin IOThreads and emulator threads to specific CPUs to reduce latency and improve performance.
Use Cases and Future of KubeVirt
Use Cases
- Development and Testing Environments: KubeVirt lets you define a VM template to run a VM image specific to your application. This makes testing an application’s compatibility with the machine type easier.
- Running Legacy Applications: Various legacy applications, such as databases or mainframe-based software, have complex architectures or dependencies that can’t be easily modernized into cloud native workloads. KubeVirt helps organizations transition from VMs to containers for legacy applications, reducing operational complexity.
- Kubernetes on Kubernetes: These VMs are not just VMs for applications; these VMs can be used as nodes for Kubernetes, which could be running within those VMs. This is useful for Kubernetes providers, who must provide multitenancy to their customers while maintaining strict isolation among tenants. With KubeVirt, you can create identical VMs across hybrid Kubernetes cloud environments, bringing consistency to large deployments across providers or infrastructures.
- Managing Traditional Workloads: KubeVirt enables organizations to manage traditional VM workloads alongside containerized applications, reducing the need for separate environments. For example, KubeVirt provides virtual desktops and runs applications that mainly rely on direct access to GPUs; this can even be handled with the KubeVirt GPU pass-through and device plugin. Lastly, to provide service, such as IaaS built on top of it, OpenStack VMware could be used.
Future and Community
As KubeVirt evolves, its roadmap highlights several upcoming features and improvements to enhance its functionality and user experience. They’ve listed the roadmap for each category; to learn more, see the KubeVirt Roadmap Wiki. KubeVirt also has an active community where you can learn more about the project and contribute.
Conclusion
KubeVirt facilitates the management of virtual machine (VM) workloads within Kubernetes, enabling organizations to migrate applications without refactoring them into containers. It supports hybrid environments, allowing both VM-based and containerized applications to coexist.
In this blog, we have installed KubeVirt on a Kubernetes cluster and started and cloned virtual machines. We have described key capabilities of KubeVirt, such as networking, storage, security, monitoring, and live migrations, and highlighted its key use cases.
Frequently Asked Questions
Q. What is KubeVirt used for in Kubernetes?
KubeVirt enables running virtual machines (VMs) alongside containers on Kubernetes clusters. It’s used for migrating legacy VM-based applications to Kubernetes without needing to refactor or containerize. It extends the Kubernetes API with VirtualMachine custom resources, allowing VM management through standard kubectl commands.
Q. How does the KubeVirt architecture support virtual machines?
KubeVirt uses four components: virt-operator (installation/updates), virt-controller (VM lifecycle management), virt-handler (node-level coordination), and virt-launcher (runs QEMU/KVM in pods). Each VM becomes a Kubernetes custom resource that creates a VirtualMachineInstance (VMI) running in a dedicated pod, leveraging Kubernetes for scheduling, networking, and storage while handling virtualization-specific operations.
Q. Can Kubernetes run VMs and containers together?
Yes, with KubeVirt. Kubernetes natively runs containers, while KubeVirt extends Kubernetes to also manage VMs as special pods. Both workload types share cluster resources while maintaining proper isolation. This enables gradual migration from VMs to containers, unified orchestration, and running non-containerizable applications alongside cloud-native services.
Q. Does KubeVirt support live migration and high availability?
Yes. KubeVirt supports live migration of running VMs between nodes with zero downtime. For high availability, it leverages Kubernetes features like pod anti-affinity, node selectors, and automatic VM restart on failure. Combined with storage solutions like Portworx, it provides enterprise-grade HA with automatic failover.
Q. What’s the difference between KubeVirt and VMware?
KubeVirt runs VMs natively on Kubernetes using open-source technology, while VMware is a proprietary virtualization platform. KubeVirt is license-free, integrates with Kubernetes APIs, and enables unified VM/container management.
Q. What are the key use cases for KubeVirt in production?
Key production use cases include: legacy application modernization (lift-and-shift without code changes), post-VMware migration (26% of Kubernetes adopters use KubeVirt), AI/ML workload isolation (GPU-accelerated VMs), dev/test environments (CI/CD pipelines), and edge computing (lightweight K3s deployments). Major adopters: NVIDIA (GeForce NOW), Intel (Gaudi data centers), and The Linux Foundation.
Q. Why choose Portworx for KubeVirt storage?
Most VM applications maintain a significant amount of data. As those applications are migrated over to KubeVirt, the need for a data management layer, similar to vSAN, is paramount. Portworx delivers the enterprise-grade storage and data services that enterprises require for their stateful VMs. This includes things like disaster recovery, live migration, backup, and additional familiar workflows like Kube Datastore, Enhanced Storage Migration, and Automated Rebalancing. As a software-defined solution, built for KubeVirt, Portworx allows enterprises to scale without relying on External CSI drivers and the limitations those drivers can present.
Recommended for you