
One of the most common questions developers ask is “how do I speed up my Docker builds”? This post answers that question.
LCFS is a new open source storage driver for Docker, built exclusively for containers. Most storage drivers such as DeviceMapper, AUFS, and Overlay2 are based on complete filesystems designed to run entire applications. Because LCFS is designed only for containers, it is up to 2.5x faster to build an image and up to almost 2x faster to pull an image.
To keep pushing things forward, we’ve just have added an algorithm that speeds up docker build & and makes commit operations with LCFS finish in constant time, irrespective of the size of the layer being committed to or the amount of changes in the layer compared to the parent layer. Because this new scheme does not have to do any diffs between layers looking for changes, it is much faster.
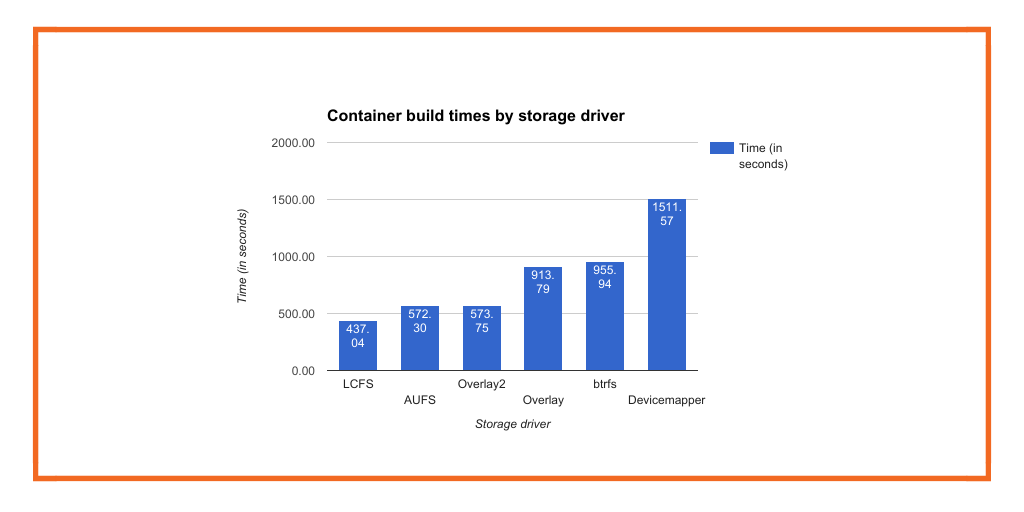
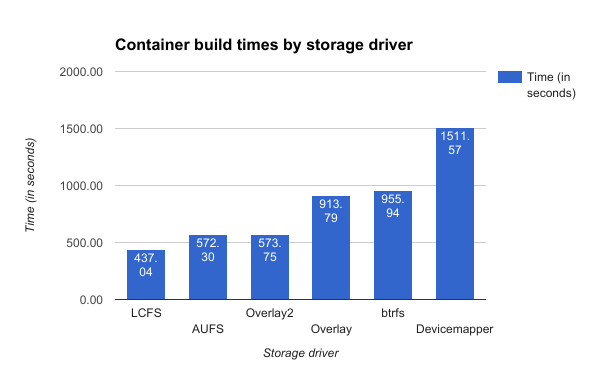
The numbers are quite dramatic actually. For$ docker build, LCFS is almost 2 and a half minutes faster (~30%), than the next closest storage driver, AUFS. It is 18 minutes faster than the slowest driver, DeviceMapper.
For $ docker commit, performance improved +800% over Overlay2 and +1900% over Devicemapper.
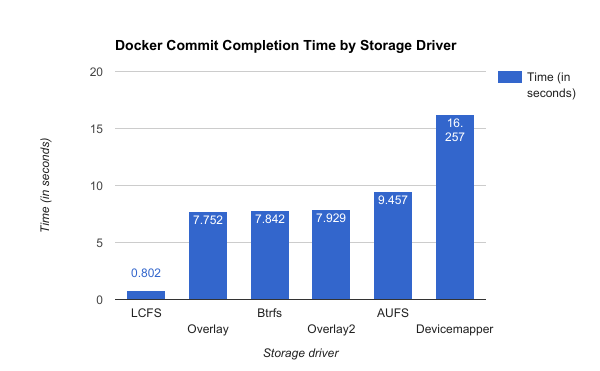
For comparison purposes, a busybox container with 1GB file created in it could be committed within a fraction of second with LCFS, while traditional storage drivers would require many seconds to finish that job.
Details of this experiment:
The rest of this post describes how Storage Drivers typically do diffing, why this can be an expensive operation, and how LCFS gets around those limitations using pointers. If you want to skip all that and just give it a try, install instructions are here.
The reason that Docker containers are portable across environments is because a Docker container includes both code for the process needing to be run (say nginx or MongoDB) and all the dependencies to run it. All that code is organized into layers that make up the Docker image. At a high level, each container image has two parts: a group of read-only layers making up the bulk of the image, and a single, thin writable layer where any changes to the container are committed.
The advantage to this architecture is that multiple containers can share the same read-only base. This sharing of resources results in one of Docker’s biggest benefits: a high density of containers per host. See image 1 for an illustration of this concept from Docker’s documentation. Here we have a bunch of containers running on the same base Ubuntu 15.04 image.
Let’s look at an example where we want to change the base layer of our ubuntu:15.04 image, layer d3a1f33e8a5a, for one and only one of these containers. Because this layer is read-only, we can’t make a change directly in the layer itself. And even if we could, we couldn’t want to because then the changes would be reflected in all the containers running off of that base, which we don’t want.
Rather, to make a change to d3a1f33e8a5a, we will copy-up the code we want to modify to the thin r/w layer of the container we want to modify, make the change there, and commit it. At this point, our container will be the sum of the base image we started with and the changes we made. This is just git-like version control for our container images.
The management of this process to modify read-only layers by committing changes to the thin writable layer is managed by the Docker storage driver that is used by every Docker container. If you don’t know which storage driver you use, you can check using the docker info command, but you are definitely using one.
$dockerinfo

Containers:0

Images:0

Storage Driver: overlay

Backing Filesystem:extfs

Execution Driver: native-0.2

Logging Driver:json-file

Kernel Version:3.19.0-15-generic

Operating System: Ubuntu15.04
Let’s look in more detail at what is involved when changes are committed to a layer, or a Docker image in built from a Dockerfile.
When you commit a container, Docker creates a new image as we have seen above. Similarly, when a container is built for the first time from a Dockerfile, many intermediate images are built for each command in the Dockerfile, before the final image is created (each command in the Dockerfile is run inside a container created from the previous image and the container is committed as an image after the command is completed).
Each time a container is committed (manually or as part of building a Dockerfile), the storage driver needs to provide a list of modified files and directories in that container compared to the image it was spawned from because, remember, we are not going to modify the original read-only layer, but rather “copy up” the code we want to modify into the thin writable layer.
Many union file systems like AUFS and Overlay2, keep track of these changes at run time and can generate that list easily – this may have other scalability concerns though when there are too many containers running and such. But other storage drivers like Devicemapper and Btrfs don’t keep track of changes in a container and need to generate that list each time by scanning for changes in the container on demand. These are expensive operations as we will see below.
Docker provides a driver to keep track of changes to a container called NaiveDiffDriver. This driver compares the underlying file systems of the container (thin r/w layer) and the image (read-only layer), traversing the whole directory tree, or namespace, from top to bottom, looking for modified directories and files. It does this by comparing modification times, inode numbers and other methods. This operation is expensive for a big data set, as all the directories and files in those file systems need to be brought into the cache and numerous system calls like readdir(2) and stat(2) are issued during this process.
After creating the list of modified directories and files in the container, a tar archive is created, which involves reading all those modified files and then writing those to a tar file. Again this step involves many read(2) and write(2) system calls. Also all modified data need to transit through the page cache (which could be huge depending on the dataset). Also the tar file may allocate space in the storage driver, and issue I/Os taking away I/O bandwidth and other resources of the system.
After the tar archive is ready, a new container is created and the data from the tar archive is extracted to the new container. This also could turn out to be an expensive operation, as new directories and files are created, replacing any old ones around (many create/mkdir/unlink system calls) and then data copied from the tar archive using read(2) and write(2) system calls. These data also transit through the page cache again, causing duplicate instances of data and consuming a lot of system resources. After all data populated in the new container, the tar file is removed which may require some additional work from the storage driver (e.g. free space, free inode, trim freed space).
If this process was done as part of building a Dockerfile, the container in which the command was run is deleted after changes in it are committed as an image. So in short, the whole process is simply for moving data from one container layer to an image layer.
The implication of the NaiveDiffDriver approach is that building a Dockerfile or committing changes to a Docker image are not constant time operations. If your container image has many layers, or if those layers include a lot of data, the commit and build operations will take longer. If your Docker builds take a long time, this could be the reason why.
LCFS, an open-source storage driver built exclusively for running containers, avoids the expensive operations described above by taking a completely different approach to identifying and committing changes to a container image.
With this new method, the time for committing a container is constant irrespective of the sizes of the underlying images and amount of changes made in the container. There is no requirement for creating a list of modified files in the container – thus there is no namespace tree traversal and all the readdir(2)/stat(2) system calls are eliminated. There is no data movement involved as well – no need for docker to read modified data from one container layer and write to another image layer. LCFS takes care of all that work behind the scenes, by promoting the container as an image internally from which new containers could be spawned. The old container (which is committed now) is available as well for continued use or could be deleted.
This is done by swapping the layers of the container (r/w layer) and the newly created image layer (read-only layer). The r/w layer of the container being committed will be made a read-only layer and the layer created for the new image layer will be made a child of that new read-only layer and converted as a r/w layer for the container to continue to run. Any running operations on the container will be properly routed to the the new r/w layer after swapping the layers. This way, a container is committed as an image layer without any namespace traversals and data movement.
So in summary, to speed up your Docker builds:
We hope that you’ll give LCFS a try and let us know what you think. We’re eager to make it better with the help of the community.
If you enjoyed what you just read, learn more about Docker storage, Kubernetes storage or DC/OS storage.