


This post is part of our ongoing series on running Cassandra on Kubernetes. We’ve published a number of articles about running Cassandra on Kubernetes for specific platforms and for specific use cases. If you are looking for a specific Kubernetes platform, check out these related articles.
Running HA Cassandra on Amazon Elastic Container Service for Kubernetes (EKS)
Running HA Cassandra on Azure Kubernetes Service (AKS)
Running HA Cassandra on Google Kubernetes Engine (GKE)
Running HA Cassandra on IBM Cloud Kubernetes Service (IKS)
Running HA Cassandra on Rancher Kubernetes Engine (RKE)
Running HA Cassandra on IBM Cloud Private
And now, onto the post…
Red Hat OpenShift is a comprehensive enterprise-grade application platform built for containers powered by Kubernetes. OpenShift lets developers quickly build, develop, and deploy applications on nearly any infrastructure, public or private.
OpenShift comes in four flavors – OpenShift Origin, OpenShift Online, OpenShift Container Platform, and OpenShift Dedicated. OpenShift Origin is the upstream, open source version which can be installed on Fedora, CentOS or Red Hat Enterprise Linux. OpenShift Online is the hosted version of the platform managed by Red Hat. OpenShift Container Platform is the enterprise offering that can be deployed in the public cloud or within an enterprise data center. OpenShift Dedicated is a single-tenant, highly-available cluster running in the public cloud.
For this walk-through, we are using a cluster running OpenShift Origin.
Portworx, is a cloud native storage platform to run persistent workloads deployed on a variety of orchestration engines including Kubernetes. With Portworx, customers can manage the database of their choice on any infrastructure using any container scheduler. It provides a single data management layer for all stateful services, no matter where they run.
Portworx is Red Hat certified for Red Hat OpenShift Container Platform and PX-Enterprise is available in the Red Hat Container Catalog. This certification enables enterprises to confidently run high-performance stateful applications like databases, big and fast data workloads, and machine learning applications on the Red Hat OpenShift Container Platform. Learn more about Portworx & OpenShift in our Product Brief.
This tutorial is a walk-through of the steps involved in deploying and managing a highly available Cassandra database on OpenShift.
In summary, to run HA Cassandra on Red Hat OpenShift you need to:
OpenShift Origin can be deployed in a variety of environments ranging from VirtualBox to a public cloud IaaS such as Amazon, Google, Azure. Refer to the official installation guide for the steps involved in setting up your own cluster. For this guide, we run an OpenShift Origin cluster in Microsoft Azure. Follow the instructions mentioned in Azure documentation.
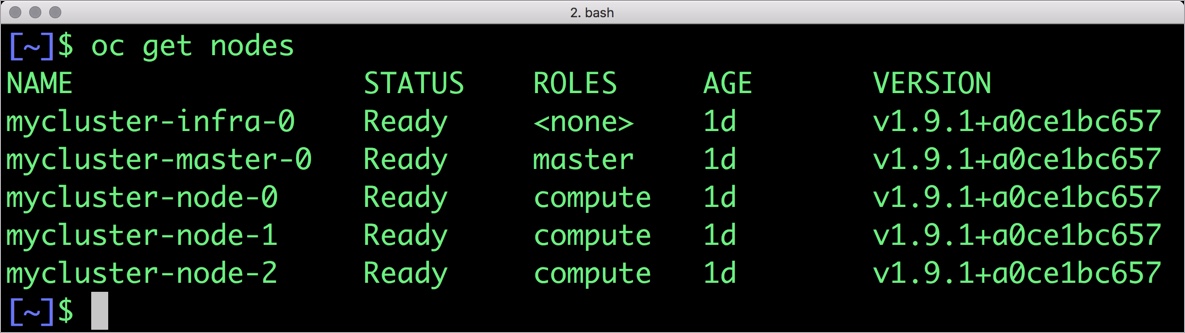
Your OpenShift cluster setup should look similar to the below configuration. It is recommended that you run at least 3 nodes for the HA configuration.
$ oc get nodes
NAME                 STATUS    ROLES     AGE       VERSION
mycluster-infra-0    Ready     none      1d        v1.9.1+a0ce1bc657
mycluster-master-0   Ready     master    1d        v1.9.1+a0ce1bc657
mycluster-node-0     Ready     compute   1d        v1.9.1+a0ce1bc657
mycluster-node-1     Ready     compute   1d        v1.9.1+a0ce1bc657
mycluster-node-2     Ready     compute   1d        v1.9.1+a0ce1bc657
Though almost all the steps can be performed through the OpenShift Console, we are using the oc CLI. Please note that most of the kubectl commands are available through oc tool. You may find the tools used interchangeably.
Since OpenShift is based on Kubernetes, the steps involved in installing Portworx are not very different from the standard Kubernetes installation. Portworx documentation has a detailed guide with the prerequisites and all the steps to install on OpenShift.
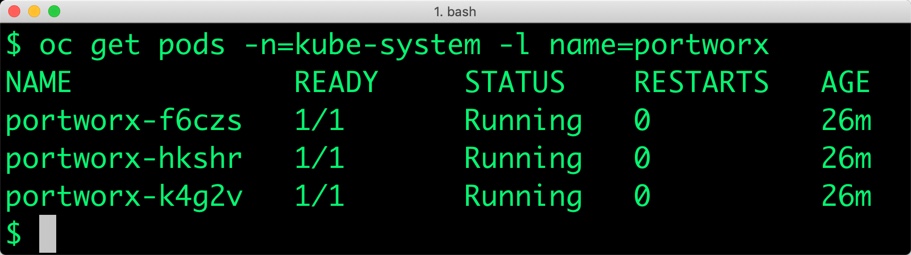
Before proceeding further, ensure that Portworx is up and running on OpenShift.
$ oc get pods -n=kube-system -l name=portworx
NAME             READY     STATUS    RESTARTS   AGE
portworx-f6czs   1/1       Running   0          26m
portworx-hkshr   1/1       Running   0          26m
portworx-k4g2v   1/1       Running   0          26m
Once the OpenShift cluster is up and running, and Portworx is installed and configured, we will deploy a highly available Cassandra database.
Through storage class objects, an admin can define different classes of Portworx volumes that are offered in a cluster. These classes will be used during the dynamic provisioning of volumes. The storage class defines the replication factor, I/O profile (e.g., for a database or a CMS), and priority (e.g., SSD or HDD). These parameters impact the availability and throughput of workloads and can be specified for each volume. This is important because a production database will have different requirements than a development Jenkins cluster.
In this example, the storage class that we deploy has a replication factor of 3 with I/O profile set to “db,” and priority set to “high.” This means that the storage will be optimized for low latency database workloads like Cassandra and automatically placed on the highest performance storage available in the cluster.
$ cat > px-cassandra-sc.yaml << EOF
kind: StorageClass
apiVersion: storage.k8s.io/v1
metadata:
  name: px-storageclass
provisioner: kubernetes.io/portworx-volume
parameters:
  repl: "3"
  io_profile: "db_remote"
  priority_io: "high"
  fg: "true"
EOF
Create the storage class and verify its available in the default namespace.
$ oc create -f px-cassandra-sc.yaml
storageclass.storage.k8s.io "px-storageclass" created

$ oc get sc
NAME                PROVISIONER                     AGE
generic (default)   kubernetes.io/azure-disk        1h
px-storageclass     kubernetes.io/portworx-volume   21m
stork-snapshot-sc   stork-snapshot                  29m
Finally, let’s create a Cassandra cluster as a Kubernetes statefulset object. Like a Kubernetes deployment, a statefulset manages pods that are based on an identical container spec. Unlike a deployment, a statefulset maintains a sticky identity for each of their Pods. For more details on statefulsets, refer to Kubernetes documentation.
A statefulset in Kubernetes requires a headless service to provide network identity to the pods it creates. The following command and the spec will help you create a headless service for your Cassandra installation.
$ cat > px-cassandra-svc.yaml << EOF
apiVersion: v1
kind: Service
metadata:
  labels:
    app: cassandra
  name: cassandra
spec:
  clusterIP: None
  ports:
    - port: 9042
  selector:
    app: cassandra
EOF
$ oc create -f px-cassandra-svc.yaml
service "cassandra" created
Now, let’s go ahead and create a statefulset running Cassandra cluster based on the below spec.
cat > px-cassandra-app.yaml << EOF
apiVersion: apps/v1
kind: StatefulSet
metadata:
  name: cassandra
spec:
  selector:
    matchLabels:
      app: cassandra
  serviceName: cassandra
  replicas: 3
  template:
    metadata:
      labels:
        app: cassandra
    spec:
      schedulerName: stork
      containers:
      - name: cassandra
        image: cassandra:3
        ports:
          - containerPort: 7000
            name: intra-node
          - containerPort: 7001
            name: tls-intra-node
          - containerPort: 7199
            name: jmx
          - containerPort: 9042
            name: cql
        env:
          - name: CASSANDRA_SEEDS
            value: cassandra-0.cassandra.default.svc.cluster.local
          - name: MAX_HEAP_SIZE
            value: 512M
          - name: HEAP_NEWSIZE
            value: 512M
          - name: CASSANDRA_CLUSTER_NAME
            value: "Cassandra"
          - name: CASSANDRA_DC
            value: "DC1"
          - name: CASSANDRA_RACK
            value: "Rack1"
          - name: CASSANDRA_AUTO_BOOTSTRAP
            value: "false"
          - name: CASSANDRA_ENDPOINT_SNITCH
            value: GossipingPropertyFileSnitch
        volumeMounts:
        - name: cassandra-data
          mountPath: /var/lib/cassandra
  volumeClaimTemplates:
  - metadata:
      name: cassandra-data
      annotations:
        volume.beta.kubernetes.io/storage-class: px-storageclass
      labels:
         app: cassandra
    spec:
      accessModes: [ "ReadWriteOnce" ]
      resources:
        requests:
          storage: 1Gi
EOF
$ oc apply -f px-cassandra-app.yaml
statefulset.apps "cassandra" created
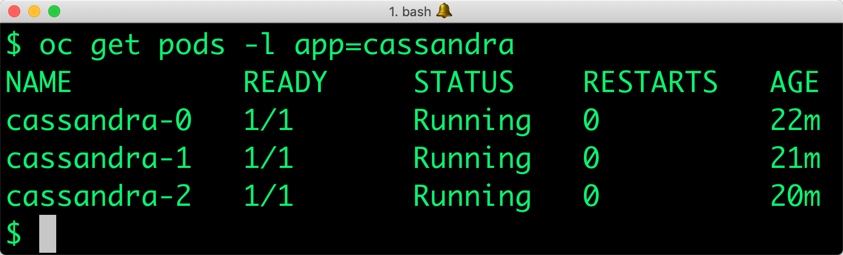
Verify that all the pods are in the Running state before proceeding further.
$ oc get statefulset
NAME        DESIRED   CURRENT   AGE
cassandra   3         2         45s
$ oc get pods -l app=cassandra
NAME          READY     STATUS    RESTARTS   AGE
cassandra-0   1/1       Running   0          2m
cassandra-1   1/1       Running   0          1m
cassandra-2   1/1       Running   1          43s
Let’s also check if persistent volume claims are bound to the volumes.
$ oc get pvc
NAME                         STATUS    VOLUME                                     CAPACITY   ACCESS MODES   STORAGECLASS      AGE
cassandra-data-cassandra-0   Bound     pvc-4b2b552e-ddb2-11e8-ba9f-000d3a1ddaa9   5Gi        RWO            px-storageclass   23m
cassandra-data-cassandra-1   Bound     pvc-5f7c2504-ddb2-11e8-ba9f-000d3a1ddaa9   5Gi        RWO            px-storageclass   23m
cassandra-data-cassandra-2   Bound     pvc-7d768f47-ddb2-11e8-ba9f-000d3a1ddaa9   5Gi        RWO            px-storageclass   22m
Notice the naming convention followed by OpenShift for the pods and volume claims. The arbitrary number attached to each object indicates the association of pods and volumes.
We can now inspect the Portworx volume associated with one of the Cassandra pod by accessing the pxctl tool.
$  VOL=`oc get pvc | grep cassandra-0 | awk '{print $3}'`
$ PX_POD=$(oc get pods -l name=portworx -n kube-system -o jsonpath='{.items[0].metadata.name}')
$ oc exec -it $PX_POD -n kube-system -- /opt/pwx/bin/pxctl volume inspect ${VOL}
Volume	:  725162224178639554
	Name            	 :  pvc-4b2b552e-ddb2-11e8-ba9f-000d3a1ddaa9
	Size            	 :  5.0 GiB
	Format          	 :  ext4
	HA              	 :  2
	IO Priority     	 :  LOW
	Creation time   	 :  Nov 1 08:44:07 UTC 2018
	Shared          	 :  no
	Status          	 :  up
	State           	 :  Attached: pxokd-node-2 (10.2.0.4)
	Device Path     	 :  /dev/pxd/pxd725162224178639554
	Labels          	 :  app=cassandra,pvc=cassandra-data-cassandra-0
	Reads           	 :  97
	Reads MS        	 :  91
	Bytes Read      	 :  2166784
	Writes          	 :  2377
	Writes MS       	 :  357245
	Bytes Written   	 :  109834240
	IOs in progress 	 :  0
	Bytes used      	 :  211 MiB
	Replica sets on nodes:
		Set 0
		  Node 		 : 10.2.0.4 (Pool 0)
		  Node 		 : 10.2.0.5 (Pool 0)
	Replication Status	 :  Up
	Volume consumers	 :
		- Name           : cassandra-0 (4b39e701-ddb2-11e8-ba9f-000d3a1ddaa9) (Pod)
		  Namespace      : default
		  Running on     : pxokd-node-2
		  Controlled by  : cassandra (StatefulSet)
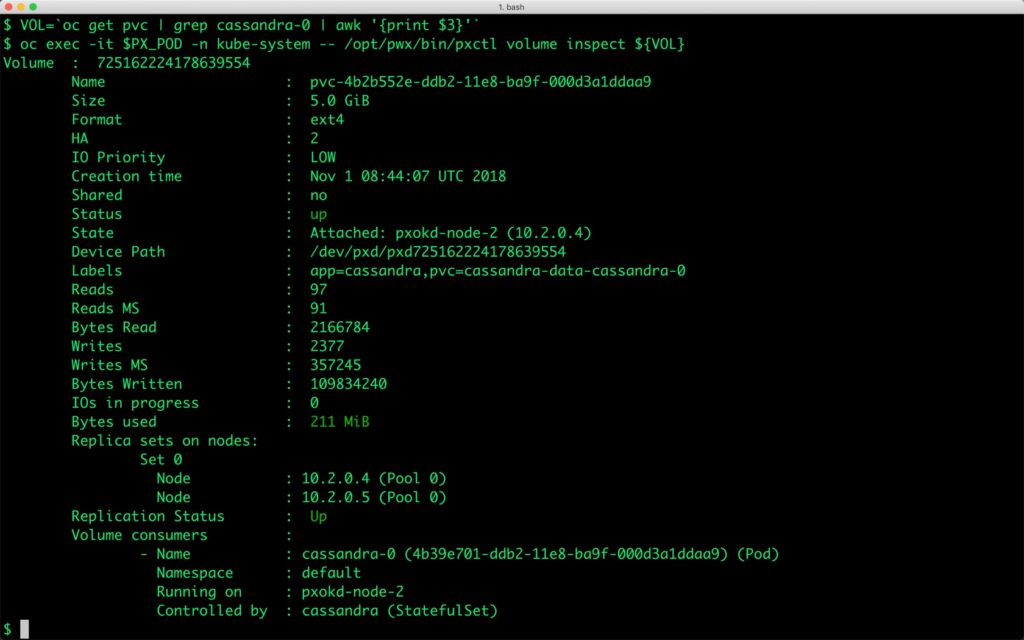
The output from the above command confirms the creation of volumes that are backing Cassandra nodes.
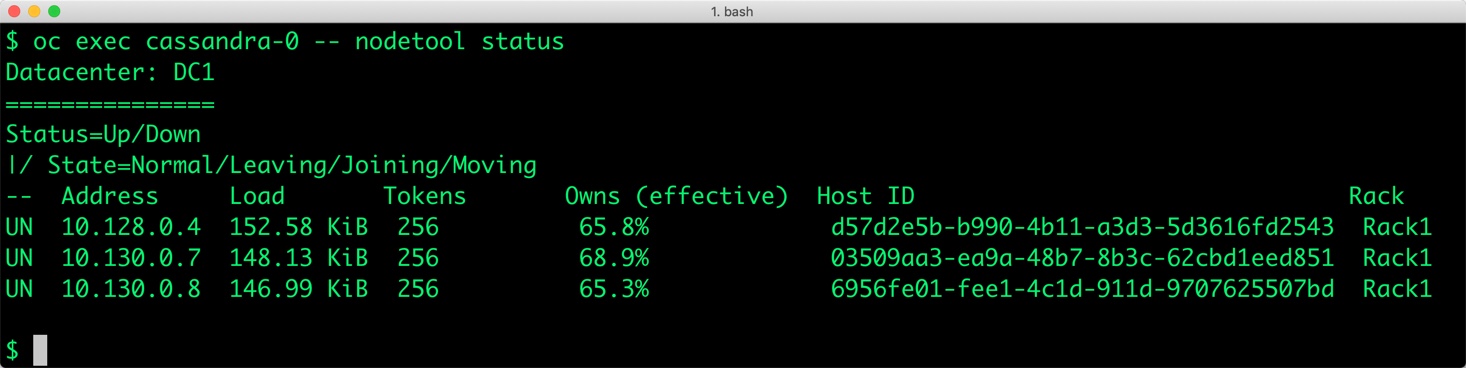
We can also use Cassandra’s nodetool to check the status of the cluster.
$ oc exec cassandra-0 -- nodetool status
Datacenter: DC1
===============
Status=Up/Down
|/ State=Normal/Leaving/Joining/Moving
--  Address     Load       Tokens       Owns (effective)  Host ID                               Rack
UN  10.48.2.16  184.23 KiB  256          67.4%             1d59f53e-b388-4e16-b237-5a5cff07f385  Rack1
UN  10.48.1.19  205.26 KiB  256          67.5%             4d149fc7-0ecd-4ae6-9e0f-b5f92942d3f8  Rack1
UN  10.48.0.20  172.46 KiB  256          65.2%             6cfc666d-5418-432f-b3bd-f8e56a1f0e1c  Rack1
To get the pods and hosts associated with the Cassandra cluster, run the below command:
$ oc get pods -l app=cassandra -o json | jq '.items[] | {"name": .metadata.name,"hostname": .spec.nodeName, "hostIP": .status.hostIP, "PodIP": .status.podIP}'
{
  "name": "cassandra-0",
  "hostname": "pxokd-node-2",
  "hostIP": "10.2.0.4",
  "PodIP": "10.130.0.7"
}
{
  "name": "cassandra-1",
  "hostname": "pxokd-node-0",
  "hostIP": "10.2.0.5",
  "PodIP": "10.128.0.4"
}
{
  "name": "cassandra-2",
  "hostname": "pxokd-node-2",
  "hostIP": "10.2.0.4",
  "PodIP": "10.130.0.8"
}
Let’s populate the database with some sample data by accessing the first node of the Cassandra cluster. We will do this by invoking Cassandra shell, cqlsh in one of the pods.
$ oc exec -it cassandra-0 -- cqlsh
Connected to Cassandra at 127.0.0.1:9042.
[cqlsh 5.0.1 | Cassandra 3.11.3 | CQL spec 3.4.4 | Native protocol v4]
Use HELP for help.
cqlsh>
Now that we are inside the shell, we can create a keyspace and populate it.
CREATE KEYSPACE classicmodels WITH REPLICATION = { 'class' : 'SimpleStrategy', 'replication_factor' : 3 };

CONSISTENCY QUORUM;
Consistency level set to QUORUM.

use classicmodels;

CREATE TABLE offices (officeCode text PRIMARY KEY, city text, phone text, addressLine1 text, addressLine2 text, state text, country text, postalCode text, territory text);

INSERT into offices(officeCode, city, phone, addressLine1, addressLine2, state, country ,postalCode, territory) values
	('1','San Francisco','+1 650 219 4782','100 Market Street','Suite 300','CA','USA','94080','NA');

INSERT into offices(officeCode, city, phone, addressLine1, addressLine2, state, country ,postalCode, territory) values
	('2','Boston','+1 215 837 0825','1550 Court Place','Suite 102','MA','USA','02107','NA');

INSERT into offices(officeCode, city, phone, addressLine1, addressLine2, state, country ,postalCode, territory) values
	('3','NYC','+1 212 555 3000','523 East 53rd Street','apt. 5A','NY','USA','10022','NA');

INSERT into offices(officeCode, city, phone, addressLine1, addressLine2, state, country ,postalCode, territory) values
	('4','Paris','+33 14 723 4404','43 Rue Jouffroy abbans', NULL ,NULL,'France','75017','EMEA');

INSERT into offices(officeCode, city, phone, addressLine1, addressLine2, state, country ,postalCode, territory) values
	('5','Tokyo','+81 33 224 5000','4-1 Kioicho',NULL,'Chiyoda-Ku','Japan','102-8578','Japan');

INSERT into offices(officeCode, city, phone, addressLine1, addressLine2, state, country ,postalCode, territory) values
	('6','Sydney','+61 2 9264 2451','5-11 Wentworth Avenue','Floor #2',NULL,'Australia','NSW 2010','APAC');

INSERT into offices(officeCode, city, phone, addressLine1, addressLine2, state, country ,postalCode, territory) values
	('7','London','+44 20 7877 2041','25 Old Broad Street','Level 7',NULL,'UK','EC2N 1HN','EMEA');

INSERT into offices(officeCode, city, phone, addressLine1, addressLine2, state, country ,postalCode, territory) values
	('8','Mumbai','+91 22 8765434','BKC','Building 2',NULL,'MH','400051','APAC');
Let’s verify that the data is populated.
SELECT * FROM classicmodels.offices;

 officecode | addressline1           | addressline2 | city          | country   | phone            | postalcode | state      | territory
------------+------------------------+--------------+---------------+-----------+------------------+------------+------------+-----------
          6 |  5-11 Wentworth Avenue |     Floor #2 |        Sydney | Australia |  +61 2 9264 2451 |   NSW 2010 |       null |      APAC
          7 |    25 Old Broad Street |      Level 7 |        London |        UK | +44 20 7877 2041 |   EC2N 1HN |       null |      EMEA
          4 | 43 Rue Jouffroy abbans |         null |         Paris |    France |  +33 14 723 4404 |      75017 |       null |      EMEA
          3 |   523 East 53rd Street |      apt. 5A |           NYC |       USA |  +1 212 555 3000 |      10022 |         NY |        NA
          5 |            4-1 Kioicho |         null |         Tokyo |     Japan |  +81 33 224 5000 |   102-8578 | Chiyoda-Ku |     Japan
          8 |                    BKC |   Building 2 |        Mumbai |        MH |   +91 22 8765434 |     400051 |       null |      APAC
          2 |       1550 Court Place |    Suite 102 |        Boston |       USA |  +1 215 837 0825 |      02107 |         MA |        NA
          1 |      100 Market Street |    Suite 300 | San Francisco |       USA |  +1 650 219 4782 |      94080 |         CA |        NA

(8 rows)
cqlsh:classicmodels>
Exit from the client shell to return to the host.
You can run the select query by accessing cqlsh from any of the pods of the statefulset.
Run nodetool again to check the replication of the data. The below command shows that the hosts on which the row with officecode=6 is available.
$ oc exec -it cassandra-0 -- nodetool getendpoints classicmodels offices 6
10.130.0.7
10.128.0.4
10.130.0.8
Let’s get the node name where the first pod of Cassandra statefulset is running.
$ NODE=`oc get pods cassandra-0 -o json | jq -r .spec.nodeName`
Now, let’s simulate the node failure by cordoning off the Kubernetes node.
$ oc adm cordon ${NODE}
node/pxokd-node-2 cordoned
The above command disabled scheduling on one of the nodes.
$ oc get nodes
NAME             STATUS                     ROLES     AGE       VERSION
pxokd-infra-0    Ready                          1h        v1.9.1+a0ce1bc657
pxokd-master-0   Ready                      master    1h        v1.9.1+a0ce1bc657
pxokd-node-0     Ready                      compute   1h        v1.9.1+a0ce1bc657
pxokd-node-1     Ready                      compute   1h        v1.9.1+a0ce1bc657
pxokd-node-2     Ready,SchedulingDisabled   compute   1h        v1.9.1+a0ce1bc657
Let’s go ahead and delete the pod cassandra-0 running on the node that is cordoned off.
$ oc delete pod cassandra-0
pod "cassandra-0" deleted
Kubernetes controller now tries to create the pod on a different node.
$ oc get pods
NAME          READY     STATUS              RESTARTS   AGE
cassandra-0   0/1       ContainerCreating   0          2s
cassandra-1   1/1       Running             0          54m
cassandra-2   1/1       Running             1          53m
Wait for the pod to be in Running state on the node.
$ oc get pods
NAME          READY     STATUS              RESTARTS   AGE
cassandra-0   1/1       Running             0          1m
cassandra-1   1/1       Running             0          54m
cassandra-2   1/1       Running             1          53m
Finally, let’s verify that the data is still available.
Let’s access the data in the first pod of the statefulset – cassandra-0.
$ oc exec cassandra-0 -- cqlsh -e 'select * from classicmodels.offices'

 officecode | addressline1           | addressline2 | city          | country   | phone            | postalcode | state      | territory
------------+------------------------+--------------+---------------+-----------+------------------+------------+------------+-----------
          6 |  5-11 Wentworth Avenue |     Floor #2 |        Sydney | Australia |  +61 2 9264 2451 |   NSW 2010 |       null |      APAC
          7 |    25 Old Broad Street |      Level 7 |        London |        UK | +44 20 7877 2041 |   EC2N 1HN |       null |      EMEA
          4 | 43 Rue Jouffroy abbans |         null |         Paris |    France |  +33 14 723 4404 |      75017 |       null |      EMEA
          3 |   523 East 53rd Street |      apt. 5A |           NYC |       USA |  +1 212 555 3000 |      10022 |         NY |        NA
          5 |            4-1 Kioicho |         null |         Tokyo |     Japan |  +81 33 224 5000 |   102-8578 | Chiyoda-Ku |     Japan
          8 |                    BKC |   Building 2 |        Mumbai |        MH |   +91 22 8765434 |     400051 |       null |      APAC
          2 |       1550 Court Place |    Suite 102 |        Boston |       USA |  +1 215 837 0825 |      02107 |         MA |        NA
          1 |      100 Market Street |    Suite 300 | San Francisco |       USA |  +1 650 219 4782 |      94080 |         CA |        NA

(8 rows)
Observe that the data is still there and all the content is intact! We can also run the nodetool again to see that the new node is indeed a part of the statefulset.
$ oc exec cassandra-0 -- nodetool status
Datacenter: DC1
===============
Status=Up/Down
|/ State=Normal/Leaving/Joining/Moving
--  Address     Load       Tokens       Owns (effective)  Host ID                               Rack
UN  10.48.2.16  184.23 KiB  256          67.4%             1d59f53e-b388-4e16-b237-5a5cff07f385  Rack1
UN  10.48.1.19  205.26 KiB  256          67.5%             4d149fc7-0ecd-4ae6-9e0f-b5f92942d3f8  Rack1
UN  10.48.0.20  172.46 KiB  256          65.2%             6cfc666d-5418-432f-b3bd-f8e56a1f0e1c  Rack1
Portworx enables storage admins to perform backup and restore operations through the snapshots. 3DSnap is a feature to capture application consistent snapshots from multiple nodes of a database cluster. This is highly recommended when running a multi-node Cassandra cluster as a Kubernetes statefulset. 3DSnap will create the snapshot from each of the node in the cluster, which ensures that the state is accurately captured from the distributed cluster.
3DSnap allows administrators to execute commands just before taking the snapshot and right after completing the task of taking a snapshot. These triggers will ensure that the data is fully committed to the disk before the snapshot. Similarly, it is possible to run a workload-specific command to refresh or force a sync immediately after restoring the snapshot.
This section will walk you through the steps involved in creating and restoring a 3DSnap for the Cassandra statefulset.
It’s a good idea to flush the data to the disk before initiating the snapshot creation. This is defined through a rule, which is a Custom Resource Definition created by Stork.
$ cat > px-cassandra-rule.yaml << EOF
apiVersion: stork.libopenstorage.org/v1alpha1
kind: Rule
metadata:
  name: px-cassandra-rule
spec:
  - podSelector:
      app: cassandra
    actions:
    - type: command
      value: nodetool flush
EOF
Create the rule from the above YAML file.
$ oc create -f px-cassandra-rule.yaml
rule.stork.libopenstorage.org "px-cassandra-rule" created
We will now initiate a 3DSnap task to backup all the PVCs associated with the Cassandra pods belonging to the statefulset.
$ cat > px-cassandra-snap.yaml << EOF
apiVersion: volumesnapshot.external-storage.k8s.io/v1
kind: VolumeSnapshot
metadata:
  name: cassandra-3d-snapshot
  annotations:
    portworx.selector/app: cassandra
    stork.rule/pre-snapshot: px-cassandra-rule
spec:
  persistentVolumeClaimName: cassandra-data-cassandra-0
EOF
$ oc create -f px-cassandra-snap.yaml
volumesnapshot.volumesnapshot.external-storage.k8s.io "cassandra-3d-snapshot" created
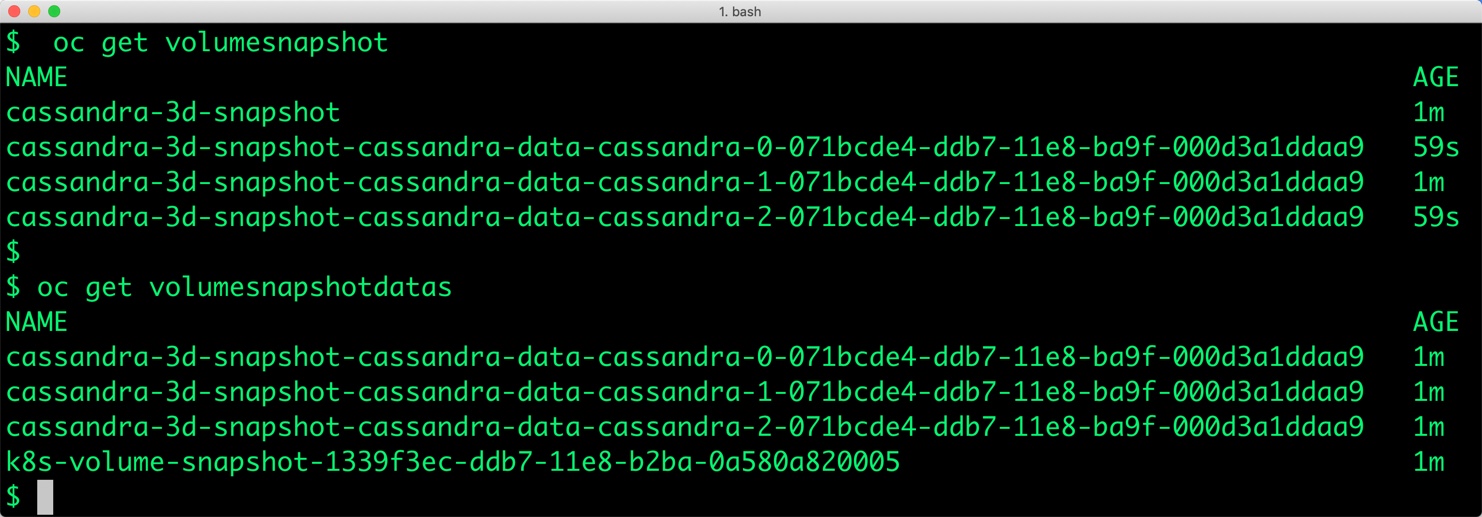
Let’s now verify that the snapshot creation is successful.
$ oc get volumesnapshot
NAME                                                                                    AGE
cassandra-3d-snapshot                                                                   1m
cassandra-3d-snapshot-cassandra-data-cassandra-0-071bcde4-ddb7-11e8-ba9f-000d3a1ddaa9   59s
cassandra-3d-snapshot-cassandra-data-cassandra-1-071bcde4-ddb7-11e8-ba9f-000d3a1ddaa9   1m
cassandra-3d-snapshot-cassandra-data-cassandra-2-071bcde4-ddb7-11e8-ba9f-000d3a1ddaa9   59s
$ oc get volumesnapshotdatas
NAME                                                                                    AGE
cassandra-3d-snapshot-cassandra-data-cassandra-0-071bcde4-ddb7-11e8-ba9f-000d3a1ddaa9   1m
cassandra-3d-snapshot-cassandra-data-cassandra-1-071bcde4-ddb7-11e8-ba9f-000d3a1ddaa9   1m
cassandra-3d-snapshot-cassandra-data-cassandra-2-071bcde4-ddb7-11e8-ba9f-000d3a1ddaa9   1m
k8s-volume-snapshot-1339f3ec-ddb7-11e8-b2ba-0a580a820005                                1m
Let’s now restore from the 3DSnap. Before that, we will simulate the database crash by deleting the statefulset and associated PVCs.
$ oc delete sts cassandra
statefulset.apps "cassandra" deleted
$ oc delete pvc -l app=cassandra
persistentvolumeclaim "cassandra-data-cassandra-0" deleted
persistentvolumeclaim "cassandra-data-cassandra-1" deleted
persistentvolumeclaim "cassandra-data-cassandra-2" deleted
Now our Kubernetes cluster has no database running. Let’s go ahead and restore the data from the snapshot before relaunching Cassandra statefulset.
We will now create three Persistent Volume Claims (PVCs) from existing 3DSnap with exactly the same volume name that the statefulset expects. When the pods are created as a part of the statefulset, they point to the existing PVCs which are already populated with the data restored from the snapshots.
Let’s create three PVCs from the 3DSnap snapshots. Notice how the annotation points to the snapshot in each PVC manifest.
$ cat > px-cassandra-pvc-0.yaml << EOF
apiVersion: v1
kind: PersistentVolumeClaim
metadata:
  name: cassandra-data-cassandra-0
  annotations:
    snapshot.alpha.kubernetes.io/snapshot: "cassandra-3d-snapshot-cassandra-data-cassandra-0-f7ffa638-cdda-11e8-a2f0-061f808edbd0"
spec:
  accessModes:
     - ReadWriteOnce
  storageClassName: stork-snapshot-sc
  resources:
    requests:
      storage: 5Gi
EOF
$ cat > px-cassandra-pvc-1.yaml << EOF
apiVersion: v1
kind: PersistentVolumeClaim
metadata:
  name: cassandra-data-cassandra-1
  annotations:
    snapshot.alpha.kubernetes.io/snapshot: "cassandra-3d-snapshot-cassandra-data-cassandra-0-f7ffa638-cdda-11e8-a2f0-061f808edbd0"
spec:
  accessModes:
     - ReadWriteOnce
  storageClassName: stork-snapshot-sc
  resources:
    requests:
      storage: 5Gi
EOF
$ cat > px-cassandra-pvc-2.yaml << EOF
apiVersion: v1
kind: PersistentVolumeClaim
metadata:
  name: cassandra-data-cassandra-0
  annotations:
    snapshot.alpha.kubernetes.io/snapshot: "cassandra-3d-snapshot-cassandra-data-cassandra-2-f7ffa638-cdda-11e8-a2f0-061f808edbd0"
spec:
  accessModes:
     - ReadWriteOnce
  storageClassName: stork-snapshot-sc
  resources:
    requests:
      storage: 5Gi
EOF
Create the PVCs from the above definitions.
$ oc create -f px-cassandra-snap-pvc-0.yaml
persistentvolumeclaim "cassandra-data-cassandra-0" created

$ oc create -f px-cassandra-snap-pvc-1.yaml
persistentvolumeclaim "cassandra-data-cassandra-1" created

$ oc create -f px-cassandra-snap-pvc-2.yaml
persistentvolumeclaim "cassandra-data-cassandra-2" created

$ oc create -f px-cassandra-app.yaml
statefulset.apps "cassandra" created
Verify that the new PVCs are ready and bound.
$ oc get pvc
NAME                         STATUS    VOLUME                                     CAPACITY   ACCESS MODES   STORAGECLASS        AGE
cassandra-data-cassandra-0   Bound     pvc-90218646-cddb-11e8-be72-02e1e4a8c0ea   5Gi        RWO            stork-snapshot-sc   12s
cassandra-data-cassandra-1   Bound     pvc-92e74a65-cddb-11e8-a2f0-061f808edbd0   5Gi        RWO            stork-snapshot-sc   7s
cassandra-data-cassandra-2   Bound     pvc-95731baa-cddb-11e8-a2f0-061f808edbd0   5Gi        RWO            stork-snapshot-sc   3s
With the PVCs in place, we are ready to launch the statefulset with no changes to the YAML file. Everything remains exactly the same while the data is already restored from the snapshots.
$ oc create -f px-cassandra-app.yaml
statefulset.apps "cassandra" created
Check the data through the cqlsh from one the Cassandra pods.
$ oc exec cassandra-0 -- cqlsh -e 'select * from classicmodels.offices'

 officecode | addressline1           | addressline2 | city          | country   | phone            | postalcode | state      | territory
------------+------------------------+--------------+---------------+-----------+------------------+------------+------------+-----------
          6 |  5-11 Wentworth Avenue |     Floor #2 |        Sydney | Australia |  +61 2 9264 2451 |   NSW 2010 |       null |      APAC
          7 |    25 Old Broad Street |      Level 7 |        London |        UK | +44 20 7877 2041 |   EC2N 1HN |       null |      EMEA
          4 | 43 Rue Jouffroy abbans |         null |         Paris |    France |  +33 14 723 4404 |      75017 |       null |      EMEA
          3 |   523 East 53rd Street |      apt. 5A |           NYC |       USA |  +1 212 555 3000 |      10022 |         NY |        NA
          5 |            4-1 Kioicho |         null |         Tokyo |     Japan |  +81 33 224 5000 |   102-8578 | Chiyoda-Ku |     Japan
          8 |                    BKC |   Building 2 |        Mumbai |        MH |   +91 22 8765434 |     400051 |       null |      APAC
          2 |       1550 Court Place |    Suite 102 |        Boston |       USA |  +1 215 837 0825 |      02107 |         MA |        NA
          1 |      100 Market Street |    Suite 300 | San Francisco |       USA |  +1 650 219 4782 |      94080 |         CA |        NA

(8 rows)
Congratulations! You have successfully restored an application consistent snapshot for Cassandra.
Portworx can easily be deployed on Red Hat OpenShift to run stateful workloads like Cassandra in production. It integrates well with K8s statefulsets by providing dynamic provisioning. Additional operations such as expanding the volumes and performing backups stored as snapshots on object storage can be performed while managing production workloads.


