Unified Infrastructure: Integrating Portworx Enterprise Storage with SUSE Virtualization
The move toward cloud-native architectures demands robust infrastructure capable of handling both traditional virtual machines (VMs) and modern containerized applications seamlessly. The integration of **Portworx Enterprise** storage by Pure Storage with **SUSE Virtualization** (formerly Harvester) provides a resilient, scalable, and unified platform for mission-critical workloads.
This guide offers a high-level overview of this powerful combination and walks through the essential steps for installation and basic configuration.
Understanding the Core Platforms
SUSE Virtualization (Harvester)
SUSE Virtualization is a modern, open, and interoperable Hyperconverged Infrastructure (HCI) solution built directly on Kubernetes.
As a flexible platform, SUSE Virtualization leverages components like SUSE Linux Micro and RKE2 to deliver a secure, resilient, and scalable environment designed for managing both container and virtual machine workloads. To fully leverage features like **high availability**, a cluster requires at least three nodes.
Portworx Enterprise
Portworx Enterprise is a leading cloud-native storage and data management platform designed specifically for Kubernetes. It delivers **elastic scalability, industry-leading availability, and self-service access to storage infrastructure.
Portworx Enterprise brings unparalleled benefits to containerized and virtualized environments, including high availability, robust backup and data protection, hybrid cloud mobility, and multi-cluster support. It achieves this integration via the native Container Storage Interface (CSI), which exposes underlying block and file storage to workloads, including KubeVirt VMs running on SUSE Virtualization.
Installation and Configuration Steps
The installation of Portworx Enterprise on SUSE Virtualization is managed via Kubernetes manifests generated through Portworx Central. The operator-based deployment method is recommended for its ease of management and orchestration of updates.
Preparation
Let’s take a moment to review the requirements to install Portworx Enterprise, and configure access to our SUSE Virtualization cluster with kubectl.
Portworx Enterprise and SUSE Virtualization Requirements
Before installation, administrators must ensure the cluster meets the minimum requirements.
Our environment features a 3-node SUSE Virtualization cluster. We will be using local SSDs to create our Portworx Enterprise Cluster, but any other block device is supported. This includes Pure Flasharray ( #update-me) disks!
For a full list of SUSE Virtualization requirements, see the SUSE documentation. For a full list of Portworx Enterprise requirements, see the Portworx documentation.
Kubectl Access to SUSE Virtualization Cluster
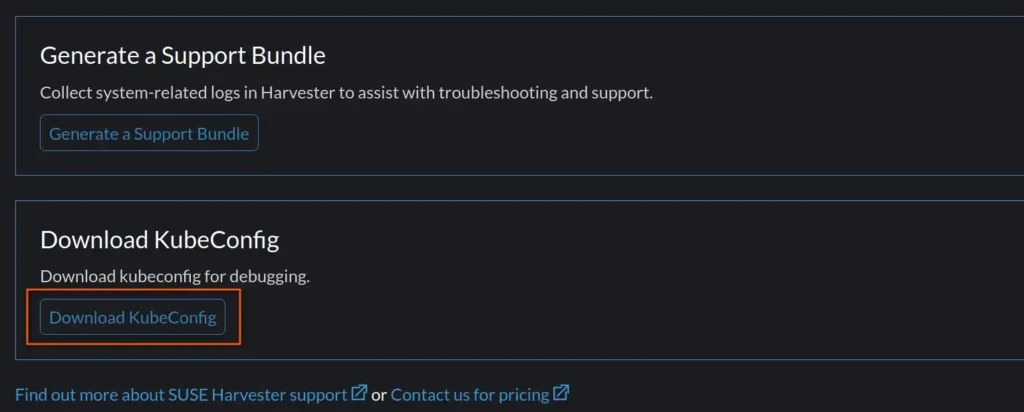
The installation of Portworx Enterprise requires kubectl access to the SUSE Virtualization cluster. In order to get access, we must download a KubeConfig file from the SUSE Virtualization cluster. We can obtain this configuration by following the steps below:
- Log in to the SUSE Virtualization cluster.
- Click ‘Support’ in the lower left of the screen.
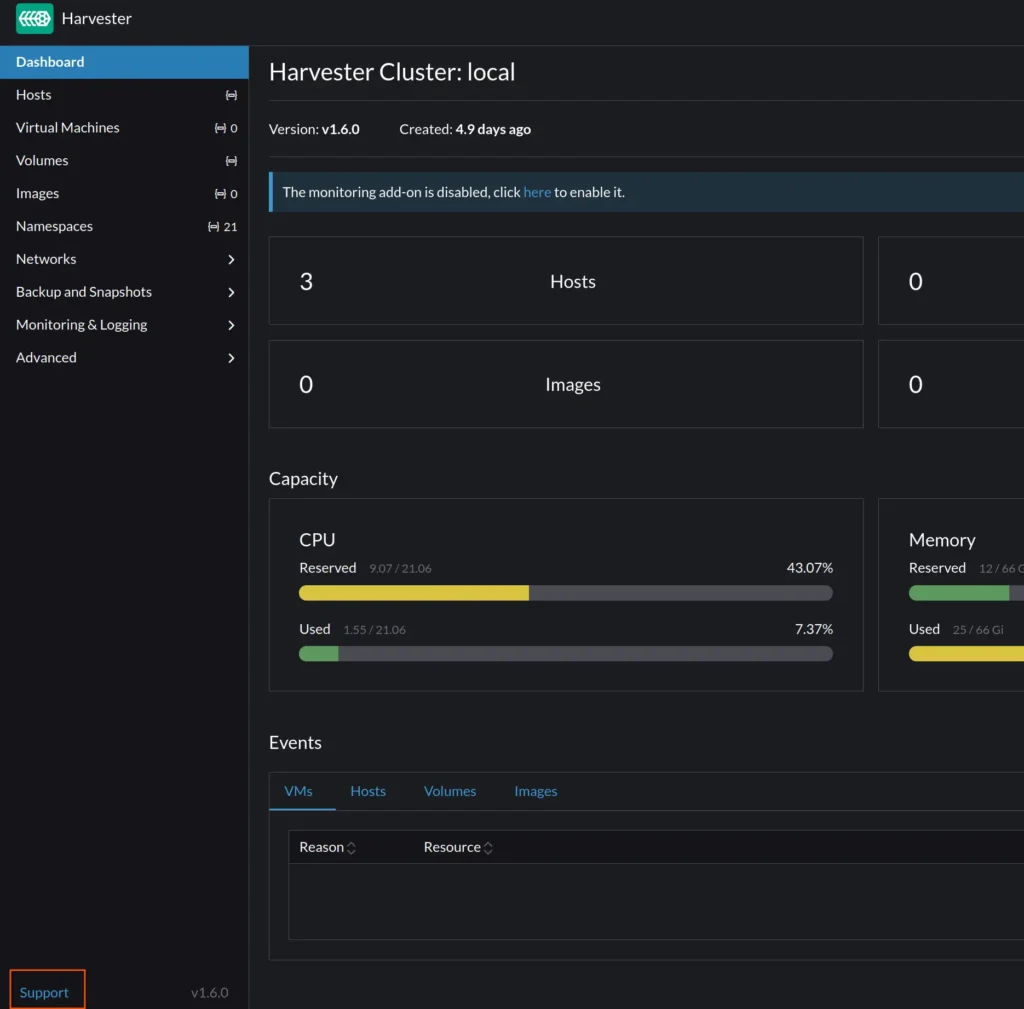
- Click ‘Download KubeConfig button.
- Open a new terminal and run:
export KUBECONFIG=~/Downloads/local.yaml
(kubectl version --short 2>&1 || kubectl version) | awk -Fv '/Server Version: / {print $3}'
If your terminal returns a Kubernetes version, you have successfully set up console access!
Generating the Portworx Manifests
The installation of Portworx consists of two parts:
-
-
- A Kubernetes Operator
- A Custom Resource called a StorageCluster
-
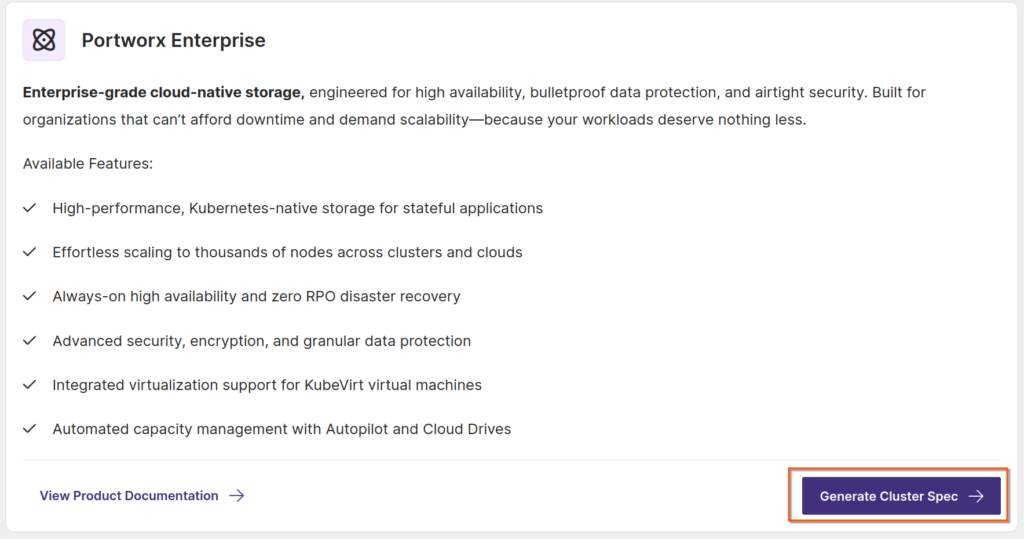
Thankfully, Portworx has a configuration builder we can use to generate our StorageCluster. Let’s head over to https://central.portworx.com to start the configuration.
We can launch the wizard by registering for an account (or using a github or Google login) and clicking on the ‘Generate Cluster Spec’ button:
We can now configure our cluster settings. There are a few fields we need to select. Let’s walk through the options together:
Portworx Version: Select the default ‘3.5’
Platform: This setting configures the type of backing disk we are going to use. Portworx supports many types of backing disks. Because we are using local SSDs, we will select ‘DAS/SAN’
Metadata Path: This setting configures the device path of our Metadata device, which contains configuration data. This should be a dedicated SSD or NVMe device. The device will be specific to your environment.
NOTE: Remember, our demo cluster has two blank SSDs attached; we will use one for the Metadata device and the other for the Portworx Cluster storage. We can always check on the devices that are present on our SUSE Virtualization cluster by running ‘lsblk’ on the SUSE Virtualization nodes.
Distribution Name: Select ‘Rancher Kubernetes Engine (RKE)’
Namespace: Select the default ‘portworx’
K8S Version: Edit the field and paste the version of SUSE Virtualization that you acquired from the terminal earlier.
NOTE: The K8S version is not the same as the version of SUSE Virtualization you are running. Rather, it is the version of Kubernetes that SUSE Virtualization is based on.
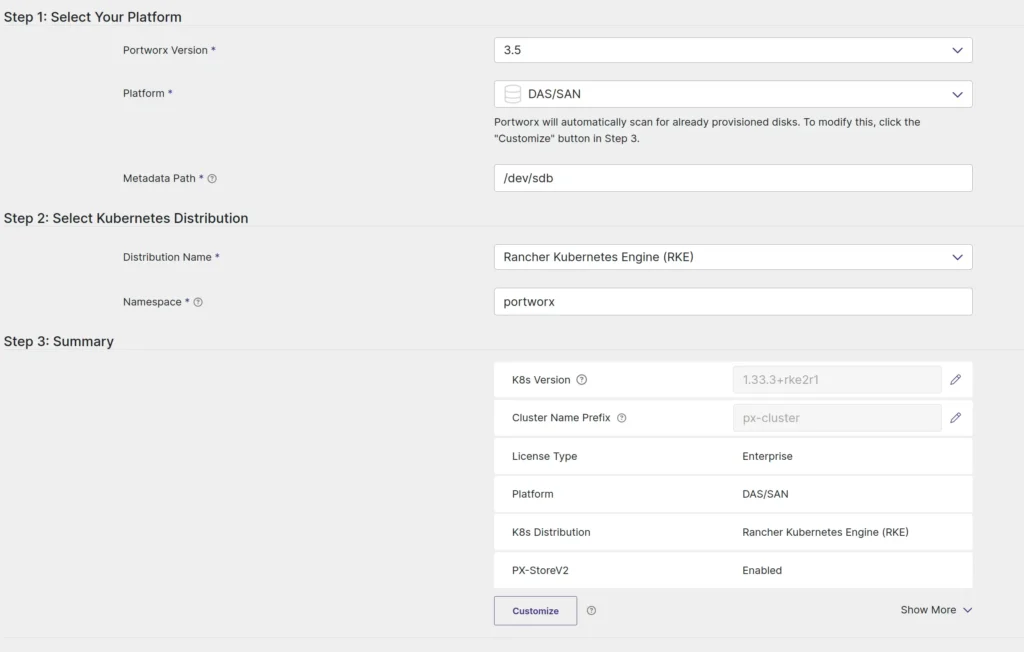
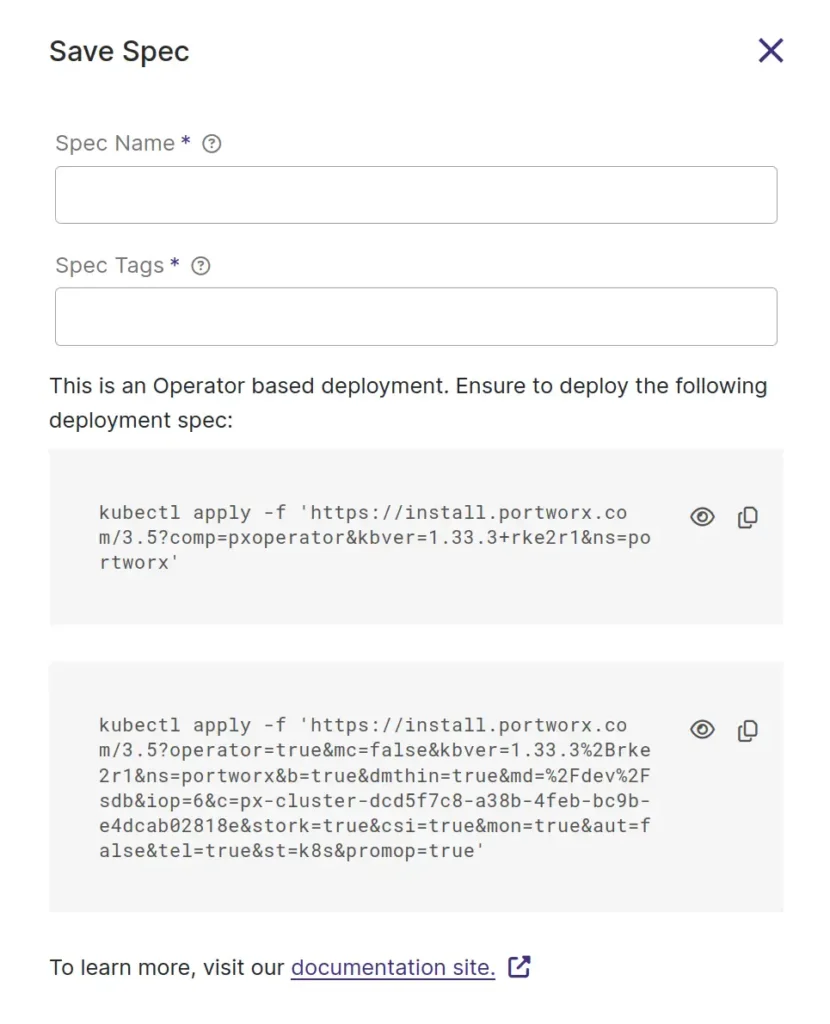
Select ‘Save and Download’. This will display a screen that has all of the commands we will need to install Portworx Enterprise.
Install Portworx Enterprise
To install Portworx Enterprise, paste in the two commands we obtained in the previous step:
ccrow@ccrow-ubuntu:~$ kubectl apply -f 'https://install.portworx.com/3.5?comp=pxoperator&kbver=1.33.3+rke2r1&ns=portworx'
namespace/portworx created
serviceaccount/portworx-operator created
clusterrole.rbac.authorization.k8s.io/portworx-operator created
clusterrolebinding.rbac.authorization.k8s.io/portworx-operator created
deployment.apps/portworx-operator created
ccrow@ccrow-ubuntu:~$ kubectl apply -f 'https://install.portworx.com/3.5?operator=true&mc=false&kbver=1.33.3%2Brke2r1&ns=portworx&b=true&dmthin=true&md=%2Fdev%2Fvdb&iop=6&c=px-cluster-dcd5f7c8-a38b-4feb-bc9b-e4dcab02818e&stork=true&csi=true&mon=true&aut=false&tel=true&st=k8s&promop=true'
storagecluster.core.libopenstorage.org/px-cluster-dcd5f7c8-a38b-4feb-bc9b-e4dcab02818e created
Note that we must run the above commands in the same terminal window where we exported the KUBECONFIG environment variable. KUBECONFIG points at the configuration we want our kubectl to use, and it is important that we tell kubectl to use our SUSE Virtualization KubeConfig file that we downloaded earlier!
We can monitor the installation by running:
watch kubectl -n portworx get pods
We know the installation has finished when all three ‘px-cluster’ pods show ready.
Configure SUSE Virtualization Snapshots
To use SUSE Virtualization’s snapshots, we need to ensure that we have created and configured a VolumeSnapshotClass by running the following command:
cat << EOF | kubectl apply -f -
apiVersion: snapshot.storage.k8s.io/v1
kind: VolumeSnapshotClass
metadata:
  name: px-csi-snapclass
  annotations:
    snapshot.storage.kubernetes.io/is-default-class: "true"
driver: pxd.portworx.com
deletionPolicy: Delete
EOF
This will create a new `VolumeSnapshotClass` that we can use to create snapshots of our virtual machines. Let’s now configure SUSE Virtualization to reference our snapshot class:
- From the SUSE Virtualization UI, find and select csi-driver-config, and then select ⋮ → Edit Setting to access the configuration options.
- Set the Provisioner to the third-party CSI driver in the settings.
- Next, Configure the Volume Snapshot Class Name. This setting points to the name of the
VolumeSnapshotClassused for creating volume snapshots or VM snapshots, in our example above, `px-csi-snapclass`
We can now use Portworx Enterprise storage classes in SUSE Virtualization!
Conclusion
The integration of Portworx Enterprise storage with SUSE Virtualization (formerly Harvester) establishes a robust, Hyperconverged Infrastructure (HCI) capable of seamlessly managing both traditional Virtual Machines (VMs) and modern containerized applications. SUSE Virtualization provides the scalable, Kubernetes-based platform, while Portworx Enterprise delivers the essential cloud-native data management features, including high availability, elastic scalability, and robust data protection, for all workloads. This unified solution ensures resilience and simplified data access for mission-critical applications by leveraging the Container Storage Interface (CSI) to connect KubeVirt VMs to the powerful storage layer.
Check out our announcement for a list of features included for SUSE Virtualization!
Share
Subscribe for Updates
About Us
Portworx is the leader in cloud native storage for containers.
Thanks for subscribing!

Chris Crow
Sr. Technical Marketing Manager, PortworxChris has been in IT since 1999 where he specializes in cloud-native applications, cloud infrastructure, virtualization, backup and recovery, storage, networking, and automation.
Chris resides in Tacoma, Washington where he enjoys playing bass, camping with his family, and nerding out on craft beer.