


Portworx is a cloud native storage platform to run persistent workloads deployed on a variety of orchestration engines, including Kubernetes. With Portworx, customers can manage the database of their choice on any infrastructure using any container scheduler. It provides a single data management layer for all stateful services, no matter where they run.
Kubemotion is one of the core building blocks of Portworx storage infrastructure. Introduced in Portworx Enterprise 2.0, it allows Kubernetes users to migrate application data and Kubernetes application configurations between clusters, enabling migration, backup & recovery, blue-green deployments, and more.
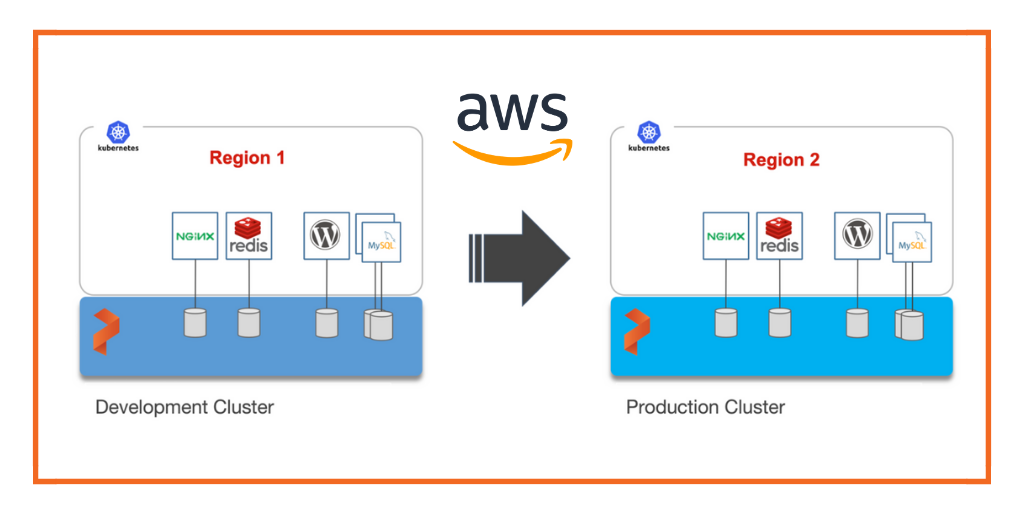
This step-by-step guide demonstrates how to move persistent volumes and Kubernetes resources associated with a stateful application from one AWS region to another.
For enterprises, a common scenario is to run development and test environments in one cloud region and the production environment in another. Development teams may choose a region that’s geographically closer to them while deploying production applications in another region that has low latency for the users and customers.
Even though Kubernetes makes it easy to move stateless workloads across environments, achieving parity of stateful workloads remains a challenge.
For this walkthrough, we will move Kubernetes resources between Amazon Elastic Kubernetes Service (EKS) clusters running in Asia Pacific South (Mumbai) and Asia Pacific Southeast (Singapore). The Mumbai region is used by the development teams for dev/test, and the Singapore region for the production environment.
After thoroughly testing an application in dev/test, the team will use Portworx and Kubemotion to move the storage volumes and application resources reliably from the development to the production environment.

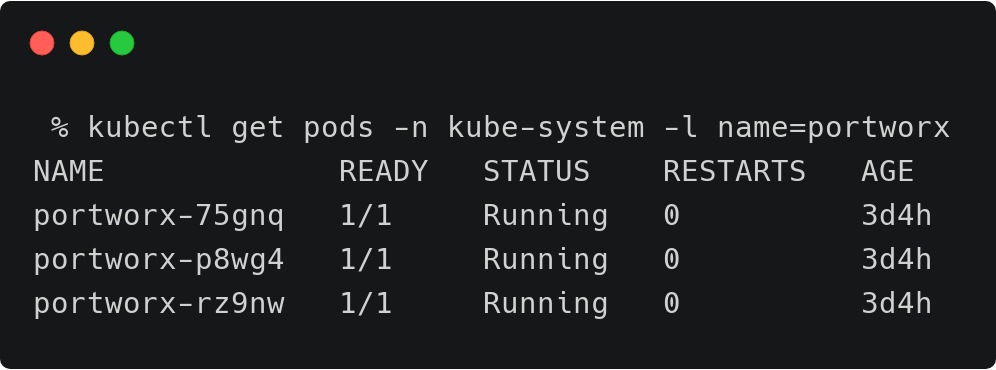
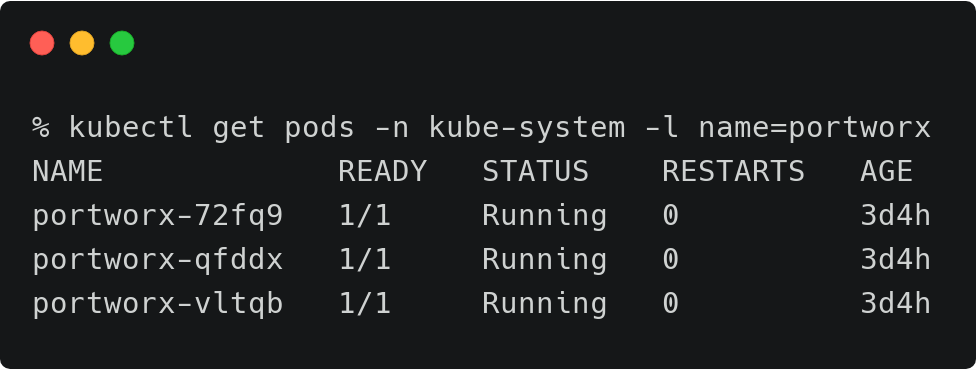
We have two Amazon EKS clusters—dev and production—running in the Mumbai and Singapore regions of AWS. Both of them have the latest version of Portworx cluster up and running.
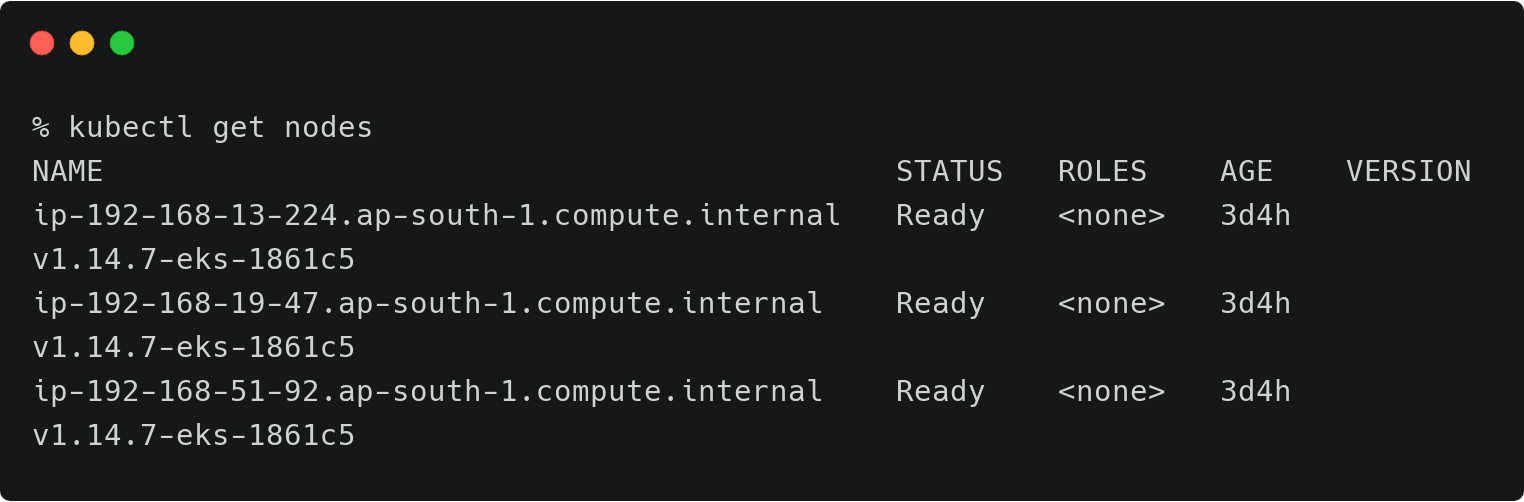
The above EKS cluster represents the development environment running in the Mumbai (ap-south-1) region of AWS.
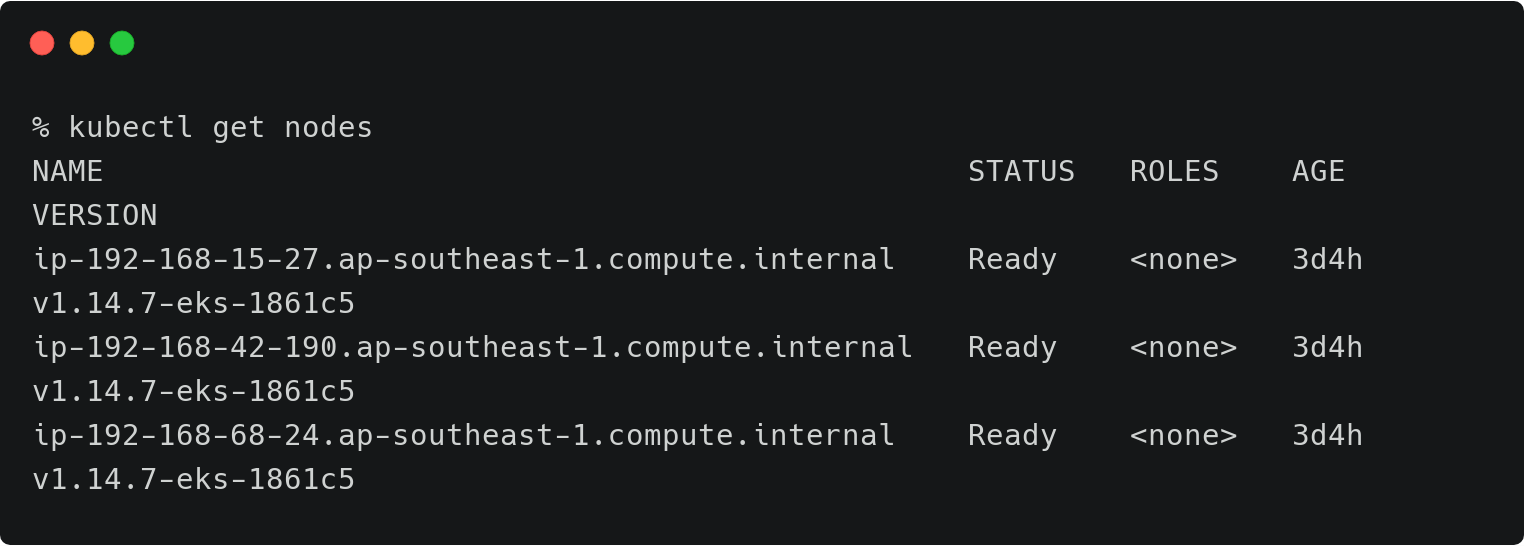
The above EKS cluster represents the development environment running in the Singapore (ap-southeast-1) region of AWS.
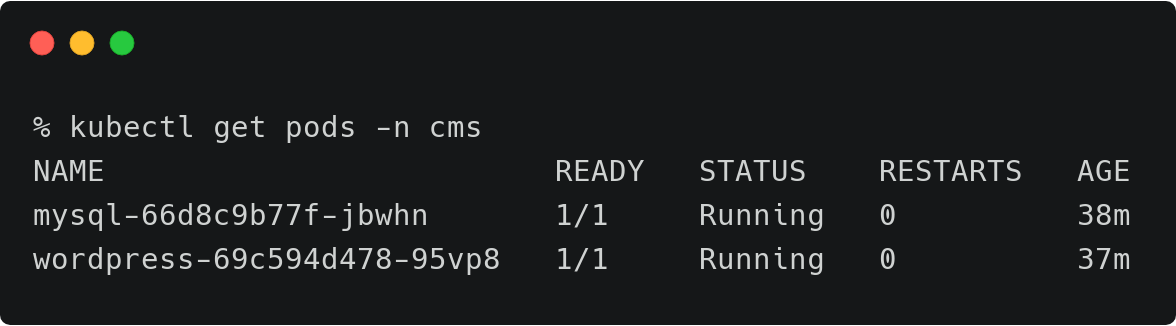
The dev/test environment currently runs a LAMP-based content management system that needs to be migrated to production.
Tip: To navigate between two kubeconfig contexts representing different clusters, use the kubectx tool and rename the contexts with dev and prod labels.
kubectx
kubectx dev=.
kubectx
kubectx prod=.
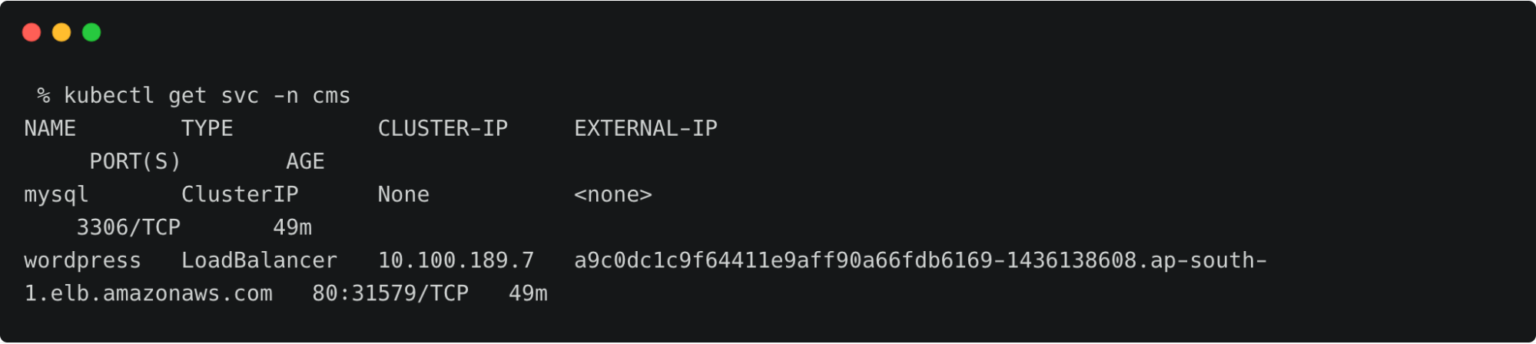
It runs two deployments—MySQL and WordPress—in the cms namespace.
For a detailed tutorial on configuring a highly-available WordPress stack on Amazon EKS, please refer to this guide.
The persistent volumes attached to these pods are backed by a Portworx storage cluster.
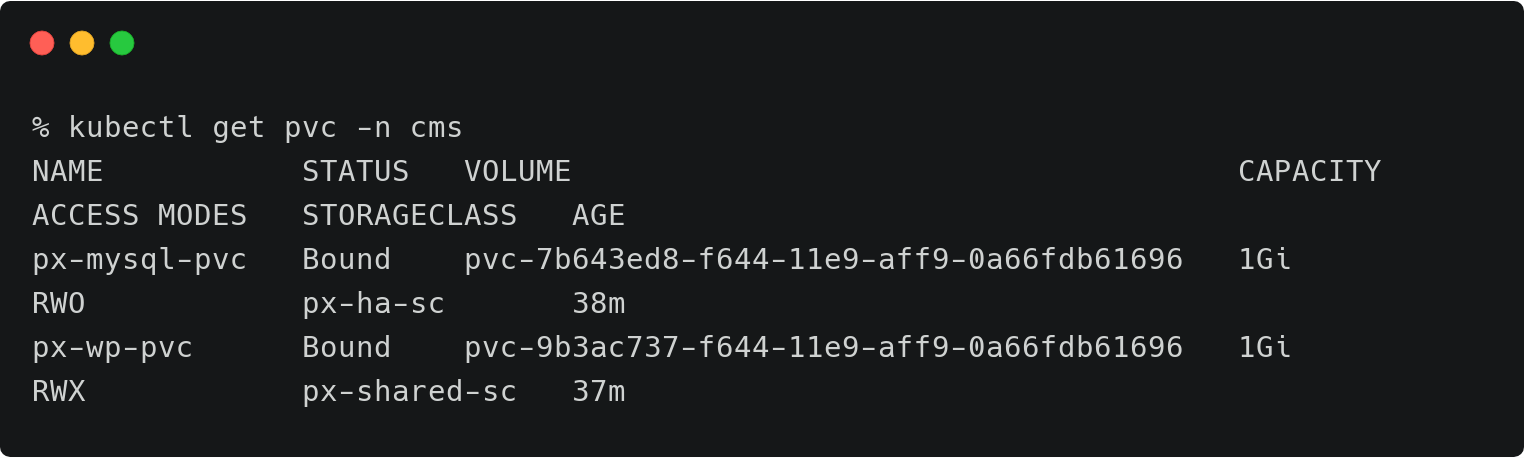
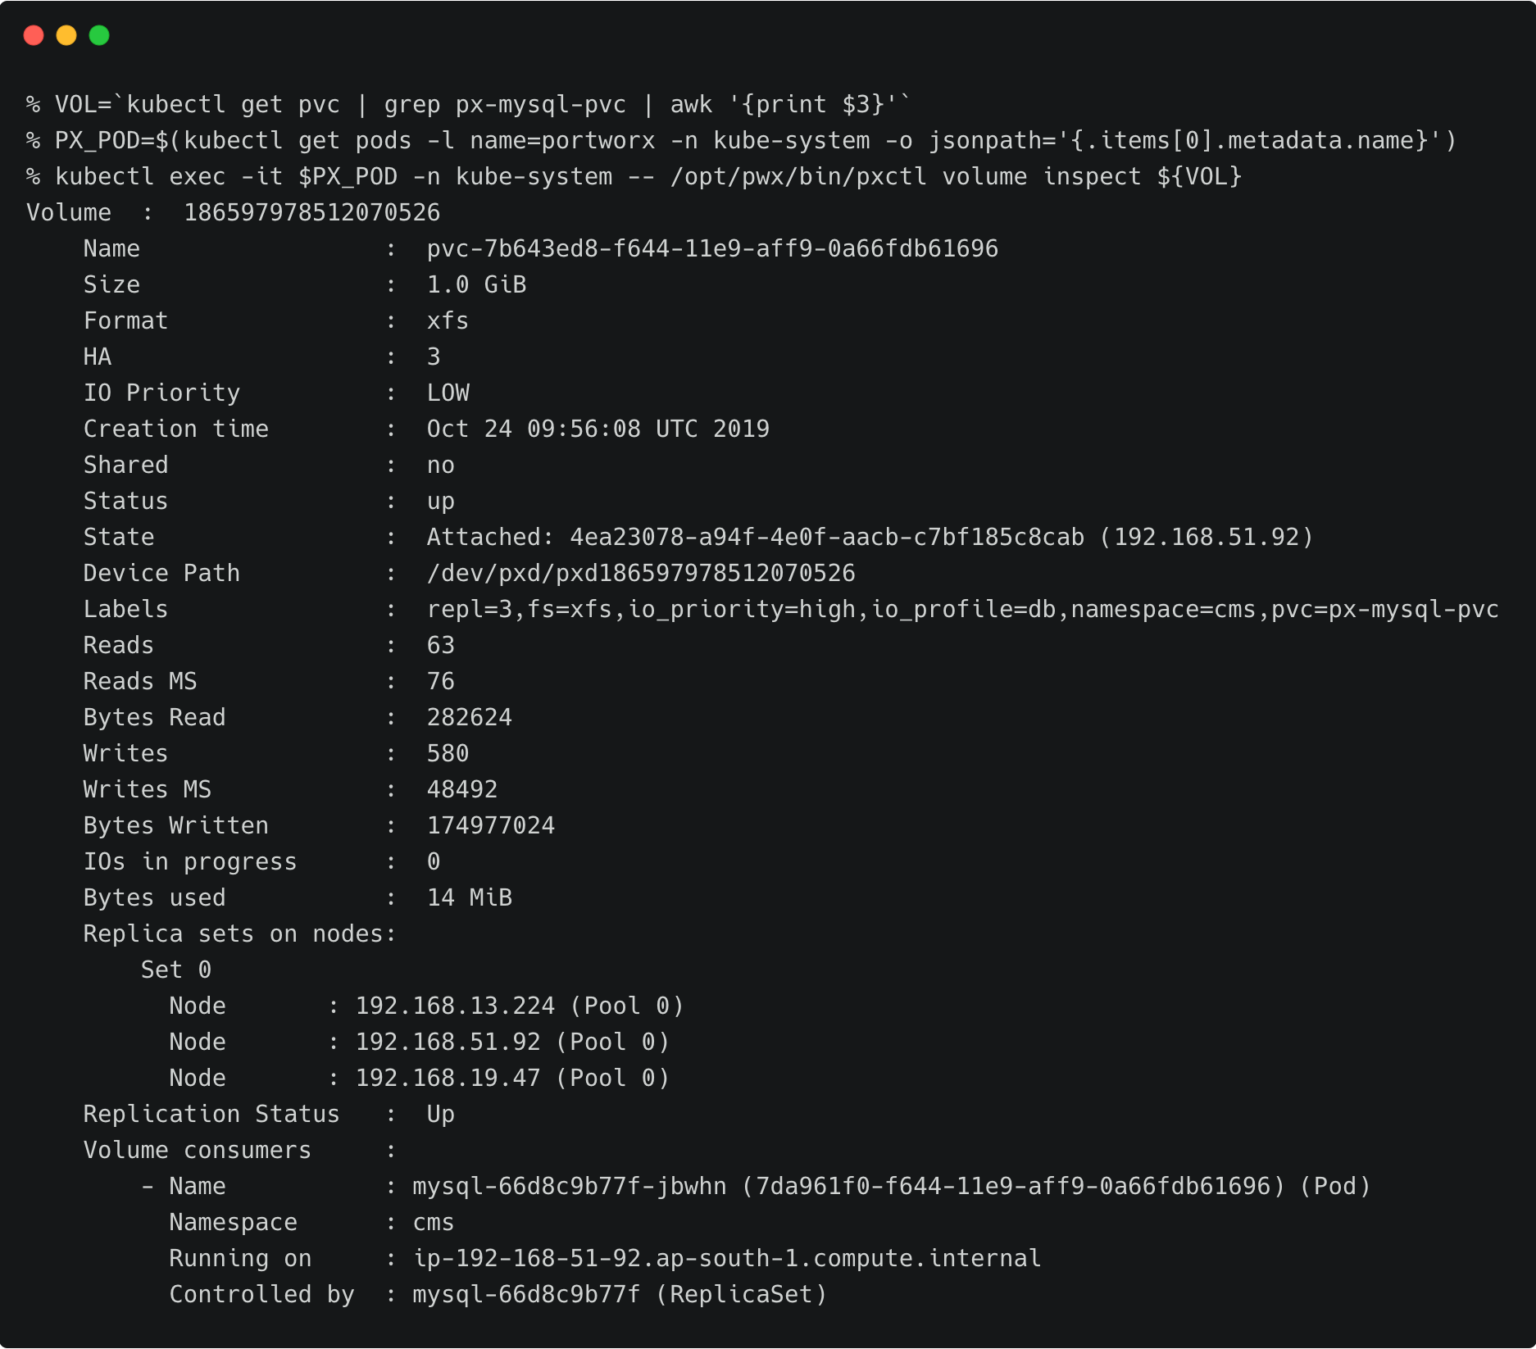
The volume below is attached to the MySQL pod.
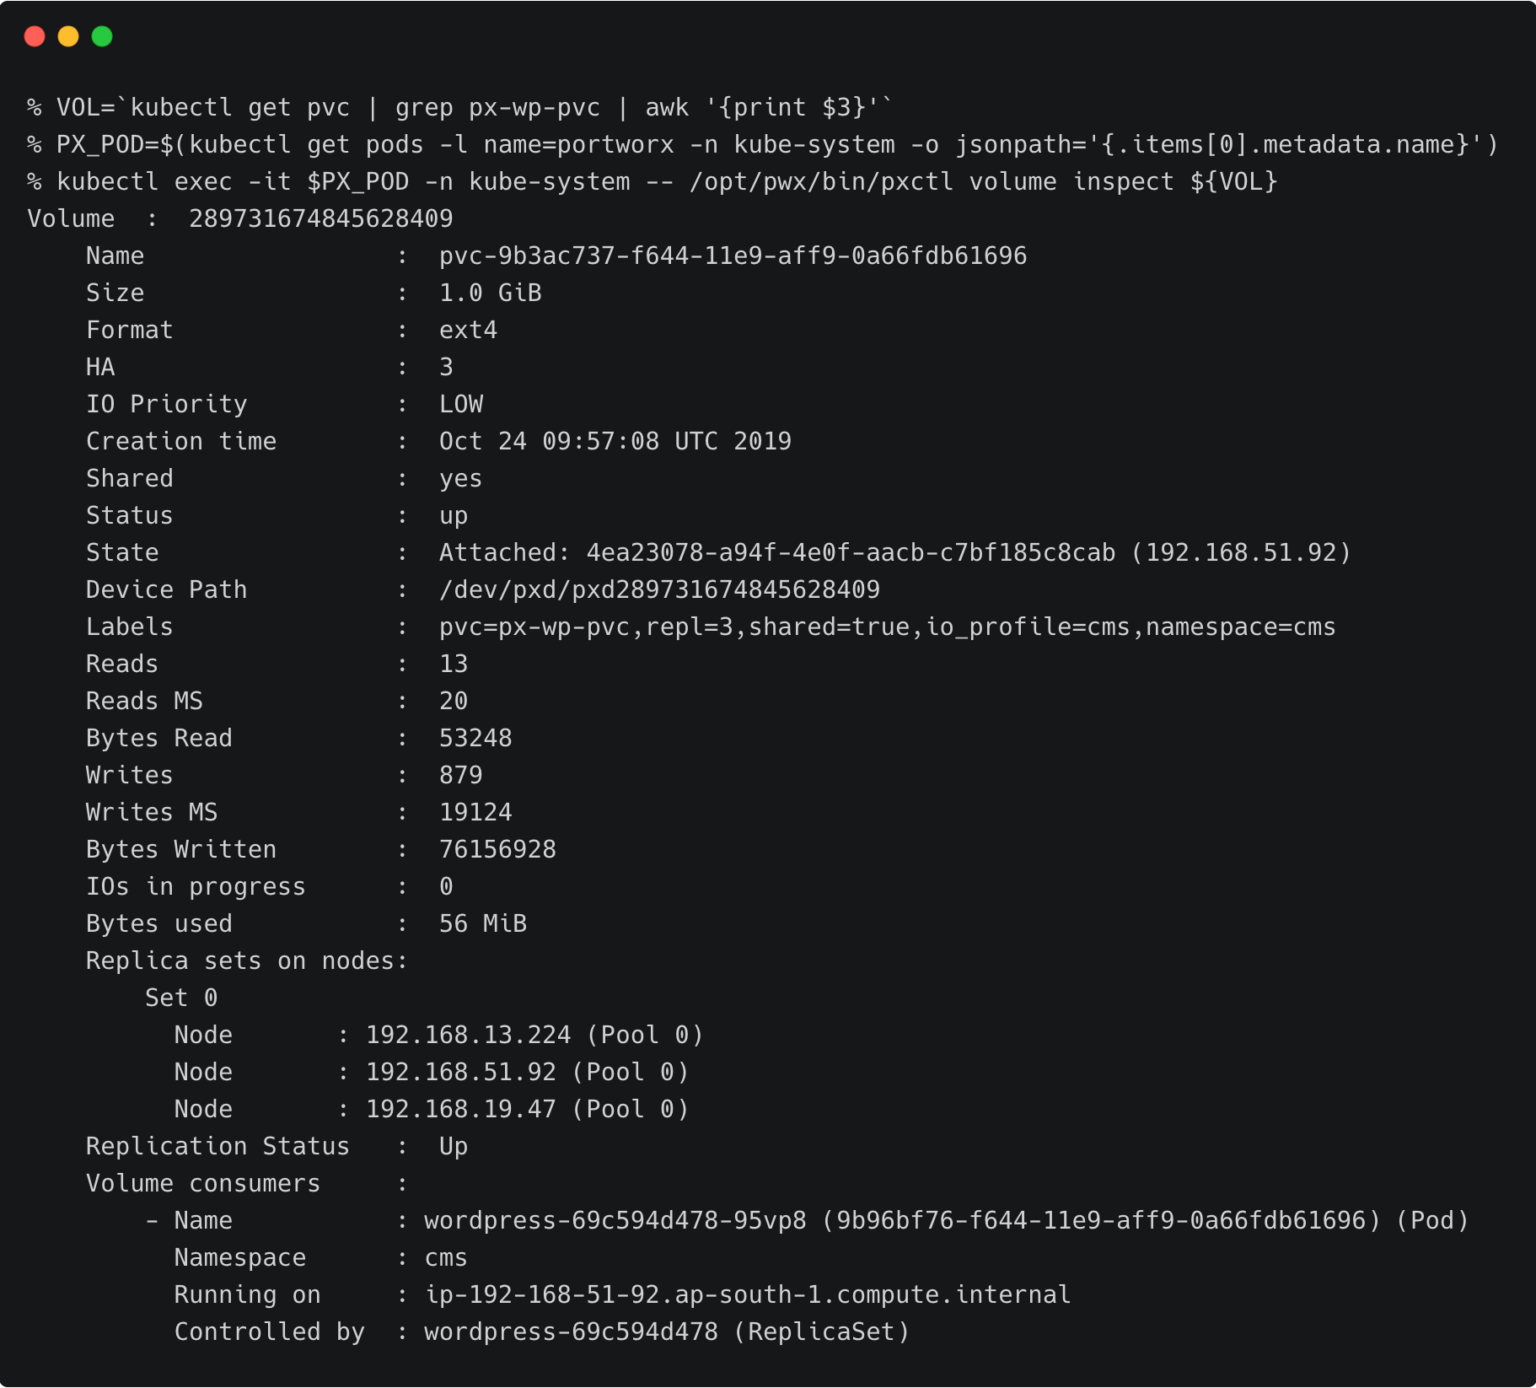
For the WordPress CMS, there is a shared Portworx volume attached to the pods.
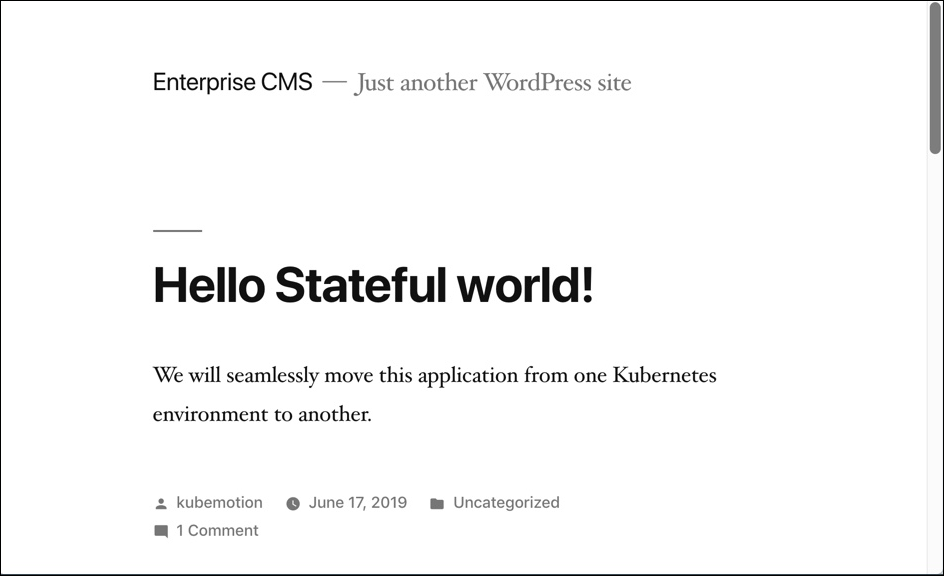
The fully configured application is accessed through the IP address of the load balancer.
Before we can migrate the resources, we need to configure the source and destination clusters.
Follow the steps below to prepare the environments.
We need to create the object store credentials on both source and destination clusters. In order to create this, we have to retrieve the UUID of the destination cluster, which will be appended to the name of the credential.
To complete this step, you need the access key and secret key of the AWS account. If you have configured the AWS CLI, you can find these values at ~/.aws/credentials.
Switch to prod cluster and run the command below to copy the UUID.
PX_POD=$(kubectl get pods -l name=portworx -n kube-system -o jsonpath='{.items[0].metadata.name}')
kubectl -n=kube-system exec $PX_POD -- /opt/pwx/bin/pxctl status
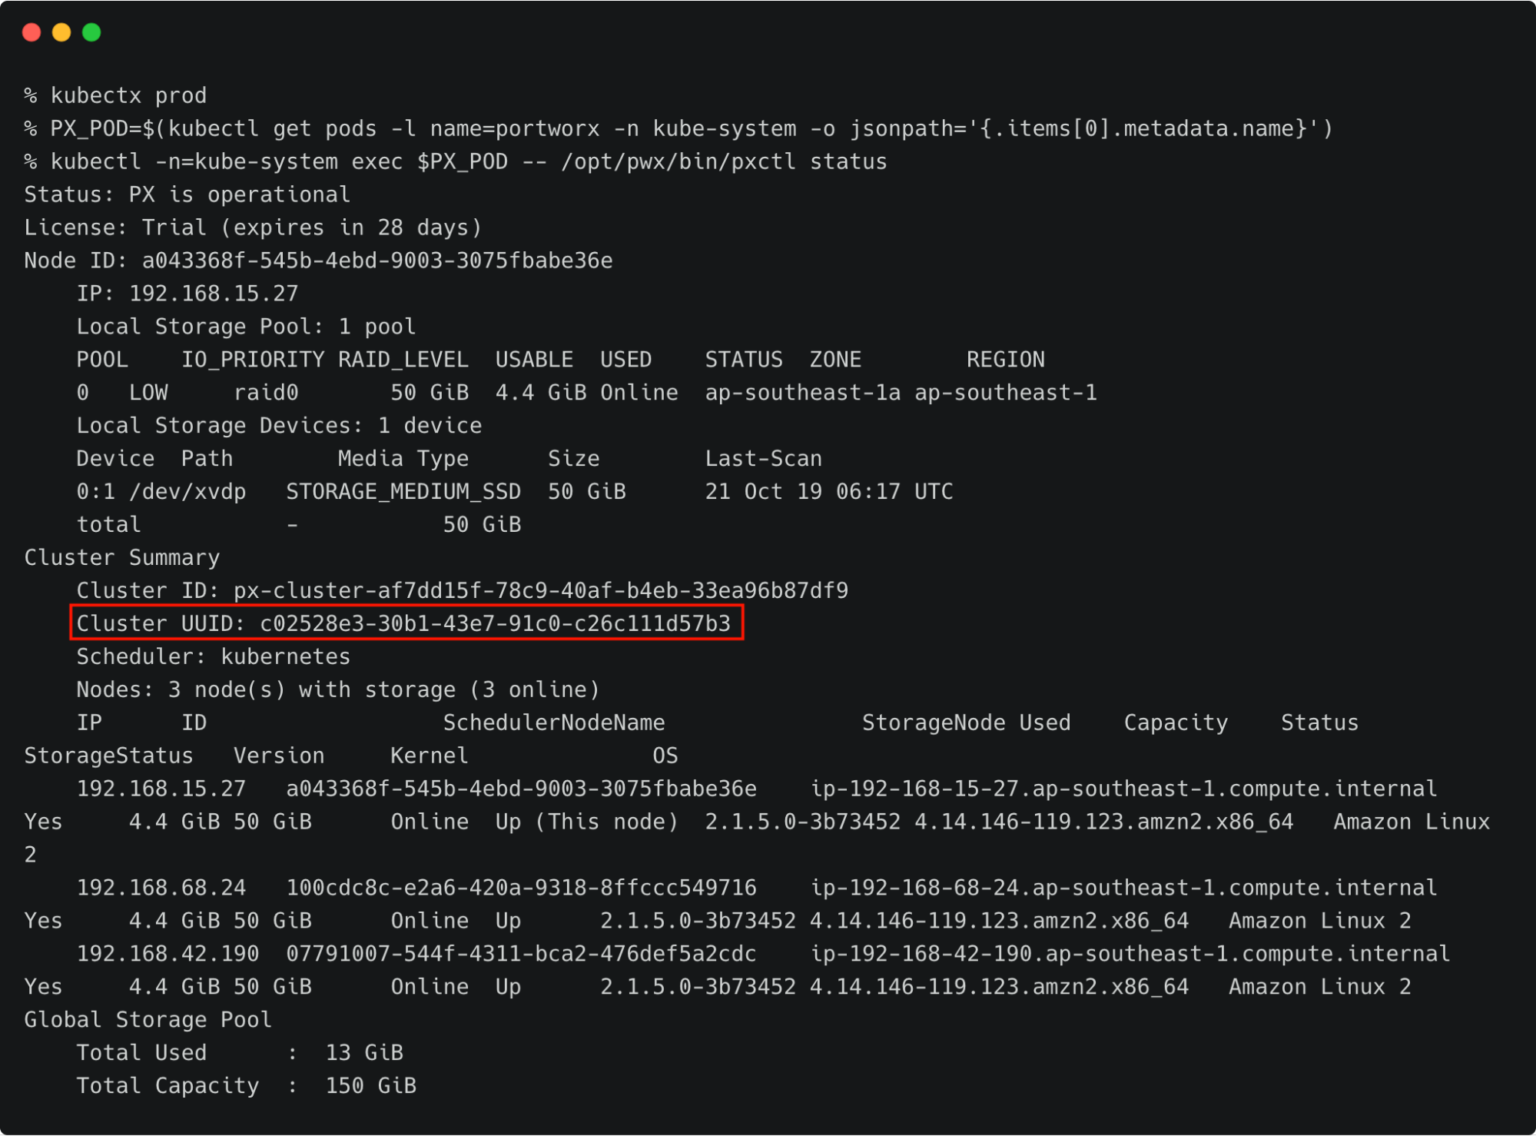
Make a note of the cluster UUID and keep it in a safe place.
Let’s create the credentials on the production cluster while we are still using its context.
kubectl -n=kube-system exec $PX_POD -- /opt/pwx/bin/pxctl credentials create \
	--provider s3 \
	--s3-access-key  \
	--s3-secret-key  \
	--s3-region ap-southeast-1  \
	--s3-endpoint s3.ap-southeast-1.amazonaws.com clusterPair_c02528e3-30b1-43e7-91c0-c26c111d57b3
Make sure that the credential name follows the convention of ‘clusterPair_UUID’.
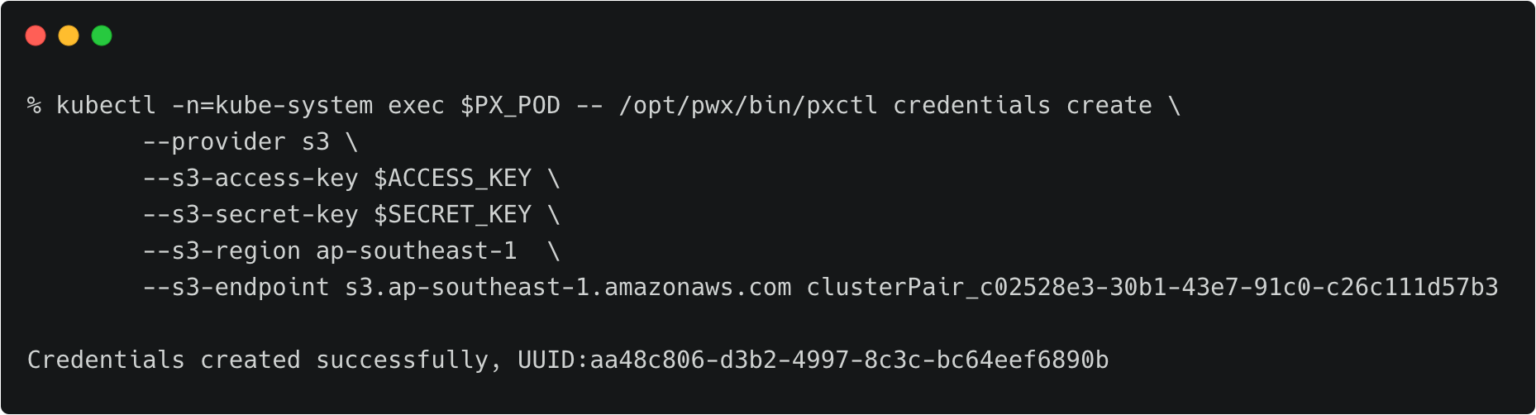
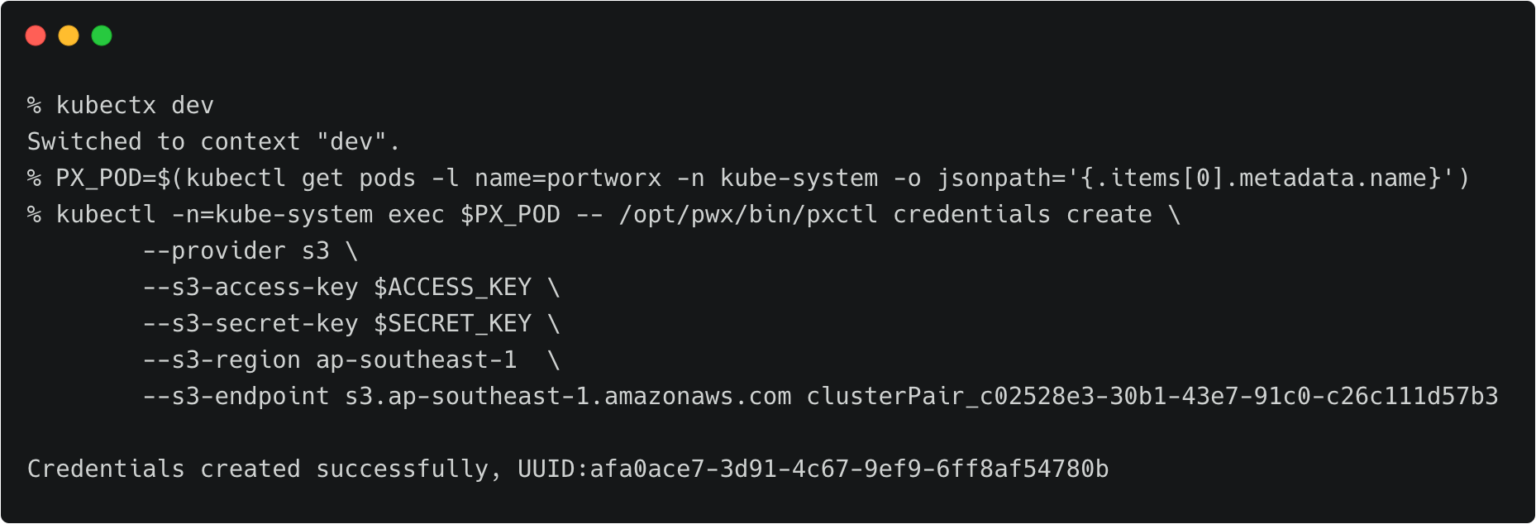
Switch to the development cluster and repeat the same steps to create the credentials for the source.
The next step is to retrieve the cluster token from the production cluster, which is used to generate the YAML file with the cluster pair definition.
Let’s switch to the production cluster and run the command below to access the token.
kubectx prod
PX_POD=$(kubectl get pods -l name=portworx -n kube-system -o jsonpath='{.items[0].metadata.name}')
kubectl -n=kube-system exec $PX_POD -- /opt/pwx/bin/pxctl cluster token show
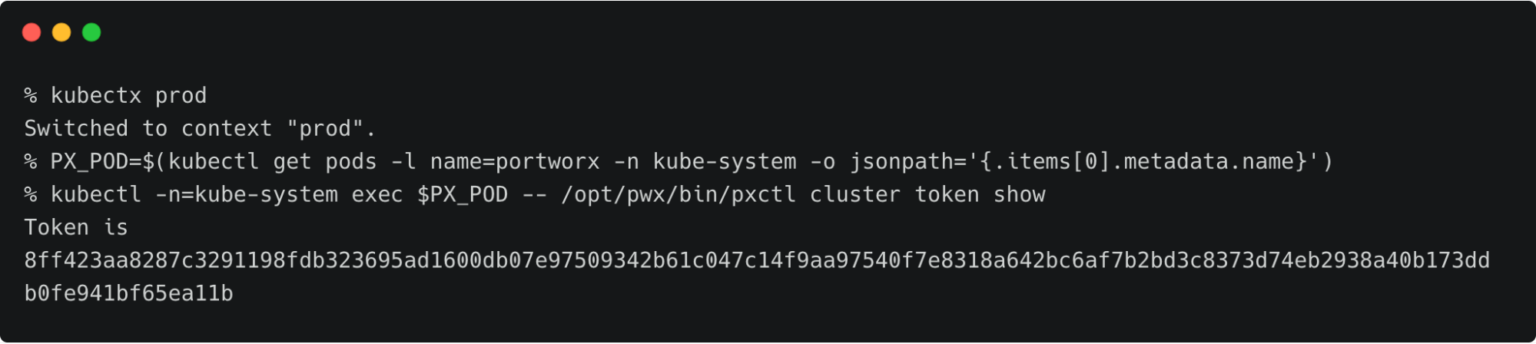
Make a note of the cluster token and keep it in a safe place.
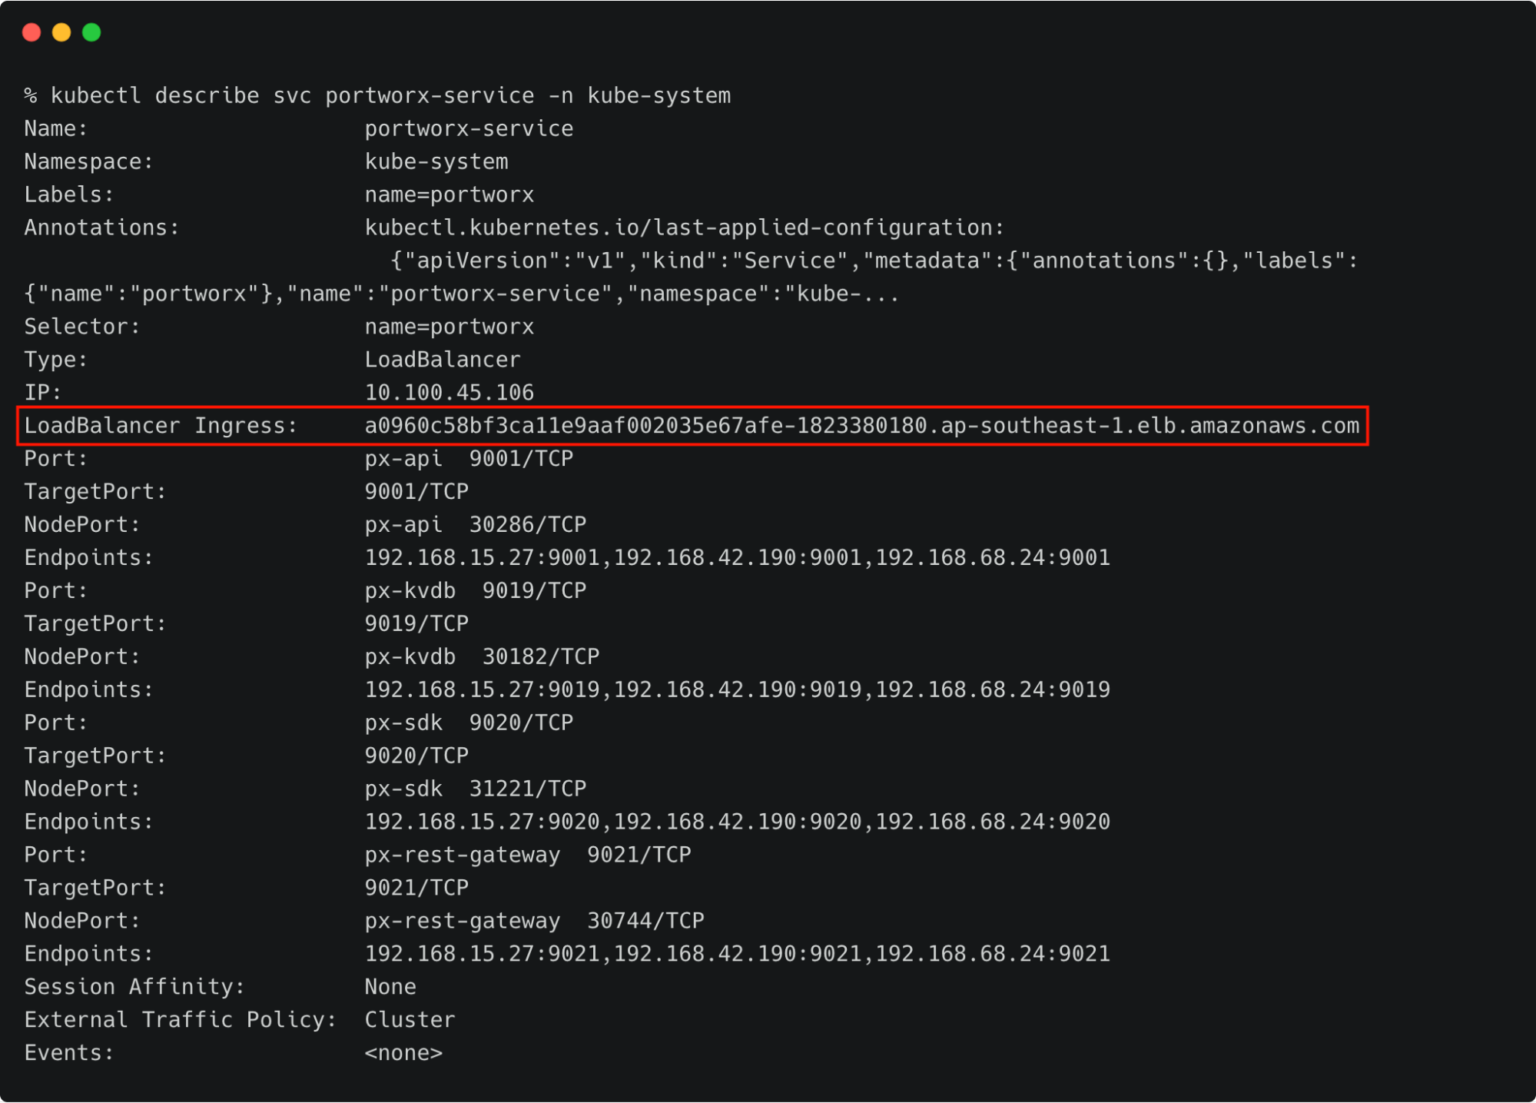
We also need the DNS name of the load balancer associated with the Portworx Service on the production cluster. We can retrieve that with the command below.
kubectl describe svc portworx-service -n kube-system
At this point, you should have the data below ready:
Let’s generate the scaffolded YAML file from the production (destination) cluster. This will be applied to the development (source) cluster later.
Make sure you are still using the prod context, and run the below command.
kubectx prod
storkctl generate clusterpair -n cms prodcluster > clusterpair.yaml
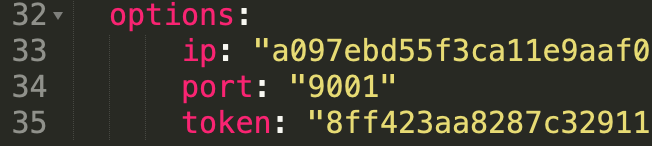
Open clusterpair.yaml and add the details below under options. They reflect the public IP address or DNS name of the load balancer in the destination cluster, port, and the token associated with the destination cluster.
We are now ready to pair the clusters by applying the clusterpair specification to the source cluster.
Let’s switch to the source cluster (dev environment) to pair the clusters.
kubectx dev
kubectl apply -f clusterpair.yaml
kubectl get clusterpair -n cms
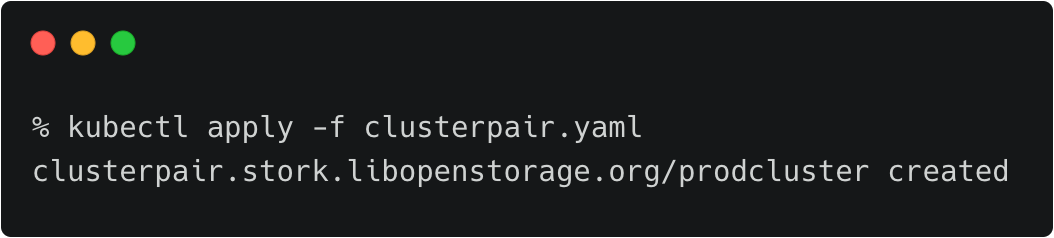
The output of <pre>kubectl get clusterpairs</pre> confirms that the pairing has been done.
We can verify the pairing status with the storkctl CLI. Ensure that both storage-status and scheduler-status are ready with no errors.
storkctl -n=cms get clusterpair
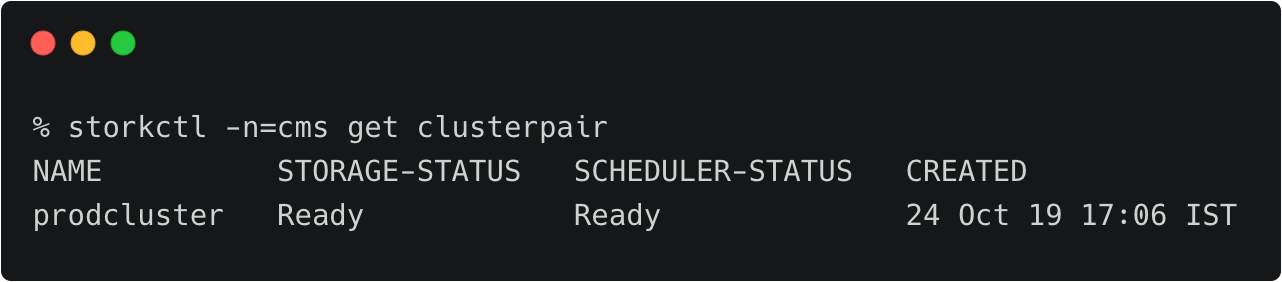
Congratulations! You have successfully paired the source and destination clusters.
We are now ready to start the migration.
Make sure that you are using the dev context, and follow the steps below to start the migration of the CMS application.
Create a YAML file called migration.yaml with the content below.
apiVersion: stork.libopenstorage.org/v1alpha1
kind: Migration
metadata:
  name: cmsmigration
  namespace: cms
spec:
  # This should be the name of the cluster pair created above
  clusterPair: prodcluster
  # If set to false this will migrate only the Portworx volumes. No PVCs, apps, etc will be migrated
  includeResources: true
  # If set to false, the deployments and stateful set replicas will be set to 0 on the destination.
  # There will be an annotation with "stork.openstorage.org/migrationReplicas" on the destinationto store the replica count from the source.
  startApplications: true
  # List of namespaces to migrate
  namespaces:
  - cms
This definition contains critical information like the name of the clusterpair, namespaces to be included in the migration, and the type of resources to be migrated.
Submit the YAML file to the dev cluster to initiate the migration job.
kubectl apply -f migration.yaml
migration.stork.libopenstorage.org/cmsmigration created
We can monitor the migration through storkctl.
storkctl get migration -n cms

Once the migration is done, storkctl reports the final number of volumes and resources migrated to the destination cluster.

To get detailed information on the migration, run the command below.
kubectl describe migration cmsmigration -n=cms
Name:         cmsmigration
Namespace:    cms
Labels:
Annotations:  kubectl.kubernetes.io/last-applied-configuration:
                {"apiVersion":"stork.libopenstorage.org/v1alpha1","kind":"Migration","metadata":{"annotations":{},"name":"cmsmigration","namespace":"cms"}...
API Version:  stork.libopenstorage.org/v1alpha1
Kind:         Migration
Metadata:
  Creation Timestamp:  2019-10-24T11:40:24Z
  Generation:          9
  Resource Version:    851953
  Self Link:           /apis/stork.libopenstorage.org/v1alpha1/namespaces/cms/migrations/cmsmigration
  UID:                 11610f2f-f653-11e9-aff9-0a66fdb61696
Spec:
  Cluster Pair:       prodcluster
  Include Resources:  true
  Include Volumes:    true
  Namespaces:
    cms
  Post Exec Rule:
  Pre Exec Rule:
  Selectors:
  Start Applications:  true
Status:
  Finish Timestamp:  2019-10-24T11:41:38Z
  Resources:
    Group:      core
    Kind:       Service
    Name:       mysql
    Namespace:  cms
    Reason:     Resource migrated successfully
    Status:     Successful
    Version:    v1
    Group:      core
    Kind:       Service
    Name:       wordpress
    Namespace:  cms
    Reason:     Resource migrated successfully
    Status:     Successful
    Version:    v1
    Group:      core
    Kind:       PersistentVolumeClaim
    Name:       px-mysql-pvc
    Namespace:  cms
    Reason:     Resource migrated successfully
    Status:     Successful
    Version:    v1
    Group:      core
    Kind:       PersistentVolumeClaim
    Name:       px-wp-pvc
    Namespace:  cms
    Reason:     Resource migrated successfully
    Status:     Successful
    Version:    v1
    Group:      core
    Kind:       PersistentVolume
    Name:       pvc-7b643ed8-f644-11e9-aff9-0a66fdb61696
    Namespace:
    Reason:     Resource migrated successfully
    Status:     Successful
    Version:    v1
    Group:      core
    Kind:       PersistentVolume
    Name:       pvc-9b3ac737-f644-11e9-aff9-0a66fdb61696
    Namespace:
    Reason:     Resource migrated successfully
    Status:     Successful
    Version:    v1
    Group:      core
    Kind:       Secret
    Name:       default-token-jn77n
    Namespace:  cms
    Reason:     Resource migrated successfully
    Status:     Successful
    Version:    v1
    Group:      apps
    Kind:       Deployment
    Name:       mysql
    Namespace:  cms
    Reason:     Resource migrated successfully
    Status:     Successful
    Version:    v1
    Group:      apps
    Kind:       Deployment
    Name:       wordpress
    Namespace:  cms
    Reason:     Resource migrated successfully
    Status:     Successful
    Version:    v1
  Stage:        Final
  Status:       Successful
  Volumes:
    Namespace:                cms
    Persistent Volume Claim:  px-mysql-pvc
    Reason:                   Migration successful for volume
    Status:                   Successful
    Volume:                   pvc-7b643ed8-f644-11e9-aff9-0a66fdb61696
    Namespace:                cms
    Persistent Volume Claim:  px-wp-pvc
    Reason:                   Migration successful for volume
    Status:                   Successful
    Volume:                   pvc-9b3ac737-f644-11e9-aff9-0a66fdb61696
Events:
  Type     Reason      Age                From   Message
  ----     ------      ----               ----   -------
    Normal   Successful  76s                stork  Volume pvc-7b643ed8-f644-11e9-aff9-0a66fdb61696 migrated successfully
  Normal   Successful  76s                stork  Volume pvc-9b3ac737-f644-11e9-aff9-0a66fdb61696 migrated successfully
  Normal   Successful  73s                stork  /v1, Kind=Service cms/mysql: Resource migrated successfully
  Normal   Successful  72s                stork  /v1, Kind=Service cms/wordpress: Resource migrated successfully
  Normal   Successful  72s                stork  /v1, Kind=PersistentVolumeClaim cms/px-mysql-pvc: Resource migrated successfully
  Normal   Successful  72s                stork  /v1, Kind=PersistentVolumeClaim cms/px-wp-pvc: Resource migrated successfully
  Normal   Successful  72s                stork  /v1, Kind=PersistentVolume /pvc-7b643ed8-f644-11e9-aff9-0a66fdb61696: Resource migrated successfully
  Normal   Successful  72s                stork  /v1, Kind=PersistentVolume /pvc-9b3ac737-f644-11e9-aff9-0a66fdb61696: Resource migrated successfully
  Normal   Successful  72s                stork  /v1, Kind=Secret cms/default-token-jn77n: Resource migrated successfully
  Normal   Successful  72s (x2 over 72s)  stork  (combined from similar events): apps/v1, Kind=Deployment cms/wordpress: Resource migrated successfully
Now we can switch the context to prod and check all the resources created within the cms namespace.
kubectx prod
kubectl get all -n cms
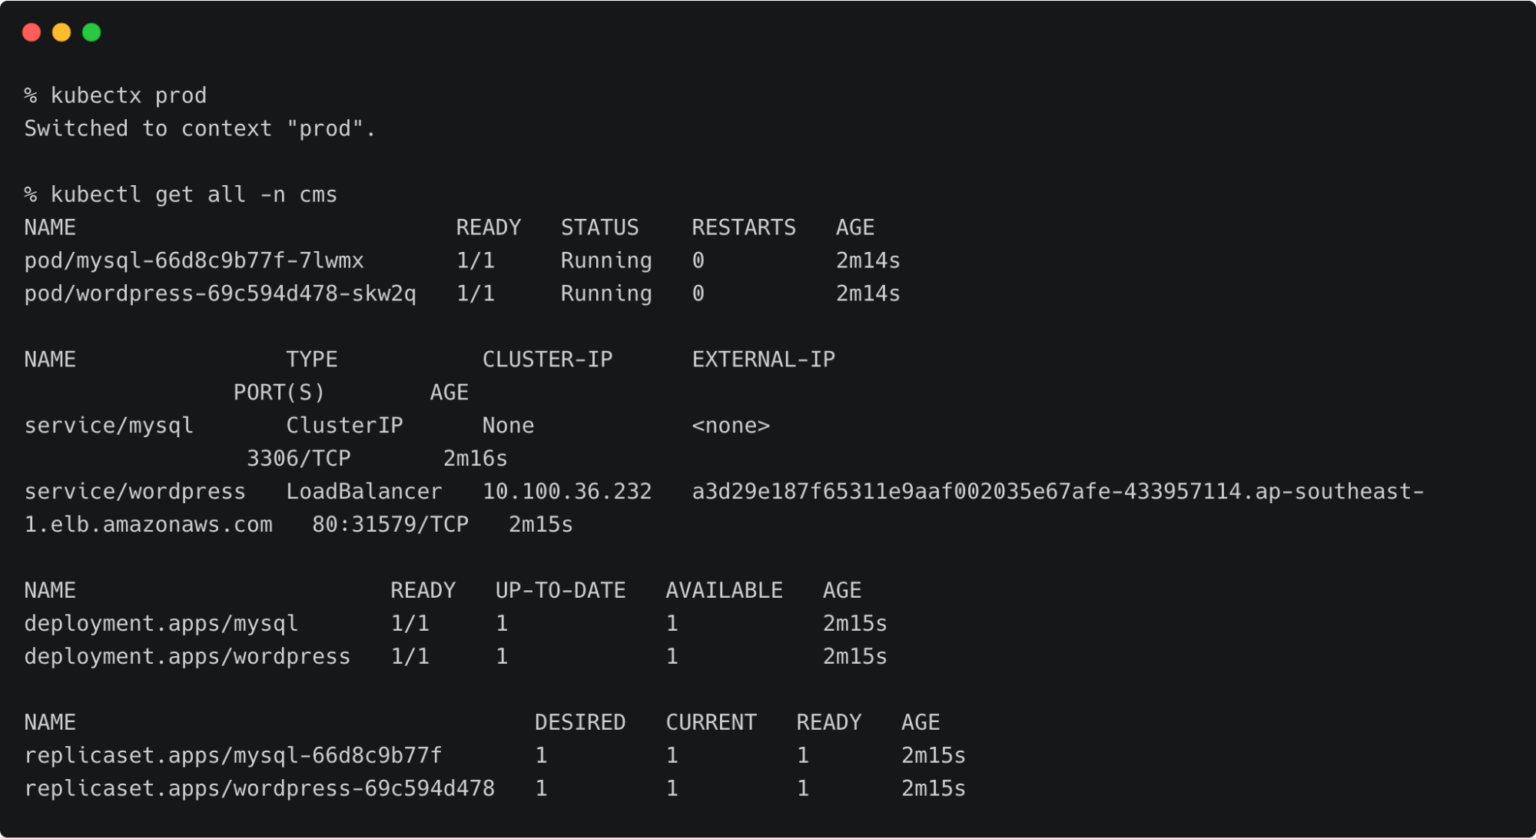
You can also access the application by visiting the CNAME of the load balancer of WordPress service.

Kubemotion extends the power of portability to stateful workloads. It can be used to seamlessly migrate volumes from on-premises to public cloud (hybrid) environments and cross-cloud platforms.


