
Knowledge Article
What VMware Experts Need to Know about Live Migration with KubeVirt

Summarize Blog With
Table of Content
KubeVirt live migration is designed to provide a functional alternative to vMotion, but it remains architecturally unfamiliar to many vSphere admins. KubeVirt uses its own hypervisor technology and wraps it inside Kubernetes pod semantics that can seem at odds with the mental model a vSphere engineer brings to the table. For example, live migration doesn’t “move” a VM. It creates a brand-new pod on the target node, streams memory into it, and deletes the old one. That single fact cascades into a dozen operational surprises covering storage access modes, network identity, CPU compatibility, and failure handling.
In the rest of this article, we’ll give VMware professionals some basic tips to ease their journey with KubeVirt. We’ll map the KubeVirt migration model onto the VMware model, identify the specific points where vSphere intuition breaks down, and explain the operational failure modes that may arise in production.
How widespread is KubeVirt adoption?
KubeVirt documents 40+ production adopters including NVIDIA GeForce NOW (cloud gaming with GPU passthrough), Cloudflare (hundreds of VMs across several clusters for ephemeral build agents), Intel Gaudi (core data center workloads), and ByteDance, among others. Red Hat ships it as OpenShift Virtualization, the enterprise-supported distribution. A SpectroCloud survey found 26% of Kubernetes adopters use KubeVirt, while Portworx found that 58% of surveyed organizations are planning to migrate some VMs to Kubernetes management.
How does KubeVirt run inside Kubernetes?
KubeVirt is a CNCF incubating project that extends Kubernetes with VM lifecycle management through Custom Resource Definitions. The actual virtualization stack is KVM (kernel module) + QEMU (userspace) + virtqemud (modular libvirt daemon), all running inside a standard Kubernetes pod.
Four components form the control plane:
virt-apiis the aggregated API server that validates VM resource definitions.virt-controlleris the cluster-wide process (deployed as a replicated Deployment) that watches for new VirtualMachineInstance objects, creates the corresponding pods, and orchestrates migrations.virt-handleris a privileged DaemonSet on every node. Think of it as the equivalent of hostd/vpxa on ESXi. It performs privileged node-level setup (networking, device passthrough, storage prep) and keeps the cluster state in sync with the actual libvirt domain.virt-launcheris a non-privileged container (although it may need elevated privileges for services like SYS_NICE and NET_BIND_SERVICE for performance tuning and networking) that runs inside every VM’s pod, hosting a per-VM virtqemud instance and the QEMU process.
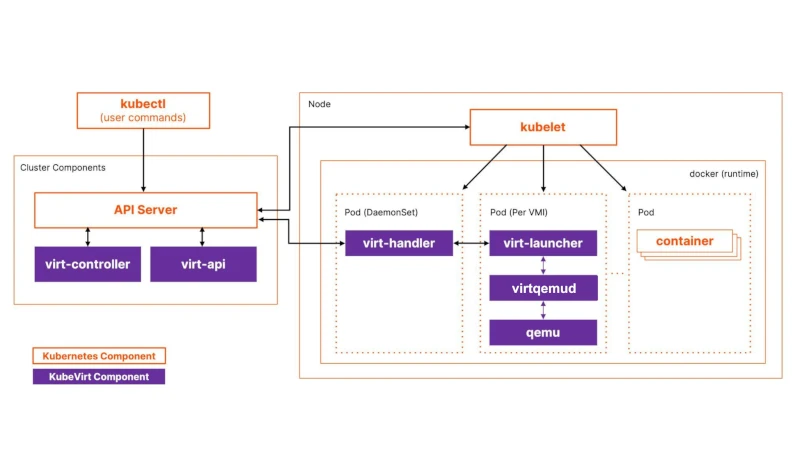
Figure 1: KubeVirt architecture
The CRD hierarchy is the first conceptual hurdle. A VirtualMachine (VM) is the persistent state. It exists even when powered off. A VirtualMachineInstance (VMI) is the ephemeral running state: created when the VM starts, deleted when it stops. The VM controller reconciles between these. If runStrategy: Always is set and the VMI dies, a new one is automatically created. Restarting a VM means deleting the current VMI and creating a new one, which also means a new pod, a new IP, and potentially a different node. There is no equivalent of the persistent VM process identity that vSphere provides.
The process tree inside a virt-launcher pod runs as: virt-launcher-monitor → virt-launcher → virtqemud → qemu-KVM → guest OS. (note: virt-launcher-monitor is the parent of both virt-launcher and virtqemud).
Each VM gets its own isolated virtqemud instance (the modular libvirt daemon) that sees only its own domain. There’s no shared hypervisor process managing multiple VMs like ESXi’s vmkernel.
Bridging storage from VMware to KubeVirt with CDI and Forklift
The Containerized Data Importer (CDI) is KubeVirt’s storage provisioning layer. It’s the equivalent of vSphere’s Content Library, OVF deployment, and template management combined into a declarative Kubernetes system. CDI watches for DataVolume CRDs, spawns importer pods that download/decompress/convert disk images, and writes them to PVCs. The automatic pipeline handles gzip/xz decompression, tar extraction, and qcow2-to-raw conversion (KubeVirt uses raw disk images internally).
For VMware-to-KubeVirt migration specifically, CDI offers a VDDK source that uses VMware’s Virtual Disk Development Kit to pull disks directly from vSphere, supporting Changed Block Tracking for warm migration with incremental deltas. At scale, Forklift (upstream of Red Hat’s Migration Toolkit for Virtualization) orchestrates the full pipeline: PVC creation, virt-v2v guest conversion (removing VMware Tools, installing VirtIO drivers), CDI image transfer, and VirtualMachine manifest creation.
Volume migration is KubeVirt’s Storage vMotion equivalent. It works by setting updateVolumesStrategy: Migration on the VM spec and swapping volume references to new PVCs. KubeVirt then triggers a live migration that copies data to the new storage. It supports cross-StorageClass migration, block-to-filesystem conversion, and different volume sizes. But be aware that volume migration currently requires migrating to a different node, as same-node storage migration is not supported. Failed volume migrations retry with exponential backoff; cancellation requires reverting the VM spec to the original volume set.
StorageClasses in KubeVirt function like Storage Policy Based Management (SPBM) profiles. CDI creates StorageProfiles matching each StorageClass, defining default access modes and volume modes for VM disks. You can annotate a StorageClass as the default virtualization class with storageclass.kubevirt.io/is-default-virt-class: "true". Getting this right at cluster provisioning time is essential, as retrofitting RWX-capable storage after VMs are running is not straightforward.
Migration policies with per-workload tuning in KubeVirt
KubeVirt’s MigrationPolicy CRD allows per-VM-group migration configuration via label selectors — more granular than vSphere’s cluster-wide vMotion settings. A policy targeting database VMs might set higher bandwidth and enable auto-converge:
apiVersion: migrations.kubevirt.io/v1alpha1
kind: MigrationPolicy
metadata:
name: database-migration-policy
spec:
allowAutoConverge: true
bandwidthPerMigration: 10Gi
completionTimeoutPerGiB: 300
selectors:
virtualMachineInstanceSelector:
workload-type: db
Figure 2: KubeVirt custom migration policy setting for a database workload
Policies match via VMI labels, namespace labels, or both. When multiple policies match, the most specific one (highest matching label count) wins, with ties broken lexicographically. Omitted fields inherit cluster-wide defaults from the KubeVirt CR.
The key difference from vSphere is that migration policies control how migrations happen, but nothing in KubeVirt controls when migrations happen automatically. There is no DRS aggressiveness slider, no Storage DRS, no proactive HA triggering preemptive migration based on predicted hardware failure. Migrations are triggered by three mechanisms only: explicit user request (VMIM creation), node drain (kubectl drain), or external tooling (descheduler, custom controllers).
A dedicated migration network can be configured via Multus NetworkAttachmentDefinition, analogous to a separate vMotion VMkernel adapter. This is strongly recommended for production, as sharing the cluster CNI network with migration traffic at scale causes congestion that affects all workloads.
What happens when you perform a live migration in KubeVirt?
Live migration is triggered declaratively by creating a VirtualMachineInstanceMigration (VMIM) CRD or running virtctl migrate <vmi-name>. It unfolds in six steps that diverge from the familiar vMotion process.
Step 1: Target pod creation. virt-controller detects the VMIM and creates a new virt-launcher pod on a target node selected by the Kubernetes scheduler. This target pod is configured identically — same RWX PVC mounts, same network configuration, same resource requests.
Step 2: Migration proxy setup. virt-handler on both nodes establishes a tunneled data path. The source node exposes a Unix socket that the source libvirtd connects to; traffic flows over TLS-encrypted TCP to the target node’s virt-handler, which pipes it into the target pod’s virtqemud socket. This proxy architecture means ports 49152 and 49153 must be available in the virt-launcher pod. If your masquerade interface explicitly binds those ports, live migration will not function.
Step 3: Memory transfer (pre-copy by default). Source libvirtd initiates QEMU migration through the proxy tunnel. All memory pages are iteratively copied; dirty pages are re-sent in subsequent rounds until the remaining dirty set is small enough for switchover. Two migration methods exist: LiveMigration copies only memory (storage is shared via RWX), while BlockMigration copies both memory and disk blocks (used when volumes are not shared). Block migration is dramatically slower than live migration.
Step 4: Switchover. When dirty pages converge, QEMU briefly pauses the source VM, sends final dirty pages, activates the target VM, and issues a network announcement to update network switches.
Step 5: Cleanup. The source pod enters Completed state and is garbage-collected. The VMI status updates with migration timestamps and completion details.
Step 6: Network reconciliation. With masquerade binding, the VM gets a new pod IP. The guest IP remains stable within the pod’s NAT, but the cluster-visible IP changes (because the Pod itself is replaced, not because the VM’s interface was reconfigured with a new address). With OVN-Kubernetes bridge binding, IP preservation is possible with <0.5 seconds network interruption and TCP connection survival.
Cold migration in KubeVirt has no formal API. You stop the VM (delete the VMI), and start it again. The scheduler places the new pod automatically, and the VirtualMachine CRD and its PVC references persist through this cycle. It’s functionally equivalent to VMware cold migration but mechanically it’s ‘destroy-and-recreate’, not ‘move.’
What are common failure modes during KubeVirt live migration?
Non-convergence. During pre-copy migration, if the VM’s dirty page rate exceeds the network transfer rate, migration never converges. Vanilla KubeVirt’s default bandwidth cap of 64 MiB/s makes this common for any VM writing memory faster than that rate, such as databases under write load, in-memory caches, or any VM using 1GB hugepages (where a single bit change dirties the entire 1GB page).
KubeVirt provides three convergence mechanisms:
- Auto-converge (
allowAutoConverge: true) progressively throttles guest vCPUs to reduce the dirty rate. It’s effective, but it also degrades guest performance. - Post-copy (
allowPostCopy: true) activates the VM on the target and page-faults back to the source for untransferred pages, guaranteeing convergence but risking data loss if the source node fails mid-migration. - Workload disruption (
allowWorkloadDisruption: true) pauses the VM to stop dirtying pages, allowing migration to complete at the cost of guest downtime.
Timeout behavior follows two parameters: completionTimeoutPerGiB sets the total allowed time (the default is 150 seconds per GiB of VM memory) , and progressTimeout (default 150 seconds) aborts if no data transfer progress is detected. When timeout hits without convergence helpers enabled the migration is simply aborted, and the VM continues running on the source node with no data loss.
Non-migratable VMs silently block node drain. VMs with GPU passthrough, SR-IOV VFs, host PCI devices, or RWO storage cannot be live-migrated. If these VMs have evictionStrategy: LiveMigrate, running kubectl drain on their node creates a PodDisruptionBudget that blocks eviction indefinitely, and the drain hangs with no clear error. The fix is evictionStrategy: LiveMigrateIfPossible (falls back to eviction if migration is impossible) or None for workloads with application-level HA. KubeVirt fires a KubeVirtVMIExcessiveMigrations alert when a VMI migrates more than 12 times in 24 hours, indicating a thrashing condition.
NUMA topology changes after migration degrade performance silently. When using NUMA passthrough, the guest may see a different NUMA topology on the target node. For workloads sensitive to memory locality (databases, HPC), this causes performance degradation that doesn’t surface as a migration failure, but only as slower application performance post-migration.
Common KubeVirt concepts that trip up VMware engineers
Storage is not implicitly shared. In vSphere, shared datastores (VMFS, vSAN, NFS) are a baseline assumption. Every ESXi host in a cluster sees the same storage, making vMotion seamless. In KubeVirt, migration behavior depends heavily on the Volume Mode and Access Mode defined in your Persistent Volume Claim (PVC):
- Filesystem Mode (Default): This is a common pitfall for newcomers. If a PVC uses
volumeMode: Filesystem(the default), it must explicitly requestReadWriteMany(RWX) access. If it is set toReadWriteOnce(RWO), Kubernetes locks the filesystem to a single node, which blocks live migration entirely to prevent data corruption. - Best Practice: While Block-mode RWO migration is technically possible, RWX Block volumes remain the best choice for vanilla KubeVirt. They provide the high performance of raw disk access with the explicit cluster-wide permissions that ensure the most reliable live migration experience.
The Kubernetes scheduler is not DRS. VMware’s Distributed Resource Scheduler (DRS) continuously monitors resource utilization and proactively live-migrates VMs to balance load. The Kubernetes scheduler makes placement decisions only at pod creation time. Once a VM’s pod is running, it stays on that node unless explicitly migrated or evicted. There is no automatic rebalancing of running VMs. Node affinity, anti-affinity, taints, and tolerations map conceptually to DRS rules but are only enforced at scheduling time. For example, a running VM that no longer satisfies an affinity rule will not be moved. For reactive rebalancing, you need the external Kubernetes descheduler, which can evict pods for rescheduling but has no VM-aware intelligence.
Network identity changes after migration. vMotion preserves the VM’s IP address transparently. In KubeVirt with standard masquerade networking, the VM gets a new pod IP after migration because a new pod is created on the target node. Applications using Kubernetes Services are unaffected (the Service IP is stable), but anything relying on direct pod IP connectivity will see a change. Only specialized CNI plugins like Kube-OVN or OVN-Kubernetes with specific configurations can preserve IP addresses.
Node failure does not trigger automatic restart. vSphere HA detects host failure and restarts VMs on surviving hosts within minutes. KubeVirt deliberately avoids automatic failover during node outage to prevent split-brain scenarios where two copies of a VM access shared storage simultaneously. The VMI stays in a stale Running phase until the failed node’s kubelet heartbeat times out and the pod is confirmed terminated. Without external node remediation tooling (e.g., medik8s Self Node Remediation, Machine Health Checks), a failed node can leave VMs stranded for the default 5-minute node timeout, plus however long it takes for pod garbage collection. This is the most operationally significant gap versus vSphere HA.
Wrap-Up: Rethinking VM Migrations under KubeVirt
The fundamental reframe for a VMware engineer is this: KubeVirt migration operates on Kubernetes scheduling primitives, not hypervisor primitives. vMotion moves a VM between hosts on shared infrastructure with the same identity, same IP, and same storage, with DRS deciding when and where. KubeVirt migration destroys a pod and creates a new one, streaming state between them, with storage sharing as an explicit configuration requirement rather than an infrastructure given.
Three decisions at cluster design time determine whether migration works at all: choosing an RWX-capable storage backend, ensuring CPU homogeneity across compute nodes (or pinning a baseline CPU model), and deploying a dedicated migration network with adequate bandwidth.
The features VMware engineers will miss most are not migration features per se, but the automation around them: no DRS for automatic load balancing, no proactive HA for preemptive failure avoidance, and no integrated HA failover on node failure without external remediation tooling. KubeVirt gives you the migration mechanism; building the operational intelligence around it remains your responsibility through Kubernetes-native tooling, custom controllers, and MigrationPolicy tuning per workload class.
Manage Storage for KubeVirt VMs with Portworx
Portworx by Everpure integrates with KubeVirt to provide Kubernetes native persistent storage for virtual machines, enabling shared access, high availability, and live migration on OpenShift and other supported distributions. Portworx supports the following types of ReadWriteMany (RWX) volumes for KubeVirt virtual machines, enabling a balance between portability and performance:
- Shared raw block volumes for streamlined live migration.
- FlashArray Direct Access (FADA) shared raw block volumes for high-performance workloads, and reduced file system overhead.
- Shared file system volumes, such as sharedv4 or NFS, for portability and multi-node access.
To learn more, visit portworx.com, and review our documentation for managing storage with KubeVirt VMs.
Recommended for you