The Jupyter Notebook is an open-source web application that allows data scientists to create and share documents that contain live code, equations, visualizations, comments, and narrative text. It’s a powerful integrated development environment for data exploration, data processing, data analysis, machine learning, and analytics.
The JupyterHub is a multi-user platform that brings the power of Jupyter Notebook to enterprises. It’s a scalable, portable, customizable, and flexible environment to run Jupyter Notebooks in a multi-tenant model. JupyterHub can be deployed on bare metal servers, virtual machines, public cloud infrastructure, containers, and container orchestration engines. It can be deployed and managed in Kubernetes through Helm charts.
JupyterHub is a stateful workload that depends on a reliable persistence layer. When it is deployed in Kubernetes, JupyterHub needs a cloud native, scale-out data management layer.
Portworx is a cloud native storage platform to run persistent workloads deployed on a variety of orchestration engines including Kubernetes. With Portworx, customers can manage the database of their choice on any infrastructure using any container scheduler. It provides a single data management layer for all stateful services, no matter where they run.
This guide is a continuation of the tutorial on deploying highly-available JupyterHub in GKE.
Uploading a sample dataset for the Notebook
Before attempting to perform a fail-over, let’s populate the environment with a sample dataset and a notebook.
Through the pod associated with user admin, we will upload a dataset to the shared storage location and verify it’s availability in user1’s environment.
Download the Pima Indian Diabetes dataset from Kaggle and save it as diabetes.csv.
We will copy it to the admin pod with the below command:
$ kubectl cp diabetes.csv jupyter-admin:/home/shared
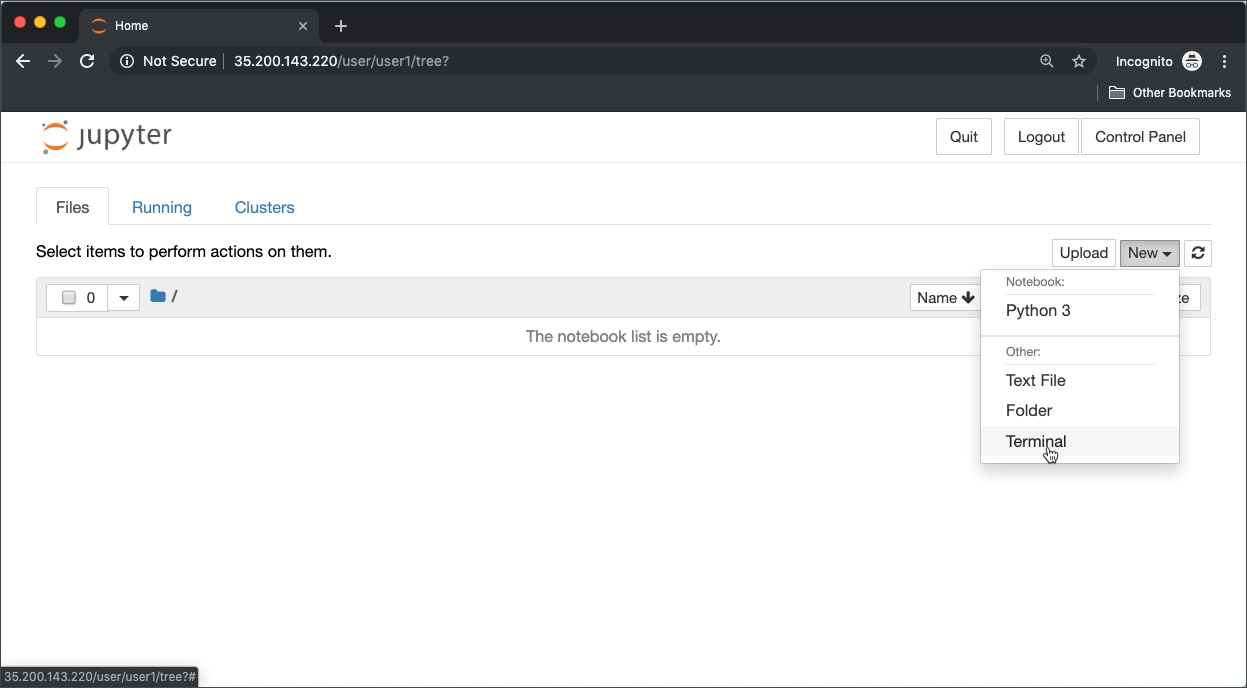
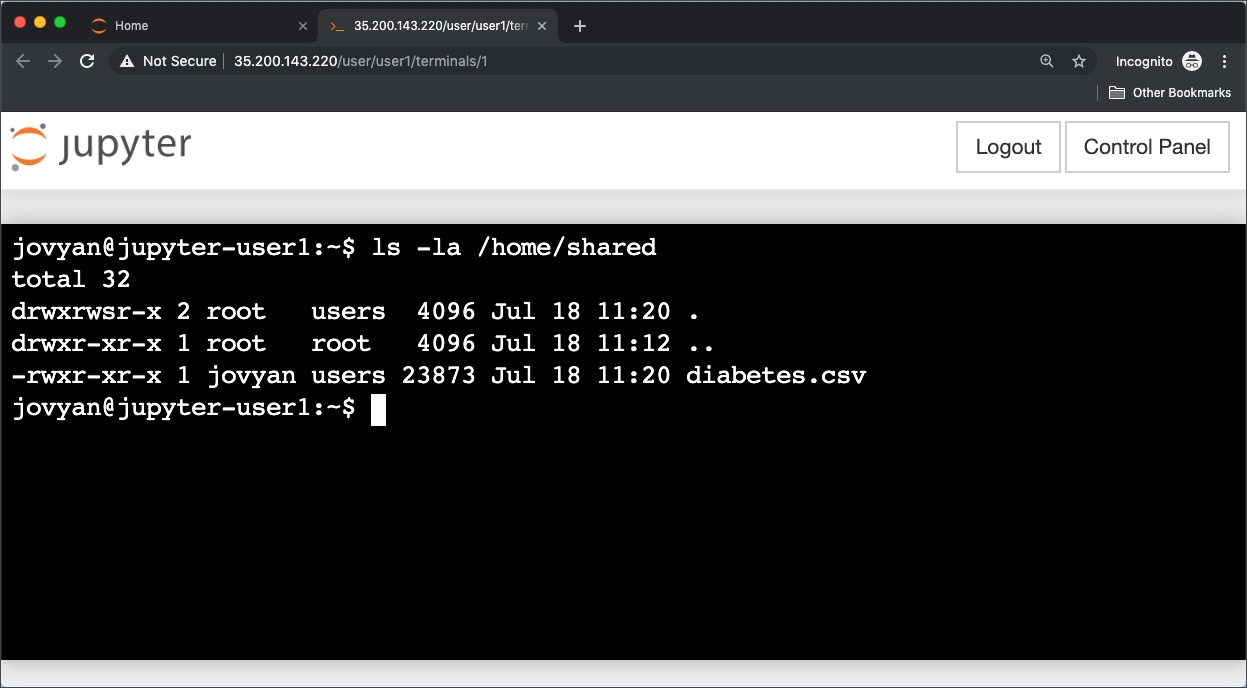
Login as user1 and create a new terminal window.
As shown below, the dataset – diabetes.csv – is now available to user1 in the /home/shared directory.
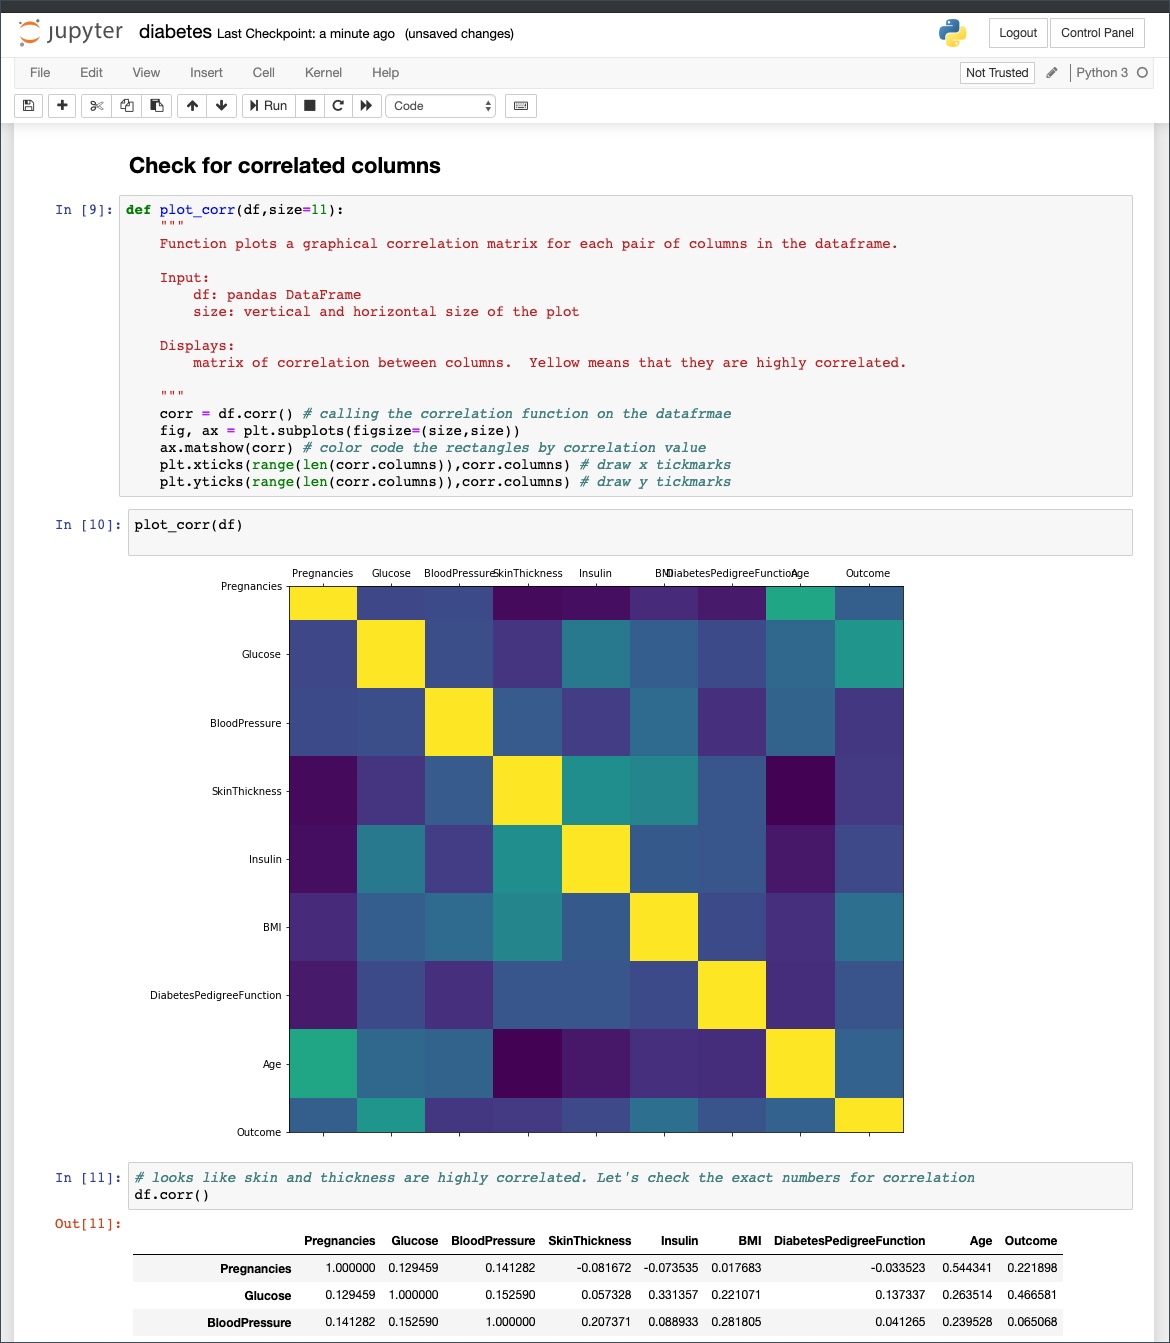
We will now import a Jupyter Notebook into user1 environment. This contains Python code to explore and visualize the dataset copied in the previous step.
Since the code in the Notebook has some dependencies, we need to install appropriate Python modules such as NumPy, Pandas, Matplotlib, and Seaborn.
Within the terminal window of user1, run the below commands to install the Python libraries.
$ pip install numpy pandas matplotlib seaborn
Upload the Jupyter Notebook and launch it. Since the Python modules are already installed, you can execute the code in the cells.
We can download the SQLite database used by JupyterHub to explore its contents.
$ HUB_POD=$(kubectl get pods -l component=hub -o jsonpath='{.items[0].metadata.name}')
[Final]$ kubectl cp $HUB_POD:/srv/jupyterhub/jupyterhub.sqlite .
Download the DB Browser for SQLite to open the JupyterHub database.
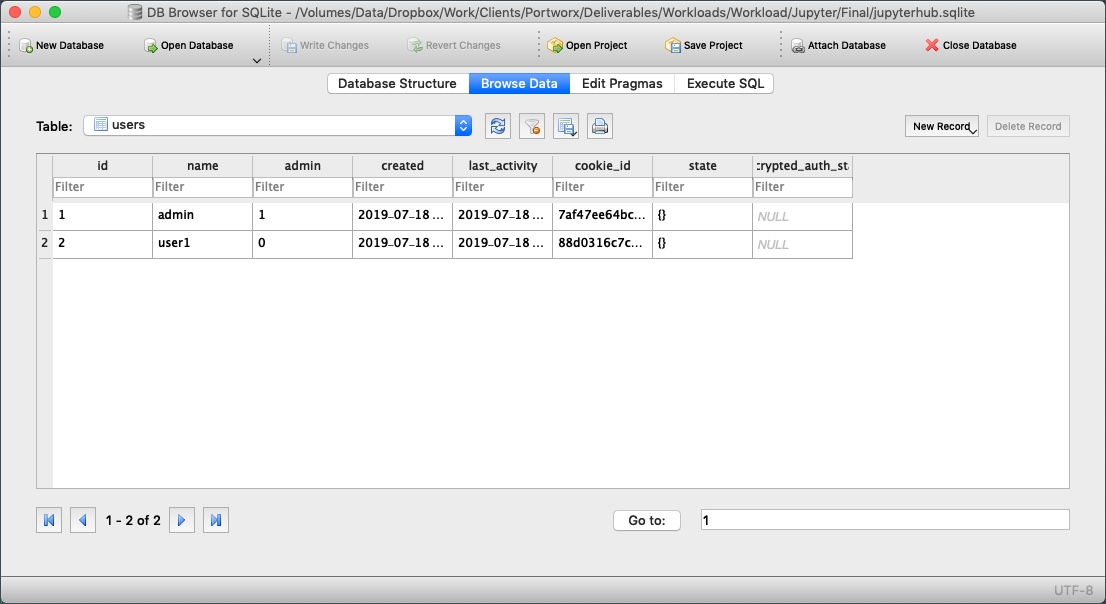
Browsing the user table shows that admin and user1 as registered users of JupyterHub.
Exploring Portworx Volumes
Since all the PVCs are based on the Portworx storage class, they are provisioned as Portworx volumes.
Let’s look at the volumes mapped to the PVCs.
PX_POD=$(kubectl get pods -l name=portworx -n kube-system -o jsonpath='{.items[0].metadata.name}')
kubectl exec -it $PX_POD -n kube-system -- /opt/pwx/bin/pxctl volume list

The first two volumes with size 10 GiB represents the user directories that were dynamically created by the hub. The third volume is used by the hub to persist SQLite database file. We can identify it by the size and the replication factor as mentioned in the storage class. The last volume is the shared volume available to all users.
Performing Node Failover
We will deliberately simulate a failure by cordoning off the node running the hub pod and delete the current hub pod.
Since it is a part of the deployment, Kubernetes will automatically create a new pod and schedules it on a different node.
As soon as the pod is deleted, it is relocated to the node with the replicated data. STorage ORchestrator for Kubernetes (STORK), Portworx’s custom storage scheduler allows co-locating the pod on the exact node where the data is stored. It ensures that an appropriate node is selected for scheduling the pod.
Let’s verify this by executing the steps of node cordoning and pod deletion. We will notice that a new pod has been created and scheduled in a different node.
We will first get the node that runs the hub pod.
$ NODE=`kubectl get pods -l component=hub -o wide | grep -v NAME | awk '{print $7}'`
echo $NODE
gke-gke-px-demo-default-pool-a76c2374-k877
The below command cordons it off by disabling pod scheduling.
$ kubectl cordon $NODE
node "gke-gke-px-demo-default-pool-a76c2374-k877" cordoned

Let’s go ahead and delete the hub pod that’s still running on the cordoned node.
$ kubectl delete pod $HUB_POD
pod "hub-864d7f4bff-rq2vq" deleted
Kubernetes scheduled the pod in a different node which can be verified with the below command:
$ kubectl get pod -l component=hub -o wide
NAME                   READY     STATUS    RESTARTS   AGE       IP           NODE
hub-864d7f4bff-qgbfk   1/1       Running   0          46s       10.36.1.15   gke-gke-px-demo-default-pool-a76c2374-pjn5
Download the SQLite database file and open it with the DB Browser. The data is intact!
HUB_POD=$(kubectl get pods -l component=hub -o jsonpath='{.items[0].metadata.name}')
kubectl cp $HUB_POD:/srv/jupyterhub/jupyterhub.sqlite .
You can repeat this task with one of the user pods to validate the failover process. It works exactly the same as the hub deletion.
Performing Storage Operations on JupyterHub
After testing end-to-end failover of the hub, let’s perform StorageOps on our GKE cluster.
Currently, the Portworx shared volume that we created at the beginning is of 1Gib size. We will now expand it to double the storage capacity.
First, let’s get the name associated with PVC of shared volume and inspect it through the pxctl tool.
VOL=`kubectl get pvc | grep px-jhub-shared-vol | awk '{print $3}'`
kubectl exec -it $PX_POD -n kube-system -- /opt/pwx/bin/pxctl volume inspect $VOL
Volume	:  811775490655601340
	Name            	 :  pvc-fd83bca0-a947-11e9-93d1-42010aa0002e
	Size            	 :  1.0 GiB
	Format          	 :  ext4
	HA              	 :  1
	IO Priority     	 :  LOW
	Creation time   	 :  Jul 18 10:37:18 UTC 2019
	Shared          	 :  yes
	Status          	 :  up
	State           	 :  Attached: bce08e9d-3392-49e1-90a9-d8cc439be60b (10.160.0.44)
	Device Path     	 :  /dev/pxd/pxd811775490655601340
	Labels          	 :  namespace=default,pvc=px-jhub-shared-vol
	Reads           	 :  36
	Reads MS        	 :  8
	Bytes Read      	 :  372736
	Writes          	 :  63
	Writes MS       	 :  144
	Bytes Written   	 :  17006592
	IOs in progress 	 :  0
	Bytes used      	 :  472 KiB
	Replica sets on nodes:
		Set 0
		  Node 		 : 10.160.0.44 (Pool 0)
	Replication Status	 :  Up
	Volume consumers	 :
		- Name           : jupyter-admin (81200ce9-a94b-11e9-93d1-42010aa0002e) (Pod)
		  Namespace      : default
		  Running on     : gke-gke-px-demo-default-pool-a76c2374-k877

		- Name           : jupyter-user1 (ed9d54ce-a94c-11e9-93d1-42010aa0002e) (Pod)
		  Namespace      : default
		  Running on     : gke-gke-px-demo-default-pool-a76c2374-k877
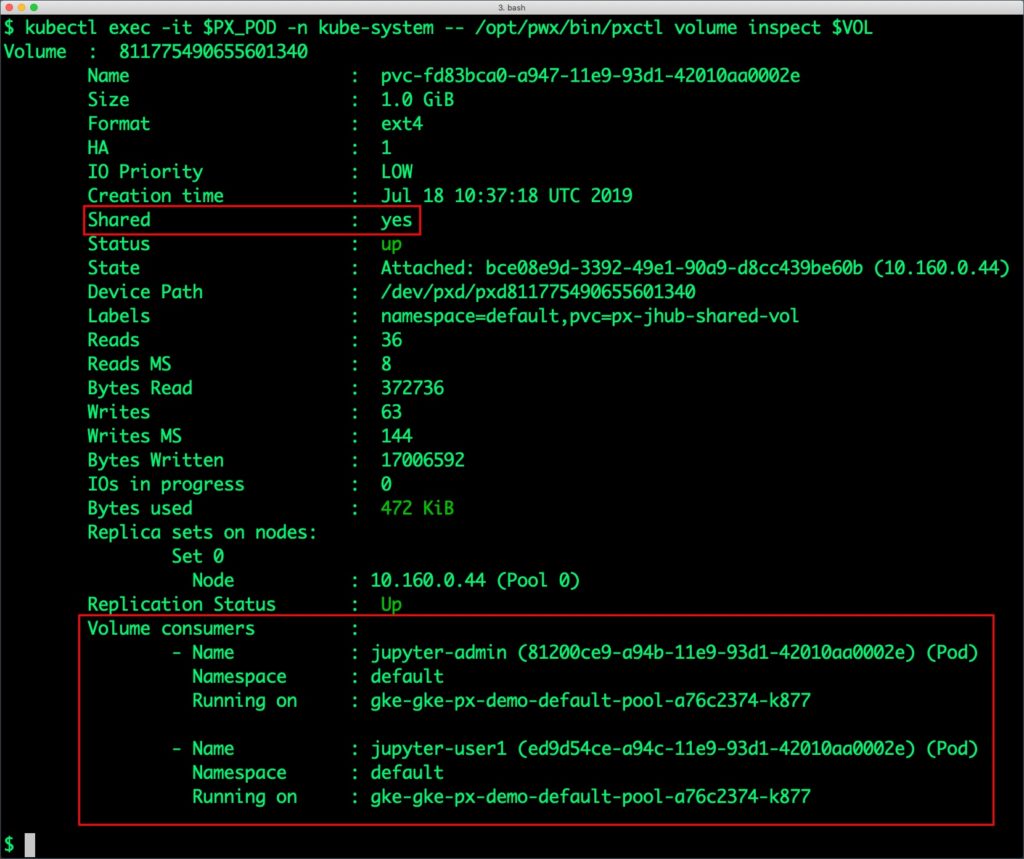
The output confirms that the shared flag is on for the volume and it is being shared by two consumers – admin and user1.
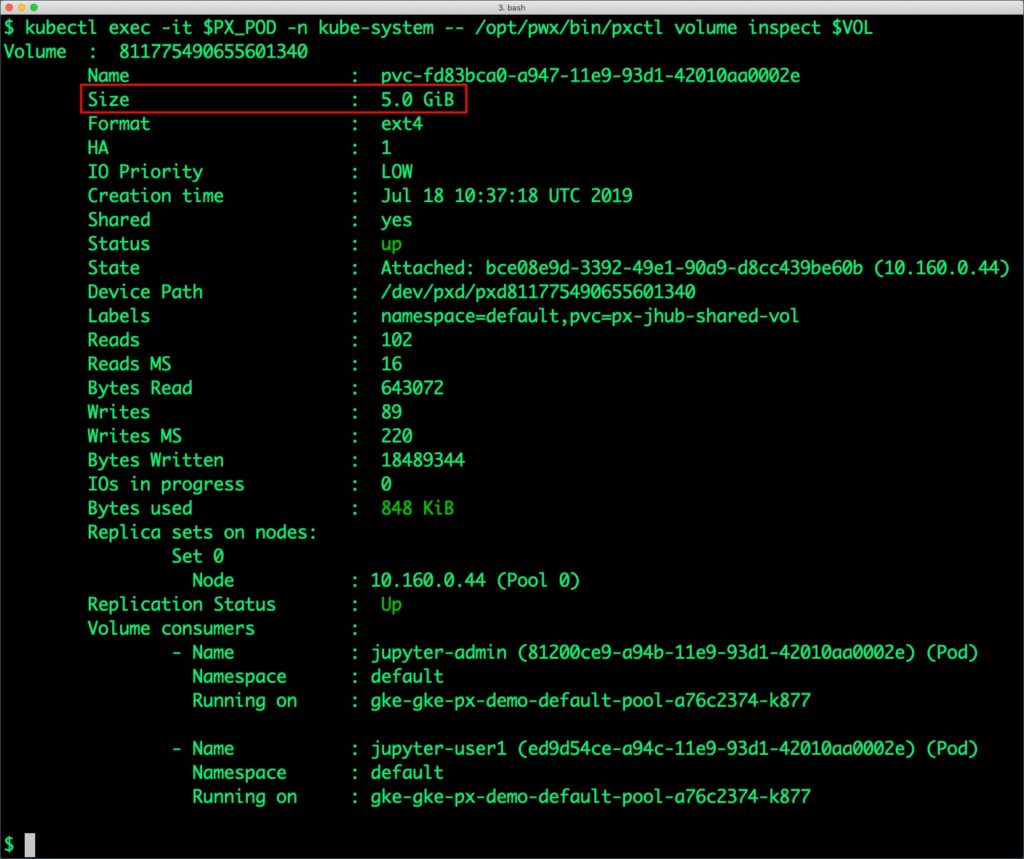
Now, let’s expand this to 5GiB to add more capacity to the shared volume. We can use the same pxctl tool to perform this operation.
$ kubectl exec -it $PX_POD -n kube-system -- /opt/pwx/bin/pxctl volume update $VOL --size=5
Update Volume: Volume update successful for volume pvc-fd83bca0-a947-11e9-93d1-42010aa0002e
As a part of storage operations, it is possible to take point-in-time snapshots of volumes that can be restored as new PVCs. Through Kubemotion, the entire JupyterHub environment can be migrated to a new Kubernetes cluster along with the PVCs and configuration data. The PX-DR capability enables synchronous or asynchronous replication of volumes for disaster recovery and business continuity.
Summary
Portworx can be easily deployed on Google Kubernetes Engine to run stateful workloads in production. Through the integration of Portworx and GKE, DevOps and DataOps teams can seamlessly run highly available database clusters in Google Cloud Platform. They can perform traditional operations such as volume expansion, snapshots, backup and recovery for the cloud-native applications.
Share
Subscribe for Updates
About Us
Portworx is the leader in cloud native storage for containers.
Thanks for subscribing!

Janakiram MSV
Contributor | Certified Kubernetes Administrator (CKA) and Developer (CKAD)
Kubernetes Tutorial: How to Failover MySQL on Google Kubernetes Engine (GKE)
Kubernetes Tutorial: How to Failover MongoDB on Google Kubernetes Engine (GKE)
Kubernetes Tutorial: How to Failover PostgreSQL on Google Kubernetes Engine (GKE)