
The Jupyter Notebook is an open-source web application that allows data scientists to create and share documents that contain live code, equations, visualizations, comments, and narrative text. It’s a powerful integrated development environment for data exploration, data processing, data analysis, machine learning, and analytics.
The JupyterHub is a multi-user platform that brings the power of Jupyter Notebook to enterprises. It’s a scalable, portable, customizable, and flexible environment to run Jupyter Notebooks in a multi-tenant model. JupyterHub can be deployed on bare metal servers, virtual machines, public cloud infrastructure, containers, and container orchestration engines. It can be deployed and managed in Kubernetes through Helm charts.
JupyterHub is a stateful workload that depends on a reliable persistence layer. When it is deployed in Kubernetes, JupyterHub needs a cloud native, scale-out data management layer.
Portworx is a cloud native storage platform to run persistent workloads deployed on a variety of orchestration engines including Kubernetes. With Portworx, customers can manage the database of their choice on any infrastructure using any container scheduler. It provides a single data management layer for all stateful services, no matter where they run.
JupyterHub Architecture
The JupyterHub platform has three essential components – hub, proxy, and single-user Notebook server. The hub is the heart of the platform that orchestrates the lifecycle of a Notebook. The proxy acts as the front-end to route requests to the hub which is exposed to the outside world through an HTTP load balancer or in Kubernetes, an ingress controller. When a user logs into the platform, the hub provisions a single-user Notebook instance for them. Each user gets a dedicated instance of the Notebook that’s completely isolated from the other users. In Kubernetes, the instance is mapped to a pod.
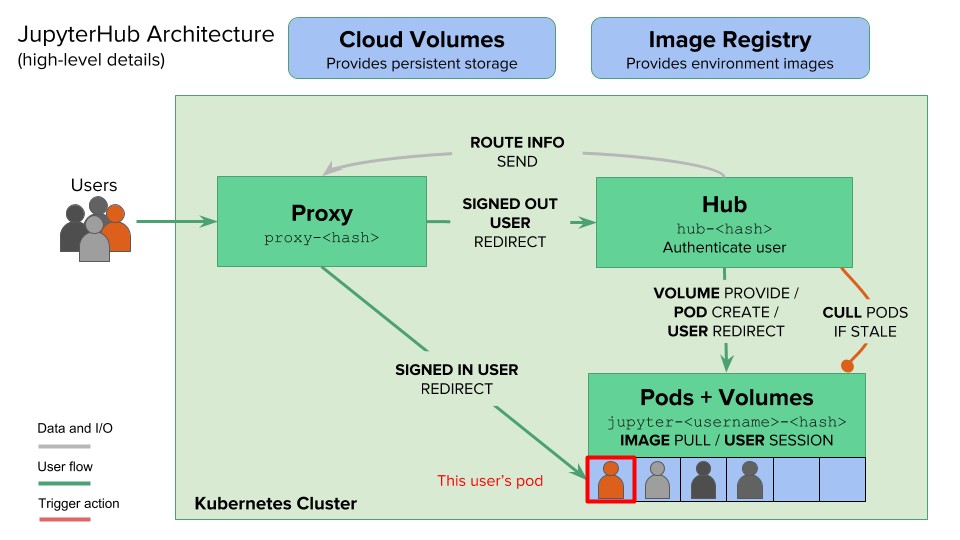
After a specific period of inactivity, the hub automatically culls the pod associated with the inactive user. When the same user logs in again, the hub schedules a pod that contains the state persisted during the previous session.
Behind the scene, JupyterHub creates a persistent volume claim (PVC) and a persistent volume for each user. Even though the pod gets deleted as part of the culling process, the PV is retained, which gets attached to the new pod when an existing user logs in.
The hub maintains the state of users, groups, permissions, and other settings in an SQLite database which is stored on the disk. There is a PVC associated with the storage volume used for persisting the database file.
Apart from the dedicated storage required by the common database and each user, JupyterHub also supports shared storage volumes that are available to all the users. This shared storage is used to populate common datasets, files, and other objects that will be available to all users of the system.
Like any stateful workload, the availability of JupyterHub is dependent on the reliability and availability of the storage engine backing the application. The availability of three volumes – database storage, per-user storage, and shared storage – are critical to the uptime of JupyterHub.
When Portworx is used as the storage orchestration engine for JupyterHub, it increases the overall reliability, availability, and mobility of the platform. Some of the key features of Portworx such as customizable storage profiles, automatic replication, dynamic volume expansion, automated snapshots, and migration to other clusters make it the ideal choice to run JupyterHub on Kubernetes.
This tutorial is a walk-through of the steps involved in deploying and managing a highly available JupyterHub environment on Kubernetes. We will configure Portworx as the storage engine for all the stateful components of JupyterHub.
In summary, to run HA JupyterHub on Google Kubernetes engine, you need to:
- Setup and configure a Kubernetes cluster in GKE
- Install cloud native storage solution like Portworxon Kubernetes
- Create storage classes for the database, users, and shared storage layers of JupyterHub.
- Deploy JupyterHub on Kubernetes through a customized Helm chart
- Test failover by killing or cordoning a node in the cluster
- Expand the storage volume without downtime
How to launch a GKE cluster
When launching a GKE cluster to run Portworx, you need to ensure that the cluster is based on Ubuntu. Due to certain restrictions with GKE clusters based on Container-Optimized OS (COS), Portworx requires Ubuntu as the base image for the GKE Nodes.
The following command configures a 3-node GKE Cluster in zone ap-south-1-a. You can modify the parameters accordingly.
gcloud container --project "janakiramm-sandbox" clusters create "gke-px-demo" \
	--zone "asia-south1-a" \
	--username "admin" \
	--cluster-version "1.12.8-gke.10" \
	--machine-type "n1-standard-4" \
	--image-type "UBUNTU" \
	--disk-type "pd-ssd" \
	--disk-size "50" \
	--scopes "https://www.googleapis.com/auth/compute","https://www.googleapis.com/auth/devstorage.read_only","https://www.googleapis.com/auth/logging.write","https://www.googleapis.com/auth/monitoring","https://www.googleapis.com/auth/servicecontrol","https://www.googleapis.com/auth/service.management.readonly","https://www.googleapis.com/auth/trace.append" \
	--num-nodes "3" \
	--enable-cloud-logging \
	--enable-cloud-monitoring \
	--network "default" \
	--addons HorizontalPodAutoscaling,HttpLoadBalancing,KubernetesDashboard
Once the cluster is ready, configure kubectl CLI with the following command:
$ gcloud container clusters get-credentials gke-px --zone asia-south1-a
Portworx requires a ClusterRoleBinding for your user. Without this configuration, the command fails with an error clusterroles.rbac.authorization.k8s.io "portworx-pvc-controller-role" is forbidden.
Let’s create a ClusterRoleBinding with the following command:
$ kubectl create clusterrolebinding cluster-admin-binding \
--clusterrole cluster-admin \
--user $(gcloud config get-value account)
You should now have a three-node Kubernetes cluster deployed in Google Cloud Platform.
NAME                                         STATUS    ROLES     AGE       VERSION
gke-gke-px-demo-default-pool-a76c2374-gxsl   Ready         1d        v1.12.8-gke.10
gke-gke-px-demo-default-pool-a76c2374-k877   Ready         1d        v1.12.8-gke.10
gke-gke-px-demo-default-pool-a76c2374-pjn5   Ready         1d        v1.12.8-gke.10

Once the cluster is up and running, install Helm. For detailed instructions on installing and configuring Helm, refer to the documentation.
If you get errors while installing Tiller on GKE, run the below commands:
$ kubectl create serviceaccount --namespace kube-system tiller
$ kubectl create clusterrolebinding tiller-cluster-rule --clusterrole=cluster-admin --serviceaccount=kube-system:tiller
$ helm init --service-account tiller --upgrade
$ kubectl patch deploy --namespace kube-system tiller-deploy -p '{"spec":{"template":{"spec":{"serviceAccount":"tiller"}}}}'
kubectl patch deployment tiller-deploy --namespace=kube-system --type=json --patch='[{"op": "add", "path": "/spec/template/spec/containers/0/command", "value": ["/tiller", "--listen=localhost:44134"]}]'
Ensure that Helm is up and running before proceeding further.
$ helm version
Client: &version.Version{SemVer:"v2.12.3", GitCommit:"eecf22f77df5f65c823aacd2dbd30ae6c65f186e", GitTreeState:"clean"}
Server: &version.Version{SemVer:"v2.12.3", GitCommit:"eecf22f77df5f65c823aacd2dbd30ae6c65f186e", GitTreeState:"clean"}
Installing Portworx in GKE
Installing Portworx on GKE is not very different from installing it on any other Kubernetes cluster. Portworx GKE documentation has the steps involved in running the Portworx cluster in a Kubernetes environment deployed in Google Cloud Platform.
Once the GKE cluster is up and running, and Portworx is installed and configured, we will deploy a highly available JupyterHub environment.
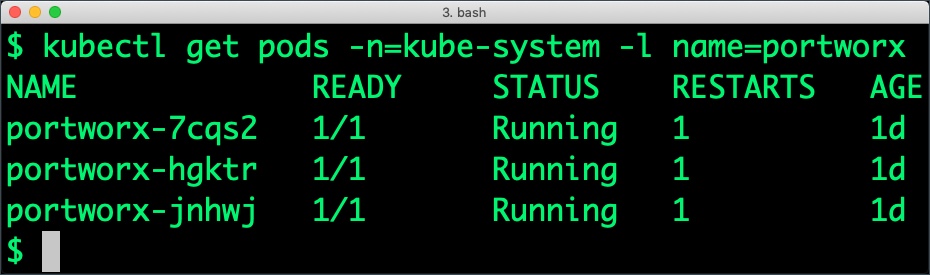
Portworx cluster needs to be up and running on GKE before proceeding to the next step. The kube-system namespace should have the Portworx pods in running state.
$ kubectl get pods -n=kube-system -l name=portworx
NAME             READY     STATUS    RESTARTS   AGE
portworx-7cqs2   1/1       Running   1          1d
portworx-hgktr   1/1       Running   1          1d
portworx-jnhwj   1/1       Running   1          1d
Creating storage classes for JupyterHub
Through storage class objects, an admin can define different classes of Portworx volumes that are offered in a cluster. These classes will be used during the dynamic provisioning of volumes. The storage class defines the replication factor, I/O profile (e.g., for a database or a CMS), and priority (e.g., SSD or HDD). These parameters impact the availability and throughput of workloads and can be specified for each volume. This is important, as an example, a production database will have different requirements than a development Jenkins cluster.
JupyterHub needs two storage classes with distinct capabilities. The first storage class is meant for the database and user home directories. This needs to be replicated across multiple nodes to ensure high availability. The second type of storage is a shared volume that is available in read/write mode to all the users.
Let’s create the storage class with a replication factor of 3 which ensures data redundancy for the database and user home directories.
$ cat > px-jhub-sc.yaml << EOF
kind: StorageClass
apiVersion: storage.k8s.io/v1beta1
metadata:
    name: px-jhub-sc
provisioner: kubernetes.io/portworx-volume
parameters:
   repl: "3"
EOF
$ kubectl create -f px-jhub-sc.yaml
storageclass.storage.k8s.io "px-jhub-sc" created
Next, we will create the storage class for the shared volume. Note that it uses the CMS profile to optimize access and throughput. The replication factor is set to 1 since it is not replicated across nodes.
kind: StorageClass
apiVersion: storage.k8s.io/v1beta1
metadata:
  name: px-jhub-shared-sc
provisioner: kubernetes.io/portworx-volume
parameters:
  repl: "1"
  shared: "true"
  io_profile: "cms"
$ kubectl create -f px-jhub-shared-sc.yaml
storageclass.storage.k8s.io "px-jhub-shared-sc" created
We also need to create a PVC and PV based on the shared storage class. The PVC is passed onto the JupyterHub configuration to mount the shared volume.
$ kubectl create -f px-jhub-shared-pvc.yaml
persistentvolumeclaim "px-jhub-shared-vol" created
The PVC and PV are ready for created and ready to use.
$ kubectl get pvc
NAME                 STATUS    VOLUME                                     CAPACITY   ACCESS MODES   STORAGECLASS        AGE
px-jhub-shared-vol   Bound     pvc-fd83bca0-a947-11e9-93d1-42010aa0002e   1Gi        RWX            px-jhub-shared-sc   43s
[Final]$ kubectl get pv
NAME                                       CAPACITY   ACCESS MODES   RECLAIM POLICY   STATUS    CLAIM                        STORAGECLASS        REASON    AGE
pvc-fd83bca0-a947-11e9-93d1-42010aa0002e   1Gi        RWX            Delete           Bound     default/px-jhub-shared-vol   px-jhub-shared-sc             36s
Installing JupyterHub
JupyterHub is available as a Helm chart which needs to be customized to work with Portworx. This is done by passing additional configuration to the chart through the config.yaml file.
First, we need to generate a random hex string representing 32 bytes to use as a security token.
$ openssl rand -hex 32
45a74f657dc4fcdc0b1a1cf2edbb36b6d5d39a72e7327186ca87db811ac764e6
Create a file called config.yaml and add the generated token.
proxy:
  secretToken: "45a74f657dc4fcdc0b1a1cf2edbb36b6d5d39a72e7327186ca87db811ac764e6"
Next, we need to customize the user environment by passing the appropriate storage configuration. Add the below text to config.yaml.
singleuser:
  storage:
    dynamic:
      storageClass: px-jhub-sc
    extraVolumes:
      - name: jhub-shared
        persistentVolumeClaim:
          claimName: px-jhub-shared-vol
    extraVolumeMounts:
      - name: jhub-shared
        mountPath: /home/shared
Notice that the home directory is taking advantage of dynamic provisioning while the shared volume is based on the PVC created in the previous step. Each time a new user logs in, a PVC and PV are dynamically created for her based on the specified storage class. The shared PVC, px-jhub-shared-vol, is attached to each pod accessible as the /home/shared directory.
The SQLite database is persisted on a volume dynamically provisioned by Portworx. We will pass this configuration in the same config.yaml file.
hub:
  db:
    type: sqlite-pvc
    pvc:
      storageClassName: px-jhub-sc
Finally, we will add user admin to the administrator group. An admin in JupyterHub has access to other user’s Notebooks.
auth:
  admin:
    users:
      - admin
Below is the complete config.yaml file with all the settings:
proxy:
  secretToken: "45a74f657dc4fcdc0b1a1cf2edbb36b6d5d39a72e7327186ca87db811ac764e6"
singleuser:
  storage:
    dynamic:
      storageClass: px-jhub-sc
    extraVolumes:
      - name: jhub-shared
        persistentVolumeClaim:
          claimName: px-jhub-shared-vol
    extraVolumeMounts:
      - name: jhub-shared
        mountPath: /home/shared
hub:
  db:
    type: sqlite-pvc
    pvc:
      storageClassName: px-jhub-sc
auth:
  admin:
    users:
      - admin
We are now ready to deploy the JupyterHub Helm chart. Add the chart to the repo refresh it.
$ helm repo add jupyterhub https://jupyterhub.github.io/helm-chart/
$ helm repo update
Hang tight while we grab the latest from your chart repositories...
...Skip local chart repository
...Successfully got an update from the "stable" chart repository
...Successfully got an update from the "jupyterhub" chart repository
Update Complete. ⎈ Happy Helming!⎈
Let’s deploy the chart passing the config.yaml with our custom configuration.
$ helm upgrade --install jhub jupyterhub/jupyterhub \
  --version=0.8.2 \
  --values config.yaml
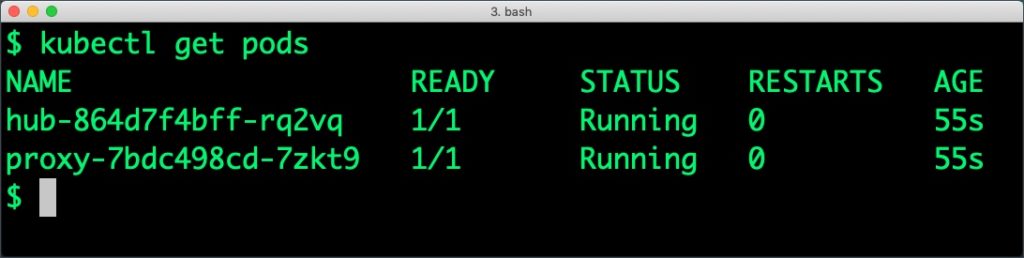
This results in the creation of two pods – hub and proxy along with a service that exposes the proxy pod through a load balancer.

Let’s explore the current state of storage classes, PVC, and PV.
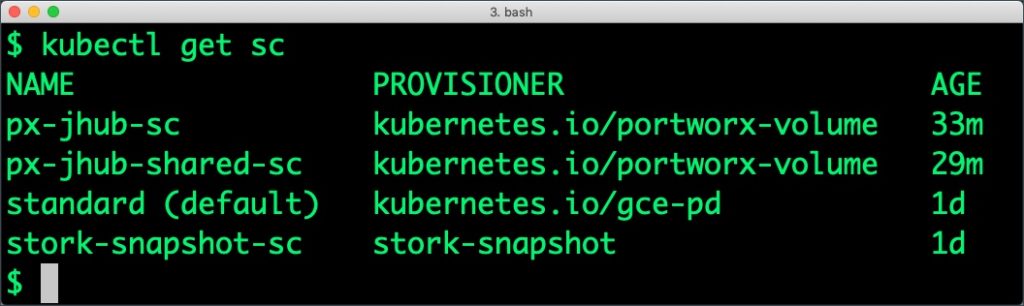

As soon as a user signs in, a new pod and a PVC are created for the pod. Let’s login to the hub with username admin and password admin. Access JupyterHub through the load balancer’s IP address.
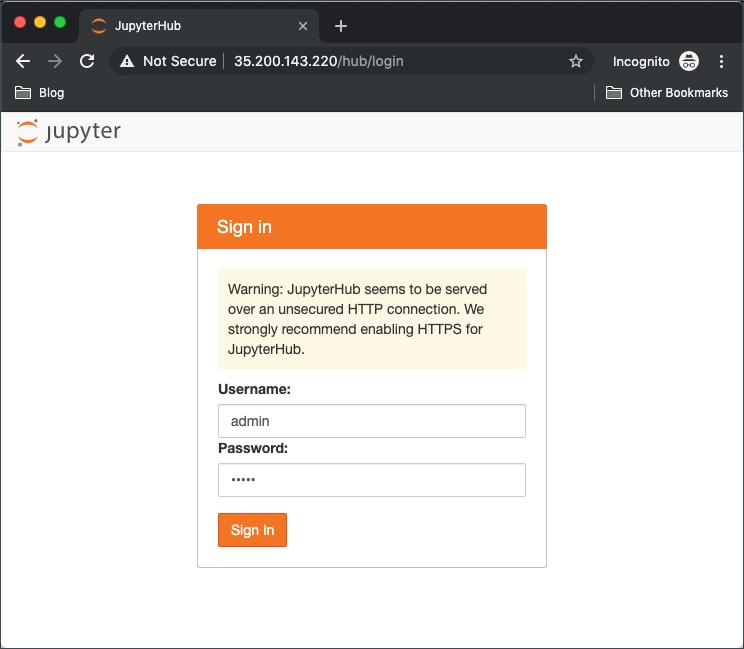
Immediately after the user logs in, JupyterHub spawns a new pod.
$ kubectl get pods
NAME                    READY     STATUS    RESTARTS   AGE
hub-864d7f4bff-rq2vq    1/1       Running   0          11m
jupyter-admin           1/1       Running   0          16s
proxy-7bdc498cd-7zkt9   1/1       Running   0          11m
The pod also gets a new PVC that follows the naming convention of claim-< username >.
$ kubectl get pvc | awk {'print $1" " $2" "$3" "$6'} | column -t
NAME                STATUS  VOLUME                                    MODES
claim-admin         Bound   pvc-811e70e6-a94b-11e9-93d1-42010aa0002e  px-jhub-sc
hub-db-dir          Bound   pvc-f2d52125-a949-11e9-93d1-42010aa0002e  px-jhub-sc
px-jhub-shared-vol  Bound   pvc-fd83bca0-a947-11e9-93d1-42010aa0002e  px-jhub-shared-sc
Note: This installation of JupyterHub is not integrated with an authentication system. Any arbitrary username and password can be used to log in. For securing production deployments, refer to JupyterHub guide on integrating authentication and authorization.
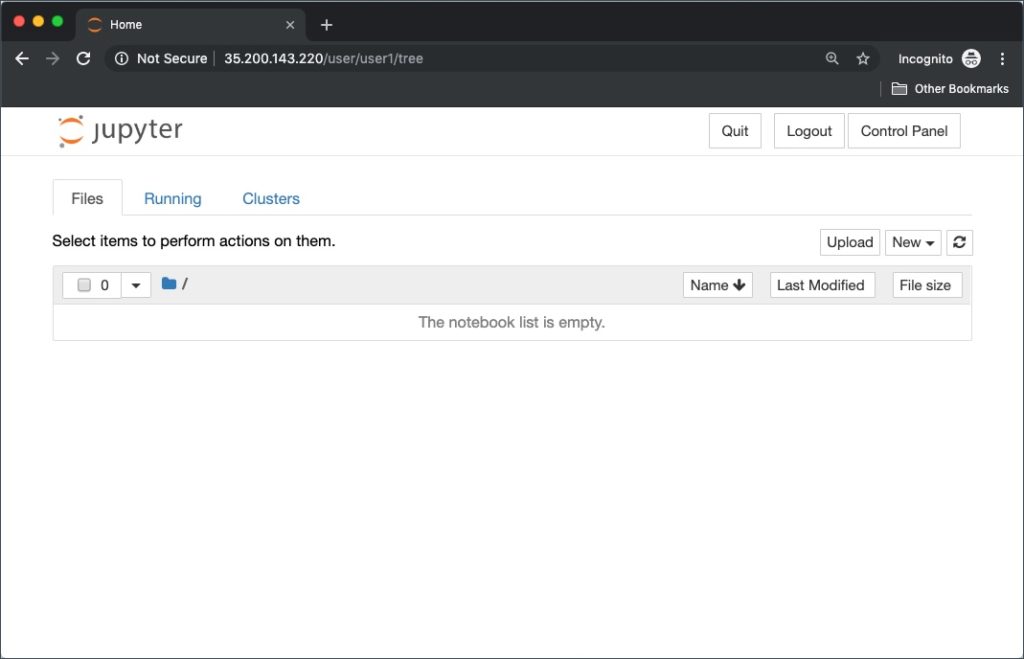
We will now log in as a different user, user1, to create a new profile.
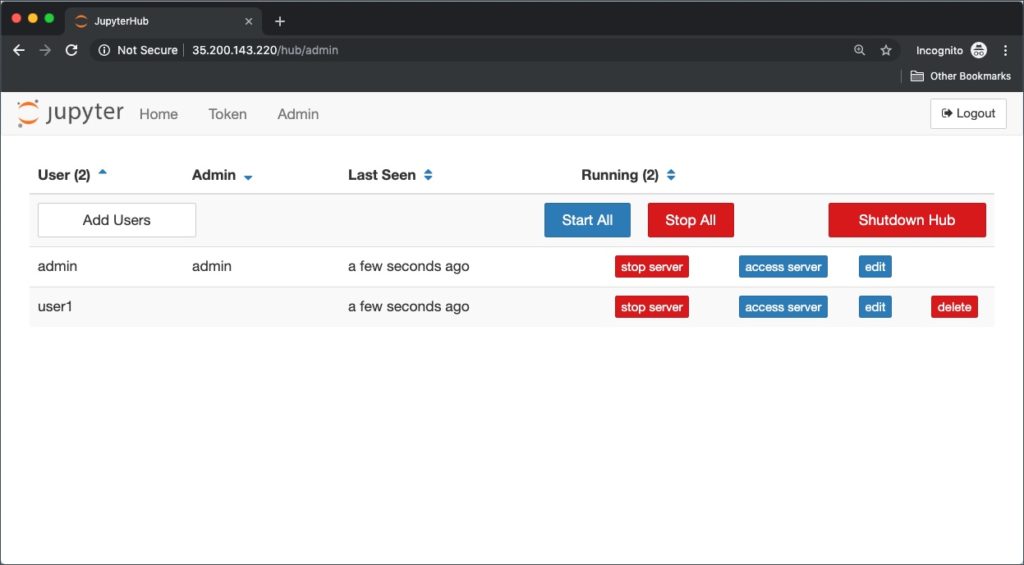
When logged in as admin, the control panel shows all the registered users in the system.
In the next part of this tutorial, we will explore the concepts of fail-over and performing storage operations on the volumes.
Share
Subscribe for Updates
About Us
Portworx is the leader in cloud native storage for containers.
Thanks for subscribing!

Janakiram MSV
Contributor | Certified Kubernetes Administrator (CKA) and Developer (CKAD)
Kubernetes Tutorial: How to Deploy MongoDB on Google Kubernetes Engine (GKE)
Kubernetes Tutorial: How to Deploy MySQL on Google Kubernetes Engine (GKE)
Kubernetes Tutorial: How to Deploy PostreSQL on Google Kubernetes Engine (GKE)
