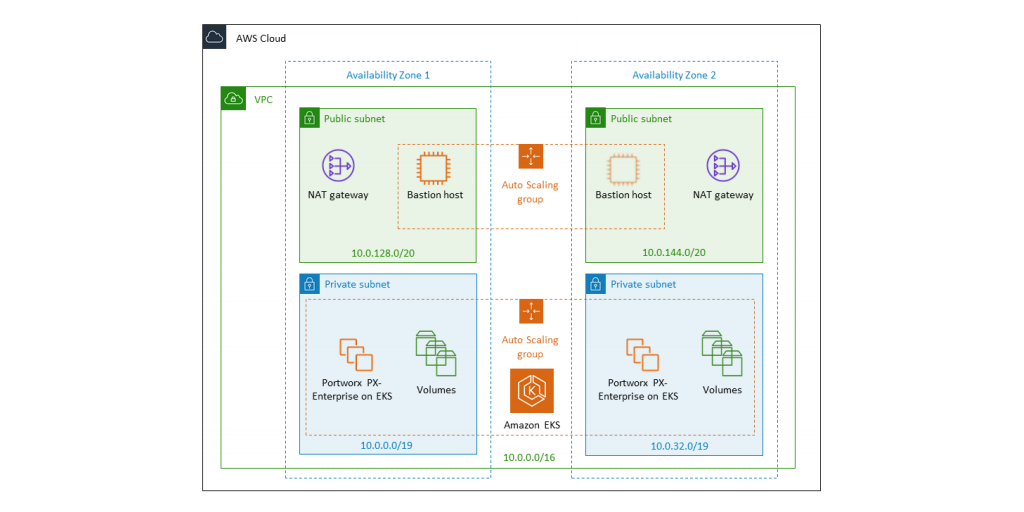
Here at Portworx, we understand that getting to know a new product or even an entire stack such as Kubernetes and Portworx can be daunting. This is why we worked together with Amazon Web Services Quick Start team to develop the Portworx Quick Start on AWS. With this Quick Start, you can use Amazon Web Services (AWS) and its products and services, such as virtual private clouds (VPCs), Amazon Elastic Compute Cloud (Amazon EC2), Amazon Elastic Container Service for Kubernetes (Amazon EKS), and AWS CloudFormation to quickly launch Kubernetes and Portworx Enterprise for your container environment without needing to know all that much in order to get started!
The deployment guide is available here, however, we’ll also walk you through using the Quick Start here.
Using the Quick Start for Portworx on AWS
One thing I want to make clear is that you will need to have an AWS account and any resources (compute, networking, storage, etc.) you use when setting up this Quick Start will also be billed for.
We’re going to deploy the Quick Start from a blank slate, meaning we’re going to let the Quick Start set up everything for us including the Virtual Private Cloud (VPC). Once you have an account set up, simply click here. This will take you to the AWS Login screen, or if you are already logged in, it will drop you right into the Quick Start launch screen (example below).

This “Create stack” screen will be pre-populated with the Portworx Enterprise template, so simply click the ![]() button.
button.
Next, you should be taken to a “Parameters” screen to fill in some parameters about the environment. You can accept the defaults for many of them, but we’ll cover what you’ll have to input before you can launch.
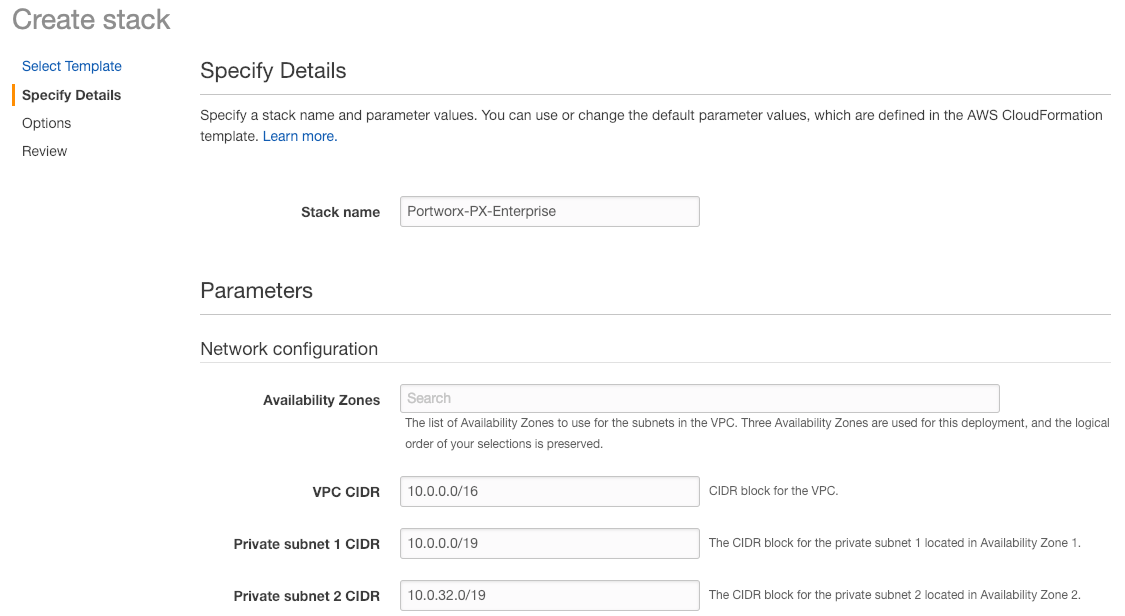
- Click on the Availability Zones box and click AT LEAST THREE availability zones that come up.
- Fill out the Allowed external access CIDR with a trusted CIDR range, if your not sure what to put, place 10.0.0.0/24 there, for now, this can always be updated later.
- Select a KeyPair from the SSH key name box. If you don’t have one, follow this guide on how to create one.
- Scroll down and click
 . The rest of the options can be left as is. If you want to change them feel free but understand what they are before changing them by looking at the deployment guide.
 - Scroll down and click again.
- Click the box for I acknowledge that AWS CloudFormation might create IAM resources with custom names.
- Click the box for I acknowledge that AWS CloudFormation might require the following capability: CAPABILITY_AUTO_EXPAND.
- Click
 .
.
Now, sit back and let the magic take place, you should be dropped into the CloudFormation dashboard where you should see the name of your Stack being created with CREATE_IN_PROGRESS.

The last stack to get created is the Portworx stack, which deploys the Portworx DaemonSet onto the newly created EKS cluster. Once that completes you should see all the stacks with the status of CREATE_COMPLETE. Which means your environment is done!
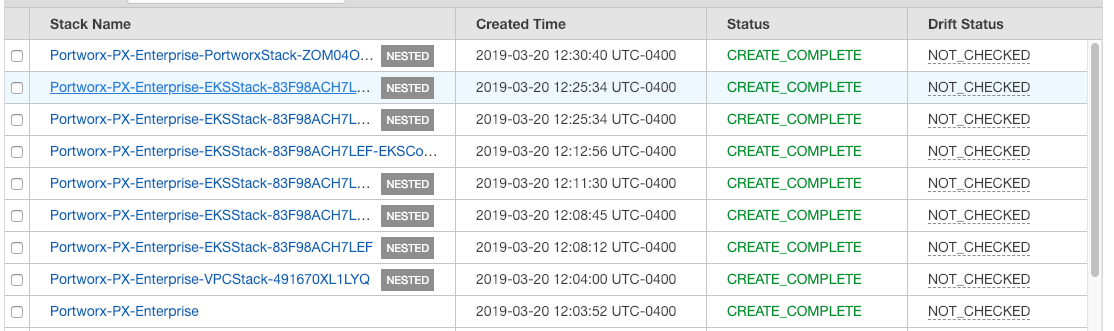
Let’s move on to access the environment. The best way to access the Kubernetes cluster that’s running the Portworx cluster is the login to the Bastion server. To do this, click on the first stack that was created (at the bottom of the list above) and click on the Outputs tab. The BastionIP will be listed there.
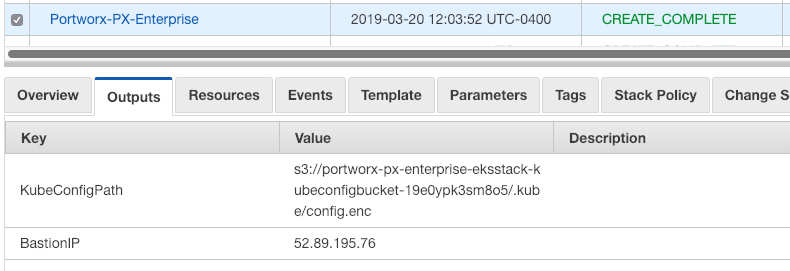
Using the same SSH Key Pair used in the parameter input, SSH into the BastionIP and use kubectl to interact with the Kubernetes environment and Portworx.
ssh -i ~/.ssh/your-keypair.pem ec2-user@52.89.195.76
The authenticity of host '52.89.195.76 (52.89.195.76)' can't be established.
ECDSA key fingerprint is SHA256:/6Z1np1QG9MMxs//0wfvSemK8LeveEkw2WZ9BUp1qLw.
Are you sure you want to continue connecting (yes/no)? yes
Warning: Permanently added '52.89.195.76' (ECDSA) to the list of known hosts.
Last login: Wed Mar 20 16:29:26 2019

__| __|_ )
_| ( / Amazon Linux AMI
___|\___|___|

https://aws.amazon.com/amazon-linux-ami/2018.03-release-notes/
10 package(s) needed for security, out of 15 available
Run "sudo yum update" to apply all updates.

[ec2-user@ip-10-0-128-97 ~]$ kubectl get no
NAME STATUS ROLES AGE VERSION
ip-10-0-0-15.us-west-2.compute.internal Ready <none> 1h v1.11.5
ip-10-0-62-183.us-west-2.compute.internal Ready <none> 1h v1.11.5
ip-10-0-78-71.us-west-2.compute.internal Ready <none> 1h v1.11.5

[ec2-user@ip-10-0-128-97 ~]$ PX_POD=$(kubectl get pods -l name=portworx -n kube-system -o jsonpath='{.items[0].metadata.name}')

[ec2-user@ip-10-0-128-97 ~]$ kubectl exec $PX_POD -n kube-system /opt/pwx/bin/pxctl cluster list
Cluster ID: EKS-94AgwqLH1jQY-portworx-cluster
Cluster UUID: 67f76cc8-0ec4-49c8-a955-7909e579d8cb
Status: OK

Nodes in the cluster:
ID SCHEDULER_NODE_NAME DATA IP STATUS
7a3f00e6 ip-10-0-62-183.us-west-2.compute 10.0.62.183 Online

38c03856 ip-10-0-78-71.us-west-2.compute 10.0.78.71 Online

96419ece ip-10-0-0-15.us-west-2.compute 10.0.0.15 Online
Great! You now have a fully deployed Portworx Enterprise cluster on AWS EKS in a new Amazon VPC across three availability zones. You can now perform updates to the stack via CloudFormation or apply other stacks that deploy resources to the EKS stack itself like a database that uses Portworx for its storage.
There are examples for Cassandra, Microsoft SQL Server, MySQL and Postgres available here. We’ll walk through the Cassandra example.
- Download the template from Github.
- Click
 in the CloudFormation Console.
 - Click Upload a template to Amazon S3.
- Click Choose File and navigate to the downloaded template.
- Click .
- Fill out a Stack Name.
- In the The KubeManifest Lambda Arn used to interact with the EKS Cluster field, place the value of KubeManifestLambdaArn from the outputs in the EKSStack.
- In the The s3 path to the KubeConfig field place the KubeConfigPath outputs from the main Portworx stack outputs where you found the BastionIP.
- Click .
- Click .
- Click .
Once the stack is listed with the status of CREATE_COMPLETE, you can list the pods now running in your Kubernetes cluster, and it should be running a three-node Cassandra cluster backed by Portworx PVCs.
[ec2-user@ip-10-0-128-97 ~]$ kubectl get po
NAME READY STATUS RESTARTS AGE
cassandra-0 1/1 Running 0 2m
cassandra-1 1/1 Running 0 1m
cassandra-2 1/1 Running 0 37s

[ec2-user@ip-10-0-128-97 ~]$ kubectl get pvc
NAME STATUS VOLUME CAPACITY ACCESS MODES STORAGECLASS AGE
cassandra-data-cassandra-0 Bound pvc-79a59d8d-4b3d-11e9-b54e-0a0f802f59f4 10Gi RWO px-cassandra-storageclass 2m
cassandra-data-cassandra-1 Bound pvc-988c593d-4b3d-11e9-b54e-0a0f802f59f4 10Gi RWO px-cassandra-storageclass 1m
cassandra-data-cassandra-2 Bound pvc-b2a3d7e4-4b3d-11e9-b54e-0a0f802f59f4 10Gi RWO px-cassandra-storageclass 40s
Check out the demo below for a walk-through deploying the Portworx Quick Start on EKS.
Relevant Links:
Share
Subscribe for Updates
About Us
Portworx is the leader in cloud native storage for containers.
Thanks for subscribing!

Ryan Wallner
Portworx | Technical Marketing Manager
Portworx simplifies cloud native, application-centric data management with PX-Enterprise 1.6

Introducing Portworx PX-Enterprise: Container-Defined Storage, with Unified File and Block

Automating Container Storage for AWS and Packet using Terraform and Portworx (aka “Go Get Terraporx”!)