Getting Started with an Oracle Kubernetes Engine (OKE) Cluster
Let’s start by creating an Oracle Kubernetes Engine cluster on Oracle Cloud Infrastructure (OCI).
You can use the OCI Web UI to manually create an OKE cluster within your OCI compartment.
Or if you prefer, you may want to consider using my Terraform automation, which is available in GitHub.
Before you start, consult the Portworx documentation for the latest supported Kubernetes and Kernel versions.
For this blog, I will be using the Portworx 2.8 supported Kubernetes v1.20.11 and Oracle Linux 7.8.
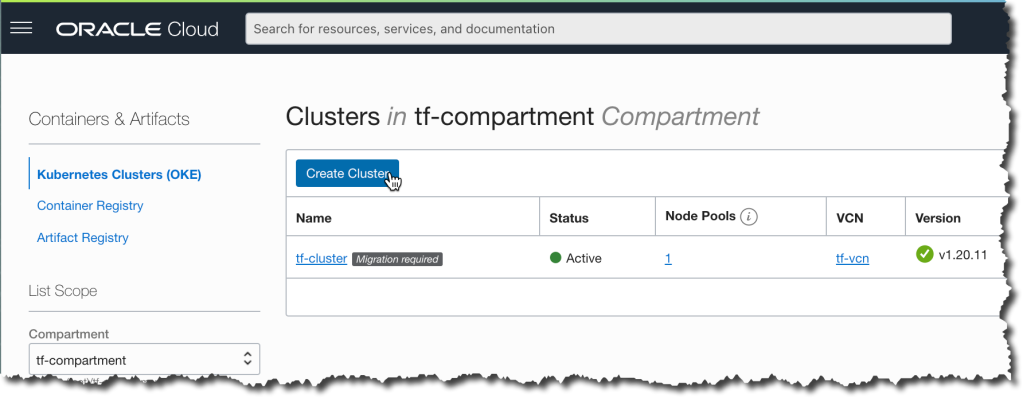
My Terraform script created a new 3-node OKE cluster in the UK-London-1 region.
I have also created three 100GB Block Volumes (one per AD) and attached a block volume to each compute node again using Terraform.
Note: UK-London-region has 3 Availability Domains (ADs), but some regions are limited to a single AD; check OCI Region documentation.
To access the OKE cluster from your laptop, select Compartment, navigate to the Containers -> Clusters -> Cluster Details, click Access Cluster, and follow the instructions for Local Access.
% oci ce cluster create-kubeconfig --cluster-id ocid1.cluster.oc1.uk-london-1.aaaaaaaayss.... --file $HOME/.kube/config --region uk-london-1 --token-version 2.0.0
Note: Existing Kubeconfig file found at /Users/rekins/.kube/config and new config merged into it.
Using the kubectl get nodes, we can see the three workers running Kubernetes v1.20.11 and Oracle Linux 7.8:
% kubectl get nodes -o wide

NAME         STATUS   ROLES   AGE   VERSION    INTERNAL-IP   EXTERNAL-IP     OS-IMAGE                  KERNEL-VERSION                     CONTAINER-RUNTIME

10.0.1.157   Ready    node    48m   v1.20.11   10.0.1.157    132.145.33.86   Oracle Linux Server 7.8   4.14.35-1902.306.2.el7uek.x86_64   cri-o://1.20.2

10.0.1.163   Ready    node    48m   v1.20.11   10.0.1.163    144.21.51.173   Oracle Linux Server 7.8   4.14.35-1902.306.2.el7uek.x86_64   cri-o://1.20.2

10.0.1.205   Ready    node    48m   v1.20.11   10.0.1.205    132.145.69.16   Oracle Linux Server 7.8   4.14.35-1902.306.2.el7uek.x86_64   cri-o://1.20.2
Again, we can use kubectl get nodes, but with the –show-labels option this time, we can see further details.
% kubectl get nodes --show-labels

NAME STATUS ROLES AGE VERSION LABELS

10.0.1.157 Ready node 52m v1.20.11 beta.kubernetes.io/arch=amd64,beta.kubernetes.io/instance-type=VM.Standard2.1,beta.kubernetes.io/os=linux,displayName=oke-cgr3bekcbka-n5k6rizv7zq-sbgpx554ada-1,failure-domain.beta.kubernetes.io/region=uk-london-1,failure-domain.beta.kubernetes.io/zone=UK-LONDON-1-AD-3,hostname=oke-cgr3bekcbka-n5k6rizv7zq-sbgpx554ada-1,internal_addr=10.0.1.157,kubernetes.io/arch=amd64,kubernetes.io/hostname=10.0.1.157,kubernetes.io/os=linux,node-role.kubernetes.io/node=,node.info.ds_proxymux_client=true,node.info/compartment.id_prefix=ocid1.compartment.oc1,node.info/compartment.id_suffix=aaaaaaaauktztjuam57uhird7up5gxp32svboo6bmjfxvotkja75tfndc2sq,node.info/compartment.name=tf-compartment,node.info/kubeletVersion=v1.20,oci.oraclecloud.com/fault-domain=FAULT-DOMAIN-2,oke.oraclecloud.com/node.info.private_subnet=false,oke.oraclecloud.com/node.info.private_worker=true,oke.oraclecloud.com/tenant_agent.version=1.38.5-8f5c194266-712,px/enabled=true,px/metadata-node=true 10.0.1.163 Ready node 52m v1.20.11 beta.kubernetes.io/arch=amd64,beta.kubernetes.io/instance-type=VM.Standard2.1,beta.kubernetes.io/os=linux,displayName=oke-cgr3bekcbka-n5k6rizv7zq-sbgpx554ada-0,failure-domain.beta.kubernetes.io/region=uk-london-1,failure-domain.beta.kubernetes.io/zone=UK-LONDON-1-AD-2,hostname=oke-cgr3bekcbka-n5k6rizv7zq-sbgpx554ada-0,internal_addr=10.0.1.163,kubernetes.io/arch=amd64,kubernetes.io/hostname=10.0.1.163,kubernetes.io/os=linux,last-migration-failure=get_kubesvc_failure,node-role.kubernetes.io/node=,node.info.ds_proxymux_client=true,node.info/compartment.id_prefix=ocid1.compartment.oc1,node.info/compartment.id_suffix=aaaaaaaauktztjuam57uhird7up5gxp32svboo6bmjfxvotkja75tfndc2sq,node.info/compartment.name=tf-compartment,node.info/kubeletVersion=v1.20,oci.oraclecloud.com/fault-domain=FAULT-DOMAIN-1,oke.oraclecloud.com/node.info.private_subnet=false,oke.oraclecloud.com/node.info.private_worker=true,oke.oraclecloud.com/tenant_agent.version=1.38.5-8f5c194266-712,px/enabled=true,px/metadata-node=true 10.0.1.205 Ready node 52m v1.20.11 beta.kubernetes.io/arch=amd64,beta.kubernetes.io/instance-type=VM.Standard2.1,beta.kubernetes.io/os=linux,displayName=oke-cgr3bekcbka-n5k6rizv7zq-sbgpx554ada-2,failure-domain.beta.kubernetes.io/region=uk-london-1,failure-domain.beta.kubernetes.io/zone=UK-LONDON-1-AD-1,hostname=oke-cgr3bekcbka-n5k6rizv7zq-sbgpx554ada-2,internal_addr=10.0.1.205,kubernetes.io/arch=amd64,kubernetes.io/hostname=10.0.1.205,kubernetes.io/os=linux,node-role.kubernetes.io/node=,node.info.ds_proxymux_client=true,node.info/compartment.id_prefix=ocid1.compartment.oc1,node.info/compartment.id_suffix=aaaaaaaauktztjuam57uhird7up5gxp32svboo6bmjfxvotkja75tfndc2sq,node.info/compartment.name=tf-compartment,node.info/kubeletVersion=v1.20,oci.oraclecloud.com/fault-domain=FAULT-DOMAIN-3,oke.oraclecloud.com/node.info.private_subnet=false,oke.oraclecloud.com/node.info.private_worker=true,oke.oraclecloud.com/tenant_agent.version=1.38.5-8f5c194266-712,px/enabled=true,px/metadata-node=true
Creating a Specification Using Portworx Enterprise
Now that we have our Kubernetes Cluster up and running, we can head over to https://central.portworx.com/ to create a Portworx specification using the wizard.
For this post, I will be using the Portworx Enterprise edition for my three OKE nodes.
And I’ll be using a Kubernetes Operator as my deployment method.
Basic Tab
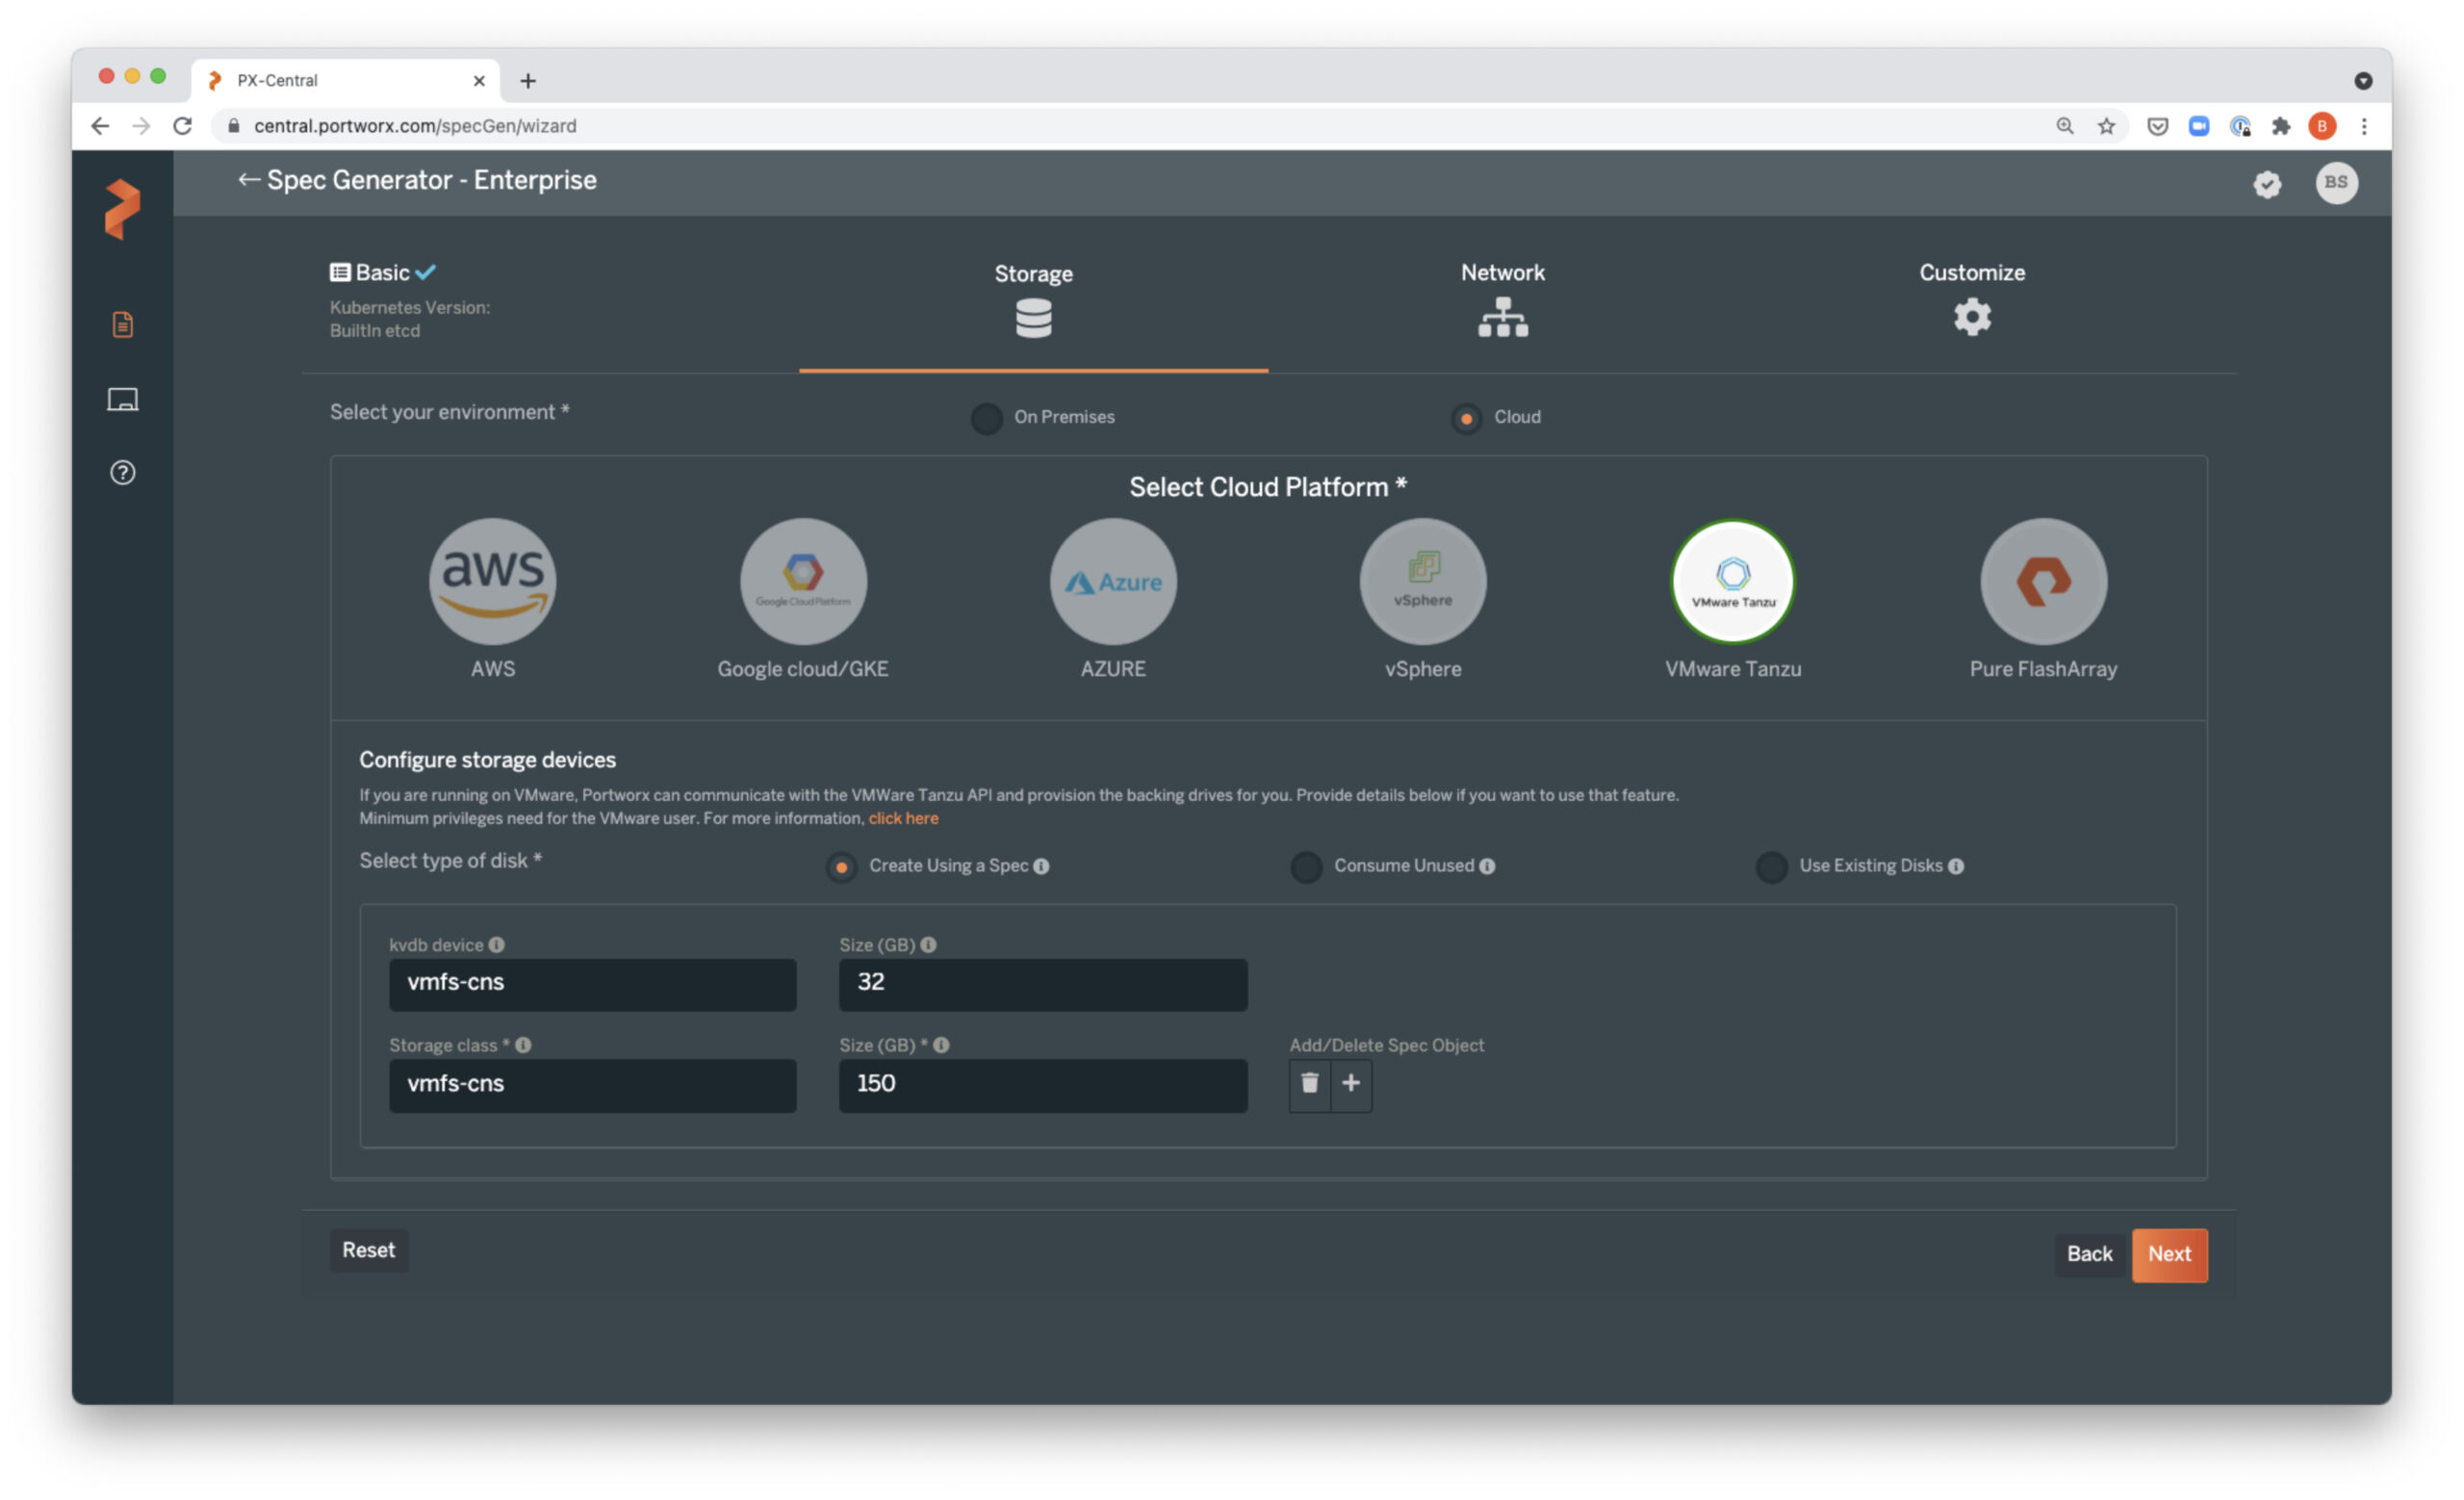
Storage Tab
On the Storage Tab, we need to select On-Premises, as the Spec Generator currently does not include a wizard for Oracle Cloud Infrastructure (OCI).
Network Tab
Customize Tab
From the Operator wizard, we can decide to Download or Save Spec.
Operator Tab
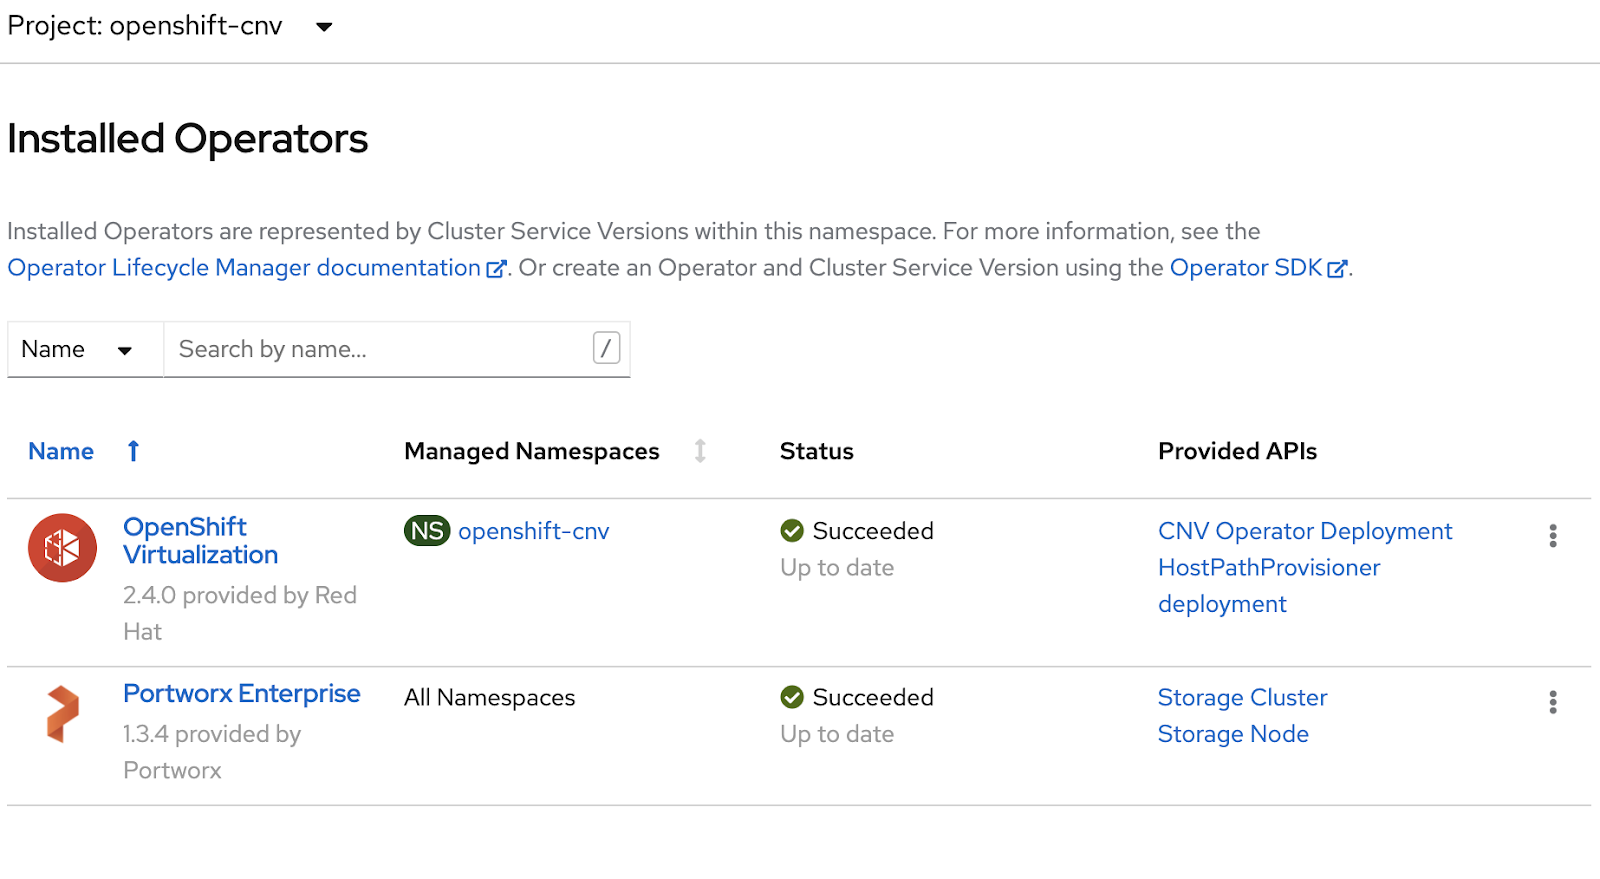
Installing the Portworx Operator
From our shell, we’ll install the Portworx Operator using kubectl apply:
% kubectl apply -f 'https://install.portworx.com/2.8?comp=pxoperator'

serviceaccount/portworx-operator created

podsecuritypolicy.policy/px-operator created

clusterrole.rbac.authorization.k8s.io/portworx-operator created

clusterrolebinding.rbac.authorization.k8s.io/portworx-operator created

deployment.apps/portworx-operator created
Applying the Specification
Apply the specification created from PX-Central:
% kubectl apply -f 'https://install.portworx.com/2.8?operator=true&mc=false&kbver=&b=true&c=px-cluster-21a6ec62-0ed7-48b8-b6ac-b6833005b533&stork=true&csi=true&mon=true&st=k8s&promop=true'

storagecluster.core.libopenstorage.org/px-cluster-21a6ec62-0ed7-48b8-b6ac-b6833005b533 created
Monitoring Progress
Enter the kubectl get pods command below and wait until all Portworx nodes show a status of running:
% kubectl get pods -n kube-system -l name=portworx --watch

NAME                                                    READY   STATUS              RESTARTS   AGE

px-cluster-21a6ec62-0ed7-48b8-b6ac-b6833005b533-c6tq6   0/3     ContainerCreating   0          82s

px-cluster-21a6ec62-0ed7-48b8-b6ac-b6833005b533-jj5gc   0/3     ContainerCreating   0          82s

px-cluster-21a6ec62-0ed7-48b8-b6ac-b6833005b533-xqfw9   0/3     ContainerCreating   0          82s

px-cluster-21a6ec62-0ed7-48b8-b6ac-b6833005b533-xqfw9   1/3     Running             0          2m7s

px-cluster-21a6ec62-0ed7-48b8-b6ac-b6833005b533-c6tq6   1/3     Running             0          2m13s

px-cluster-21a6ec62-0ed7-48b8-b6ac-b6833005b533-jj5gc   1/3     Running             0          2m14s

px-cluster-21a6ec62-0ed7-48b8-b6ac-b6833005b533-jj5gc   2/3     Running             0          2m30s

px-cluster-21a6ec62-0ed7-48b8-b6ac-b6833005b533-c6tq6   2/3     Running             0          2m35s

px-cluster-21a6ec62-0ed7-48b8-b6ac-b6833005b533-xqfw9   2/3     Running             0          2m38s

px-cluster-21a6ec62-0ed7-48b8-b6ac-b6833005b533-jj5gc   3/3     Running             0          3m42s

px-cluster-21a6ec62-0ed7-48b8-b6ac-b6833005b533-jj5gc   3/3     Running             0          3m43s

px-cluster-21a6ec62-0ed7-48b8-b6ac-b6833005b533-c6tq6   2/3     Running             0          3m48s

px-cluster-21a6ec62-0ed7-48b8-b6ac-b6833005b533-xqfw9   2/3     Running             0          3m55s

px-cluster-21a6ec62-0ed7-48b8-b6ac-b6833005b533-c6tq6   2/3     Running             0          3m55s

px-cluster-21a6ec62-0ed7-48b8-b6ac-b6833005b533-c6tq6   2/3     Running             0          3m55s

px-cluster-21a6ec62-0ed7-48b8-b6ac-b6833005b533-xqfw9   2/3     Running             0          4m1s

px-cluster-21a6ec62-0ed7-48b8-b6ac-b6833005b533-xqfw9   2/3     Running             0          4m1s

px-cluster-21a6ec62-0ed7-48b8-b6ac-b6833005b533-c6tq6   3/3     Running             0          4m4s

px-cluster-21a6ec62-0ed7-48b8-b6ac-b6833005b533-xqfw9   3/3     Running             0          4m9s

px-cluster-21a6ec62-0ed7-48b8-b6ac-b6833005b533-jj5gc   3/3     Running             0          4m12s

% PX_POD=$(kubectl get pods -l name=portworx -n kube-system -o jsonpath='{.items[0].metadata.name}')

% echo $PX_POD

px-cluster-21a6ec62-0ed7-48b8-b6ac-b6833005b533-c6tq6
Now we need to confirm that we are using Portworx 2.8:
% kubectl exec -it $PX_POD -n kube-system -- /opt/pwx/bin/pxctl -v

Defaulted container "portworx" out of: portworx, csi-node-driver-registrar, telemetry

pxctl version 2.8.0.0-1ef62f8
And then we’ll check the status of the Portworx cluster:
% kubectl exec -it $PX_POD -n kube-system -- /opt/pwx/bin/pxctl status

Defaulted container "portworx" out of: portworx, csi-node-driver-registrar, telemetry

Status: PX is operational

Telemetry: Healthy

License: Trial (expires in 31 days)

Node ID: b2a4cd36-f0d0-4c06-9de2-378a68dafe5a

IP: 10.0.1.205

  Local Storage Pool: 1 pool

POOL IO_PRIORITY RAID_LEVEL USABLE USED STATUS ZONE REGION

0 MEDIUM raid0 100 GiB 7.1 GiB Online UK-LONDON-1-AD-1 uk-london-1

Local Storage Devices: 1 device

Device Path Media Type Size Last-Scan

0:1 /dev/sdb STORAGE_MEDIUM_MAGNETIC 100 GiB 09 Oct 21 13:05 UTC

* Internal kvdb on this node is sharing this storage device /dev/sdb  to store its data.

total - 100 GiB

Cache Devices:

 * No cache devices

Cluster Summary

Cluster ID: px-cluster-21a6ec62-0ed7-48b8-b6ac-b6833005b533

Cluster UUID: faf0a08a-d456-436e-81c8-7d6dbab1525e

Scheduler: kubernetes

Nodes: 3 node(s) with storage (3 online)

IP ID SchedulerNodeName Auth StorageNode Used Capacity Status StorageStatus Version Kernel OS

10.0.1.163 d5e96ff9-94d0-4004-9753-6a2a4568a79c 10.0.1.163 Disabled Yes 7.1 GiB 100 GiB Online Up2.8.0.0-1ef62f8 4.14.35-1902.306.2.el7uek.x86_64 Oracle Linux Server 7.8

10.0.1.205 b2a4cd36-f0d0-4c06-9de2-378a68dafe5a 10.0.1.205 Disabled Yes 7.1 GiB 100 GiB Online Up (This node) 2.8.0.0-1ef62f8 4.14.35-1902.306.2.el7uek.x86_64 Oracle Linux Server 7.8

10.0.1.157 3dea3719-f7b3-4cfa-8d4c-b934f615e357 10.0.1.157 Disabled Yes 7.1 GiB 100 GiB Online Up2.8.0.0-1ef62f8 4.14.35-1902.306.2.el7uek.x86_64 Oracle Linux Server 7.8

Warnings:

 WARNING: Insufficient CPU resources. Detected: 2 cores, Minimum required: 4 cores

 WARNING: Persistent journald logging is not enabled on this node.

 WARNING: Internal Kvdb is not using a dedicated drive on nodes [10.0.1.157 10.0.1.205]. This configuration is not recommended for production clusters.

Global Storage Pool

Total Used     :  21 GiB

Total Capacity :  300 GiB
Next, we’ll check the status of the Portworx storage nodes:
% kubectl -n kube-system get storagenodes -l name=portworx

NAME         ID                                     STATUS   VERSION           AGE

10.0.1.157   3dea3719-f7b3-4cfa-8d4c-b934f615e357   Online   2.8.0.0-1ef62f8   53m

10.0.1.163   d5e96ff9-94d0-4004-9753-6a2a4568a79c   Online   2.8.0.0-1ef62f8   53m

10.0.1.205   b2a4cd36-f0d0-4c06-9de2-378a68dafe5a   Online   2.8.0.0-1ef62f8   53m
Finally, using kubectl get sc, we can see the OCI & Portworx storage classes:
% kubectl get sc

NAME                             PROVISIONER                       RECLAIMPOLICY   VOLUMEBINDINGMODE      ALLOWVOLUMEEXPANSION   AGE

oci (default)                    oracle.com/oci                    Delete          Immediate              false                  165m

oci-bv                           blockvolume.csi.oraclecloud.com   Delete          WaitForFirstConsumer   false                  165m

px-db                            kubernetes.io/portworx-volume     Delete          Immediate              true                   59m

px-db-cloud-snapshot             kubernetes.io/portworx-volume     Delete          Immediate              true                   59m

px-db-cloud-snapshot-encrypted   kubernetes.io/portworx-volume     Delete          Immediate              true                   59m

px-db-encrypted                  kubernetes.io/portworx-volume     Delete          Immediate              true                   59m

px-db-local-snapshot             kubernetes.io/portworx-volume     Delete          Immediate              true                   59m

px-db-local-snapshot-encrypted   kubernetes.io/portworx-volume     Delete          Immediate              true                   59m

px-replicated                    kubernetes.io/portworx-volume     Delete          Immediate              true                   59m

px-replicated-encrypted          kubernetes.io/portworx-volume     Delete          Immediate              true                   59m

stork-snapshot-sc                stork-snapshot                    Delete          Immediate              true                   59m
Summary
From the example above, we can see that the Portworx Enterprise deployment is using the three OCI compute instances as Portworx storage nodes and has discovered the 100 GB volumes for a total storage capacity of 300GB.
Share
Subscribe for Updates
About Us
Portworx is the leader in cloud native storage for containers.
Thanks for subscribing!