In today’s digital era, infrastructure and application modernization are the cornerstones of all digital transformation strategy. However, one often-overlooked critical aspect is implementing a robust approach to disaster recovery (DR). Disasters may be rare and can result from unforeseen events, human error, or sabotage. But what makes a disaster devastating is the inability to recover quickly and effectively, leading to long downtimes. Organizations modernizing their infrastructure using solutions like VMware Tanzu need to build a robust DR plan. This is where PX-DR from Portworx can help them design and deploy a DR solution that allows them to recover quickly and effectively from disasters. Having a strong DR solution like PX-DR allows organizations to avoid widespread negative impacts on the business and brand, whether it’s poor customer experience, lost revenue, or business and operational issues.
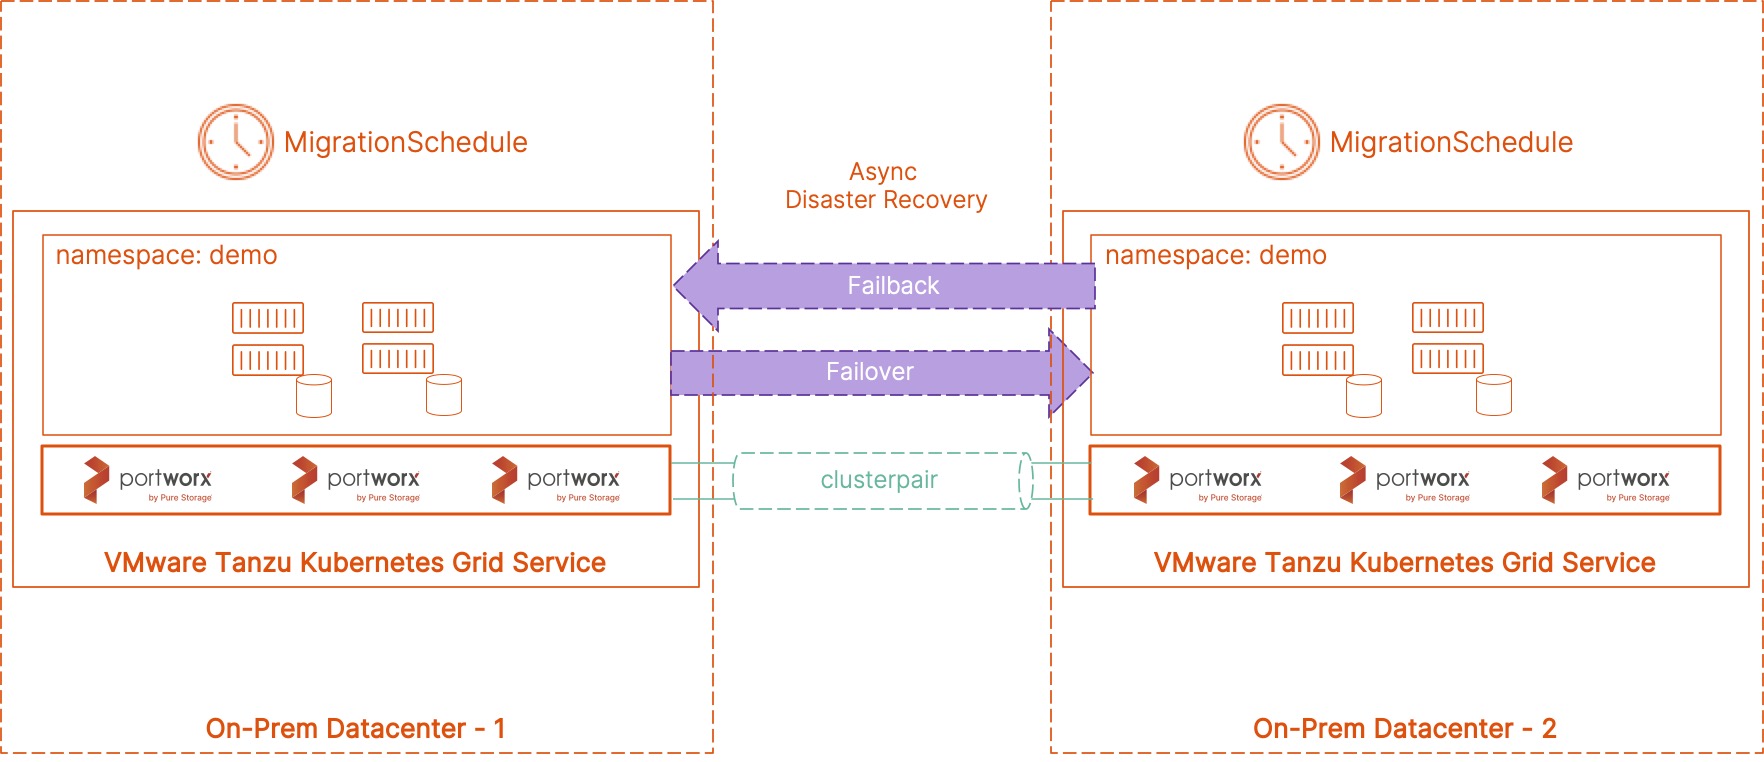
PX-DR allows administrators to create Asynchronous DR relationships between multiple Kubernetes clusters. With PX-DR, source and destination VMware Tanzu Kubernetes clusters can be running in the same datacenter or region, or they can be spread across datacenters for more resilience. Async DR doesn’t have any latency requirements, and the RPO configuration will depend on the network bandwidth you have available between the two VMware Tanzu clusters.
To set up Async DR between two VMware Tanzu clusters, use the following steps:
- Deploy a source and a destination VMware Tanzu Kubernetes cluster, either on the same vSphere cluster or separate vSphere clusters spread across multiple racks or multiple datacenters. These clusters should be able to talk to each other using the public subnets defined for external traffic. These source and destination clusters can be deployed on VMware Cloud Foundation with Tanzu, vSphere with Tanzu, or just TKG-compliant clusters.
- Install Portworx Enterprise version 2.8 on the Tanzu Kubernetes clusters. PX-DR works with releases prior to 2.8 as well. Using Portworx Enterprise version 2.8 or higher allows dynamic provisioning of Portworx virtual disks using the native VMware CSI plugin. Assign the necessary license needed for PX-DR on both the clusters.
- Edit the ‘portworx-service’ service object in the kube-system namespace and change it to type LoadBalancer. We will talk about why this is needed when we generate a ClusterPair between the two Tanzu Kubernetes clusters. Ports 9001 and 9010 on the destination cluster should be reachable from the source cluster as well.
- Install storkctl utility on your jump host or bastion host. This bastion host should have connectivity to both your source and destination clusters. Use the following command if you are using a Linux bastion host:
STORK_POD=$(kubectl get pods -n kube-system -l name=stork -o jsonpath='{.items[0].metadata.name}') &&
kubectl cp -n kube-system $STORK_POD:/storkctl/linux/storkctl ./storkctl
sudo mv storkctl /usr/local/bin &&
sudo chmod +x /usr/local/bin/storkctl
- Create object store credentials on the Tanzu clusters running Portworx. You can use AWS S3 or S3-compatible object store, Azure, or GCP for this. Use the following command if you are using AWS S3 or an S3-compatible object store. You can get the UUID of the destination cluster by using the ‘pxctl cluster status’ command.
/opt/pwx/bin/pxctl credentials create \
--provider s3 \
--s3-access-key <aws_access_key> \
--s3-secret-key <aws_secret_key> \
--s3-region us-east-1  \
--s3-endpoint s3.amazonaws.com \
--s3-storage-class STANDARD \
clusterPair_<UUID_of_destination_cluster>
- Now that we have all the pre-reqs configured, we can now proceed with the Async DR configuration. The first step in configuring Async DR is creating a ClusterPair object between the source and the destination cluster. ClusterPair is a trust object in Kubernetes, and Portworx requires this object to communicate with the destination cluster. The ClusterPair object pairs the Portworx storage driver with the Kubernetes scheduler, allowing volumes and resources to be migrated between clusters. The ClusterPair spec is generated on the destination cluster and is applied on the source cluster.
storkctl generate clusterpair -n migrationnamespace remotecluster > clusterpair.yaml
Once you have the yaml file generated, edit it to update the following options:
options:
    ip:     <ip_of_remote_px_node>
    port:   <port_of_remote_px_node_default_9001>
    token:  <token_from_step_3>
    mode: DisasterRecovery
Fetch the IP using ‘kubectl get svc -n kube-system | grep portworx-service’ command—this is the LoadBalancer IP that we edited in step 3. To fetch the token, use the command ‘pxctl cluster token show’.
Use this updated yaml file and apply it against your source cluster:
kubectl apply -f clusterpair.yaml
You can use the following command to verify whether the ClusterPair is deployed successfully and ready.
kubectl get clusterpair -n migrationnamespace
storkctl get clusterpair -n migrationnamespace
- Once we have the ClusterPair ready to go, we will configure a ‘SchedulePolicy’ object. You can configure distinct schedule policies for different applications and cluster pairs based on the RPO requirements for your application. Below is a schedule policy example with an RPO of 1 minute.
apiVersion: stork.libopenstorage.org/v1alpha1
kind: SchedulePolicy
metadata:
  name: testpolicy
  namespace: demo
policy:
  interval:
    intervalMinutes: 1
  daily:
    time: "10:14PM"
  weekly:
    day: "Thursday"
    time: "10:13PM"
  monthly:
    date: 14
    time: "8:05PM"
You can refer to the Schedule Policy reference page for additional parameters that you can use to customize your Async DR setup.
- Next, we will create a ‘MigrationSchedule’ spec that helps you protect your application from disaster events. Let’s look at a sample migration schedule spec and discuss the different parameters:
apiVersion: stork.libopenstorage.org/v1alpha1
kind: MigrationSchedule
metadata:
  name: demomigrationschedule
  namespace: demo
spec:
  template:
    spec:
      clusterPair: remotecluster
      includeResources: true
      startApplications: false
      namespaces:
      - demo
  schedulePolicyName: testpolicy
We use the MigrationSchedule object to link our ClusterPair configuration, our application running in a particular namespace, and a SchedulePolicy that we created to meet the SLA requirements. We also specify a couple of additional things in the spec section— ‘includeResources: true’ to imply that we want to move over all the Kubernetes objects in addition to the application data between the two Tanzu clusters, and the ‘startApplications: false’ to specify that we don’t want the applications to come online at the destination site. We will only bring the application online in case of a disaster event at the source site.
- Once you have applied the MigrationSchedule yaml file, you can use the following commands to monitor the migration objects that are created per your schedule to copy your application from source to the destination cluster:
kubectl get migrationschedule -n demo
kubectl get migrations -n demo
kubectl describe migrationschedule -n demo
storkctl get migrations -n demo
storkctl get migrationschedule -n demo
- For each migration instance, PX-DR will copy all the Kubernetes objects and the application data from the source and target cluster, but it won’t deploy any pods for your application. So, if your application is using a Kubernetes Deployment object, its replica count will be set to 0. Only in case of a disaster, when you use the following command, will it update the replica count to match your desired state and deploy those pods in your destination cluster.
storkctl activate migrations -n demo
- When your source cluster is online again and capable of hosting applications, you can create a ClusterPair in the reverse direction and configure a migration schedule to failback the application from the destination back to the source cluster.
This is a robust way to implement an asynchronous disaster recovery solution for your VMware Tanzu Kubernetes clusters running your containerized applications. If you want to see a failover and failback operation in action, click the link below to learn more about how to set up DR in your clusters.
Share
Subscribe for Updates
About Us
Portworx is the leader in cloud native storage for containers.
Thanks for subscribing!

Bhavin Shah
Sr. Technical Marketing Manager | Cloud Native BU, Pure Storage
Automate storage capacity management for VMware Tanzu Kubernetes clusters using PX-Autopilot

Deploying a highly available Cassandra cluster on VMware Tanzu with Portworx
How to deliver cloud native storage for Tanzu Kubernetes clusters on Amazon EC2 using Portworx